VOGONS

Common searches


more fingers in the pie

Topic actions

Reply 60 of 74, by Quest

User metadata
Rank Newbie
Rank
Newbie

Gambit I finally scraped up the gumption to tackle the Aztec sun calender . But the textures align oddly . It looks as if it's just a matter of shifting the tiles around to acommodate the mis-alignment .

I am wondering if you had to stretch or deform any of your textures to get teh sun calender to fit correctly ?

http://www.timewarp.greatnow.com/tex2/17chun.html

Attachments

  • mutantothmb.jpg
    Filename
    mutantothmb.jpg
    File size
    41.36 KiB
    Views
    1805 views
    File license
    Fair use/fair dealing exception

Reply 61 of 74, by Gambit37

User metadata
Rank Oldbie
Rank
Oldbie

Whoa! I'm beginning to think you have a much better talent for this than me. That's a great image and i think the high contrast works well on this one. Good job.

EDIT: Yes, I did nudge and expand the textures slightly to overcome the overlapping issue.

Last edited by Gambit37 on 2005-04-14, 12:18. Edited 1 time in total.

Reply 63 of 74, by Quest

User metadata
Rank Newbie
Rank
Newbie
Gambit37 wrote:

Whoa! I'm beginning to think you have a much better talent for this than me. That's a great image and i think the high contrast works well on this one. Good job.

EDIT: Yes, I did nudge and expand the textures slightly to overcome the overlapping issue.

Thanks gambit , and guest type person 😀 .

You know I say the almost teh same thing , except about you , about talent every time I look at your textures . The quality of your stuff is what inspires me to try a little harder than I otherwise might .

The sun calender was produced much more easily than you might imagine. I started with a B&W line drawing of the calender( http://www.bluehoney.org/Images/SunWorship/Su … alendar-big.gif ) . Grabbed the outline shape of just the black 'lines' off of it as an alpha channel . Then used the base rock texture (that I made the brick walls from ) and applied a nice sharp outer bevel (lit from the 'bottom') to the 'selection' from the alpha channel .

This gave the nice sharp 'carved' look for the basic big shapes . I chopped out some of the line sections before doing the bevel so that some of the bits would seem broken / eroded .

Then I used the same alpha selection on a seperate base rock layer , except I used a nice smooth wide rounded outer bevel ( lit from above ) to get a bunch of raised or "puffy " features . where apropriate I chopped the puffy bits and layered them on top of the first crisp beveled image .

To get a bit more definition in the detailed carving areas without having the lines look fakey and flat .I used the Alpha saved selection again only I used an inner bevel ( with really lower numbers due to the few pixels that make up the lines ) and then applied this on top of every thing as a partial transparency .

Then it was just a matter of dropping shadows ( by choping out selections and using drop shadow on them ) where shadows should be on a 'real' object .

It could be a bit cleaner , perceptually and mechanically speaking, but I think it's not half bad at the moment 😀

Reply 64 of 74, by Quest

User metadata
Rank Newbie
Rank
Newbie

Oh, and that is some excellent work on the villa temple wall texture ( http://www.resonantedge.com/trx/?p=example : 'shot_09.jpg',640,480). the aged plaster is very nice, but especially that edge decoration and the way it flows around teh corners.

Reply 65 of 74, by Quest

User metadata
Rank Newbie
Rank
Newbie

I am not sure I understadn how to create a bump map , but ... IF I correctly understand what a bump map does it would be very cool indeed .

Everyday I am learning more tricks on how to go about geting PSP to do what I want it to do. Though every step forward makes me want to re-do all of the stuff I wasn't quite happy with( As I imagine is ever the case ) . For anyone interested I am going to try and share what i have for the villa level by ( more likely on ) this weekend . I cannot quite decide between a gritty plaster look and a somewhat more contrast bland 'original' plaster feel .

for the nonce though....

Attachments

  • CLR.jpg
    Filename
    CLR.jpg
    File size
    35.03 KiB
    Views
    1718 views
    File license
    Fair use/fair dealing exception

Reply 67 of 74, by Quest

User metadata
Rank Newbie
Rank
Newbie

I think I understand . One would have to create some kind of 'watcher' program that somehow captured , pulled or otherwise translated into some useable form the viewing directions and lighting( although TR lighting is fixed for every thing not underwater , and I think they get that apparent change in light levels by manipulating the gamma ) data , cached it and then fed it to opengl ?

Since the lighting ( except for gun flares which are not supported anyway ) is fixed I wonder if it would be possible to determine the 'current' veiwing angle by capturing a running record of keyboard or joystick movements .

oh well, but on the plus side it means less work for the textures 😉

Reply 68 of 74, by Quest

User metadata
Rank Newbie
Rank
Newbie

A little teaser for the villa level. I think a few of the textures are quite good are a few are funky plus a handlefull of the textures are or simply not really style compatable ( as is the case with the skull wall ) , although the pak is close enough to complete that I believe one can get a feel for my personal tweakishness .

You may have to adjust the gamma a little. I test ran most of the textures @ 1600x1200 with a gamma of .85

****( correction : I have been running the gamma at .91 , ( not .85, oops ) , if the texturtes seem to light or too dark try this setting ) ****

and everything looked fine for me but I have had some gamma funkiness so your experience may vary 😀

As always comments ( good or bad ) are appreciated.

Attachments

  • Filename
    textures(villa).rar
    File size
    4.71 MiB
    Downloads
    359 downloads
    File comment
    part 0ne
    File license
    Fair use/fair dealing exception
Last edited by Quest on 2005-04-25, 02:08. Edited 1 time in total.

Reply 69 of 74, by Quest

User metadata
Rank Newbie
Rank
Newbie

had to break the fiel into two pieces to get it to fit on this board , whihc reminds me ...

I hate to use up vogons/glidos bandwidth for this , if anyone can recommend a decent , possibly free, place to hang the files for download I would appreciate the info .

Attachments

  • Filename
    textures(villapt2).rar
    File size
    599.12 KiB
    Downloads
    355 downloads
    File comment
    add these to the same folder as the first ones
    File license
    Fair use/fair dealing exception

Reply 70 of 74, by Gambit37

User metadata
Rank Oldbie
Rank
Oldbie

I had a quick play of these textures. I think they take a bit of getting used to. 😉 I like some of the dirtier textures -- the Olmec head is cool as is the rocky texture. Your interpretation of Kinich Atau (the sun god in the bear room) is also very good.

However, others don't really work for me. I think you're overworked many of them so that the dirt no longer 'adds' to the realism but in fact is makes them look a bit over-the-top. I still think the contrast is too high in many of them. I really didn't like the mosaic effect -- too fussy -- and the bubble like scales on the serpents in the pool room doesn't really fit with your other textures.

But of course this is all subjective: it simply comes down to personal preference. Keep it up!

Reply 71 of 74, by Quest

User metadata
Rank Newbie
Rank
Newbie

"I think you're overworked many of them so that the dirt no longer 'adds..."

I agree . Part of the learning process . As the old timers say : " don't finger f@k it " . I assume I will learn when I get to be an old timer .

The textures for this level range from the first ones being marginal to some of the later ones actually being quite good . The distribution curve is directly proportional to my Paint Shop learning curve .

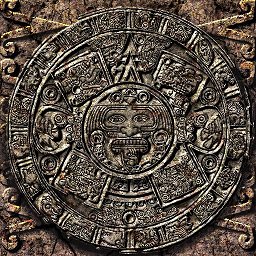
Although I did a bit of reseach on how some of the mayan / inca / and aztec ruins looked when first found ( not as they look now cleaned and in some cases partially restored ) and even the sealed tombs were unbelieveably filthy . The pyramid which contained the Xoc slab as a cap on the sarcophocus had to have 400 tons (400 TONS! ) of rumble removed ( by hand no less , it took 2-1/2 years ) and had black glassy / resinous looking "poured" accretions on the walls and 'stalagmites' ( for lack of a better word ) of lime stone which had oozed through the cracks over the years , leaving ceiling to floor deposits which resembled frozen pancake dough caught in mid pour .

I think that I am leaning towards more of an over the top look simply because I like that "cartoonish" kind of exageration

The 'pool' tiles are a bit 'busy' in a noisy way and are somewhat of a cheat . they are slated for the chopping block at some point ( that point being when I figure how to make them look better without making them look like a greek bathing pool )

the "bubbles" were one of my very first attempts at making any kind of texture and got left in by mistake *(simply because I have seen it so many times they have become invisible) .

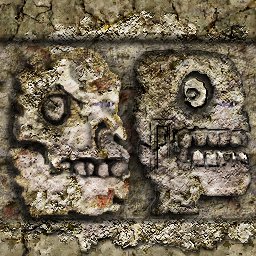
I should mention that most of the textures have been generated from scratch ( except the exit door , the sides of the gun , the bamboo ( which I am not happy with ) , the dark areas of the orange plaster , and the head and shoulders of the stand alone wall "bust" ( the headress was made from scratch , as is probably evident ) ) . At first I was resizing and layer, etc , etc ad nauseum to try and figure out to to do this or that or the other , so the textures ( especially the main white plaster texture ) do show a LOT of hammer marks.

can't make an omelette without breaking something or other : )

Oh , yeah and I am slowly nursing myself off the bevel ( high contrast ) tool and figuring out how to paint shadows / shading and highlight . I like some of the dramtic effect ofpure black and dark areas but I think some future work will benefit from handling the situation with something more sophisticaed than thet ham fists I have been using .