First post, by gaffa2002
- Rank
- Member
Hey everyone,
Some (long) time ago I created a small menu application to install multiple DOS programs from a distribution media (i.e. CD) to the user's hard drive. The main idea behind it was to create compilation CDs with DOS shareware/freeware titles. Since it was released, some users got in touch asking for features like being able to change colors or be able to add sound to the menu. Now I'm releasing version 2.0 of it, and also gave it a name... GINSTALL.
Some key differences from the previous version:
-Colors can be customized
-Support for PC Speaker sounds (the sounds can be customized, too)
Hope this is useful for some people...Here is how it works (taken from the readme file):
---------------------------------------------------------------------
1- What is GINSTALL?
---------------------------------------------------------------------
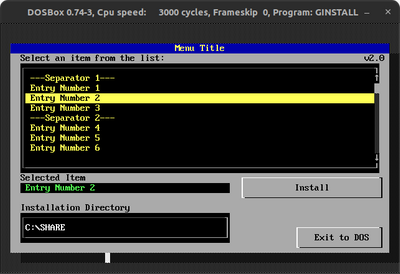
GINSTALL allows you to create a simple, but nice installer menu for multiple DOS programs. With it, you can store each program in separate zip files, and once the user selects one entry in the menu, the contents of the corresponding zip file will be extracted to the user's hard drive.
The intended use case for GINSTALL is for creating DOS compilation CDs
(i.e. shareware titles) and setting up your installer is easily done by editing some configuration files.
GINSTALL was meant to run under DOS and should run in any machine that supports it.It also works under DOSBox, but keep in mind DOSBox has some limitations regarding batch files, so you may have problems running post-installation scripts that work in actual DOS.
---------------------------------------------------------------------
2- How to use GINSTALL?
---------------------------------------------------------------------
To use GINSTALL, you just need to copy the files provided in the zip file you downloaded to the place you want to use as root for your installation menu and perform the necessary configuration by changing the configuration files located inside CFG sub-directory.
In addition to that, you must compress the programs you want to distribute in separate zip files and move them to the ZIPFILES sub-directory. More details on each step can be found in the next sections.
---------------------------------------------------------------------
2.1- Adding items to the installer:
---------------------------------------------------------------------
As already mentioned, everything in the installer is defined through configuration files inside the CFG sub-directory. All menu items are loaded from APPLIST.CFG file and its structure is quite simple: Odd lines contain the name of the zip file to be extracted while even lines
contain the text that will be displayed in the menu.
For instance, if you want to create a menu to install some shareware games, the APPLIST.CFG file would look like this:
DOOM
Doom Shareware
HERETIC
Heretic Shareware
DUKE3D
Duke Nukem 3D Shareware
That means the menu will display three entries for the user to pick:
Doom Shareware
Heretic Shareware
Duke Nukem 3D Shareware
If the user selects Doom Shareware, then the program will attempt to extract the contents of ZIPFILES\DOOM.ZIP to a subfolder named DOOM inside the defined installation directory. Considering the default installation directory is defined as C:\SHARE, then all contents of
DOOM.ZIP would be extracted to C:\SHARE\DOOM. The default installation directory can be changed in STRINGS.CFG file (covered under the Customizing Text section) and also at runtime by the user.
---------------------------------------------------------------------
2.2- Compressing files
---------------------------------------------------------------------
Of course, for the installer to work, you need to add the contents you want to install to zip files. Zip files must be located into the ZIPFILES directory and should follow some recommendations:
All files and sub-directories inside the program's root directory must be added to the zip file. Please note the program's root directory itself must NOT be part of the zip file as the installer already creates a new directory with the zip file name before decompressing.
As another example, if you want to make a installer for some program located at C:\MYPROG, and this folder contains:
MYPROG.DAT
MYPROG.EXE
MYPROG.TXT
FOLDER1
Then your zip file must contain all the files and folders listed above at its root, but NOT the MYPROG folder. Otherwise the installer will end up extracting it to C:\SHARE\MYPROG\MYPROG, which is not the desired result. Its recommended to use PKZIP to compress your files. Others like 7zip can work, but using PKZIP is safer as the menu uses PKUNZIP for decompression. For reference, the command I`m using to compress files is:
PKZIP MYPROG.ZIP C:\MYPROG\*.* -R -P
---------------------------------------------------------------------
2.3- Customizing text
---------------------------------------------------------------------
All text can be found under STRINGS.CFG file, each line represents a portion of text displayed by the menu, including its title, the text displayed by the message box and the default installation directory. Those can be changed/translated as needed, just keep in mind the number of lines must remain the same as the program expects each text string to be in its corresponding line number.
---------------------------------------------------------------------
2.4- Customizing colors
---------------------------------------------------------------------
Colors can be customized editing the COLORS.CFG file. Each line represents the color to be used for different menu sections. Unfortunately, the button text color cannot be changed due to a limitation in Visual Basic for DOS (the button component doesn't have a foreground color property for some reason). Each line in this file corresponds the color to be used by different installer items as described below:
-----------------------------
Line Item
-----------------------------
1 Background color
2 ForeGround color
3 Menu title bar Background color
4 Menu title bar text color
5 Button Color
6 Item list background color
7 Item list text color
8 Selected item text, background color
9 Selected item text, text color
10 Installation directory box, background color
11 Installation directory box, text color
And there are 16 possible values for colors:
0-Black
1-Blue
2-Green
3-Cyan
4-Red
5-Magenta
6-Brown
7-White
8-Gray
9-Bright Blue
10-Bright Green
11-Bright Cyan
12-Bright Red
13-Pink
14-Yellow
15-Bright White
---------------------------------------------------------------------
2.5- Customizing sounds
---------------------------------------------------------------------
The installer can play different sounds in events such as:
Installer started
Installer closed
Item is highlighted
Item is selected
All sounds are defined in SOUND.CFG file, the first line of this file will be either ON or OFF, indicating sound is enabled/disabled. The following lines represent the sound to be played in certain situations, those sounds are represented by a string in the format used by the PLAY function in VB, which allows you to create your own compositions using the PC speaker.
The sound string looks like this:
MB L25 N30 N32 N34 N36 P10 N35 N32 L1 N30
And here is how it can be interpreted:
MB/MF - Defines if the sound will play in the background or
foreground, if it's set to background, the program will proceed
while the sound is playing. If it's foreground, the program will
wait for the sound to play before continuing. It's recommended
to use MB for all sounds except the one that plays when the
installer closes (otherwise the program will close and you'll not
be able to hear it).
L[1-64] - Indicates how "long" any subsequent note will play.
1 plays the note the longest while 64 plays it the fastest.
N[X] - Indicates a note between 0-84, it will play as long as
defined by the last L value
P[x] - Indicates a pause between 1-64
There are more functionalities that can be found in the Visual Basic 1.0 documentation, but the above should be enough for most people.
---------------------------------------------------------------------
2.6- Distributing your compilation
---------------------------------------------------------------------
Once you have finished everything, you should have the following file structure:
CFG --> Directory containing all menu customizations
ZIPFILES --> Directory containing all zip files the user can extract
RESOURCE --> Directory containing PKUNZIP and main script for extracting files
SCRIPTS --> If you intend to use post-installation scripts (covered under section 3)
GINSTALL.EXE --> The menu executable, you can rename it to something else if you like (i.e. INSTALL.EXE)
It is recommended that you run the menu from a directory in your hard drive and test if there isn't any issues like missing/wrong zip files or incorrect configuration. Once everything is ok, the files and directories above can be burned/copied to a floppy, CD or DVD.
---------------------------------------------------------------------
3- Advanced features
---------------------------------------------------------------------
GINSTALL has some other features that can be defined in the APPLIST.CFG file.
---------------------------------------------------------------------
3.1- Dummy menu entries
---------------------------------------------------------------------
Dummy menu entries are entries which cannot be selected by the user, such entries can be used to create separators between items. For example, if you have both applications and games in your installer, you can use dummy entries to separate each category like this:
-----Games------- <-- This is a dummy entry
Doom Shareware
Heretic Shareware
Duke Nukem 3D Shareware
-----Apps--------- <-- Another dummy entry
Visual Basic 1.0 for DOS
Sound Tools
Dummy entries are identified by the DUMMY_ENTRY tag instead of the zip file name. So inside the APPLIST.CFG those would look like:
DUMMY_ENTRY
-----Games-------
DOOM
Doom Shareware
HERETIC
Heretic Shareware
DUKE3D
Duke Nukem 3D Shareware
DUMMY_ENTRY
-----Apps---------
VBDOS
Visual Basic 1.0 for DOS
SOUND
Sound Tools
IMPORTANT NOTE: Adding two or more dummy entries in sequence is not supported. Program will crash if two or more dummy entries are present in either the beginning or at the end of the list. Two or more dummy entries in the middle of the list do work, though.
---------------------------------------------------------------------
3.2- Sub-Directories per item
---------------------------------------------------------------------
GINSTALL supports extracting items to different sub-directories in addition to the default installation path. This is useful for installing items in different sub-directories based on its category. Considering the same example above with two categories (games and apps),
all items would be extracted to the same main installation directory (i.e. C:\SHARE\DOOM, C:\SHARE\VBDOS, etc.).
But, if you modify the APPLIST.CFG file as below you can specify a separate sub-directory for each item:
DUMMY_ENTRY
-----Games-------
DOOM GAMES <-- Item will be installed in "GAMES" sub-folder
Doom Shareware
HERETIC GAMES
Heretic Shareware
DUKE3D GAMES
Duke Nukem 3D Shareware
DUMMY_ENTRY
-----Apps---------
VBDOS APPS <-- Item will be installed in "APPS" sub-folder
Visual Basic 1.0 for DOS
SOUND APPS
Sound Tools
In that case, DOOM would be installed into C:\SHARE\GAMES\DOOM and
Visual Basic 1.0 would go to C:\SHARE\APPS\VBDOS
---------------------------------------------------------------------
3.3- Post Installation Scripts
---------------------------------------------------------------------
If something needs to be done after a program was installed, you can create a post installation script that will run after the file is decompressed. The script must be added into the SCRIPTS sub-folder and have the same name of the zip file, aside from the .BAT extension. For example, if you want to run some script after extracting DOOM, all you need to do is to create a new file named DOOM.BAT and move it to the SCRIPTS directory. This batch file will execute after the corresponding item is extracted and will receive the installation path as a parameter.
LO-RES, HI-FUN
EP-7KXA Motherboard
Athlon Thunderbird 750mhz
256Mb PC100 RAM
Geforce 4 MX440 64MB AGP (128 bit)
Sound Blaster AWE 64 CT4500 (ISA)
32GB HDD