VOGONS


The 486 I swore I'd never build.

Topic actions

Reply 20 of 34, by jakethompson1

User metadata
Rank Oldbie
Rank
Oldbie

I would keep the 486DX2 also, but the empty cache socket would annoy me and I'd pick up the chip and install it--should take about 30 sec (just make sure it faces the right direction!) The good thing is that those chips are cheap and aren't going anywhere soon, so you can come back later whenever you get bored with the system and add it.

Reply 21 of 34, by Namrok

User metadata
Rank Oldbie
Rank
Oldbie

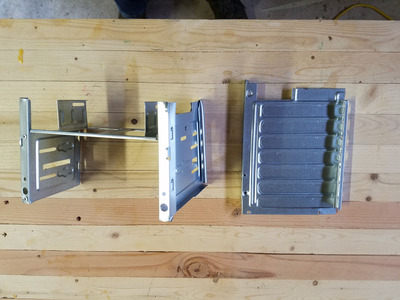
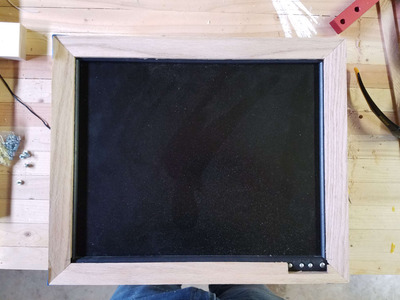
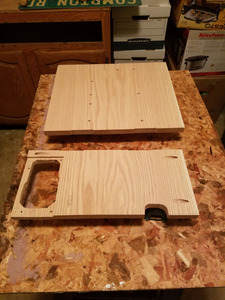
Well, I completely dismantled the sacrificial cheapo case. Drilled out all the rivets, and dremeled out the expansion card bracket and drive cage, such as it is.

20230923_121152.jpg
Filename
20230923_121152.jpg
File size
1.32 MiB
Views
1247 views
File license
Public domain

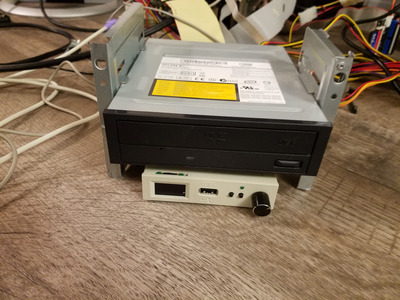
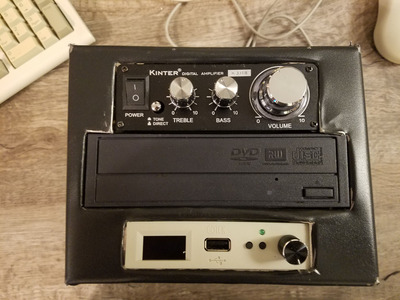
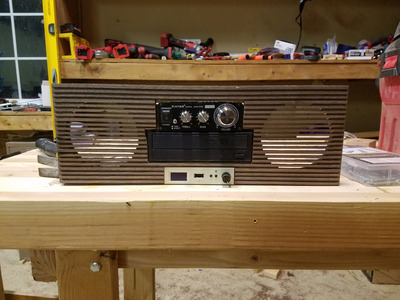
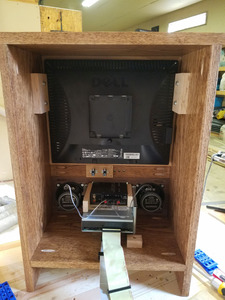
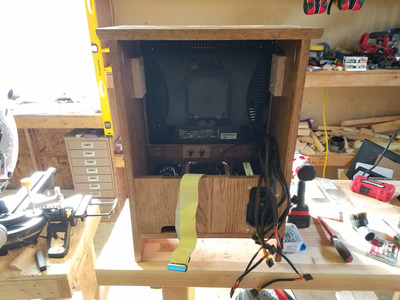
I got the CD-ROM and GOTEK mounted, and I think I'll find a way to mount the Kinter amp up top. I think when I get this put into the case, I may just sandwich it between some scrap pieces as stop blocks kitty corner to each other. I think I'll also get the dremel out again and fashion a faceplate out of one of the black aluminum side panels. Just do some cuts, and then fold back where I want the drives to poke out. Might take a few tries to get it right, but I have enough side panel to work with.

20230923_152257.jpg
Filename
20230923_152257.jpg
File size
1.45 MiB
Views
1247 views
File license
Public domain

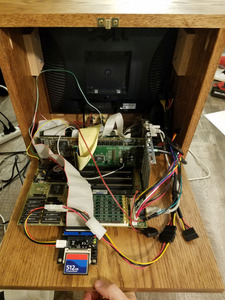
I did finally get the PC Speaker connected without it complaining that the keyboard was locked. I think it might have been as simple as every time I leaned over the motherboard to get that little beeper plugged in, I was jiggling the keyboard loose. All 6 times I tried. Go figure.

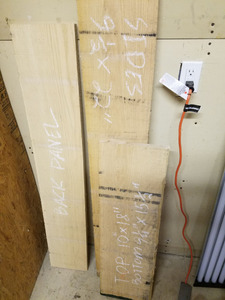
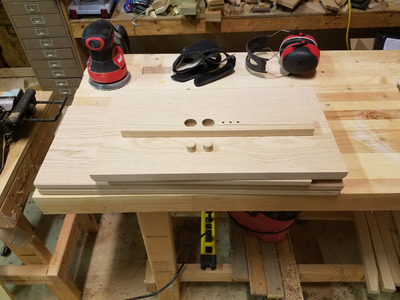
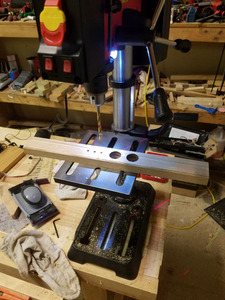
Lastly I picked out the red oak stock I plan on using for the sides top and bottom. Maybe tomorrow I'll find time to start the milling process. It's kind of a royal pain since I don't have a jointer, only a thickness planer. So I have to hot glue everything with shims to a planing sled. Looks rough now, because it is. But oh boy is it fun to watch it clean up during the milling process.

20230923_121216.jpg
Filename
20230923_121216.jpg
File size
894.17 KiB
Views
1247 views
File license
Public domain

Oh, and I've done all sorts of wacky things with WarCraft II's crackling issues to no avail. I tried installing Command & Conquer, but it's installer keeps crashing at different points. Wondered if it might be memory instability so I backed off all my settings, to no benefit. Not sure what that's about. I have this weird gut instinct that the CD-ROM was too fast? I've tried using CDBQ to slow it down, but it doesn't seem supported.

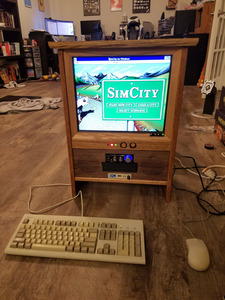
The Quest for Glory VGA remake installed and ran just fine though. Audio sounds great as always.

I am starting to wonder if games like WarCraft II would benefit from upgrading to 16 MB of ram from 8 MB.

Win95/DOS 7.1 - P233 MMX (@2.5 x 100 FSB), Diamond Viper V330 AGP, SB16 CT2800
Win98 - K6-2+ 500, GF2 MX, SB AWE 64 CT4500, SBLive CT4780
Win98 - Pentium III 1000, GF2 GTS, SBLive CT4760
WinXP - Athlon 64 3200+, GF 7800 GS, Audigy 2 ZS

Reply 22 of 34, by Namrok

User metadata
Rank Oldbie
Rank
Oldbie

Got probably the most important part of the build done today. The single, immutable dimension of the entire build everything else revolves around. Also probably the most detailed, second to what I have planned for the speaker grills. The wooden bezel/mount for the LCD monitor.

20230924_112554.jpg
Filename
20230924_112554.jpg
File size
816.3 KiB
Views
1217 views
File license
Public domain

It's a good thing I did it first, because it wound up being 15-3/4" wide instead of 15-1/2" I had initially measured. Made a judgement call to cut the rabbet the monitor fits inside 1/8" shallower so that there was less risk of the whole thing splitting. Put about a 25 degree chamfer on it too. It doesn't quite cover the plastic bezel as much as I wanted it to, due to the aforementioned judgement call. But it's not bad. And then of course I had to notch out room for the buttons. There was a little bit of chip out in the bottom left miter joint, but I've since repaired it.

I may still put some splines in the corners because it doesn't feel super sturdy. But it's going to get glued and screwed/brad nailed to the rest of the case, so it doesn't need to hold together perfectly all by it's lonesome. I'm still debating how I want to finish it. I may leave it natural with just shellac, to have some contract with the rest of the stain the sides, top, bottom, and random trim will get. I'm also torn between using walnut for the speaker grills, or just red oak stained walnut. I'm leaning towards just using stain, since I kind of want to keep a more consistent grain pattern going. But I'm very inspired color wise by the old RCA Victor set I posted up above, with the lighter screen bezel and the dark grill.

Next time I get out to the shop, I should be able to get the sides, top and bottom built. Whatever I decide, I expect the rest to go a lot quicker. Just going to be pocket holing most of the rest together.

Win95/DOS 7.1 - P233 MMX (@2.5 x 100 FSB), Diamond Viper V330 AGP, SB16 CT2800
Win98 - K6-2+ 500, GF2 MX, SB AWE 64 CT4500, SBLive CT4780
Win98 - Pentium III 1000, GF2 GTS, SBLive CT4760
WinXP - Athlon 64 3200+, GF 7800 GS, Audigy 2 ZS

Reply 23 of 34, by Namrok

User metadata
Rank Oldbie
Rank
Oldbie

Well, I took the scrap side panel and attempted to dremel/bend this faceplate for my drives/amp. I think I kind of hate it.

20230927_195355.jpg
Filename
20230927_195355.jpg
File size
1.36 MiB
Views
1181 views
File license
Public domain

I knew it wouldn't be perfect. I've never done any metal work ever. It may even be not that bad for a first time. But I really, truly hate it. It's lumpy, dented and scratched. My idea was to cut out a smaller area for each drive, and then bend the excess back to avoid sharp edges. But that bending process was so inexact I think it's actually worse. I have enough metal to try again. I may just dremel out each drive area in it's entirety, no bending needed. And if that also looks like shit, I may just take a piece of 1/4" plywood, jigsaw out the drive bays, and paint it black or something.

Win95/DOS 7.1 - P233 MMX (@2.5 x 100 FSB), Diamond Viper V330 AGP, SB16 CT2800
Win98 - K6-2+ 500, GF2 MX, SB AWE 64 CT4500, SBLive CT4780
Win98 - Pentium III 1000, GF2 GTS, SBLive CT4760
WinXP - Athlon 64 3200+, GF 7800 GS, Audigy 2 ZS

Reply 24 of 34, by Namrok

User metadata
Rank Oldbie
Rank
Oldbie

Well, I'm much happier with the results from today's labors.

20230930_194508.jpg
Filename
20230930_194508.jpg
File size
1.35 MiB
Views
1133 views
File license
Public domain

The routing went mostly smoothly. Put a 1/16" rabbet around the edge, and then put a 1/8" grill across the front as a design element, and then went even deeper to reach the speaker area I routed out on the back. That all went mostly well, with one single spot where the router jumped on me and took a chuck out of one of the grill fins. Cutting out the drive bays went super fucky though. I tried plunge cutting with my oscilating multitool, but I guess that attachment is getting old because it just started burning the walnut and gumming up. Then I tried using my jigsaw after I drilled a starting hole in the center, and that went ok, but the blade deflected on me here and there causing some squirrelly cuts. I straightened out most of them with a chisel and liberal sanding. May do some more another day.

And with that, the two most labor intensive elements are finished. The rest should be relatively smooth sailing, until I get to mounting the motherboard.

Win95/DOS 7.1 - P233 MMX (@2.5 x 100 FSB), Diamond Viper V330 AGP, SB16 CT2800
Win98 - K6-2+ 500, GF2 MX, SB AWE 64 CT4500, SBLive CT4780
Win98 - Pentium III 1000, GF2 GTS, SBLive CT4760
WinXP - Athlon 64 3200+, GF 7800 GS, Audigy 2 ZS

Reply 25 of 34, by TuesdaysGone

User metadata
Rank Newbie
Rank
Newbie

Still following the trials and tribulations of this project! I'm really liking the look of your latest post. The grill with the speakers is looking awesome! The drive bays look good as well. Can't wait to see how it progresses and it all comes together!

Best wishes,

Tony.

ASUS P2B-F 440BX BIOS Rev. 1014 Beta 003
Intel "Katmai" Pentium III 450Mhz
256MB, 80GB, Epson SD-800 Combo FD, Voodoo Banshee 16MB, SB Live, CT7160 MPEG-2 PCI Decoder, 3Com 3C905B-TX PCI NIC, Iomega Zip 100, Creative PC-DVD, Sony CDRW, Win 98SE

Reply 26 of 34, by Namrok

User metadata
Rank Oldbie
Rank
Oldbie

Been a hot minute.

I put WIndows 3.11 on the computer because why not. Installed the ES1868 and Cirrus Logic GD5428 drivers super easily. Even got Sim City Classic installed already. I have a smattering of games that are really best suited for Windows 3.11. Civilization 2, Lost Mind of Dr Brain, Wizardry Gold, maybe a few others. Mostly because, going off memory at least, they play best at Windows 3.11's default desktop resolution and color depth.

Most of my free time I've spent in the shop though. Got the red oak for the sides, top and front milled down. Then I put an edge profile on them I'm pretty happy with. 45 degree chamfer for the sides and bottom, but a 25 degree chamfer for the slightly thicker top. I even made it through most of my sanding progression tonight.

20231012_201307.jpg
Filename
20231012_201307.jpg
File size
1.35 MiB
Views
1022 views
File comment
All the wood
File license
Public domain

Made the front panel IO tonight too. Just a power button, turbo button, and LEDs for the power, turbo and HDD. Splurged on the drill press you see here so I could get them lined up way more perfectly than I've ever been able to do by hand. I had a fancy bit that actually cut out he buttons, so the face grain will be preserved across them. This was after I used a forstner bit to mill the buttons down about 1/4" to fit the dimensions of the mechanical switch they'll be attached to. Father in law actually passed those down to me. I believe they were his father's, but he never used them.

20231012_191821.jpg
Filename
20231012_191821.jpg
File size
968.12 KiB
Views
1022 views
File comment
Buttons and LEDs
File license
Public domain

I put a very slight chamfer on the inside edge of the button holes, and on the buttons as well. Routing the edge of the buttons was actually a bit of a logistical challenge, since I'm not dumb enough to put my fingers that close to the router bit on such a small part. However, using some double sided tape to attach it to a piece of scrap wood as a handle worked wonderfully.

With luck, this weekend I'll finish my sanding progression, stain them, shellac them, and maybe even get them all assembled. But probably not.

Win95/DOS 7.1 - P233 MMX (@2.5 x 100 FSB), Diamond Viper V330 AGP, SB16 CT2800
Win98 - K6-2+ 500, GF2 MX, SB AWE 64 CT4500, SBLive CT4780
Win98 - Pentium III 1000, GF2 GTS, SBLive CT4760
WinXP - Athlon 64 3200+, GF 7800 GS, Audigy 2 ZS

Reply 27 of 34, by Namrok

User metadata
Rank Oldbie
Rank
Oldbie

Well, major update this weekend. Well, not just for this weekend, but I figured the process of sanding, sanding and more sanding, staining, shellac, sanding, and waxing isn't the most exciting.

The front is fully assembled!!

20231028_152529.jpg
Filename
20231028_152529.jpg
File size
970.63 KiB
Views
925 views
File license
Public domain

As you can see, the back is still wide open.

20231028_154232.jpg
Filename
20231028_154232.jpg
File size
917.57 KiB
Views
925 views
File license
Public domain

My original plan had the PSU in the bottom, with the motherboard and expansion cards behind the monitor. Probably a hinge in the middle where the motherboard "tray" swings out. Maybe a fan up top, but it's just a 486 so it doesn't need some sort of engineered wind tunnel. Then again, heat rises, so maybe try to get the PSU up top old style with a fan in the bottom?

I'll probably start milling the material for the back tomorrow.

Win95/DOS 7.1 - P233 MMX (@2.5 x 100 FSB), Diamond Viper V330 AGP, SB16 CT2800
Win98 - K6-2+ 500, GF2 MX, SB AWE 64 CT4500, SBLive CT4780
Win98 - Pentium III 1000, GF2 GTS, SBLive CT4760
WinXP - Athlon 64 3200+, GF 7800 GS, Audigy 2 ZS

Reply 29 of 34, by TuesdaysGone

User metadata
Rank Newbie
Rank
Newbie

Looking awesome my friend¡ Beautiful job so far¡

Best wishes,

Tony.

ASUS P2B-F 440BX BIOS Rev. 1014 Beta 003
Intel "Katmai" Pentium III 450Mhz
256MB, 80GB, Epson SD-800 Combo FD, Voodoo Banshee 16MB, SB Live, CT7160 MPEG-2 PCI Decoder, 3Com 3C905B-TX PCI NIC, Iomega Zip 100, Creative PC-DVD, Sony CDRW, Win 98SE

Reply 30 of 34, by Namrok

User metadata
Rank Oldbie
Rank
Oldbie

My labors are at an end!

The last few weeks were mostly taken up blowing leaves. But then I finally got around to gluing up the back panel, then cutting it into the two sections. I did my best to route out a section for the power supply, but it's a little jank. But it's the back of the case so who cares, right?

20231127_174902.jpg
Filename
20231127_174902.jpg
File size
905.51 KiB
Views
600 views
File comment
Panels
File license
CC-BY-4.0

Things got tight after I pocket screwed the bottom part in. The PSU and drive cage barely fit back in past the monitor being in the way. The monitor does come out though, if it has to. This time I managed.

20231202_134050.jpg
Filename
20231202_134050.jpg
File size
1.19 MiB
Views
600 views
File comment
Attached
File license
CC-BY-4.0

Getting everything wired up was quit the task in such tight confines. I had to unscrew the two switches to attach the turbo and power leads to them, then screw them back in, very carefully. Had to make a few jumper wires too.

20231202_204639.jpg
Filename
20231202_204639.jpg
File size
1.1 MiB
Views
600 views
File comment
So many wires
File license
CC-BY-4.0

Overall, I couldn't be happier with the final result.

20231202_204613.jpg
Filename
20231202_204613.jpg
File size
1.02 MiB
Views
600 views
File comment
Finished!
File license
CC-BY-4.0

Win95/DOS 7.1 - P233 MMX (@2.5 x 100 FSB), Diamond Viper V330 AGP, SB16 CT2800
Win98 - K6-2+ 500, GF2 MX, SB AWE 64 CT4500, SBLive CT4780
Win98 - Pentium III 1000, GF2 GTS, SBLive CT4760
WinXP - Athlon 64 3200+, GF 7800 GS, Audigy 2 ZS

Reply 32 of 34, by TuesdaysGone

User metadata
Rank Newbie
Rank
Newbie

Wow! What a cool build! I love, love, love it! Beautiful job!

Best wishes,

Tony.

ASUS P2B-F 440BX BIOS Rev. 1014 Beta 003
Intel "Katmai" Pentium III 450Mhz
256MB, 80GB, Epson SD-800 Combo FD, Voodoo Banshee 16MB, SB Live, CT7160 MPEG-2 PCI Decoder, 3Com 3C905B-TX PCI NIC, Iomega Zip 100, Creative PC-DVD, Sony CDRW, Win 98SE

Reply 33 of 34, by Sandmaennchen

User metadata
Rank Newbie
Rank
Newbie

Very nice wooden build case.... i like it... just like the old TV-Sets back in the 50s.
A little tip for the dent in the grill... perhaps you can use some coloured wax to fill it? I used some of this for repairing my wooden floor and normaly you can find it in the right color... some around the edge and into the dent and i guess you won't see the dent afterwards.

Reply 34 of 34, by Namrok

User metadata
Rank Oldbie
Rank
Oldbie
Sandmaennchen wrote on 2023-12-09, 23:07:

Very nice wooden build case.... i like it... just like the old TV-Sets back in the 50s.
A little tip for the dent in the grill... perhaps you can use some coloured wax to fill it? I used some of this for repairing my wooden floor and normaly you can find it in the right color... some around the edge and into the dent and i guess you won't see the dent afterwards.

That's a really good idea. I'll look into it.

Win95/DOS 7.1 - P233 MMX (@2.5 x 100 FSB), Diamond Viper V330 AGP, SB16 CT2800
Win98 - K6-2+ 500, GF2 MX, SB AWE 64 CT4500, SBLive CT4780
Win98 - Pentium III 1000, GF2 GTS, SBLive CT4760
WinXP - Athlon 64 3200+, GF 7800 GS, Audigy 2 ZS