First post, by olddos25

- Rank
- Member
Hi everyone, I am olddos25! (yeah, not many of you know me, but I hope you do after this guide!) And I am gonna teach YOU how to run Windows 1.0 in DOSBox!
And will all be wondering, "Why would I like to run Windows 1.0?". I don't know, just for the heck of it!
Windows 1.0 is generally regarded as a system that is very difficult to run in DOSBox because of it's installer system. But it actually is very easy to run it and I'll show you how!
But a couple of things in mind before I get started:
First, you can't install it on DOSBox 0.74 or an earlier version, because those lack a feautre that we are gonna need: Floppy disk swaps! I'll show you what I mean soon enough.
Second, you need to have the Windows 1.0 diskettes, which ain't technically freeware, even though the system is very old, so I won't link you to those. But Winworld is a good source to get them. Need a link? Just google it, for god's sake!
Now, we can get started!
The things we are gonna need are the following ones:
-The Windows 1.0 diskettes (obviously)
-An SVN DOSBox build or DOSBOX ECE by Yesterplay80 (which I really recommend). The most recent build of both of these can be downloaded at the previously stated user's website, here: http://blog.yesterplay80.net/dosbox-ece-en/
Assuming you got all that, we can start.
You need to set up a directory where you are gonna put the Windows 1.0 installation, in my case it is "D:\DOSFILES\win10", but it can be whatever you want, I recommend sticking to the DOS 8.3 character limitation just for convenience.
And I have my Windows 1.0 diskettes in "D:\COLECCIÓN DE WINDOWS Y OFFICE\Windows\Microsoft Windows 1.01\".
Ok, now for the actual stuff, I.E. the setup.
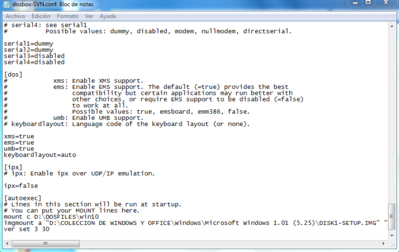
First, you'll need to go to your DOSBox config file and change the following (I will assume that you already know where the config file is and how to change it):
machine to ega
Now, we need to put the following in the autoexec section:
mount c <path of your installation directory>
imgmount a <path of the first disk> <path of the second one> <path of the third> <path of the fourth> <path of the fifth> -t floppy
ver set 3 30 (if we don't put this, Windows won't start)
Remember to put collins at the start and the end of each path if it doesn't conform to the 8.3 standard, otherwise it won't work.
You should be left with this: (ignore my paths)
Now, save that and start DOSBox.
Go to the A: drive and type setup to start the installation.
Press enter twice.
Now you'll be asked to type in the Windows installation path, you can change that if you want, but I won't. Press enter.
Now you'll be greeted with this screen:
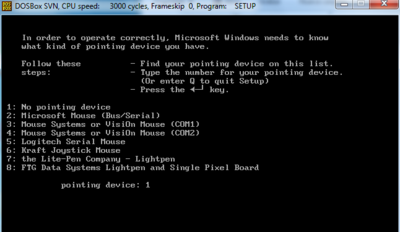
Just choose option two and press enter.
Now, this is one of the more important things in the setup:

Remember the setting we changed earlier? It was for this part. Choose option 5 and press enter.
Now you will be asked for the second disk.
Press the Ctrl+F4 shortcut to change disks and press enter.
Same thing with the third one.
Now it'll ask you if you want to install a printer, just press n.
Insert the 4th disk and then the 5th disk.
And that is it!
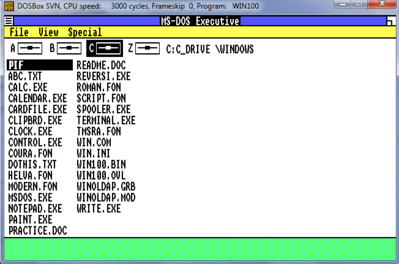
Now just type win and press enter and you'll be greeted by Windows 1.0 in all its glory!
But, you'll notice a problem. The mouse does not work!
That is because Windows 1.0 expects a serial mouse with the options we chose. But DOSBox emulates a PS/2 mouse! How do we correct this?
Well, we can use two methods:
One,replace the Windows 1.0 mouse.drv file on the first disk with the one on the first Windows 2.0 disk and then choosing option two at the setup program (and yes, you'll have to delete the folder and do everything all over again), but this hasn't worked for me.
Two, use the Serial Mouse Emulator by videogamer555, fellow member of VOGONS. The thread is here: Serial Mouse Emulator
There is everything you need to know to get the program up and running!
In this case, I'll use the second method.
Go to the config file and change the following:
serial1 to nullmodem port:1234
And while we are at it, go to the autoexec section, delete the imgmount line and add the following line underneath the ver set line:
C:
Save and start DOSBox again.
Maybe you'll need to accept the firewall window, so do that if it pops up.
Now start the serial emulator. (Note: you can't have mouse support if you run the serial emu after you started Windows, so keep that in mind)
Go to the windows folder and start it.
Now, you'll have Windows 1.0 running with full mouse support!
Use Ctrl+F10 to lock the cursor into the DOSBox window and you are good to go!
Thanks for viewing my guide!
It costed me a lot of time (and a whole soccer match) to do it, so I hope this is going to the DOSBox Guides section, and that it was useful.
I'll do more guides in the upcoming future if this one prooves succesful!
Thanks dearly,
olddos25
Just another user that likes old OSes and videogames, nothing interesting to see here...
Other places to find me:
DraStic: http://drastic-ds.com (as dsattorney)