First post, by olddos25

- Rank
- Member
Hello, it is your good ole' friend, olddos25, with another guide!
The last one prooved successful, so here I go with another one!
Looks like niche guides are my thing now, but I will make more useful guides in the future!
And today, I'll show you how to run Windows 3.0 MME!
What is MME you may ask?
Well, it was a version of the popular Windows 3.0 that was OEM only and that it differenciated itself from regular 3.0 for the following features:
One, it added native sound card support, because regular 3.0 did not have that.
Two, it added better multimedia features, like CD playback, an Audio player, etc, because Windows 3.0 didn't read a CD as that, but it read it as a large read-only hard drive, so it couldn't play Audio CDs.
Before we get started, I'll mention a couple of things:
-First, I won't provide links to the ISO of the OS even though the system is ancient, because it isn't abandonware. You'll need to search for that yourselves. Again, I recommend Winworld to download it.
-Second, unlike the last guide, this one will work on normal DOSBox and subsequently SVN and ECE. I'll do it on normal DOSBox through D-Fend Reloaded.
-Third, in this guide I'll be covering the Tandy release, which seems to be the most common one.
-Fourth, I'll explain how to extract the compressed file with Winrar, so if you are using 7zip instructions may be a bit different.
Now, let's get started!
First, you are gonna need the following things:
-A Windows 3.0 MME ISO
-A copy of DOSBox
-The Windows 3.0 ET4000 drivers, which can be downloaded right here: http://files.mpoli.fi/hardware/DISPLAY/TSENG/ET-4000.ZIP
Create a folder in your dedicated dos folder (you should have one if you want to call yourself a VOGONS member) as whatever you want, but I will call it win30. There is where we are gonna install Windows and put the driver.
Put the zip in that folder, right click it and select "Extract to ET-4000\". We are gonna do this to be a bit more organized.
Now, go to the config file and change the following:
machine to svga_et4000 (to make use of that driver)
sbtype to sbpro1
irq to 10
dma to 3
hdma to 6
You have noticed that we changed most of the sound values. That is because this version of Windows expects a proprietary sound board which is exactly the same as the Sound Blaster Pro 1 (the one that used Dual OPL2s) and the irq, dma and hdma settings are the ones the setup program expects.
Go to the autoexec section and input the following:
mount c: <path of your dedicated Windows 3.0 folder>
imgmount d <path of your ISO image> -t cdrom
Now, let's get started on the installation!
Start up DOSBox, go to the MWIN folder on the D drive and type setup. Easy peasy.
Press enter. Then you will be asked if you want to change the installation path. You can change it if you want to, but I will not.
Then you'll be greeted by this screen:
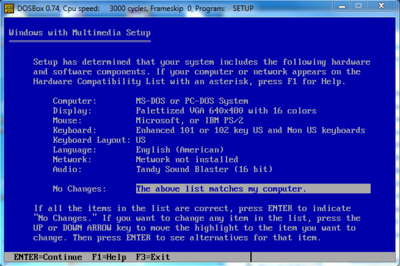
Change the Display option to the setting that says "VGA 640x480 with 16 colors". That's the only mandatory thing you need to do here. You can change things like the keyboard layout and the language options if you aren't an american like me, but leave the rest of them untouched.
Once you are ready to proceed, go to the option "The above list matches my computer" and hit enter.
Press enter once more.
Wait a moment.
You'll now be greeted with the usual Windows 3.x style setup.
Click yes if you want to install the Multimedia Demonstration software. Otherwise, click no.
You will be greeted by this screen now:
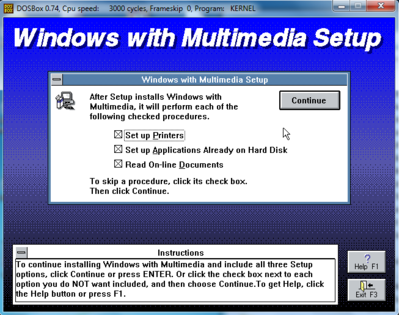
Select the options you want, I'll just uncheck them all. Press enter once you are ready to continue.
Wait a moment and click yes if you want to copy HyperGuide to the hard drive. Otherwise, click no.
The installer will then complain about not being able to find mouse.sys. Just click cancel and then ignore, the mouse will still work.
Wait a moment.
Press continue and then OK.
Close DOSBox and open it again.
And now Windows 3.0 MME is installed!
Now, let's go to the driver installation.
Go to where your driver folder is and type install.
You'll then be greeted by this screen:
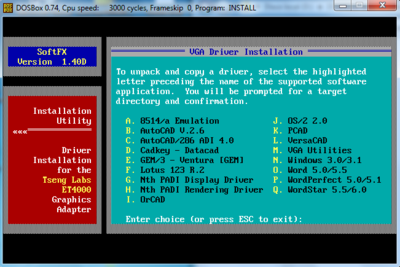
Type N and press enter. Then type a and press enter.
Now you will be asked if you want to change the directory. I'll change it to C:\drivers\ET, but you can keep defaults if you want.
Wait for the installation to finish, it might take a little while.
When installation finishes, press enter and then escape.
Now go to the Windows installation directory and type setup.
Once there, go to the display menu and select the option "Other"
You will be asked to input the path of the driver's folder. Do that and press enter.
If you did it right, you will be greeted by a list of ET4000 modes that you can choose. The maximum color depth DOSBox supports with the ET4000 is of 256 colors, so don't choose any of the modes with a higher color depth. Also don't choose any of the ETTURBO modes. I'll choose 800x600 as my resolution, once you've decided, press enter.
You will be asked for the Windows CD. Input D:\MWIN and then press enter.
Now input the path of the driver and press enter.
Press enter once more and you will be out of the setup.
Now just type win and it will boot.
You should be greeted with this screen:
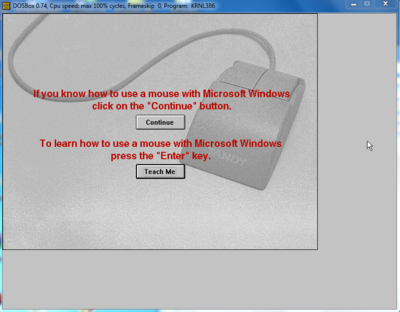
Just click on continue. Click on no on the next screen and wait for the audio test to finish. If there is sound, then you did everything right. If not, go check the settings and see if you changed them appropiately.
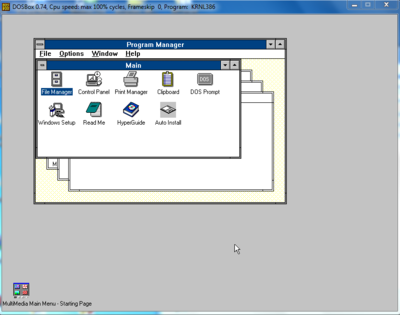
Once that is done, you should be greeted with the Multimedia Main Menu.
If you want to use Program Manager, just click on the corresponding option.
A dialog will pop up saying that if you want to make it the default shell. Accept it if you want.
And now you will be greeted by Windows 3.0 MME in all its glory!
And with this, the guide is over!
-Optional step:
If you do not want to go to the Windows folder every time you want to start it, then follow the following steps:
First, create a text file named win and change its extension to .bat
Second, go edit it and put the following:
PATH <path of your Windows directory>
SET TEMP=<path of your Windows directory>\TEMP
WIN.COM
Save it and move it to the Windows 3.0 folder.
And now, you just have to type in win at the root and it will boot!
This costed me even more than my Windows 1.0 guide, so I hope this was useful!
If you have any doubts or problems, just tell me and I'll try to help you!
Until next time,
olddos25
Just another user that likes old OSes and videogames, nothing interesting to see here...
Other places to find me:
DraStic: http://drastic-ds.com (as dsattorney)