VOGONS


First post, by tony359

User metadata
Rank Member
Rank
Member

Hi there

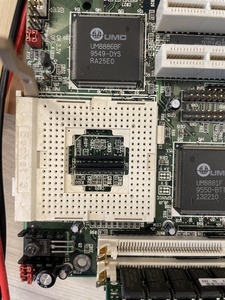
I’ve bought a faulty MB and I was trying to revive it.

As my CPU is 3.3V, I checked the VCC voltage before installing it and it read 3.3V, great. But then the CPU - known working - is in, the voltage drops to 1.7V.

The voltage is regulated by a transistor C3420.

The collector is always 4.8V, PSU rail.

The emitter is 3.5V or 1.7V depending whether the CPU is on or not

The base is 3.1V with no CPU but goes up to 4.8V with CPU on.

Any thoughts?

Attachments

My Youtube channel: https://www.youtube.com/@tony359

Reply 2 of 7, by Imperious

User metadata
Rank Oldbie
Rank
Oldbie

A typical NPN Power transistor, pdf here https://datasheet.octopart.com/2SC3420-Inchan … et-15978886.pdf

I'd do the diode test with the multimeter to test the transistor, remove it if You have to. If the base is ever lower than the emitter then the
transistor isn't even being turned on. Nothing funny on the other side of the board?
The fact that the Power rail on the collector doesn't change indicates no problems from the collector side, maybe look at the base to emitter
side of the transistor and get a manual for the board from TH99 and make sure those jumpers are in the right place.

Atari 2600, TI994a, Vic20, c64, ZX Spectrum 128, Amstrad CPC464, Atari 65XE, Commodore Plus/4, Amiga 500
PC's from XT 8088, 486, Pentium MMX, K6, Athlon, P3, P4, 775, to current Ryzen 5600x.

Reply 3 of 7, by tony359

User metadata
Rank Member
Rank
Member

Thanks imperius

I had the transistor out already to inject an external 3.3V anyways. I tested it and indeed I measure a voltage drop of 1.9V between collector and emitter - so I ordered a new one!

I'll keep you posted!

My Youtube channel: https://www.youtube.com/@tony359

Reply 4 of 7, by tony359

User metadata
Rank Member
Rank
Member

The new transistor did the trick! It was curious that when I went to test it again the following day it was NOT showing that 1.8/1.9V across E and C.

I have made a repair video which is now on youtube: https://youtu.be/jwChQct2ghc

(I am not a professional youtuber and I do not make any money out of it!)

Thanks again for your help!

My Youtube channel: https://www.youtube.com/@tony359

Reply 5 of 7, by Imperious

User metadata
Rank Oldbie
Rank
Oldbie

Awesome news! I always like to see successful repairs. I'll check out the youtube video tomorrow.

Atari 2600, TI994a, Vic20, c64, ZX Spectrum 128, Amstrad CPC464, Atari 65XE, Commodore Plus/4, Amiga 500
PC's from XT 8088, 486, Pentium MMX, K6, Athlon, P3, P4, 775, to current Ryzen 5600x.

Reply 6 of 7, by whitepawn

User metadata
Rank Newbie
Rank
Newbie

Watched youtube video good job, I didn't get bored while watching so don't criticize yourself.
Here is full manual i believe:(Your hard copy has missing pages.)Also attached to post.
https://www.elhvb.com/webhq/models/486pci/m921.htm
I also liked your CPU testing SIS 486G board that you repaired before.What was it repair story?
I really like old 486-386 motherboard repairs.

Attachments

  • Filename
    m921.zip
    File size
    373.36 KiB
    Downloads
    31 downloads
    File license
    Public domain

Reply 7 of 7, by tony359

User metadata
Rank Member
Rank
Member

hey thanks a lot for your comment! @whitepawn

Good question about the SIS 486G board - I do remember I had to add a 3.3V regulator as the board was not featuring one. I posted some questions here - and the community was very helpful as usual.
Adding 3.3V regulator to a cost reduced 486 motherboard

I have the feeling the issue was just some corroded chip sockets - but I cannot remember for sure, that was before my (very slow and amateurial!) youtube career!

I am currently repairing another 386 board - which you guys are helping me with here Keyboard crashes on old 386 motherboard - which should become a video at some point. I will surely mention Vogons!

Thanks again - and also for the manual!

My Youtube channel: https://www.youtube.com/@tony359