VOGONS


Fabricating a New Turbo Display

Topic actions

Reply 20 of 112, by wiretap

User metadata
Rank Oldbie
Rank
Oldbie

I used the design rules from JLCPCB for what they are capable of manufacturing, so trace to outline is ≥0.2mm. I will shift over the pin headers toward R5 to make more room for the screws since there may not be enough room, and also route traces further away from those holes.

My Github
Circuit Board Repair Manuals

Reply 21 of 112, by wiretap

User metadata
Rank Oldbie
Rank
Oldbie

There we go.. made more clearance around the top board edge for the traces, moved the pins over away from the bottom screw hole, routed traces a little further away from the holes, and added pin header markings to the silk screen. A little paper washer would still be recommended around the screw holes though.

Stepping through the logic of the PIC programming..
- When power is applied, it will read the turbo switch pin to see if it is high or low.
- When the turbo button is closed (pressed), the H pin will activate and the L pin deactivates, set the turbo LED to on, and setting the 7-segment display to the turbo frequency value.
- When the turbo button is open, the H pin will deactivate and the L pin will activate, set the turbo LED to off, and setting the 7-segment display to the low frequency value.
- For a 2-pin motherboard turbo connection, you'd just have to connect to the H and G pins.

OoiB8yRh.png

yXKA7iJh.png

My Github
Circuit Board Repair Manuals

Reply 22 of 112, by H3nrik V!

User metadata
Rank Oldbie
Rank
Oldbie

Is one connection to R5 split around the PIC's pin 11? Or is it graphical errors in the 3D rendering?

Would you mind post a new shot of the layout with both layers visible as the previous?

Please use the "quote" option if asking questions to what I write - it will really up the chances of me noticing 😀

Reply 23 of 112, by wiretap

User metadata
Rank Oldbie
Rank
Oldbie

Hmm, I'll have to go back and look. R3 thru R9 all have splits since they are tied to two different digits' segments and the transistors switch between turning on/off the two faster than your eye can see. However, the 3D render does look a bit off from where some of the actual traces should go according to the schematic. Maybe the autorouting messed it up. I'll double check tonight and post more pix.

My Github
Circuit Board Repair Manuals

Reply 24 of 112, by wiretap

User metadata
Rank Oldbie
Rank
Oldbie

Just traced it all out manually. It routed everything correctly per the schematic. It just looks a little odd with the traces on the PCB. But yes, those are intersections in the trace, and you can see them on the schematic. (green dots) Intersections on traces are fine, especially when they are this large. It doesn't become a problem unless there is higher current or >1GHz frequency and the trace is less than 15mil. In that case, you would want to use a chamfered trace intersection.

LoTkz8q.png

RLWMkoE.png

My Github
Circuit Board Repair Manuals

Reply 25 of 112, by H3nrik V!

User metadata
Rank Oldbie
Rank
Oldbie
wiretap wrote:
Just traced it all out manually. It routed everything correctly per the schematic. It just looks a little odd with the traces on […]
Show full quote

Just traced it all out manually. It routed everything correctly per the schematic. It just looks a little odd with the traces on the PCB. But yes, those are intersections in the trace, and you can see them on the schematic. (green dots) Intersections on traces are fine, especially when they are this large. It doesn't become a problem unless there is higher current or >1GHz frequency and the trace is less than 15mil. In that case, you would want to use a chamfered trace intersection.

RLWMkoE.png

Surely an intersection is no problem (I design PCBs for a living, so I've routed my shares of intersections as well 😉) , I just didn't see on the first image in your previous post that it had that, so I thought it might be a bug in the autorouter .. I would, however give it a little more clearance to pin 11 of the PIC, just to help the etching process. You might have an acid trap around that pad.

Please use the "quote" option if asking questions to what I write - it will really up the chances of me noticing 😀

Reply 27 of 112, by GigAHerZ

User metadata
Rank Oldbie
Rank
Oldbie
wiretap wrote:
GigAHerZ wrote:
wiretap wrote:

As to using a resistor network, no, because each individual control line has to have its own resistor going to each segment --- a resistor network has a single common pin. If you were to use a single resistor on the common of the 7 segment display, you get varying brightness per segment.

Really? You don't have to do it like that. Reverse the signal from mC itself or something, but (without going super deep into project) it should be possible to put all the resistors for each segment on a resistor network with a common ground or 5v.

But maybe i'm missing something right now quickly glancing over the pictures here...

Feel free to draw a quick schematic showing a better way. (You still need a current limiting resistor per segment.)

You are correct. When i very quickly glanced over, i thought i see 2 pins per every segment. (anode and cathode) But this display has already connected one pin of all segments into common pin and has 2 two sets of pins because it has 2 digits. So yes, single resistors are needed...

"640K ought to be enough for anybody." - And i intend to get every last bit out of it even after loading every damn driver!

Reply 28 of 112, by Jo22

User metadata
Rank l33t++
Rank
l33t++

Aww, the good old 16F84! It warmens my heart to see it being supported still. 😊
This little chip was my very first microcontroller I started learning µC programming with.
It must have been around 2004 or so, when I made my first DIY prommer for it.
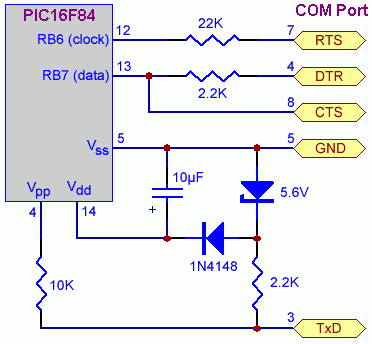
- I built a simple RS232 version, altered for a dedicated battery and used PonyProg/PICProg/ICProg with it.
This was in Win9x times, before we got cheap-a$$ multi-programmers like G540 and TL866, of course.

Attachments

  • Schematic.gif
    Filename
    Schematic.gif
    File size
    6.6 KiB
    Views
    2065 views
    File license
    Fair use/fair dealing exception
  • Filename
    PICProg.zip
    File size
    171.05 KiB
    Downloads
    99 downloads
    File license
    Fair use/fair dealing exception
  • Filename
    icprog.zip
    File size
    765.63 KiB
    Downloads
    81 downloads
    File license
    Fair use/fair dealing exception

"Time, it seems, doesn't flow. For some it's fast, for some it's slow.
In what to one race is no time at all, another race can rise and fall..." - The Minstrel

//My video channel//

Reply 29 of 112, by HanJammer

User metadata
Rank Oldbie
Rank
Oldbie
wiretap wrote:

Alrighty, I suppose I'll just make a few of these for a personal project since there doesn't seem to be much interest. Thanks for the feedback. 😀

As to using a resistor network, no, because each individual control line has to have its own resistor going to each segment --- a resistor network has a single common pin. If you were to use a single resistor on the common of the 7 segment display, you get varying brightness per segment.

Another problem with them is they were never standardized when it comes to PCB or even segment display dimensions. Mounting holes were in many different spots as well. If case was originally fitted with one - then it probably still works just fine (only one time I found a case with the display which had problems - replacing dip switches fixed them) but there are some cases with place for the display which was never populated and it's window was either filled with a blank or has to be cutted out - but again, no way of knowing if the PCB will fit it without problems...

New items (October/November 2022) -> My Items for Sale
I8v8PGb.jpg

Reply 30 of 112, by wiretap

User metadata
Rank Oldbie
Rank
Oldbie

Overlooked the fact that the PIC16F84A needs an external oscillator, so I'll be switching to a different PIC. I don't want to add even more components to the PCB. It will be an easy change and I have a few different physical chips laying around with built in oscillators.

I already programmed the C code for the whole system to work with the PIC16F84A, so porting it to a different chip shouldn't be all that hard. I'm thinking a 16F690 or 18F1220.

I'll post some PIC simulator screenshots if I get a chance this weekend.

My Github
Circuit Board Repair Manuals

Reply 31 of 112, by Jo22

User metadata
Rank l33t++
Rank
l33t++

^Ah, I see. Good luck! 😀

PS: From what I remember, a cheap resonator might work with the 16F84, too.
That being said, I don't know how much or less performance is required to control the 7 segment LEDs.

"Time, it seems, doesn't flow. For some it's fast, for some it's slow.
In what to one race is no time at all, another race can rise and fall..." - The Minstrel

//My video channel//

Reply 32 of 112, by wiretap

User metadata
Rank Oldbie
Rank
Oldbie

Ooooh yea good call on the resonator. I totally forgot about using those back in the day. That may be feasible since it is only 1 component instead of at least 3 with using a proper crystal. The performance doesn't really matter all that much, I just need a basic clock source for delays and multiplexing the 7-segment display output -- and the PIC16F84A needs it to run. 😵

My Github
Circuit Board Repair Manuals

Reply 33 of 112, by Tiido

User metadata
Rank l33t
Rank
l33t

Changing to a different MCU with internal RC clock or something would be better choice if cost is lower, you have less stuff to assemble also.

You should fatten up all the power traces, it will reduce any mysterious problems that may happen (the MCU could mibehave due to ground bounce or such), and do something about the trace going in the middle of power input pins (there's this little hook thing that just makes clearance worse for no reason and looks ugly too...).

T-04YBSC, a new YMF71x based sound card & Official VOGONS thread about it
Newly made 4MB 60ns 30pin SIMMs ~
mida sa loed ? nagunii aru ei saa 😜

Reply 34 of 112, by wiretap

User metadata
Rank Oldbie
Rank
Oldbie

Thanks. I'll make power traces a little larger and continue routing traces with better clearance/angles around pin pads. Also, I'm optimizing the resistor values right now, since the initial values were just guestimates to get the initial layout.

The solid state optoisolated relays will use 3.8k ohm range resistors. 3.8V / 0.001A = 3800 ohms.

The 7 segment display inputs will use 145 ohm range resistors. (5V - 2.1V) / 0.02A = 145 ohm.

Then I have to take TLED off of PORTB since that is used for the 7-seg display and tie it to the Turbo High pin (RA2) so it will drive the LED on when the Turbo Switch is pressed.

I already added the resonator to the board and tied it to the PIC16F84A oscillator pins. I'm also exploring the use of a PIC16F690 with built in oscillator. (only 1 pin longer than the PIC16F84A, and about the same price under $2 on Mouser)

My Github
Circuit Board Repair Manuals

Reply 35 of 112, by wiretap

User metadata
Rank Oldbie
Rank
Oldbie

Updated.. incorporated all of the above changes -- I'll clone the project file and do a PIC16F690 version to get rid of the resonator component.

Tvry1a1.png

PYti3pH.png

AKkXri7.png

C4TMENA.png

Code.. I'm sure I'm doing this code poorly and I'm missing some PIC config settings since I haven't programmed on a PIC in about a decade. However, it does run in the simulator as designed/intended once I compiled it to a *.HEX file. Feel free to play around with it or make suggestions.

#include <xc.h>
#include <pic16f84a.h>
#define _XTAL_FREQ 4000000
#define DIGIT1 PORTAbits.RA0
#define DIGIT2 PORTAbits.RA1
#define HIGH PORTAbits.RA2
#define LOW PORTAbits.RA3
#define TSWCH PORTAbits.RA4

unsigned char Display(unsigned char digit){
unsigned char pattern;
unsigned char SEGMENT_MAP[10] = {0x3F,0x06,0x5B,0x4F,0x66,0x6D,0x7D,0x07,0x7F,0x6F};
pattern = SEGMENT_MAP[digit]; // The 7-segment pattern to return
return (pattern);
}

void main(void) {
TRISAbits.TRISA0 = 0x00; // Set RA0 to digital output (DIGIT1)
TRISAbits.TRISA1 = 0x00; // Set RA1 to digital output (DIGIT2)
TRISAbits.TRISA2 = 0x00; // Set RA2 to digital output (HIGH)
TRISAbits.TRISA3 = 0x00; // Set RA3 to digital output (LOW)
TRISAbits.TRISA4 = 0x01; // Set RA4 to digital input (TSWCH)
PORTB = 0x00; // Set PORTB to digital outputs (7-segment)
unsigned char MSD, LSD, TURBO = 26, NONTURBO = 19; // Variables
DIGIT1 = 0; // Disable digit 1
DIGIT2 = 0; // Disable digit 2


while(1){
if(TSWCH){ // If the switch is enabled...
HIGH = 1; // Turn on H pin to motherboard and Turbo LED
LOW = 0; // Turn off L pin to motherboard

MSD = (TURBO / 10) % 10; // Extract most significant digit from turbo speed
PORTB = Display(MSD); // Send most significant digit to PORTB outputs
DIGIT2 = 1; // Turn on DIGIT2 (RA1)
__delay_ms(10); // 10ms delay
DIGIT2 = 0; // Turn off DIGIT2 (RA1)

LSD = TURBO % 10; // Extract least significant digit from turbo speed
PORTB = Display(LSD); // Send least significant digit to PORTB outputs
DIGIT1 = 1; // Turn on DIGIT1 (RA0)
__delay_ms(10); // 10ms delay
DIGIT1 = 0; // Turn off DIGIT1 (RA0)
}
else{ // If the switch is not pressed...
HIGH = 0; // Turn off H pin to motherboard and Turbo LED
LOW = 1; // Turn off L pin to motherboard

MSD = (NONTURBO / 10) % 10; // Extract most significant digit from non-turbo speed
PORTB = Display(MSD); // Send most significant digit to PORTB outputs
DIGIT2 = 1; // Turn on DIGIT2 (RA1)
__delay_ms(10); // 10ms delay
DIGIT2 = 0; // Turn off DIGIT2 (RA1)

LSD = NONTURBO % 10; // Extract least significant digit from non-turbo speed
PORTB = Display(LSD); // Send least significant digit to PORTB outputs
DIGIT1 = 1; // Turn on DIGIT1 (RA0)
__delay_ms(10); // 10ms delay
DIGIT1 = 0; // Turn off DIGIT1 (RA0)
Show last 4 lines
        }
}
}

My Github
Circuit Board Repair Manuals

Reply 36 of 112, by SirNickity

User metadata
Rank Oldbie
Rank
Oldbie

Suggestion: Don't run your segments at 20mA. I know they're probably rated for it, but there's no reason to drive them full-tilt. They'll be nearly as bright with significantly less current, and it'll increase their life-span / reduce the dimming effects of aging on the oft-used segments. Try manually lighting a few with different R values until you find a nice compromise between brightness and current. 10mA would be a good starting point.

Reply 37 of 112, by wiretap

User metadata
Rank Oldbie
Rank
Oldbie

I planned on throwing it on the breadboard to test the brightness before finalizing the design. I was just going off the datasheets. Hopefully this weekend I'll get around to breadboarding. 😀

My Github
Circuit Board Repair Manuals

Reply 38 of 112, by Jo22

User metadata
Rank l33t++
Rank
l33t++

Glad to hear! 😀

If you encounter trouble (I hope not) with porting to the other (more recent) PIC types,
have a quick look at http://www.hpcc.ecs.soton.ac.uk/dan/16F628.htm (just stumbled over that page while browsing the web).
It's an outdated page, but may contain some useful tips still for migrating to newer PIC types (at the times).

"Time, it seems, doesn't flow. For some it's fast, for some it's slow.
In what to one race is no time at all, another race can rise and fall..." - The Minstrel

//My video channel//