VOGONS


Reply 26060 of 27504, by creepingnet

User metadata
Rank Oldbie
Rank
Oldbie

Basically spent all of sunday repairing and prepping the returned old 486 for it's second run on e-bay again. Quite a pain in the Ass. Wound up going with a 210MB HDD because that seemed to be the most reliable option. Had to fix the CD-ROM Drive (it was fixable, tray was jammed by a CD that was in it and off it's track - works great now), and fixed the seven segment display to now show 100/33 when changed.

Now have been setting up a Windows 3.11 for Workgroups setup in DOS GPL 7.01, going to try this out. If I don't like it, I might buy another 8.4GB Seagate Drive and duplicate the setup I had before. I used the 8.4GB in the Compaq Deskpro 386s/20 machine. Got sick of deleting stuff just to run something else on there.

~The Creeping Network~
My Youtube Channel - https://www.youtube.com/creepingnet
Creepingnet's World - https://creepingnet.neocities.org/
The Creeping Network Repo - https://www.geocities.ws/creepingnet2019/

Reply 26061 of 27504, by PD2JK

User metadata
Rank Oldbie
Rank
Oldbie

Thanks to Thermalwrong, I got the DX4 Overdrive working at 100 MHz instead of only 75.

More info here: Ramping up the Intel DX4

I also replaced the power supply fan and placed a small fan on the processor without damaging it.

DSC_7077.JPG
Filename
DSC_7077.JPG
File size
1.47 MiB
Views
1384 views
File license
Public domain

It wouldn't spin at first, easy fix.

DSC_7076.JPG
Filename
DSC_7076.JPG
File size
1.18 MiB
Views
1384 views
File license
Public domain

i386 16 ⇒ i486 DX4 100 ⇒ Pentium MMX 200 ⇒ Athlon Orion 700 | TB 1000 ⇒ AthlonXP 1700+ ⇒ Opteron 165 ⇒ Dual Opteron 856

Reply 26062 of 27504, by Thermalwrong

User metadata
Rank Oldbie
Rank
Oldbie
PD2JK wrote on 2023-11-27, 15:57:
Thanks to Thermalwrong, I got the DX4 Overdrive working at 100 MHz instead of only 75. […]
Show full quote

Thanks to Thermalwrong, I got the DX4 Overdrive working at 100 MHz instead of only 75.

More info here: Ramping up the Intel DX4

I also replaced the power supply fan and placed a small fan on the processor without damaging it.

DSC_7077.JPG

It wouldn't spin at first, easy fix.
DSC_7076.JPG

That's such a nice tidy little system and thanks 😀

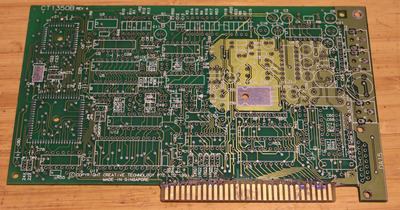
I got some small carbide drill bits and a little hand drill last week. Today I spotted this sad PCB (still haven't got this fabricated as a new PCB yet...) and got some ideas given some recent posts with that floppy drive connector repair:

Attachments

Reply 26064 of 27504, by Thermalwrong

User metadata
Rank Oldbie
Rank
Oldbie

I've got some serrated scissors that do a great job cutting through thin steel or in this case fibreglass without blowing up dust 😀
Tim Holtz - Non-Stick Micro-Serrated Multi-Cutter 7" - 102e apparently, I bought them years ago

Reply 26065 of 27504, by Tiido

User metadata
Rank l33t
Rank
l33t

Yeah, you absolutely do not want to breathe it in. Not quite as bad as asbestos but still terrible. I am most curious about how the results will be, that poor SB though 🤣

T-04YBSC, a new YMF71x based sound card & Official VOGONS thread about it
Newly made 4MB 60ns 30pin SIMMs ~
mida sa loed ? nagunii aru ei saa 😜

Reply 26066 of 27504, by DerBaum

User metadata
Rank Oldbie
Rank
Oldbie
Thermalwrong wrote on 2023-11-27, 17:41:

I got some small carbide drill bits and a little hand drill last week. Today I spotted this sad PCB (still haven't got this fabricated as a new PCB yet...) and got some ideas given some recent posts with that floppy drive connector repair:

i used the saw dust of the pcb as filler material for the superglue... i wanted to use the "baking soda" method but had nothing on hand.
Maybe thats even better then sawdust. Nothing wrong with saw dust, but i will always ask myself "Would it be even bettererer?" 😁

Good luck!

FCKGW-RHQQ2

Reply 26067 of 27504, by Bruninho

User metadata
Rank Oldbie
Rank
Oldbie

Played some old SEGA/Nintendo console games on my ATV 4K emulators 😀

"Design isn't just what it looks like and feels like. Design is how it works."
JOBS, Steve.
READ: Right to Repair sucks and is illegal!

Reply 26068 of 27504, by Thermalwrong

User metadata
Rank Oldbie
Rank
Oldbie
DerBaum wrote on 2023-11-27, 19:09:
i used the saw dust of the pcb as filler material for the superglue... i wanted to use the "baking soda" method but had nothing […]
Show full quote
Thermalwrong wrote on 2023-11-27, 17:41:

I got some small carbide drill bits and a little hand drill last week. Today I spotted this sad PCB (still haven't got this fabricated as a new PCB yet...) and got some ideas given some recent posts with that floppy drive connector repair:

i used the saw dust of the pcb as filler material for the superglue... i wanted to use the "baking soda" method but had nothing on hand.
Maybe thats even better then sawdust. Nothing wrong with saw dust, but i will always ask myself "Would it be even bettererer?" 😁

Good luck!

I used some super cheap epoxy that cost £1, even with this cheap and slightly odd epoxy that smells more like PVA glue, it's holding fantastically well. It looks great now too!

ct1350 - connector rebuilt 2.jpg
Filename
ct1350 - connector rebuilt 2.jpg
File size
1.34 MiB
Views
1207 views
File license
CC-BY-4.0

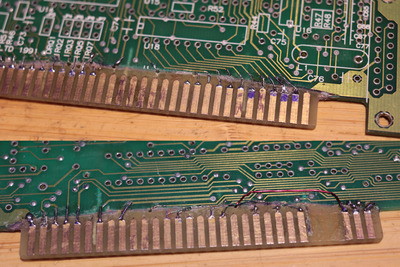
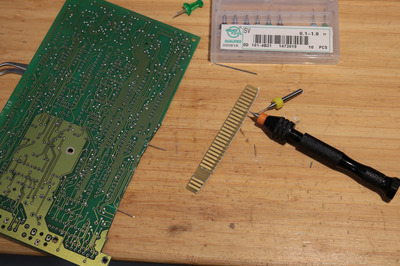
This was the tricky part, getting the holes drilled without breaking all of these carbide bits. Small metal drill bits do almost nothing to this fibreglass, but carbide cuts through it slowly but surely. Sadly carbide is also very fragile and if the bit is bent too much it'll snap and the bit is basically useless after that.

ct1350 - drilling new connector - carbide bits 2.jpg
Filename
ct1350 - drilling new connector - carbide bits 2.jpg
File size
670.09 KiB
Views
1207 views
File license
CC-BY-4.0

I did a couple of test fits and initially found that the slight off angle my cut was at resulted in the card's front edge hitting the nearby test case, so I spent ages whittling down the edges with a very decent cutter blade. Turns out fibreglass is amazing for blunting blades. In the end though it was fitting with only a bit of light shining through, the metal legs fit nicely and it all fit together fairly flat.
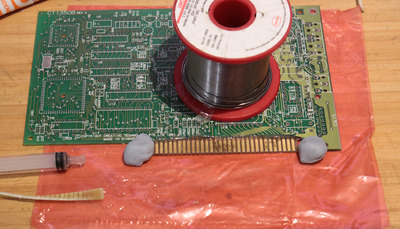
To make that permanent I used this cheap epoxy with the PCB held down on a disposable plastic sheet. To keep the epoxy from getting everywhere I used this little syringe and that worked surprisingly well, somehow this 'epoxy' could even be removed from the syringe after so it's still usable. The connector was partially assembled so it could be pushed together in place once there was enough epoxy in there and it was left to cure for a bit. Then I started cleaning off the excess with a knife before it was all dry.

ct1350 - epoxy.jpg
Filename
ct1350 - epoxy.jpg
File size
938.11 KiB
Views
1207 views
File license
CC-BY-4.0

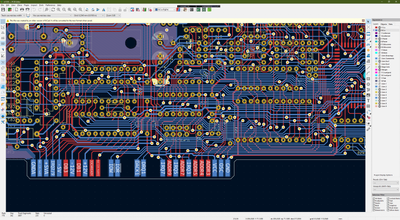
To reconnect the traces I mostly used magnet wire tinned up - it took me a few traces before I realised that hard-gold finish on the ISA slot pins would be ruined without some protection, which proper kapton tape does a fantastic job of. The board was cut in such a way that I had to guess where some of the very missing traces went - thankfully all the hard work was done a year ago and now I can refer to the pcb layout to see where the traces are and where vias need to be re-made:

checking connections.png
Filename
checking connections.png
File size
341.53 KiB
Views
1207 views
File license
CC-BY-4.0

The final result is mechanically strong and soon I'll put the components back so they don't just get lost over time 😀
Here's how the front and back look close up, ignore the possibly shorting loose traces wires, those will get secured once I know things work.
finished trace rebuild.jpg
Filename
finished trace rebuild.jpg
File size
1.33 MiB
Views
1207 views
File license
CC-BY-4.0

Reply 26069 of 27504, by DerBaum

User metadata
Rank Oldbie
Rank
Oldbie
Thermalwrong wrote on 2023-11-28, 03:36:

Here's how the front and back look close up, ignore the possibly shorting loose traces wires, those will get secured once I know things work.
finished trace rebuild.jpg

I see no reason why it shouldnt work.
That looks great. 👍

edit: Ok maybe i see a reason near JYEN jumper... traces seem broken there

FCKGW-RHQQ2

Reply 26070 of 27504, by SWZSSR

User metadata
Rank Newbie
Rank
Newbie

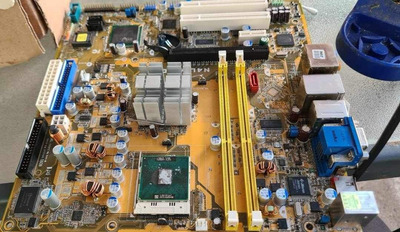
Recently got my hands on an ASUS N4L-VM DH which is a Socket 479 motherboard that supports Core 2 Mobile chips. Intended for the HTPC market back in 2005/2006…

Capacitors were shot, so I had it recapped by a good friend of mine.

It now lives.. updated to latest bios and currently running a T7200 2GHZ Core 2 Duo. Plan to get a T7600 soon and do some overclocking paired with a overkill videocard for some fun.

Attachments

  • IMG_4701.jpeg
    Filename
    IMG_4701.jpeg
    File size
    1.72 MiB
    Views
    1158 views
    File license
    Fair use/fair dealing exception
  • IMG_4714.jpeg
    Filename
    IMG_4714.jpeg
    File size
    139.56 KiB
    Views
    1158 views
    File license
    Fair use/fair dealing exception
  • IMG_4712.jpeg
    Filename
    IMG_4712.jpeg
    File size
    137.4 KiB
    Views
    1158 views
    File license
    Fair use/fair dealing exception
  • IMG_4713.jpeg
    Filename
    IMG_4713.jpeg
    File size
    107.22 KiB
    Views
    1158 views
    File license
    Fair use/fair dealing exception

5TH / Dual 233MMX / Kyro-1-PCI / Maxi-Studio ISIS
EP-MVP3G5 / K6-3+@600 / Geforce3-Ti500 / EWS64XL
Thunder 2500 / Dual P3-S 1.4 / HD3850AGP / Audigy
M919-3.4bf / 5x86@180 / Banshee-PCI / Soundscape Elite
AX4GE-Tube / 3.2EE / FX5950Ultra / Tube Audio

Reply 26071 of 27504, by appiah4

User metadata
Rank l33t++
Rank
l33t++
Thermalwrong wrote on 2023-11-28, 03:36:
I used some super cheap epoxy that cost £1, even with this cheap and slightly odd epoxy that smells more like PVA glue, it's hol […]
Show full quote
DerBaum wrote on 2023-11-27, 19:09:
i used the saw dust of the pcb as filler material for the superglue... i wanted to use the "baking soda" method but had nothing […]
Show full quote
Thermalwrong wrote on 2023-11-27, 17:41:

I got some small carbide drill bits and a little hand drill last week. Today I spotted this sad PCB (still haven't got this fabricated as a new PCB yet...) and got some ideas given some recent posts with that floppy drive connector repair:

i used the saw dust of the pcb as filler material for the superglue... i wanted to use the "baking soda" method but had nothing on hand.
Maybe thats even better then sawdust. Nothing wrong with saw dust, but i will always ask myself "Would it be even bettererer?" 😁

Good luck!

I used some super cheap epoxy that cost £1, even with this cheap and slightly odd epoxy that smells more like PVA glue, it's holding fantastically well. It looks great now too!
ct1350 - connector rebuilt 2.jpg

This was the tricky part, getting the holes drilled without breaking all of these carbide bits. Small metal drill bits do almost nothing to this fibreglass, but carbide cuts through it slowly but surely. Sadly carbide is also very fragile and if the bit is bent too much it'll snap and the bit is basically useless after that.
ct1350 - drilling new connector - carbide bits 2.jpg

I did a couple of test fits and initially found that the slight off angle my cut was at resulted in the card's front edge hitting the nearby test case, so I spent ages whittling down the edges with a very decent cutter blade. Turns out fibreglass is amazing for blunting blades. In the end though it was fitting with only a bit of light shining through, the metal legs fit nicely and it all fit together fairly flat.
To make that permanent I used this cheap epoxy with the PCB held down on a disposable plastic sheet. To keep the epoxy from getting everywhere I used this little syringe and that worked surprisingly well, somehow this 'epoxy' could even be removed from the syringe after so it's still usable. The connector was partially assembled so it could be pushed together in place once there was enough epoxy in there and it was left to cure for a bit. Then I started cleaning off the excess with a knife before it was all dry.
ct1350 - epoxy.jpg

To reconnect the traces I mostly used magnet wire tinned up - it took me a few traces before I realised that hard-gold finish on the ISA slot pins would be ruined without some protection, which proper kapton tape does a fantastic job of. The board was cut in such a way that I had to guess where some of the very missing traces went - thankfully all the hard work was done a year ago and now I can refer to the pcb layout to see where the traces are and where vias need to be re-made:
checking connections.png

The final result is mechanically strong and soon I'll put the components back so they don't just get lost over time 😀
Here's how the front and back look close up, ignore the possibly shorting loose traces wires, those will get secured once I know things work.
finished trace rebuild.jpg

I'm intensely waiting for the results.. My main fear is that the cheap epoxy won't handle ISA insertion/removal stress..

Retronautics: A digital gallery of my retro computers, hardware and projects.

Reply 26072 of 27504, by CrazyCatman

User metadata
Rank Newbie
Rank
Newbie

I spent my night/early mornings on working on my Amitech FreeNote 4407 (Mitac MiNote 7521C) first doing some trial and error on Windows 2000, then in the end deciding to install Windows Me instead and patch up with all the updates I could find, and install the drivers. That's going to be it for now 😀

In the mean time I was running back and forth between the work table and my (almost one year old) son's bedroom to calm him back to sleep again. I hit the sack at 0230, and back up at work.

So many computers, so little time...

Reply 26073 of 27504, by Shponglefan

User metadata
Rank l33t
Rank
l33t

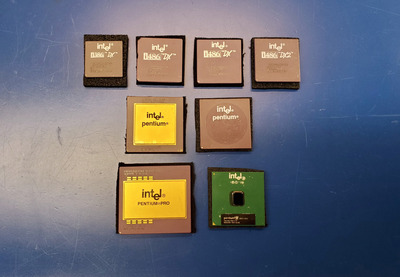
Sorting, cleaning and bagging of various CPUs.

Attachments

  • Intel CPUs various.jpg
    Filename
    Intel CPUs various.jpg
    File size
    673.37 KiB
    Views
    1017 views
    File license
    Fair use/fair dealing exception

Pentium 4 Multi-OS Build
486 DX4-100 with 6 sound cards
486 DX-33 with 5 sound cards

Reply 26074 of 27504, by Thermalwrong

User metadata
Rank Oldbie
Rank
Oldbie

Heh I give up for now, this took so dang long. I lost so many of the smaller capacitors & resistors somehow and it took ages to find them, bend the legs, trim the legs. Check the values etc.

ct1350-rebuilt.JPG
Filename
ct1350-rebuilt.JPG
File size
1.65 MiB
Views
981 views
File license
CC-BY-4.0

Here's how it fits in the slot of one of my mini SBC computers. I wanted to just use it in the big testing PC since that's got the remnants of a real case to check fitment, but for this initial testing I needed -5v and to be able to see power consumption

IMG_2566 (Custom).JPG
Filename
IMG_2566 (Custom).JPG
File size
1.26 MiB
Views
981 views
File license
CC-BY-4.0

Good news and bad news...... the ISA connector works though and it's not falling off. The glue is more of a space filler, those metal legs inside the fibreglass are giving all the important mechanical strength it needs, more now with the traces soldered on too.

Reply 26075 of 27504, by Nexxen

User metadata
Rank Oldbie
Rank
Oldbie
Thermalwrong wrote on 2023-11-29, 03:08:
Heh I give up for now, this took so dang long. I lost so many of the smaller capacitors & resistors somehow and it took ages to […]
Show full quote

Heh I give up for now, this took so dang long. I lost so many of the smaller capacitors & resistors somehow and it took ages to find them, bend the legs, trim the legs. Check the values etc.
ct1350-rebuilt.JPG

Here's how it fits in the slot of one of my mini SBC computers. I wanted to just use it in the big testing PC since that's got the remnants of a real case to check fitment, but for this initial testing I needed -5v and to be able to see power consumption
IMG_2566 (Custom).JPG

Good news and bad news...... the ISA connector works though and it's not falling off. The glue is more of a space filler, those metal legs inside the fibreglass are giving all the important mechanical strength it needs, more now with the traces soldered on too.

Kudos, (hands clapping).

PC#1 Pentium 233 MMX - 98SE
PC#2 PIII-1Ghz - 98SE/W2K

Reply 26076 of 27504, by Horun

User metadata
Rank l33t++
Rank
l33t++

Nice work ! hope the glue holds 😀

All I have time for is pulled out a computer given me by relative a few years ago shoved away in the garage for a few years. They claimed I gave it to them in 2006 and had some upgrades but was not used since 2016, I got it in 2020 iirc.
So it sat for at least 3-7 years. It took some coaxing but fired up. Has a MSI P6N mobo w/e6600, 2Gb ram, both an IDE CD/DVD and IDE DVD/DVD-DL burner, some Asus 6600 256Mb vid card and 160GB IDE+ 1TB sata drive.
Has Crappy Windows Vista (wish it was XP or Win7) on the boot drive. added: I need to retire or re-think this hobby 😁

Hate posting a reply and then have to edit it because it made no sense 😁 First computer was an IBM 3270 workstation with CGA monitor. Stuff: https://archive.org/details/@horun

Reply 26077 of 27504, by PD2JK

User metadata
Rank Oldbie
Rank
Oldbie
Thermalwrong wrote on 2023-11-29, 03:08:

Heh I give up for now, this took so dang long.

That's magnificent (again 😉 ). Aren't you afraid the connector snaps? If it's working in the final rig (if any), I wouldn't dare to touch it ever again. 😁

i386 16 ⇒ i486 DX4 100 ⇒ Pentium MMX 200 ⇒ Athlon Orion 700 | TB 1000 ⇒ AthlonXP 1700+ ⇒ Opteron 165 ⇒ Dual Opteron 856

Reply 26078 of 27504, by CrazyCatman

User metadata
Rank Newbie
Rank
Newbie

Spent time dismantling an IBM ThinkPad 760 XL which no longer starts up (before dismantling), but just have a speaker symbol flashing. I read that it could be just the switch for hibernation, but that didn't seem to be the case. I also read that it could be most likely the main system board or the power board.
I tested the PSU and it gives 16.4 V which is close to the 16 V DC it says.

So many computers, so little time...

Reply 26079 of 27504, by appiah4

User metadata
Rank l33t++
Rank
l33t++
Thermalwrong wrote on 2023-11-29, 03:08:

Good news and bad news...... the ISA connector works though and it's not falling off. The glue is more of a space filler, those metal legs inside the fibreglass are giving all the important mechanical strength it needs, more now with the traces soldered on too.

And the bad news is?..

Retronautics: A digital gallery of my retro computers, hardware and projects.