VOGONS


Let's restore my 486 motherboard - AOpen Vi11

Topic actions

First post, by CkRtech

User metadata
Rank Oldbie
Rank
Oldbie

What I thought was going to be a fun project that consisted of adding some drives and other misc. expansion cards to my old 486SX-33 turned into a nightmare when I popped open the case and saw that the barrel battery had leaked down the motherboard - creating a path of corrosion and eating traces for breakfast.

I also thought that perhaps this would be a fun computer build project that would give me a break from my electronics hobby. Oh, the irony.

My plan is to document my work here as I clean the board, restore traces, and replace components. While a replacement 486 board would be an easier route to take - this isn't a motherboard I just acquired. I bought it new circa 1993/1994. I would like to see my actual system come back to life.

Some minor initial scrubbing done with rubbing alcohol and a toothbrush. AT Power header removed. One resistor removed. Most likely going to remove the keyboard controller and maybe even the XT slot. I'll do a more serious scrub and then start seriously evaluating traces and vias.

You can see some major damage to a few of the power rails.

IMG_4047.JPG
Filename
IMG_4047.JPG
File size
2.19 MiB
Views
1874 views
File license
Fair use/fair dealing exception
IMG_4048.JPG
Filename
IMG_4048.JPG
File size
2.14 MiB
Views
1874 views
File license
Fair use/fair dealing exception

Displaced Gamers (YouTube) - DOS Gaming Aspect Ratio - 320x200 || The History of 240p || Dithering on the Sega Genesis with Composite Video

Reply 1 of 87, by cj_reha

User metadata
Rank Oldbie
Rank
Oldbie

Man, that poor thing took a pretty bad beating from the battery. Is that actual corrosion in the slot as well? 😮

The only one I've seen that was worse was a friend's family's old 486 DX4-100 PC with a barrel battery that sat in a damp, warm garage and it had physically eroded the board away and corroded the pins on the ISA slots away.

Join the Retro PC Discord! - https://discord.gg/UKAFchB
My YouTube Channel - https://www.youtube.com/channel/UCDJYB_ZDsIzXGZz6J0txgCA

Reply 2 of 87, by CkRtech

User metadata
Rank Oldbie
Rank
Oldbie
cj_reha wrote:

Man, that poor thing took a pretty bad beating from the battery. Is that actual corrosion in the slot as well? 😮

Yes. 🙁
Sorry about your friend's family's system!

I feel like I am going to have to remove that ISA slot. You can see some damage to a thinner trace at the top between CN6 and CN7. I might be able to keep the XT socket if I scrub those 10 pins enough.

Under the keyboard controller. Arg:

IMG_4051.JPG
Filename
IMG_4051.JPG
File size
2.3 MiB
Views
1847 views
File license
Fair use/fair dealing exception

Displaced Gamers (YouTube) - DOS Gaming Aspect Ratio - 320x200 || The History of 240p || Dithering on the Sega Genesis with Composite Video

Reply 3 of 87, by TheMobRules

User metadata
Rank Oldbie
Rank
Oldbie

Wow, that barrel battery was completely lethal!

Looks like you're going to need a few spare wires there, but if the corrosion didn't go too deep you may be able to save the patient...

Good luck with the restoration!

Reply 4 of 87, by feipoa

User metadata
Rank l33t++
Rank
l33t++

I repaired a 386 board with a similar level of damage. The fix required numerous hours/days and there were 2 dozen wires soldered underneath and atop. It is not a very pretty sight, but it did work.

Apparently, you are supposed to "neutralise" the battery acid with vinegar. If you just use Isopropyl, apparently the blue corrosion comes back. My experience has led me to believe that the vinegar trick (acetic acid) is mostly true.

Best of luck!

Plan your life wisely, you'll be dead before you know it.

Reply 5 of 87, by TheMobRules

User metadata
Rank Oldbie
Rank
Oldbie
feipoa wrote:

Apparently, you are supposed to "neutralise" the battery acid with vinegar. If you just use Isopropyl, apparently the blue corrosion comes back. My experience has led me to believe that the vinegar trick (acetic acid) is mostly true.

That is correct, because those barrels use an alkaline electrolyte, so an acid substance is needed to neutralize it. In my experience vinegar works well, some people also mentioned lemon juice is effective too.

Reply 6 of 87, by feipoa

User metadata
Rank l33t++
Rank
l33t++

I originally thought that if I removed ALL battery leakage with ISO that this would be sufficient. If it is all removed then what is left for the vinegar to neutralise? I think the issue is that the battery juice and corrosion gets well under the traces and embedded in, both, the protective plastic resin on the PCB and into the PCB material itself. So I think no matter how much scrubbing you do with ISO, the battery juice remains soaked into to some components, which is where neutralising it comes in. All of this is an assumption on my part as I have not dug into the chemistry or absorbitity of PCB components, but it seems to make sense on the surface.

Plan your life wisely, you'll be dead before you know it.

Reply 7 of 87, by CkRtech

User metadata
Rank Oldbie
Rank
Oldbie
TheMobRules wrote:

Good luck with the restoration!

Thank you!

feipoa wrote:

I repaired a 386 board with a similar level of damage. The fix required numerous hours/days and there were 2 dozen wires soldered underneath and atop. It is not a very pretty sight, but it did work.

I waited seven to eight months before I could finally retrieve this from the house I grew up in. As excited as I was to finally get it - my weapon right now is patience! Glad to hear of your success.

What wires did you use for your trace repair? I am a ways off from that, but I am considering my options as I would like to make it as low profile as possible. I have stranded 22 awg that I will potentially try to use for the power runs. For the other traces, I am thinking about using this 30 AWG kynar if it is good enough for the signals. It would certainly help with literally passing through a via and soldering to the other side of the board where necessary. I have a good number of vias that are currently rings of green, and they are most likely worthless regardless of cleaning.

feipoa wrote:

Best of luck!

Thank you as well!

I think I have reached the end of my removal of (major) components to assist with cleaning. "Desolder an 8-bit ISA slot" can now be checked off my bucket list.

Various instances of alcohol, water, baking soda, and vinegar (but not vinegar + baking soda 😊 ) are in my near future.

IMG_4053.JPG
Filename
IMG_4053.JPG
File size
2.73 MiB
Views
1783 views
File license
Fair use/fair dealing exception

Displaced Gamers (YouTube) - DOS Gaming Aspect Ratio - 320x200 || The History of 240p || Dithering on the Sega Genesis with Composite Video

Reply 8 of 87, by feipoa

User metadata
Rank l33t++
Rank
l33t++

I used stranded 26 AWG, because that is the smallest I had at the time. Since then, I have been using all solid core 30 AWG kynar. I keep solid core 22, 24, 26, and 30 AWG around.

Plan your life wisely, you'll be dead before you know it.

Reply 9 of 87, by vetz

User metadata
Rank l33t
Rank
l33t

Cool project. I wish you good luck!
I had a similar 486 VLB damaged motherboard once, but I just gave up on it. Not worth to fix unless its really uncommon/special. It should be in my shed in my backup parts bin, but I might also have recycled it.

Keep us updated!

3D Accelerated Games List (Proprietary APIs - No 3DFX/Direct3D)
3D Acceleration Comparison Episodes

Reply 11 of 87, by brassicGamer

User metadata
Rank Oldbie
Rank
Oldbie

You've got more patience than me. If I had the last 486 motherboard on Earth I might be bothered. I'll be thrilled if you get it working though!

Check out my blog and YouTube channel for thoughts, articles, system profiles, and tips.

Reply 12 of 87, by CkRtech

User metadata
Rank Oldbie
Rank
Oldbie
feipoa wrote:

Since then, I have been using all solid core 30 AWG kynar. I keep solid core 22, 24, 26, and 30 AWG around.

Oh good. Did you route your wires tightly, or did you go with a loose, jumper wire look?

vetz wrote:

Cool project. I wish you good luck!

Thanks!

Predator99 wrote:

Very good work!
How did you desolder the slot? Any special strategy? How did you get the holes clean like this?

Thanks, Predator99. I use a Hakko FR-300 desoldering tool. I probably wouldn't attempt this without it. I add fresh solder to the pins as needed to help with heat transfer, and then use the FR-300 to heat and vacuum up the solder. I keep the desoldering tip moving as it heats up the joint. Ground pins take slightly longer.

brassicGamer wrote:

You've got more patience than me. If I had the last 486 motherboard on Earth I might be bothered. I'll be thrilled if you get it working though!

Haha. I'll be thrilled as well! I hope it works.

Update - This is after some alcohol scrubbing, alcohol + baking soda scrubbing, and finally some dish soap scrubbing. The dish soap scrubbing helped more than I thought it would. I am looking to use some oil to loosen up some of the remaining corrosion. I don't think I have those chemicals at my bench. I may need to shop.

It looks like the corrosion weakened JP16 pin 1. It broke off while I was scrubbing. The jumper itself is stuck on pins 2-3 - corrosion between the pins and jumper has most likely bonded the two together. This is the clear CMOS jumper. I will most likely replace the pin block and jumper at some point.

IMG_4065.JPG
Filename
IMG_4065.JPG
File size
2.24 MiB
Views
1672 views
File license
Fair use/fair dealing exception

Cleaning so far:

compare2.jpg
Filename
compare2.jpg
File size
1.31 MiB
Views
1672 views
File license
Fair use/fair dealing exception

Displaced Gamers (YouTube) - DOS Gaming Aspect Ratio - 320x200 || The History of 240p || Dithering on the Sega Genesis with Composite Video

Reply 13 of 87, by keropi

User metadata
Rank l33t++
Rank
l33t++

nice work!
scratch that corroded paint on the tracks, whenever you see discoloration or green stuff scratch it, neutralize the acid and then re-tin with solder (you might want to use a fiber pen or something on the cleaned exposed copper to make solder stick easier/better) or replace the whole damaged track. Don't let paint stay in the damaged parts, there could be acids at work underneath it.
I am pretty sure you'll succeed repairing it, you just need to be patient.

🎵 🎧 PCMIDI MPU , OrpheusII , Action Rewind , Megacard and 🎶GoldLib soundcard website

Reply 14 of 87, by CkRtech

User metadata
Rank Oldbie
Rank
Oldbie
keropi wrote:

nice work!
scratch that corroded paint on the tracks, whenever you see discoloration or green stuff scratch it, neutralize the acid and then re-tin with solder (you might want to use a fiber pen or something on the cleaned exposed copper to make solder stick easier/better) or replace the whole damaged track. Don't let paint stay in the damaged parts, there could be acids at work underneath it.
I am pretty sure you'll succeed repairing it, you just need to be patient.

Thanks, keropi. Patience has been my primary weapon all along.

Displaced Gamers (YouTube) - DOS Gaming Aspect Ratio - 320x200 || The History of 240p || Dithering on the Sega Genesis with Composite Video

Reply 15 of 87, by feipoa

User metadata
Rank l33t++
Rank
l33t++

No, I was not neat about the repair whatsoever because I didn't have any faith that it would be fixed. After the cleanup, a few of the traces were so difficult to trace out their termination. I had to use 10x and endless days of patience. Then recheck it all again and again. It worked, but then speedsys didn't run. So I figured something was still up. I let it sit for over a year. I checked all again and again and added more solder to questionable spots. Speedsys ran fine now, but it was not keeping time properly, even when powered on. There is a thread about this somewhere. I redrew the whole oscillator/inverter circuit and finally determined that the crystal needed to be replaced. After that, it kept time fine and works well.

I spent so much time on it because it is a very desirable 386 motherboard which contains a SiS Rabbit chipset. This chipset seems to have the fastest memory throughput of any 386 I've tested or have seen tested. It is a Chaintech 333SCD/340SCD.

I cannot locate the threads, so I'll repost the photos. I'd like to redo the wiring one day to clean it up. It is nasty looking.

Chaintech_333SCD_Trace_Repair_2.jpg
Filename
Chaintech_333SCD_Trace_Repair_2.jpg
File size
175.34 KiB
Views
1654 views
File license
Fair use/fair dealing exception
Chaintech_333SCD_Trace_Repair_1.jpg
Filename
Chaintech_333SCD_Trace_Repair_1.jpg
File size
156.87 KiB
Views
1654 views
File license
Fair use/fair dealing exception

Do you guys know if washing PCB contact corrosion from other sources also works to neutralise it? I've seen corrosion on old sockets, like in BIOS sockets, or on gold CPU pins which had been installed in a non-gold contact VRM module. I'm guessing the corrosion from the DIP BIOS socket might be from finger oils? Or perhaps when mixing dis-similar metals together, it attracts water or other molecules from the air, leading to corrosion. Just speculating. Is it only corrosion due to battery acid that one uses vinegar on?

Plan your life wisely, you'll be dead before you know it.

Reply 16 of 87, by feipoa

User metadata
Rank l33t++
Rank
l33t++

For example, here is some corrosion I noticed on some 30 pin SIMMs on my AMI Mark V Baby Screamer. This board didn't even contain a battery. I figure the corrosion came from finger oils and time. Will vinegar neutralise this type of corrosion? Or do I need another substance?

AMI_Baby_Screamer_Memory_Repair_1.jpg
Filename
AMI_Baby_Screamer_Memory_Repair_1.jpg
File size
69.53 KiB
Views
1654 views
File license
Fair use/fair dealing exception
AMI_Baby_Screamer_Damage_1.jpg
Filename
AMI_Baby_Screamer_Damage_1.jpg
File size
54.65 KiB
Views
1654 views
File license
Fair use/fair dealing exception

Plan your life wisely, you'll be dead before you know it.

Reply 17 of 87, by CkRtech

User metadata
Rank Oldbie
Rank
Oldbie

Perhaps the blue is just from moisture over time?

I did some posting on another forum that is dedicated toward the electronics hobby (eevblog), and received this very useful and specific bit of information from user Ian.M regarding the corrosion on my board (as the result of a leaky Ni/Cd battery) -

NiCd battery electrolyte is Potassium Hydroxide, which reacts with the Carbon Dioxide in air to form Potassium Carbonate. The corrosion residue will therefore be a mixture of copper oxide and copper carbonate on the tracks, and Tin and lead oxides and carbonates on the solder joints. These corrosion products are not soluble in water, alcohol or non-polar organic solvents so will have to be removed mechanically or chemically.

You can use dilute Acetic or Citric acids to remove copper carbonate deposits - DO NOT use mineral acids and DO NOT add salt! (organic acids + salt = PCB etchant, and residual chloride contamination can be very destructive to copper).
EDTA would clean off the remaining oxides. Rinse between chemicals, and afterwards wash first with dilute detergent, then plain water, then distilled water, then shake as much water off as possible and rinse with IPA.

I used household vinegar (5%) as the acetic acid and also purchased a fiberglass brush - a tool also recommended in the thread.

The results were satisfactory. It took elbow grease as expected, and it also took out a bulk of the brush. Here are some results for phase 1.

brushoff2.jpg
Filename
brushoff2.jpg
File size
1.96 MiB
Views
1588 views
File license
Fair use/fair dealing exception
brushed phase 1.jpg
Filename
brushed phase 1.jpg
File size
2.06 MiB
Views
1588 views
File license
Fair use/fair dealing exception

Displaced Gamers (YouTube) - DOS Gaming Aspect Ratio - 320x200 || The History of 240p || Dithering on the Sega Genesis with Composite Video

Reply 18 of 87, by feipoa

User metadata
Rank l33t++
Rank
l33t++

Good information. Nobody ever mentions how long the citric or acetic acid should be soaking on the traces. I tend to let it sit for only 5 minutes, but not sure if that is optimal.

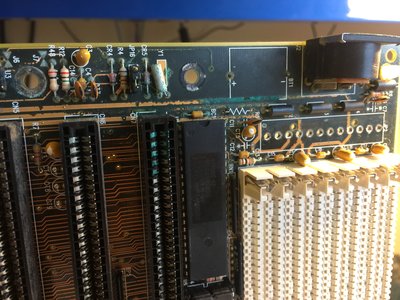
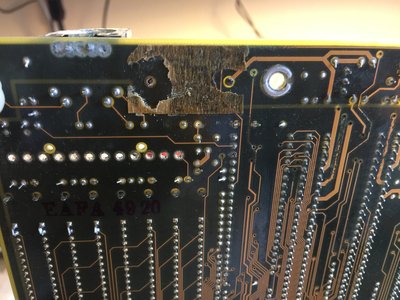
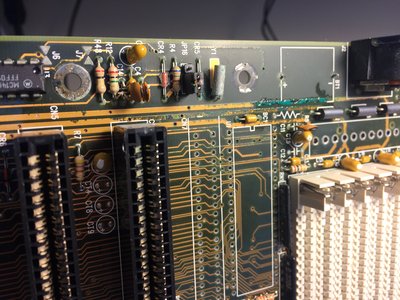
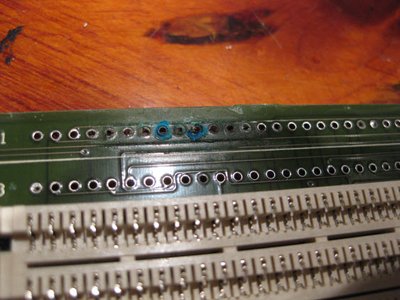
I still see blue corrosion on your board. Look at the traces under CR5.

Also, what I normally do is:

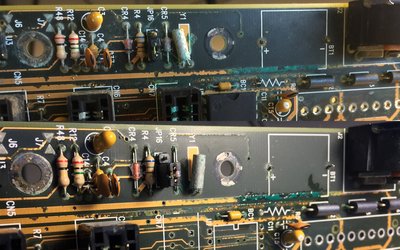
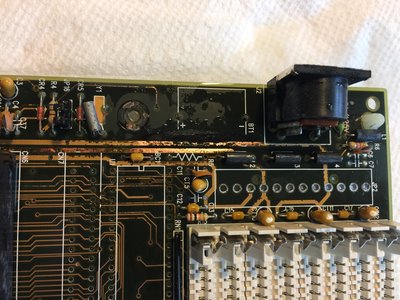
a) first scratch off all the laquer on the traces which have evidence of lift-off (there are darker splotches of different colour on the traces). There is usually quite a that carbon carbonate, which feels and acts a little like rust. I scratch all of it off.

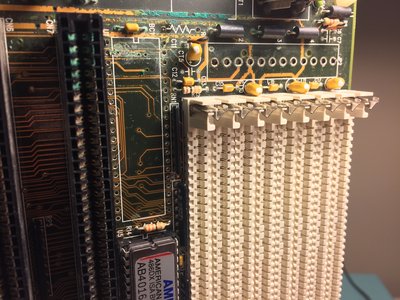
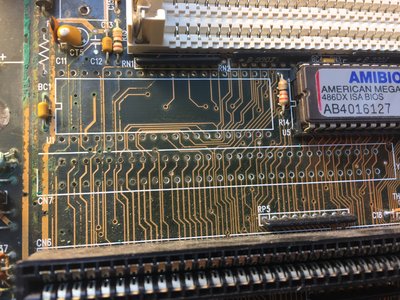
b) I clean out all the vias and surface corrosion by physical removal (rubbing off). I get all the blue out of there and all of the non-shiny copper removed. Then I brush it dry with a soft toothbrush. This usually involves removing several components and headers, as you have done.

c) I am in the beginning of forming a theory that the battery electrolyte can hangout inside those little inductors (L2, L3, etc). It might turn out false, but it might be worth while to replace them if they are being removed anyway. They are usually for the keyboard data/clock and mouse data/clock and are almost always either 1 uH, 2 uH, or 4 uH. Sometimes I see the keyboard using 4 uH and the PS/2 mouse using 1 uH, but sometimes there are 2's. For simplicity, I have a bag of 2.2 uH inductors around (e.g. 78F2R2K-RC). They are rated for 630 mA, which is about double the max. for PS/2 keyboard/mice.

d) Once all is brushed away dry, I brush it with water, then dry it with compressed air. Then I take varying sizes of wire guage (22, 24, 26, 28, and 30 AWG) and stuff them through the through holes and via to sorta of scrub them like flossing teeth. I want all of the reacted gunk (which we've been informed is copper carbonate and copper oxide) out of there by physical removal before neutralising it with acetic acid. This might take another hour.

e) Now I brush on the vinegar (acetic acid) and let it sit for 5 min. Again, I'd like some clarification on how long this reaction will take. I suppose it depends on the depth of the residue, but by now it should be quite thin.

f) Then I rinse off the vinegar with tap water and use compressed air to blow away as much water as possible.

g) I stick the motherboard on the floor of the powder room and a heater set on low (~600 W setting) for 20-30 min.

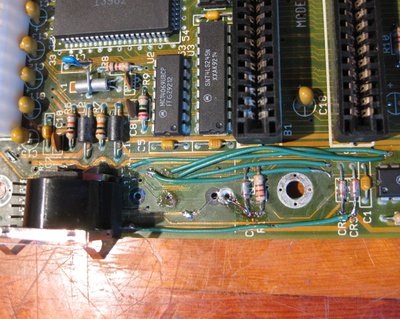
h) I now check all the questionable traces for continuity with my multi-meter and fix where appropriate. I also check the questionable inductors and capacitors. On traces which look like they have very little copper completing the traces, I bridge a wire over the area to increase its current carrying capability, usually on the larger 5V traces.

i) One last dry brush, then a rise with ISO. For headers that I removed, I usually replace them with new ones.

Plan your life wisely, you'll be dead before you know it.

Reply 19 of 87, by CkRtech

User metadata
Rank Oldbie
Rank
Oldbie

Oh yes. There are definitely still places on the board that need to be addressed. I wrote "phase 1" of the scrubbing because it seemed to me the best idea would be to remove more components prior to doing another scrub.

All of those top components (and beyond the edge of the photo) have been removed. I am even going so far as to desolder 16 bit ISA slot CN6 just because of one trace that looks suspect.

Thanks for writing up your process. I wanted to add some responses to it in regard to my current project.

a) You can see I have some darker areas on the second large trace (either -5V or -12V. I'd have to look). Most of the fiberglass scrubbing was with the first one due to all the green on there, but there is some definitely dark, almost rust-like coloring on that second trace. I expect the removal of CN6 to help with any scrubbing or scrapping I have to do there.

c) Hmm. I am also wondering about those inductors. I have a spare 386 motherboard that I am using for parts (bad battery but not as much damage). I pulled an ISA slot, keyboard connector, and what I hope to be a suitable replacement crystal for Y1. There are inductors on that one and in the same general area as this 486 board, but I am unfamiliar with the values. Just as I don't know if the crystal I need/pulled is 32 kHz, or what I would need to replace those diodes (CR4, CR5, etc). Meanwhile, I have drawers full of 1/4 watt resistors to go to for fresh replacement. If you think 2.2 uH is good for those inductors, I suppose i could pick up a few of those like the one you mentioned.

There is also a hex inverter (MC10469) down the line from those components. Perhaps I will throw one in a digikey cart if I end up with a grocery list of replacement components.

d) So you dry it immediately? So far, I have let everything air dry with the board standing up and at a slight angle. The first major scrub I did, I just blew it out with some compressed air a bit and then set it upward. The second time, I gave it an alcohol bath and just set it up.

Man. Flossing vias is... oh, it hurts. Like the time spent (and time remaining that has yet to be spent on this board) is already quite high. Knew that from the beginning, though!

e) Yeah. I wondered that, myself. How much of my scrubbing was required elbow grease vs simply waiting a bit longer for reaction time for the vinegar?
----

I am getting slightly ahead, but do you think running kynar 30 gauge wire down through the vias of the -12V and -5V traces for delivering those -12V and -5V lines would be adequate enough for power delivery to the expansion slots considering the PSU involved delivers both -12V and -5V at 0.5A? The only reason I wouldn't simply use something thicker and move on is because I like the idea of routing the wires through the vias for wiring convenience. Research suggests that I am good up to 1A for kynar 30.

Of course, that third trace from the top of the photo is +12V. Not quite as damaged as -12V and -5V, but also a much more major voltage trace to replace. I am not sure how I want to deliver 12V, but I am also quite a ways away from that step.

Displaced Gamers (YouTube) - DOS Gaming Aspect Ratio - 320x200 || The History of 240p || Dithering on the Sega Genesis with Composite Video