VOGONS


First post, by fierarul

User metadata
Rank Newbie
Rank
Newbie

Hello,

I finally have my old PC booting but I am very annoyed by the amount of dust I feel in the air when it's running.

It's been in an attic for a decade or more and it's even older, so it makes sense.

I did clean up manually a bit and with a can of compressed air, but I feel there's much more to be done.

Any tutorial and general steps to follow?

I saw somebody dismantling every piece and re-assembling it. I somehow wouldn't want to do that since I'm not entirely certain it would boot again 😉

Most of the dust is either from within the case or from the PSU. Should I try clean the PSU (complicated?) or maybe buy another PSU (if I find one...)?

Reply 1 of 28, by bjwil1991

User metadata
Rank l33t
Rank
l33t

Use compressed air into the PSU as well, but buy a new one and replace it in case the current one bites the dust (in a matter of speaking). Also, I recommend getting a PSU adapter that also provides -5V in case you have any add-in cards that require the -5V. If it's an AT PSU that you have, get the one that's for the ATX 20/24-pin to AT w/ -5V and 3.3V dummy load adapter or if it's an ATX, ATX 20/24-pin to ATX 20-pin w/ -5V adapter.

Discord: https://discord.gg/U5dJw7x
Systems from the Compaq Portable 1 to Ryzen 9 5950X
Twitch: https://twitch.tv/retropcuser

Reply 2 of 28, by Scubs

User metadata
Rank Newbie
Rank
Newbie

Be sure to unplug your fans when you blow compressed or use a metro vac to remove dust. The high rate of spinning can create a charge and kill your fan headers. Its not common, but why take the risk?
metro vac sell a really nice duster, look up the metro datavac ED500.

Reply 3 of 28, by bandicoot67

User metadata
Rank Newbie
Rank
Newbie

Good on you for keeping the old PC alive! I get scared taking stuff apart sometimes too, specially if the thing is working ok, but every now n then you have to go for broke. Dismantle every thing, clean it all and re-assemble it. Takes a long time. Some of the PC's ive found thrown out have been horrific to even look at. Honestly, i don't understand how anyone could expect a computer to work properly like this.
***WARNING-EXTREME GRAPHIC CONTENT***

Attachments

  • HORRIFIC_DUST.jpg
    Filename
    HORRIFIC_DUST.jpg
    File size
    814.36 KiB
    Views
    1603 views
    File license
    Fair use/fair dealing exception

Reply 4 of 28, by Scubs

User metadata
Rank Newbie
Rank
Newbie
bandicoot67 wrote:

Good on you for keeping the old PC alive! I get scared taking stuff apart sometimes too, specially if the thing is working ok, but every now n then you have to go for broke. Dismantle every thing, clean it all and re-assemble it. Takes a long time. Some of the PC's ive found thrown out have been horrific to even look at. Honestly, i don't understand how anyone could expect a computer to work properly like this.
***WARNING-EXTREME GRAPHIC CONTENT***

That's nothing.

Last edited by Scubs on 2018-02-22, 16:49. Edited 1 time in total.

Reply 5 of 28, by bandicoot67

User metadata
Rank Newbie
Rank
Newbie

oh my lord!!!...i am going to have to speak to the people who run this place and have you permanently banned for posting *links to those disgusting images.

Reply 6 of 28, by bjwil1991

User metadata
Rank l33t
Rank
l33t

They say if you have a clean room, the computer on the inside gets dusty. If you have a dirty room, your computer is clean on the inside.

7b0d7db1293ca47eba970b69be4b02150b5a7e647d3ef952d6447a04d2a09fd0.jpg

Discord: https://discord.gg/U5dJw7x
Systems from the Compaq Portable 1 to Ryzen 9 5950X
Twitch: https://twitch.tv/retropcuser

Reply 7 of 28, by fierarul

User metadata
Rank Newbie
Rank
Newbie

I'll try to see if I can use the compressed air on the PSU too.

Except the PSU I only have the CPU fan which is wobbly and working half the time. (Which reminds me I have to order one).

The machine is actually much cleaner than these horror photos. It's the dust you feel, not you see, that's a problem.

In the attic there's also had a chimney passing through. I wonder if it didn't pick up any particles from the smoke?

Reply 8 of 28, by bjwil1991

User metadata
Rank l33t
Rank
l33t

That's surprising. The only attics I have are for electrical work throughout my house: one for the kitchen and living room, and the other for the upstairs bedrooms, bathroom, and hallway. Storage options for me are either the garage, laundry/plumbing/HVAC/back room, or crawl space. I've never seen a mouse in my house, except for nests in something when I was clearing out the back room so that I won't break something when attending to the HVAC, water heater, or sump pump.

Discord: https://discord.gg/U5dJw7x
Systems from the Compaq Portable 1 to Ryzen 9 5950X
Twitch: https://twitch.tv/retropcuser

Reply 9 of 28, by Scubs

User metadata
Rank Newbie
Rank
Newbie
bandicoot67 wrote:

oh my lord!!!...i am going to have to speak to the people who run this place and have you permanently banned for posting *links to those disgusting images.

Im a dirty boy. 🤣

Ever seen a garage pc? Or a smokers pc? It would make that system look clean.

Reply 10 of 28, by Deksor

User metadata
Rank l33t
Rank
l33t

It will probably sound extreme to you, but I'm cleaning my retro computers with water and soap + brush, that way it make most dust to go away and it remove quite some smell from the board. Though on really smelly computers, this can remain for a long time. Once I had a computer (IBM PC 340) that had a terrible smell even after two baths, and the only thing that finally made the smell to go away was time. However I'm pretty sure that if I left the dust in the computer or especially in the PSU, it would have stayed there much longer.

I had another computer coming from the same place that had a PSU with bad caps. That one also had a terrible smell, but once again, when the PSU was clean (and recapped), everything was fine. I usually use that psu for testing now, and it doesn't blow that smell in the room like it did before. Now you can slightly smell something when you put your nose really close to it, but that's nothing to bother with ...

Trying to identify old hardware ? Visit The retro web - Project's thread The Retro Web project - a stason.org/TH99 alternative

Reply 11 of 28, by fierarul

User metadata
Rank Newbie
Rank
Newbie
Deksor wrote:

It will probably sound extreme to you, but I'm cleaning my retro computers with water and soap + brush, that way it make most dust to go away and it remove quite some smell from the board.

Doesn't water... destroy your computers? I thought isopropyl alcohol is the go-to cleaning solution.

I'm not speaking about smell, I literally feel the air has some dust/particles in it.

Reply 12 of 28, by bjwil1991

User metadata
Rank l33t
Rank
l33t

Water does destroy boards (corrodes, conducts, and smoking, oh, my!) easily. For me, it's isopropyl alcohol, dust rags, brushes (gentle ones), or compressed air all the way. Any corrosion on there, then I use my DeoxIt to get rid of the corrosion.

Discord: https://discord.gg/U5dJw7x
Systems from the Compaq Portable 1 to Ryzen 9 5950X
Twitch: https://twitch.tv/retropcuser

Reply 13 of 28, by Deksor

User metadata
Rank l33t
Rank
l33t

For all the mobos I cleaned, I never had corrosion, right after giving it a bath, I use a hairdryer to make most water to go away

All you need is to remove everything that may still produce some electricity (batteries, etc) and don't use it untill it's dry. Water only hurts when it's doing short circuits (by itself or after corrosion), but it will only corrode if you let the water sit for long period of time, or else any spray of water on anything made of iron would have terrible consequences ^^

Trying to identify old hardware ? Visit The retro web - Project's thread The Retro Web project - a stason.org/TH99 alternative

Reply 14 of 28, by Snayperskaya

User metadata
Rank Member
Rank
Member

For a full cleaning, I always do:

* Disconnect everything from the motherboard (but the CPU);

* Run a brush (with soft tip) through everything (motherboard, heatsinks, other cards, etc) so the dust particles that got stuck loosen up;

* Use a portable air compressor (similar to a DataVac) so almost all the dust gets removed;

* Check fans for any sign of failure. If I can't swap it, I try to apply some WD-40 on its bearings/oil shaft;

* Remove the CPU and clean all the slots and connectors (also power connectors) with isopropylic/contact cleaner. I use a toothbrush or a brush with hard tip to clean them. After the cleaning solution wears off, I run a soft brush over all of them again + another pass of a soft brush over all the motherboard;

* I use a soft rubber for almost every flat connector (RAM, ISA/PCI/PCIe/etc golden fingers), brush them, then apply some contact cleaner or isopropyl;

* Reinstall the CPU (already cleaned from old thermal paste), reapply thermal paste and install the cooler, and everything else.

Reply 16 of 28, by timb.us

User metadata
Rank Newbie
Rank
Newbie
Deksor wrote:

For all the mobos I cleaned, I never had corrosion, right after giving it a bath, I use a hairdryer to make most water to go away

All you need is to remove everything that may still produce some electricity (batteries, etc) and don't use it untill it's dry. Water only hurts when it's doing short circuits (by itself or after corrosion), but it will only corrode if you let the water sit for long period of time, or else any spray of water on anything made of iron would have terrible consequences ^^

I too have given a bath to electronics, but only in extreme cases (when it’s absolutely filthy). I also restore vintage test gear (oscilloscopes, multimeters, function generators) and routinely give them baths. In those cases, I generally (don’t) bathe the circuit boards, but *will* bathe stuff like transformers and CRTs, along with all the case parts. I use Dawn dish detergent and warm water, plus a battery powered scrub brush (with high density, medium hardness bristles), ScotchBrite sponge and, most crucially, a Mr. Clean Magic Eraser (melamine sponge).

I also use the the same equipment for restoring vintage PC case parts (before a course of RetroBrite). After cleaning and rinsing with warm water, I perform a second rinse with a 1:5 mix of distilled water and 90% Iso Alcohol then let the parts air dry. (Doing the distilled water rinse prevents water spots when the parts air dry; the small amount of alcohol helps to accelerate drying while not damaging the plastics.)

After cleaning large transformers like this, I will place them in the oven (or on a PCB heater) at 100c for 6 hours to make sure all the water is forced out. Never use just 90% Iso, grain alcohol, acetone, etc. on these, as they’re generally sealed with a lacquer, which you don’t want to dissolve.

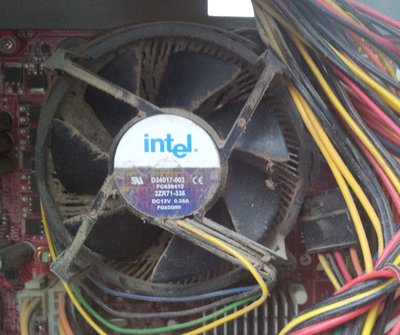
Sometimes I will give large PCBs, motherboards, etc. a bath like this as well, however you should be fast, never let the board soak for long periods. I’ve found an anti-static nylon brush, baking soda, Dawn and warm water in a bath tub is a great way to clean up corrosion on motherboards with damage from a leaking battery. (The baking soda adds a bit of grit and acts like ultra fine grain sand paper, plus it neutralizes acid from the battery.)

Keep in mind PCBs are hydroscopic and will absorb water, so again, do *not* let it soak! Get in and get out. If you use the baking soda method, make sure you rinse all the ISA and memory slots *very* well. Once I do a clean water rinse, I do a pure 90% Iso soak in a small plastic bin and scrub (again, with a nylon bristle brush) all the solder joints, to clean any residual flux residue that might have been left after manufacturer (if you don’t do an alcohol scrub after washing in water the flux will show up as white crusty spots around solder joints). After the alcohol soak/scrub, I rinse the board with fresh Iso Alcohol from a spray bottle (I let the board drip over the plastic bin I used for the scrub; you can then put a lid on the bin and keep using it for board cleaning until the alcohol turns yellow with flux residue).

After rinsing and air drying for 30 minutes I put large boards in the bottom oven rack (and small boards on my PCB pre-heater) at 100c for a couple of hours. If you have a gas cooking oven, I’d keep the door open or cracked, as they can overshoot quite a bit as they cycle. In the summer, you can put the board on the hood of your car when the sun is directly overhead too (works great for RetroBrite as well).

I developed some of my techniques by trial and error, others from methods Tektronix used to clean Oscilloscopes after servicing them. (They used a medium pressure spray wand, a distilled water rinse, plus a large walk in oven for drying. They would do this to the entire scope, circuit boards, transformers, CRTs and all!)

I’ve restored close to 100 pieces of vintage test gear and computers like this, so I know it works. 😀

Any sufficiently advanced technology is indistinguishable from magic. (E.g., Cheez Whiz, RF, Hot Dogs)

Reply 17 of 28, by clueless1

User metadata
Rank l33t
Rank
l33t

Don't use WD40 for fans. Use sewing machine oil. And only oil when you have a rubber grommet to lift up and get under. Don't oil over electronics. A drop or two is all it takes.
https://www.techrepublic.com/article/quiet-no … -a-drop-of-oil/

I use an air compressor for blowing dust out of cases. Careful not to touch the fans with the air nozzle as you blow them, it's easy to break a blade when they're spinning and then touched.

The more I learn, the more I realize how much I don't know.
OPL3 FM vs. Roland MT-32 vs. General MIDI DOS Game Comparison
Let's benchmark our systems with cache disabled
DOS PCI Graphics Card Benchmarks

Reply 19 of 28, by timb.us

User metadata
Rank Newbie
Rank
Newbie
oeuvre wrote:

Does WD40 help with the fan?

God no! Plain WD-40 is pretty horrible (as far as long term lubricants go). It will gum up after awhile and make things worse.

Personally, I use Hoppe’s Number 9 Lubricating Oil to re-lube fan bearings after cleaning them. It doesn’t gum up or evaporate and tolerates very high levels of heat (after all, it’s designed as a firearm lubricant). Normally, I remove the C-clip holding the fan blade/shaft assembly to the frame, take the springs, bearing and washers out and soak them in a small pill bottle of Iso Alcohol, then I clean the frame and fan blade assemblies with a bit of Dawn dish detergent in the sink, rinse with distilled water and let air dry.

As I reassemble it, I add a bit of oil to all sides of the bearing and put it all back together. Then I apply power and let the fan spin while adding a couple more drops of oil to the top of the bearing (where the C-clip attaches to the groove in the shaft). Then re-apply the original label (or a new label or sticker or something, you need to cover the bearing/shaft so it doesn’t pull in dust and stuff).

Any sufficiently advanced technology is indistinguishable from magic. (E.g., Cheez Whiz, RF, Hot Dogs)