VOGONS


First post, by anetanel

User metadata
Rank Member
Rank
Member

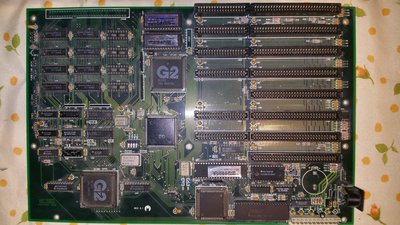
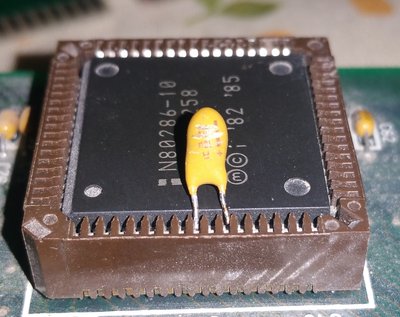
I found a 286 motherboard, equipped with an Intel 286-10Mhz CPU and a 287 co-processor.
I hooked it to an ATX power supply with an ATX to AT converter (this one: https://www.ebay.com.au/itm/4-PCS-ATX-20-PIN- … E-/261635278711), connected the speaker, an ISA VGA card and booted it.
It booted, beeped, and the display started showing text! It was in the middle of memory check when the PSU turned off.
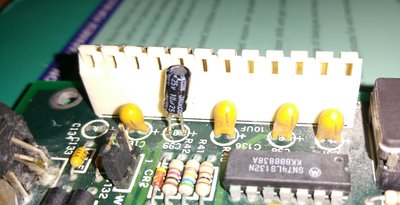
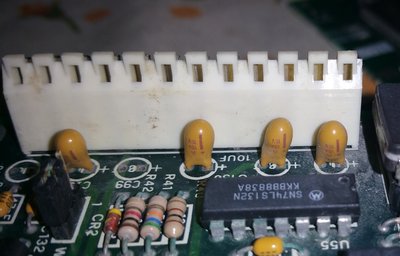
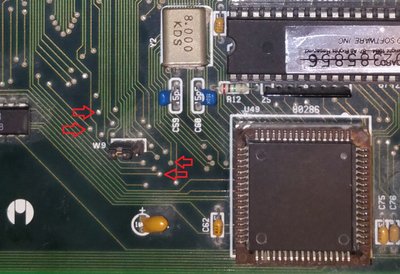
I tried turning it on again but the PSU would immediately turn off again. I tried several other PSUs but the result was the same. I managed to detect that the 4th pin (-12V) on the motherboard is shorted to ground. I traced the.. umm.. traces, and found that the capacitor directly adjacent to the -12 pin is shorting. I de-soldered the capacitor and was able to find and solder a matching capacitor (10uF. I removed it from some cheapo modem that I had in my throw bin).
Now the PSU keeps running, but the computer does not boot anymore. The CPUs get warm.. even a bit hot. Not sure if it is normal.
But I get no beep, and no display.
I de-soldered the battery and cleaned the area a bit with alcohol.
I tried taking the 287 out but it didn't help.

Any Ideas?

Attachments

  • 2018-10-19 17.09.14.jpg
    Filename
    2018-10-19 17.09.14.jpg
    File size
    1.32 MiB
    Views
    1419 views
    File license
    Fair use/fair dealing exception
  • 2018-10-19 17.02.21.jpg
    Filename
    2018-10-19 17.02.21.jpg
    File size
    693.08 KiB
    Views
    1419 views
    File license
    Fair use/fair dealing exception
  • 2018-10-19 12.33.56.jpg
    Filename
    2018-10-19 12.33.56.jpg
    File size
    367.16 KiB
    Views
    1419 views
    File license
    Fair use/fair dealing exception
  • 2018-10-19 12.32.13.jpg
    Filename
    2018-10-19 12.32.13.jpg
    File size
    457.97 KiB
    Views
    1419 views
    File license
    Fair use/fair dealing exception

Reply 1 of 18, by Deksor

User metadata
Rank l33t
Rank
l33t

Check all tantalum capacitors, if one go bad, all the other ones are likely to go bad as well. Tantalum capacitors fail short so this should be easy to find out if any other cap is doing that as well (and should should even do that for those that don't yet as they're likely to fail soon)

Trying to identify old hardware ? Visit The retro web - Project's thread The Retro Web project - a stason.org/TH99 alternative

Reply 2 of 18, by bjwil1991

User metadata
Rank l33t
Rank
l33t

Make sure you're using the right cap since some of them are more than 16V or less than 16V. In fact, recap the whole motherboard since that'll be the issue right there. Think of the tantalum capacitors as the older Christmas lights: one light goes out they all go out, and finding that one bulb can take hours.

Discord: https://discord.gg/U5dJw7x
Systems from the Compaq Portable 1 to Ryzen 9 5950X
Twitch: https://twitch.tv/retropcuser

Reply 3 of 18, by anetanel

User metadata
Rank Member
Rank
Member

I can't say that I checked ALL of the 100+ capacitors on the board, but so far I wasn't able to find anymore that are short. I looked at prices for tantalum capacitors, and replacing all of them would be quite expansive. Its possible to use electrolytic capacitors instead, right?

Reply 4 of 18, by quicknick

User metadata
Rank Oldbie
Rank
Oldbie

I see green stuff on your close-up photo. Perhaps a trace was corroded, barely making contact and it finally gave up when you worked on the board to change the capacitors.
The usual drill - vinegar, water, alcohol (isopropyl for the board, beer for you), then carefully check that area. You might also need to look under some of the ICs and sockets/connectors...

Reply 5 of 18, by anetanel

User metadata
Rank Member
Rank
Member
quicknick wrote:

The usual drill - vinegar, water, alcohol (isopropyl for the board, beer for you), then carefully check that area. You might also need to look under some of the ICs and sockets/connectors...

I"m not familiar with "the usual drill". Can you elaborate?

Reply 6 of 18, by realoldguy23

User metadata
Rank Newbie
Rank
Newbie
anetanel wrote:

Its possible to use electrolytic capacitors instead, right?

Yes, that should be no problem here.

I have to agree with Quicknick, your board is really "dirty". There is a high probability that especially the 3 big PLCC sockets give bad contacs to their chips.

Some time ago I refurbished a Amiga 500 that was in a quite similar condition dirt-wise. It worked for some time. One day it didn't turn on anymore showing just a black screen. I did all the easy things of thoroughly cleaning the DIL IC's pins and sockets, even replacing some of them. Finally I took a closer look at the Fat Agnus chip and its PLCC socket. I first needed to buy a PLCC chip remover tool, but this was worth it. The contacts of the PLCC socket were completely corroded and they were stuck and didn't apply spring pressure on the contacts of the Fat Agnus chip.

I replaced the PLCC socket altogether, which was easy given that the A500 has only a double sided board and I have the soldering equipement for such things. After this the A500 started up without any problems.

I think desoldering and replacing the PLCC sockets is not an option for such a hard-to-solder multi layer board. But you should get a PLCC tool, remove the chips, and clean the contacts and the pins thoroughly.

Reply 7 of 18, by anetanel

User metadata
Rank Member
Rank
Member
realoldguy23 wrote:

But you should get a PLCC tool, remove the chips, and clean the contacts and the pins thoroughly.

I actually have such tool, but I wasn't able to remove the CPU with it. The prongs do not seem to fit the notches in the CPU socket. But I'll give it another try when I'm home.

Reply 8 of 18, by realoldguy23

User metadata
Rank Newbie
Rank
Newbie
anetanel wrote:
realoldguy23 wrote:

But you should get a PLCC tool, remove the chips, and clean the contacts and the pins thoroughly.

I actually have such tool, but I wasn't able to remove the CPU with it. The prongs do not seem to fit the notches in the CPU socket. But I'll give it another try when I'm home.

I had the same problem, the chip was sitting very tight in the socket. I think the corrosion had made i stick. Maybe you can try to use some contact cleaner to loosen the corroded contacts. Anyway, you should be very careful, these PLCC sockets are said to be easily broken apart. And as I said, you don't want to replace them on a multi layer board even if you have the right soldering tools. These boards have a very high thermal capacity due to their power plane layers.

Reply 9 of 18, by root42

User metadata
Rank l33t
Rank
l33t

I had a blown tantalum on an Octek II 286 board. I ended up raplacing all the tantalum caps. I am not sure this was necessary, but at some point the others probably would have failed as well. However desoldering the caps was really tricky, since the board is quite thick and has lots of thermal capacity. 😀

Be careful not to lift any pads. Get a desoldering gun, if possible! (Maybe borrow one)

My board works, kind of, now, but I think one or two slots are wonky. But I haven't really debugged that anymore, since I am using a Suntac board in my machine now.

YouTube and Bonus
80486DX@33 MHz, 16 MiB RAM, Tseng ET4000 1 MiB, SnarkBarker & GUSar Lite, PC MIDI Card+X2+SC55+MT32, OSSC

Reply 10 of 18, by quicknick

User metadata
Rank Oldbie
Rank
Oldbie
anetanel wrote:

I"m not familiar with "the usual drill". Can you elaborate?

Well, it's been described here a few times, so I was just trying to save space 😀
Here's my way of dealing with dirty/corroded boards:
-Remove everything that can be damaged by water or other liquids. Be aware that you might lose or destroy some labels, serial numbers and such.
-If battery corrosion is present, use plenty of vinegar on the affected area. In a few cases that meant the whole board. Let it sink in for a few minutes (see note*).
-Rinse with water, then thoroughly wash with dish detergent. I use an assortment of brushes - softer, harder, smaller, wider - depending on the type of board, degree of filthyness, etc.
-Again rinse with plenty of water, you don't want soap/detergent left anywhere. Let it to dry for a couple of minutes, then:
-With a clean and dry brush I apply enough alcohol (usually isopropyl 99%) to displace all the water, especially from the (isa/vlb/pci/agp/cpu) slots/sockets and from under the large ICs.
-After that, I dry the board with a hairdryer and if no other repairs are needed it can be powered on right away. If you're lucky it will also work, for this it's better to fit any parts that you might have removed at the first step 😁

Note* - it's been mentioned here that corrosion can re-appear after a while, even after a vinegar bath. Seems that after extended exposure the battery electrolyte may "soak" the board. While a longer (overnight?) bath in vinegar could solve that, it's been also mentioned that the vinegar itself can eat some metal parts on the board. So I guess YMMV, trial and error, stuff like that...

Also take care with the PLCC extractor, as the chips are usually very stuck. On trying to remove a PLCC 84-pin chip from a 286 board one of the prongs destroyed the corner of the chip, I had to tear down the socket piece by piece (and replace it with a new one) to extract the chip.

Reply 11 of 18, by anetanel

User metadata
Rank Member
Rank
Member

I think that my tool is not appropriate for those sockets. Its pins are too thick and they do not get under the chip. I was able to remove all the chips with a tiny screwdriver though.
In the meantime I did more or less exactly what you described.
I used a little spray bottle instead of a brush with alcohol and it seems to do the trick.
The board is drying now. I don't have a blow dryer, but hopefully by tomorrow it'll be dry.

Attachments

  • 2018-10-22 20.04.43.jpg
    Filename
    2018-10-22 20.04.43.jpg
    File size
    574.88 KiB
    Views
    1241 views
    File license
    Fair use/fair dealing exception

Reply 13 of 18, by root42

User metadata
Rank l33t
Rank
l33t

Do you have a Speaker attached? This helped with my board due to RAM test clicks and POST beep codes.

YouTube and Bonus
80486DX@33 MHz, 16 MiB RAM, Tseng ET4000 1 MiB, SnarkBarker & GUSar Lite, PC MIDI Card+X2+SC55+MT32, OSSC

Reply 14 of 18, by anetanel

User metadata
Rank Member
Rank
Member
root42 wrote:

Do you have a Speaker attached? This helped with my board due to RAM test clicks and POST beep codes.

There is. It beeped that one (and only) time the computer turned on. But it does not anymore.

Reply 15 of 18, by root42

User metadata
Rank l33t
Rank
l33t

Can you try the following things and check for beep codes:

- Remove everything but CPU, RAM, video card
- Remove video card
- Remove RAM
- Remove CPU

Can you also measure the voltages on the motherboard? Can you trace them to see if there is anything wonky?

Does the board have any test points by any chance?

YouTube and Bonus
80486DX@33 MHz, 16 MiB RAM, Tseng ET4000 1 MiB, SnarkBarker & GUSar Lite, PC MIDI Card+X2+SC55+MT32, OSSC

Reply 16 of 18, by quicknick

User metadata
Rank Oldbie
Rank
Oldbie

- A POST analyzer card could prove helpful.
- Did you check for broken/corroded traces near the battery?

If the board proves to be un-repairable and you decide to scrap it, please contact me.

Reply 17 of 18, by anetanel

User metadata
Rank Member
Rank
Member
root42 wrote:
Can you try the following things and check for beep codes: […]
Show full quote

Can you try the following things and check for beep codes:

- Remove everything but CPU, RAM, video card
- Remove video card
- Remove RAM
- Remove CPU

No beeps in all configurations :\

root42 wrote:

Can you also measure the voltages on the motherboard? Can you trace them to see if there is anything wonky?

I guess I can... not sure what to look for though 😁

root42 wrote:

Does the board have any test points by any chance?

I think so. you mean the small contacts that go to each component (picture attached)? How do I use them?

Attachments

  • 2018-10-19 17.09.14.jpg
    Filename
    2018-10-19 17.09.14.jpg
    File size
    390.68 KiB
    Views
    1126 views
    File license
    Fair use/fair dealing exception

Reply 18 of 18, by anetanel

User metadata
Rank Member
Rank
Member
quicknick wrote:

- A POST analyzer card could prove helpful.

Got one in the mail as we speak 😀

quicknick wrote:

- Did you check for broken/corroded traces near the battery?

If the board proves to be un-repairable and you decide to scrap it, please contact me.

All traces seems fine as far as I can tell. I also replaced the battery with a CR2032 socket.