VOGONS


First post, by Intel486dx33

User metadata
Rank l33t
Rank
l33t

When you solder on new capacitors do you apply some flux first to the area so the solder will adhere better ?
Or do you just solder it dry ?
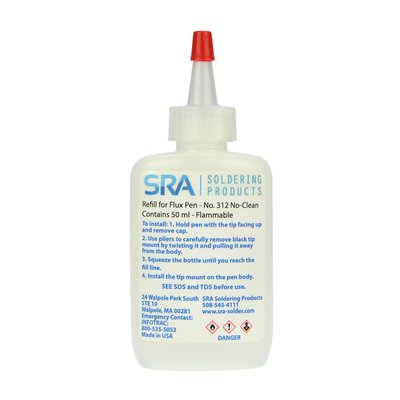
If so what type of flux do you use ?
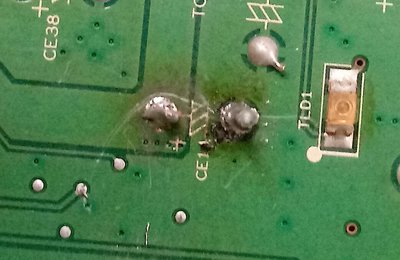
I find that when I try to solder dry it does not adhere well to the PCB area and usually burns the PCB.
If I add some No-clean flux it adheres better and does not burn the PCB area.
I want to know what is the best type of flux to use ?
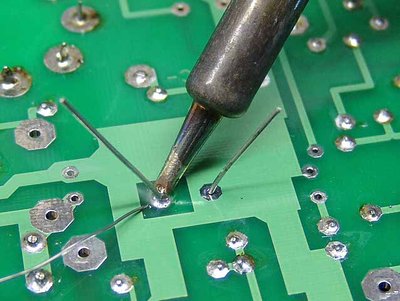
Also I add the solder to the iron tip and not to the capacitor PCB area.
Once I have the solder iron loaded with some solder I then just touch the PCB/capacitor leg and the solder flows on to make the bond between the capacitor leg and PCB.

Attachments

  • bad solder.jpg
    Filename
    bad solder.jpg
    File size
    165.67 KiB
    Views
    1165 views
    File comment
    Bad solder job
    File license
    Fair use/fair dealing exception
  • solder-iron.jpg
    Filename
    solder-iron.jpg
    File size
    100.21 KiB
    Views
    1165 views
    File comment
    Good solder job
    File license
    Fair use/fair dealing exception
Last edited by Intel486dx33 on 2018-11-02, 14:01. Edited 1 time in total.

Reply 1 of 10, by treeman

User metadata
Rank Oldbie
Rank
Oldbie

what you are doing is probably a technique better used for smd where u can't physically touch the pads because the capacitor or chip is on top so the flux is applied manually.

for through hole and bigger things I find it the easiest to apply some heat with the tip to the area you are soldering and touch the solder there direct, most solder has flux in it so as soon as the solder melts the flux activates and wets the area you are soldering bonding the wet solder.

thats my experience but I'm a amateur too,

Reply 2 of 10, by Intel486dx33

User metadata
Rank l33t
Rank
l33t

Yes, I find I get cleaner and better adhesion if I apply some no-clean flux to the area first by wetting the PCB area.
https://www.ebay.com/itm/SRA-312-No-Clean-Flu … S!-1:rk:40:pf:0

Attachments

  • no-clean flux.jpg
    Filename
    no-clean flux.jpg
    File size
    119.95 KiB
    Views
    1154 views
    File license
    Fair use/fair dealing exception

Reply 3 of 10, by treeman

User metadata
Rank Oldbie
Rank
Oldbie

well whatever works for you I guess, I usually watch YouTube videos on different techniques to see how its generally done. I always use some iso alcohol to clean off flux, no clean flux too as it still leaves residue

Reply 4 of 10, by wiretap

User metadata
Rank Oldbie
Rank
Oldbie

I follow IPC guidance for soldering on circuit boards. (I'm IPC rework certified as well)

For proper soldering and rework, follow these documents:
IPC-J-STD-001
IPC-7711B
IPC-7721B

My Github
Circuit Board Repair Manuals

Reply 5 of 10, by Vipersan

User metadata
Rank Oldbie
Rank
Oldbie

The real issue replacing mobo electrolytic caps is getting the solder to flow ..
mainly because of the large ground and psu planes...
also consider these are multi layered boards so often have sandwiched traces on those hidden layers.
I use chipquik during the removal process which makes it easier to keep both solder points liquid at the same time..thus wiggling it out with a side to side motion doable.
But imo it is imortant to make sure your solering iron is of a high enough wattage to liquify the solder properly ...a low wattage iron cannot achieve this.
Other things you can do to help the process is quality flux ..and pre-warming the pcb ...thus helping your soldering iron do its job.
rgds
VS

Last edited by Vipersan on 2018-11-02, 16:09. Edited 1 time in total.

Reply 6 of 10, by Intel486dx33

User metadata
Rank l33t
Rank
l33t

Yes, I like this guys 3 step technique for cleaning , fluxing and soldering. For a good clean solder job.
https://youtu.be/vx50YtEC2S8?list=PL34ErCtXRk … wD4LZ08p&t=1143

Reply 7 of 10, by jxalex

User metadata
Rank Member
Rank
Member

* I use only that flux which is already in solder. Both for removing old ones and soldering new ones I just add solder.

the same way I clean the holes -- to remove old solder, just adding MORE fresh solder becouse thats the way how to melt the solder in that multilayer PCBs.
Then just on occassion the solder wick cleans the holes when needed or just adding more solder to melt the solder and using the drill to clean the holes while solder is melted. THis way no burned PCBs.

All done with 50W soldering iron.
Just the solder with high lead content used for all these procedures.

Current project: DOS ISA soundcard with 24bit/96Khz digital I/O, SB16 compatible switchable.
newly made SB-clone ...with 24bit and AES/EBU... join in development!

Reply 8 of 10, by shock__

User metadata
Rank Oldbie
Rank
Oldbie

I'm basically doing the same as jxalex, except that I use a desoldering pump - be sure to use a _good_ one with a teflon tip and low kickback, otherwise you can enjoy your soldering iron chiseling away on the board. My personal recommendation would be the Soldapult SS350 (~20€)
Just make sure pins can be wiggled after sucking away the old solder, sometimes they get stuck to the outsides of the vias even tho they look free.
When unsoldering pins that are attached to ground/supply planes on multi layer boards (like electrolytic caps on pc motherboards usually) make sure to use a tip with decent thermal capacity, don't resist to ramp up the heat if required and expect for go for multiple 'suckings' to get the component unsoldered.

I usually only use wick for SMD or cleanup once through hole parts have been removed.

Current Project: new GUS PnP compatible soundcard

[Z?]

Reply 9 of 10, by Nprod

User metadata
Rank Newbie
Rank
Newbie

I use Interflux IF8300 which is meant for BGA and lead-free applications. I apply it to the pad/hole beforehand. In some cases you can get away with just the flux core inside the solder, but for PC motherboards you need the full arsenal - not just flux, but also a fat tip on the soldering iron with a lot of thermal mass.

Sort of on subject - can anyone recommend a good cleaning solution for flux, especially the crusty rosin-based type? I'm using 99% ethanol and it sort of works, but it takes a lot of scrubbing to get rid of the tacky residue.

Reply 10 of 10, by jxalex

User metadata
Rank Member
Rank
Member

Similar method here. But with just the cheap technical sprit.
I sink them in the tank filled with 1 liter sprit, completely. And shake them for a while. Mostly 15-30 seconds is enough. If needed then will repeat the same process in another tank too which has the newer cleaner sprit.
After that taking it out it is clean. With small circuit boards it is simplest as just a small can is enough. That should be enough for years and whole series of boards. Havent swapped out that fluid yet.

(Still I havent used such trick with big motherboards, however some modified photolab developing trays would do the trick too I guess).

Current project: DOS ISA soundcard with 24bit/96Khz digital I/O, SB16 compatible switchable.
newly made SB-clone ...with 24bit and AES/EBU... join in development!