VOGONS


First post, by Cga.8086

User metadata
Rank Member
Rank
Member

I got this cooler when i bought a box full of hardware. Thermaltake big thypoon.
it is supposed to be one of the biggest coolers of its era.

i was not able to find the installation manual online, since it was replaced with the VX version and the clamps are all different. Does anyone own this cooler? I need to know how it gets installed.

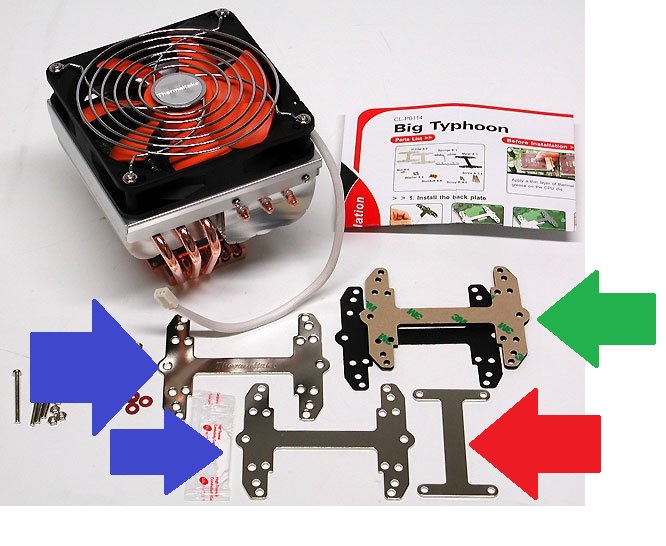
- The gren arrow shows 2 things, a thin layer of plastic bracket, and a thick layer rubber bracket (i belive this goes on the back of the motherboard.

-the blue arrows shows two brackets, i think one goes on the front and one on the back of the motherboard.

- But what is the red bracket for??? i don´t get whats the use of it, as the holes in it... match some holes on the blue bracket.

tt-typhoon-all2.jpg

Reply 1 of 13, by PC Hoarder Patrol

User metadata
Rank l33t
Rank
l33t

Can't find the newer version of the manual, but this 2004 version covers the basics

https://web.archive.org/web/20051026231145/ht … Big_Typhoon.pdf

I think the red arrow is the small H clip used when the standard H clip fouls components near the socket

Reply 2 of 13, by cyclone3d

User metadata
Rank l33t++
Rank
l33t++

Thermaltake Big Typhoon and the VX (fan is really the only difference) both rock.

The smaller bracket is indeed for help with clearing components.

Install is super easy... but you will want to have:

1. Bracket with insulator on back of board.
2. Bolts going through board
3. insulating washers and nuts on front of board... if you don't do this, the bolts will move around and the whole mounting will wobble around. Pretty sure the original Big Typhoon I bought new way back in the day, which I still have, did not specify this and it was horrid as far as stable mounting goes.

4. Then the heatsink goes on and you use one of the other brackets and then nuts to tighten it down. Plastic or self locking nuts work a million times better than the regular nuts. In fact, I use plastic/nylon wing nuts. So much easier to install that way and they won't come loose like the stock nuts do.

Yamaha modified setupds and drivers
Yamaha XG repository
YMF7x4 Guide
Aopen AW744L II SB-LINK

Reply 3 of 13, by Cga.8086

User metadata
Rank Member
Rank
Member

thank you for the PDF!!! i was not fining it anywhere on google.
So the smaller bracket, the one with the red arrow, can be used on top of the cooler?

the reason im asking all this is because on the box only this stuff came:

1) Only 1 bracket of the blue arrow
2) 1 mylar bracket.
3) 1 bracket of the red arrow.

- the missing sponge is easy, i can cut EVA rubber and make a new one.
- But not even in the pdf mention the smaller bracket (red arrow) and wanted to know if it can be used too on top of the cooler.

Reply 4 of 13, by PC Hoarder Patrol

User metadata
Rank l33t
Rank
l33t

As far as the brackets go, it'll depend what socket you're fitting it to - I think the small bracket is only for AMD K7 (Athlon XP, Sempron) socket 462 (socket A) motherboards. If you look at the last 3 pictures on the K7 installation in the PDF, that's where the small bracket goes, in place of the standard sized one shown in those pictures. Also, if you didn't get any screws, nuts, washers or standoffs then you'll need to source these separately.

Reply 5 of 13, by undeon

User metadata
Rank Newbie
Rank
Newbie

I brought a Big Typhoon that wont come with the mylar... I've tryied to install is using a sponge to cover the back of the board. It stayed firm, but the CPU wont worked. Everything was firm, but was a no-no... I believe my CPU died too, because it's not working with the previous cooler anymore too... =(

Reply 6 of 13, by cyclone3d

User metadata
Rank l33t++
Rank
l33t++

Make sure to put the mylar between the metal bracket and the sponge/foam. If you don't, it will have a good chance of shorting out on the back of the board.

The stock one is a very, very dense foam. On the setup that I am using it on now (Abit KT7A), I just went with plastic spacers where the bolts go in order to hold the bracket from shorting out with anything on the back of the board. Works perfectly fine that way.

Yamaha modified setupds and drivers
Yamaha XG repository
YMF7x4 Guide
Aopen AW744L II SB-LINK

Reply 7 of 13, by Cga.8086

User metadata
Rank Member
Rank
Member
cyclone3d wrote:

Make sure to put the mylar between the metal bracket and the sponge/foam. If you don't, it will have a good chance of shorting out on the back of the board.

The stock one is a very, very dense foam. On the setup that I am using it on now (Abit KT7A), I just went with plastic spacers where the bolts go in order to hold the bracket from shorting out with anything on the back of the board. Works perfectly fine that way.

how come?
isn´t eva rubber a non conductive material? that thin layer of black mylar is extremely needed?
The eva rubber needs to be 1mm thick? or 2mm thick?

the order is:

1) > metal bracket
2) > mylar
3) > sponge
4) > motherboard

Reply 8 of 13, by cyclone3d

User metadata
Rank l33t++
Rank
l33t++
Cga.8086 wrote:
how come? isn´t eva rubber a non conductive material? that thin layer of black mylar is extremely needed? The eva rubber needs t […]
Show full quote
cyclone3d wrote:

Make sure to put the mylar between the metal bracket and the sponge/foam. If you don't, it will have a good chance of shorting out on the back of the board.

The stock one is a very, very dense foam. On the setup that I am using it on now (Abit KT7A), I just went with plastic spacers where the bolts go in order to hold the bracket from shorting out with anything on the back of the board. Works perfectly fine that way.

how come?
isn´t eva rubber a non conductive material? that thin layer of black mylar is extremely needed?
The eva rubber needs to be 1mm thick? or 2mm thick?

the order is:

1) > metal bracket
2) > mylar
3) > sponge
4) > motherboard

Because the pressure from the heatsink and bolts will eventually cause the sponge to poke through all the way and short the bracket against the back of the board. The EVA rubber was probably about 4-5mm thick from the factory and it squishes down a lot when you tighten everything down. That is also part of the reason why I went with plastic/nylon spacers.. because they don't squish. Everything just stays in place better and you don't have to worry about the foam squishing over time which would cause the heatsink to tip down in a tower case and cause almost no contact with the CPU.

The original mounting system was just not very well thought out. I went through multiple iterations of "fixing" the mounting system.. one even included welding the bolts to the bracket.

Yamaha modified setupds and drivers
Yamaha XG repository
YMF7x4 Guide
Aopen AW744L II SB-LINK

Reply 10 of 13, by cyclone3d

User metadata
Rank l33t++
Rank
l33t++
undeon wrote:

Can I use non-conductive tape to cover every piece of metal that may touch the motherboard?

You could.. but the tape could very well be punctured and a much simpler solution would just to be use plastic/nylon spacers on the bolts in between the board and the plate. It also provides much more solid mounting compared to the stock way of mounting it.

Yamaha modified setupds and drivers
Yamaha XG repository
YMF7x4 Guide
Aopen AW744L II SB-LINK

Reply 11 of 13, by SETBLASTER

User metadata
Rank Member
Rank
Member
cyclone3d wrote on 2018-12-18, 00:03:
cyclone3d wrote:

Make sure to put the mylar between the metal bracket and the sponge/foam. If you don't, it will have a good chance of shorting out on the back of the board.

The stock one is a very, very dense foam. On the setup that I am using it on now (Abit KT7A), I just went with plastic spacers where the bolts go in order to hold the bracket from shorting out with anything on the back of the board. Works perfectly fine that way.

hey cyclone, how tall are those nylon spacers ?

so you just use on the back: a) motherboard > b) nylon spacer, and C) metal bracket + screws

you left out the mylar and the foam right?

Reply 12 of 13, by cyclone3d

User metadata
Rank l33t++
Rank
l33t++

I'll take a look this evening.

And yeah, no foam or mylar.

There are also nylon nuts on the top side of the motherboard to hold the bolts in place. Otherwise you end up with a very wobbly setup.

Edit: I would have to take the motherboard out of the case to measure the thickness of the spacers.

There really isn't any need to anyway as you can just use multiple thin ones to raise the bar far enough away from the back of the board to not touch anything. Guessing that is what I did but don't exactly remember as it was quite a while ago.

Yamaha modified setupds and drivers
Yamaha XG repository
YMF7x4 Guide
Aopen AW744L II SB-LINK

Reply 13 of 13, by Bruno128

User metadata
Rank Member
Rank
Member

Smaller bracket is for through-board socket A mount and is found in some earlier BigTyp 120 kits (P/N: CL-P0114-01). In use.

Attachments

My builds: 1995 VLB, 2003 Acrylic
SBEMU compatibility reports