VOGONS


First post, by SETBLASTER

User metadata
Rank Member
Rank
Member

I have a very nice ABIT 486 motherboard that has 2 72pin simm slots, one of them is ruined with many metal pins broken and tabs missing
the other one looks like the retention tab is cracked but the metal pins look kind of ok.

I wanted to know if someone on the forum managed to remove and replace the 30pin simm sockets. What tools were used and if its a easy job to do with desoldering braid and patience

Reply 1 of 15, by retardware

User metadata
Rank Oldbie
Rank
Oldbie

Don't use braid, period.
This can be done with a powerful soldering station and vacuum only if you do not want to do damage.
I recommend Soldapullt for this.

Reply 2 of 15, by SETBLASTER

User metadata
Rank Member
Rank
Member
retardware wrote:

Don't use braid, period.
This can be done with a powerful soldering station and vacuum only if you do not want to do damage.
I recommend Soldapullt for this.

that is good also, my concern is that for a good use of Soldapullt you need to heat it up really high. and those pins are touching the plastic and you can end up melting the plastic

i have a spare 486 motherboard to take the sockets out, since those simm slots are not found on my country as a replacement.

Reply 4 of 15, by retardware

User metadata
Rank Oldbie
Rank
Oldbie
SETBLASTER wrote:
retardware wrote:

Don't use braid, period.
This can be done with a powerful soldering station and vacuum only if you do not want to do damage.
I recommend Soldapullt for this.

that is good also, my concern is that for a good use of Soldapullt you need to heat it up really high. and those pins are touching the plastic and you can end up melting the plastic

i have a spare 486 motherboard to take the sockets out, since those simm slots are not found on my country as a replacement.

Yes, these SIMM sockets are somewhat yucky to get out even with the original big blue soldapullt (not cheap, avoid the cheap chinese copies!).
The trick is to use a soldering station that can deliver much heat in short time.
I use an Ersa 60W set at maximum temperature (450 degs) for this.

First step is to resolder every pin, adding a small bit of new [leaded] solder and flux to make for good heat transfer.
Second step is to heat just a bit more so that solder is liquid at component side, and stays liquid until it has been sucked out.
If you heat too short, then it will solidify while getting sucked out, meaning you have to start over with first step.
If you heat too long, plastics can get soft (visible melt traces, but still usable)
If you heat way too long, plastics can deform, rendering the socket unusable.
To keep board cool, I do not do neighboring pins subsequently, but do some kind of interleaving.

Best to practice with some junk boards before extracting the sockets intended as replacement.

Reply 5 of 15, by Deksor

User metadata
Rank l33t
Rank
l33t

I did it on my ATC1415 : My new 486-386 junk boards [IT gore]

I used a desoldering station in order to do it.

First I applied some more solder on the pins so it'll melt more easily, then I desoldered the old ones, desoldered the new ones from the donnor board, and finally I installed them on the ATC1415.

Trying to identify old hardware ? Visit The retro web - Project's thread The Retro Web project - a stason.org/TH99 alternative

Reply 6 of 15, by SirNickity

User metadata
Rank Oldbie
Rank
Oldbie

I did the 30-pin SIMM slots on my AWE32 recently. It was a PITA with just a thermally-controlled soldering iron and a good solder sucker. I don't ever expect the piece I'm removing to survive the ordeal - particularly if it's made of plastic. That would up the stakes considerably. I don't think I would attempt it without a really good desoldering station.

A motherboard, which might have multiple layers and huge ground planes, would be trickier still. Replacing a capacitor on a Pentium board recently almost had me reaching for a drill to get the last bit of a broken lead out of the via. I'm sure THAT would have ended well.... Instead, I roasted one side with a hot-air nozzle and held the solder tip to the other side, and sucked out the debris as quickly as I could. Took a few tries, but eventually it worked. I can't even imagine doing that 30 times. I would still be working on it.

Reply 7 of 15, by .legaCy

User metadata
Rank Oldbie
Rank
Oldbie

Those desoldering pumps don't work for me, i have a station that is the same as this
61qq1nB9-ZL._SL1500_.jpg
and it work 1000% better, i suck all the leadfree solder first from all pins, then i "solder" with 60/40 with flux all the pins, making sure to heat a lot, (not heat to a extremely high temperature, but to ensure that every part of the solder is melted and mixed, then the station come in handy, heating well and activating the vacuum giving the pin a little wiggle.
All pins should wiggle freely through the hole before attempting to remove the component from the board.

Reply 8 of 15, by SETBLASTER

User metadata
Rank Member
Rank
Member

i cant spend that much. i know its a kickass equipment

yesterday i used hot air from my soldeing station and a cheap china solder sucker. air speed ar half.. and temperature was set at maximum 450degreesC

it was quite easy job. once hot air started to flow solder sucker worked perfectly and fast. but the plastic on the other side was white..and ended up with a brown tan.

i think the heat was too much. what temp should be use for hot air?

loved to work with hot air..made things so easy

Reply 9 of 15, by rasz_pl

User metadata
Rank l33t
Rank
l33t

I use different method. Pre warm whole board to ~100C, flip it over sockets down, heat all the pins evenly until solder starts to melt, slot should fall off on its own (might need a sharp smack on the desk). Another option is Solder Pot/Bath.

Open Source AT&T Globalyst/NCR/FIC 486-GAC-2 proprietary Cache Module reproduction

Reply 10 of 15, by SirNickity

User metadata
Rank Oldbie
Rank
Oldbie

Hot air temperature is difficult to pin down. It's going to regulate this at the nozzle, but what is the effective temperature at the board? Kinda depends on ambient temp, distance, air flow, thermal capacity....

The problem with plastic parts is that they are often jjuuuuuusst at the threshold of viability when the solder is molten. If you look at the approved thermal profiles for SMD components, it's usually an envelope with a peak of a few seconds at maximum temp. Just long enough to get the job done and start cooling off again. You're not going to comply with that if you're just waving a hot air nozzle over/under your work piece and trying to rework a part, so it's always a crapshoot.

Reply 11 of 15, by dkarguth

User metadata
Rank Member
Rank
Member

Where are you located? I have a very nice Pace PRC-2000 board rework station. I'd be willing to repair it for you if you covered shipping. I have some extra 72 pin simm sockets as well.

"And remember, this fix is only temporary, unless it works." -Red Green

Reply 12 of 15, by SETBLASTER

User metadata
Rank Member
Rank
Member
dkarguth wrote:

Where are you located? I have a very nice Pace PRC-2000 board rework station. I'd be willing to repair it for you if you covered shipping. I have some extra 72 pin simm sockets as well.

I am in Argentina, shipping would be too expensive.
I managed to get all 4 simm slots out of a broken socket3 motherboard, sockets look tanned because of the heat, just that, the plastic did not melt.... so it will work.

on the weekend i will remove the sockets from the Abit, in that case i will not use heat, just soldering iron to push the pins and cut the original socket plastic, then use desoldering braid to clean the holes and put the tanned sockets in.

Reply 13 of 15, by EduardoHF

User metadata
Rank Newbie
Rank
Newbie

Hi everyone, first I apologize because although I have been living in the US for some time, I have difficulty with the English language. I feel more comfortable using Google translator.
I tried to open a specific topic about my doubts, but as I am new here, this is not allowed yet.
I have some motherboards with SIMM 72 memory socket and I have to change some as they have bad pins.
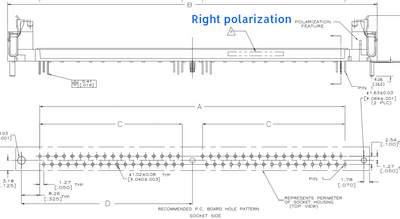
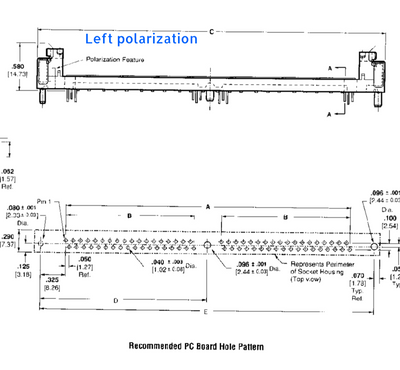
One of these boards use right polarization SIMM sockets, but the socket I have is left polarization. I've tried to buy the ones I need, but it's hard to find and/or too expensive. How am I going to swap the two, (this motherboard has only two), can I use the left mounted inverted? The memory card will go in from the opposite side, but pin 1 will point in the same direction as in the original mount.
I'm also thinking: Many people may not know that these sockets have two polarization options, and end up replacing it with the wrong socket, which could damage something.
Thank you all!

Attachments

Reply 15 of 15, by EduardoHF

User metadata
Rank Newbie
Rank
Newbie

Thanks for the tip!
I'm looking for a better price.
4 pcs plus shipping will cost approximately U$30.00
I recently bought two top quality left sockets on Ebay for 4.95 plus shipping 4.25 - total U$9.20.
Four would cost U$14.15
Unfortunately the seller doesn't have the right polarization socket.
The plastic clip model has both model sides for $0.88 at Phoenix Enterprises. Minimum purchase $25.00 plus shipping. This store sells many old model connectors.
But I really don't like the plastic clip. As I'm not in a hurry, I'll look a little more. if not, I will buy the one you posted.