VOGONS


First post, by brownk

User metadata
Rank Member
Rank
Member
Untitled.jpg
Filename
Untitled.jpg
File size
227.81 KiB
Views
704 views
File license
Fair use/fair dealing exception

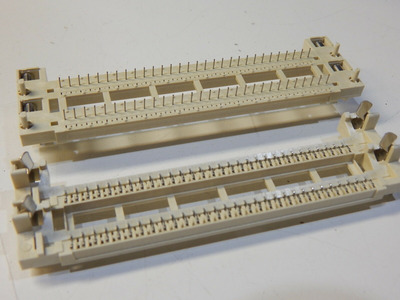
So, on a sunny, bright Sunday afternoon, I decided to dodge the bullet and tried to replace a horribly broken CT3670 ram socket with AMP 822113-2.

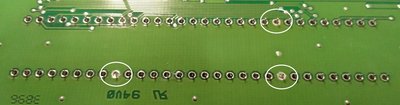
After wielding desoldering pump for a while, I managed to suck up pretty much every hole in the back. I could see white plastic stub on the other side of PCB through the holes.

Nevertheless, those three holes in white circles are absolutely stubborn to a point that solder in the hole does not give up, like at all.

I armed myself with plenty of youtube soldering master courses, and they all taught me excessive amount of hot massage would destroy my beautiful card.

Perhaps, I was a bit more on the conservative side, and didn't apply enough heat to remove them. Well, I'd rather want to be slow than sorry.

For those who have experience in replacing the socket, I'd like to ask. "how do I remove the remaining solder completely?"

* It seems the holes are so-called "plated through-holes" as they are noticeably difficult to clean up.

Last edited by brownk on 2019-12-16, 00:37. Edited 2 times in total.

Reply 1 of 13, by Tiido

User metadata
Rank l33t
Rank
l33t

Crank up the heat on the iron, there's no thermal relifs on these vias and that means the ground fill acts as a heatsink and sucks away the heat. You'll only manage to get the solder out when the solder melts fully and that means overcoming the heatsink effect.

T-04YBSC, a new YMF71x based sound card & Official VOGONS thread about it
Newly made 4MB 60ns 30pin SIMMs ~
mida sa loed ? nagunii aru ei saa 😜

Reply 2 of 13, by brownk

User metadata
Rank Member
Rank
Member
Tiido wrote:

Crank up the heat on the iron, there's no thermal relifs on these vias and that means the ground fill acts as a heatsink and sucks away the heat. You'll only manage to get the solder out when the solder melts fully and that means overcoming the heatsink effect.

I used a 30W iron. Should I go with +40W then?

Man, it's getting on my nerve. 😎

Almost forgot. Thanks for the concise explanation. It makes sense.

Reply 3 of 13, by Tiido

User metadata
Rank l33t
Rank
l33t

40W will probably help. On my soldering station I increase the heat to 380ºC and sometimes beyond for cases like this, with non-temperature controlled irons there's no real knowing how high the temps get...

T-04YBSC, a new YMF71x based sound card & Official VOGONS thread about it
Newly made 4MB 60ns 30pin SIMMs ~
mida sa loed ? nagunii aru ei saa 😜

Reply 4 of 13, by brownk

User metadata
Rank Member
Rank
Member
Tiido wrote:

40W will probably help. On my soldering station I increase the heat to 380ºC and sometimes beyond for cases like this, with non-temperature controlled irons there's no real knowing how high the temps get...

If that's the case, I think I should go into an oursourcing route as professional hands would simply shine.
Thank you very much for the help.

Reply 5 of 13, by Predator99

User metadata
Rank l33t
Rank
l33t

In such cases I put some (or even more) fresh solder on the hole. Then heat up for a longer time so that the new solder and the part reminaing in the hole melts up. Then suck everything out.

The additional solder stores more heat and heat transfer is better than only with the iron.

Reply 6 of 13, by stamasd

User metadata
Rank l33t
Rank
l33t

Another suggestion I would make: the extra solder you add should be a low-melt temperature solder like this one: https://www.digikey.com/product-detail/en/chi … SN48-ND/8681827 Not only it stores heat, but also it stays liquid until it reaches lower temperatures compared to usual solder and that will make sucking it out with a pump easier. Low-melt solder is very useful for all kinds of component desoldering.

I/O, I/O,
It's off to disk I go,
With a bit and a byte
And a read and a write,
I/O, I/O

Reply 7 of 13, by brownk

User metadata
Rank Member
Rank
Member
Predator99 wrote:

In such cases I put some (or even more) fresh solder on the hole. Then heat up for a longer time so that the new solder and the part reminaing in the hole melts up. Then suck everything out.

The additional solder stores more heat and heat transfer is better than only with the iron.

stamasd wrote:

Another suggestion I would make: the extra solder you add should be a low-melt temperature solder like this one: https://www.digikey.com/product-detail/en/chi … SN48-ND/8681827 Not only it stores heat, but also it stays liquid until it reaches lower temperatures compared to usual solder and that will make sucking it out with a pump easier. Low-melt solder is very useful for all kinds of component desoldering.

Thank you for the tips.

While at it, I actually melt more solder into the hole then tried to suck all up at once. I thought Creative wasn't up to no-lead back in mid 90's so 60:40 solder should be a safe bet. What happened next was more residual solder remained in the hole and left white stain around the pad. (You can see from the photo the three holes are clogged indeed.) 63:37 with hotter iron might have produced a different outcome. Maybe my iron wasn't hot enough, or I wasn't skilled enough to pull the job, most likely.

I'll try to find a professional hand in my area, and if that's not available, I'll try stamasd's suggestion and/or a hotter iron with low-melt solder.
Wish me good luck.

Reply 8 of 13, by brownk

User metadata
Rank Member
Rank
Member
hole-cleared.jpg
Filename
hole-cleared.jpg
File size
758.94 KiB
Views
537 views
File license
CC-BY-4.0

Finally I was able to remove the damaged socket out of its old place.

I tried lowmelt & quickchip, but they made things even worse; once those low-melting tins shoved in plated through-holes, the holes seemed to dissipate extra heat extra fast.

What finally helped me out was this turbo-charged solder iron that you could kick its temperature up to 700C for a short while.

Nothing stood against the hod-rod and I could finally suck out what remained in the stubborn holes.

God, those holes were of course full of tin.

PS. Thanks @Tiido.

Reply 9 of 13, by Deksor

User metadata
Rank l33t
Rank
l33t

A hot air station would have come handy for this kind of cases as well.
I had a similar problem with a soldered DALLAS battery chip, but after applying hot air on the area for a while the chip went off ^^

Trying to identify old hardware ? Visit The retro web - Project's thread The Retro Web project - a stason.org/TH99 alternative

Reply 10 of 13, by brownk

User metadata
Rank Member
Rank
Member
Deksor wrote on 2020-04-21, 12:01:

A hot air station would have come handy for this kind of cases as well.
I had a similar problem with a soldered DALLAS battery chip, but after applying hot air on the area for a while the chip went off ^^

A hot-air station would have been absolutely awesome in my case as there were huge heat-sinking real-estates above and below PCB. By the time I took out the socket, I wasn't able to believe what I was seeing; the gigantic metal plate underneath was surely eye-catching.

Reply 11 of 13, by SETBLASTER

User metadata
Rank Member
Rank
Member

where would you buy areplacement socket?

i got an awe32 with broken socket, i cant replace it because the memory socket is different from any 486motherboard since the memory is laying to one side

Reply 13 of 13, by brownk

User metadata
Rank Member
Rank
Member
SETBLASTER wrote on 2020-04-23, 02:02:

where would you buy areplacement socket?

i got an awe32 with broken socket, i cant replace it because the memory socket is different from any 486motherboard since the memory is laying to one side

AMP_822113-2.jpg
Filename
AMP_822113-2.jpg
File size
214.36 KiB
Views
429 views
File license
Public domain

I've got mine from ebay and the part # is "AMP 822113-2". I'm sure you can find it from other parts stores too.
It sits right in, and "everything" fits. The nicest part is it has metal memory arms rather than clumsy plastic ones.

P.S. Sorry for the late reply.