VOGONS


First post, by Miphee

User metadata
Rank Oldbie
Rank
Oldbie

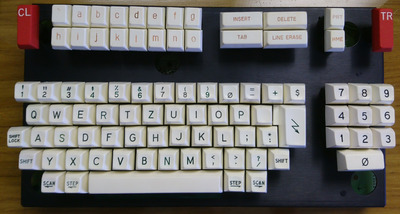
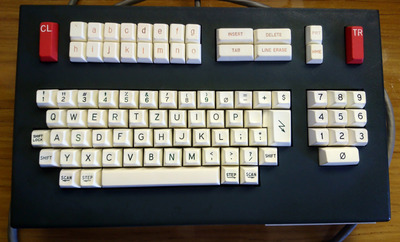
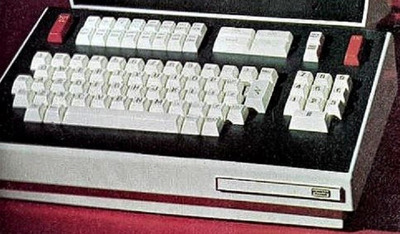
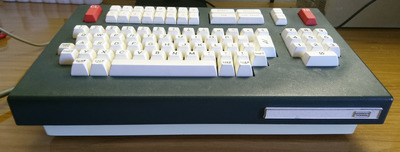
I finally got the nerve to clean the Bunker Ramo 2200 terminal keyboard, maybe my experiences will help you decide what to do and what NOT to do when attempting to restore a piece of hardware to it's former glory.
The original owner stored it in the attic of a tumbledown farm building in 1991 so it was exposed to dust, direct sunlight, heat-cold cycles and rat piss for 28 years. 70's terminals were popular in Hungarian companies in the 80's and were still in use when Western countries already switched to more modern hardware. Interesting to note that even though Hungary had a hard-line communist government they still allowed the import and use of American technology in certain areas like sciences and banking.
IBM Hungary was founded in 1936 and that cooperation never stopped even during the Cold War.
When the Soviet Union collapsed Hungary was exposed to all of the new technology and old terminals were quickly replaced by modern computers. With the replacement of old mainframes these terminals were useless so thousands of them were dumped within months and only a handful remained intact. Some of them were "liberated" by employees just like this terminal.
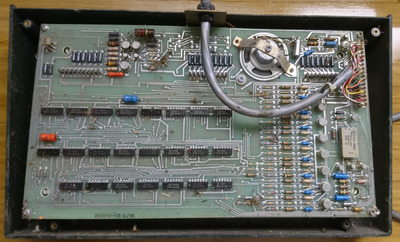
When I opened it I expected rust everywhere because the bottom 4 screws and the 25 pin d-sub connector had rust on them. Aside from some dirt there was minimal corrosion on the transistors so it was a promising start!
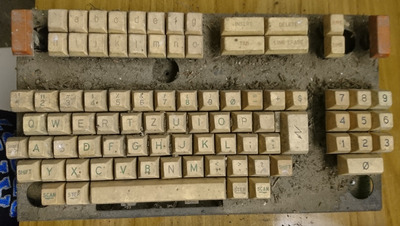
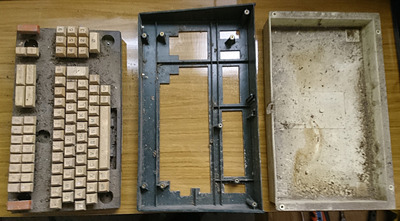
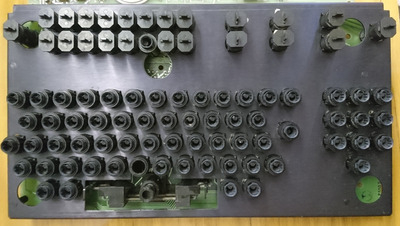
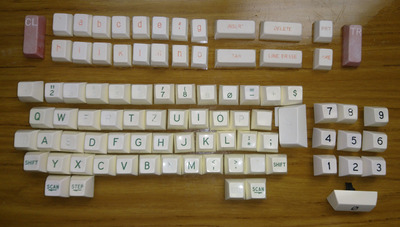
My initial optimism disappeared after I removed the top cover, it was the filthiest keyboard I have ever seen! No way it was working, even the mechanisms under the keycaps were dirty, some of them stuck.
The buckling springs were rust-free though so maybe it was not so bad after all.

Attachments

  • ramobillentyu.jpg
    Filename
    ramobillentyu.jpg
    File size
    375.75 KiB
    Views
    515 views
    File license
    Fair use/fair dealing exception
  • DSC_0456.JPG
    Filename
    DSC_0456.JPG
    File size
    1.76 MiB
    Views
    515 views
    File license
    Fair use/fair dealing exception
  • DSC_0457.JPG
    Filename
    DSC_0457.JPG
    File size
    1.14 MiB
    Views
    515 views
    File license
    Fair use/fair dealing exception
  • DSC_0461.JPG
    Filename
    DSC_0461.JPG
    File size
    707.46 KiB
    Views
    515 views
    File license
    Fair use/fair dealing exception

Reply 1 of 9, by Miphee

User metadata
Rank Oldbie
Rank
Oldbie

The beige plastic bottom yellowed unevenly. The top cover was dark green and it was in excellent shape. The keycaps also yellowed and the colors of the legends were dirty and faded. They were engraved and colored with a brittle plaster-like material, some of those have already fallen out. Two keycaps were broken and many of them had hairline cracks in them. The two red caps turned ugly orange. So I had a choice: either I leave the keycaps as they are and preserve them in original condition or try retrobrighting them and potentially mess them up for good (retrobrighting doesn't last anyway). I saw someone else do it with another Bunker Ramo keyboard so it was possible, but mine was in way worse shape and that caused a lot of problems later.
I cleaned the metal top first and it went easier than expected. After removing the keycaps and mechanisms, lots of soaking in warm dish soap and scrubbing with a toothbrush and q-tips, the dirt was gone and not a sign of rust anywhere. I tested each key with a multimeter and they worked just as fine as they did 41 years ago. The top plastic took a little more work: I removed the plastic logo then I scrubbed it with dish soap first, vinegar second and washing soda third. I used a soft cloth to avoid scratching up the plastic.
I removed the aluminium sticker and the four rubber legs from the underside and gave the beige bottom plastic the same treatment as the top. After it was properly cleaned I put the beige in a 12% peroxide bath and left it outside under roof for a few hours. In the meantime I cleaned the electronics with vinegar and used sandpaper on the rusted screws and connector parts.

Attachments

  • DSC_0505.JPG
    Filename
    DSC_0505.JPG
    File size
    356.08 KiB
    Views
    514 views
    File license
    Fair use/fair dealing exception
  • DSC_0507.JPG
    Filename
    DSC_0507.JPG
    File size
    248.81 KiB
    Views
    514 views
    File license
    Fair use/fair dealing exception
  • DSC_0519.JPG
    Filename
    DSC_0519.JPG
    File size
    726.37 KiB
    Views
    514 views
    File license
    Fair use/fair dealing exception

Reply 2 of 9, by Miphee

User metadata
Rank Oldbie
Rank
Oldbie

The keycaps were also scrubbed and went in the peroxide. I expected the legends to fade out as well but they were already damaged. I put the 2 red keycaps in 5% peroxide as a test even though I knew they would probably fade further and I need to paint them anyway.
After a day of peroxide treatment the bottom side was very nice but the keycaps were atrocious. The beige parts were fine but half of the legends just disintegrated, the colored material fell out of the engravings.

Attachments

  • DSC_0499.JPG
    Filename
    DSC_0499.JPG
    File size
    719.03 KiB
    Views
    514 views
    File license
    Fair use/fair dealing exception

Reply 3 of 9, by Miphee

User metadata
Rank Oldbie
Rank
Oldbie

I decided to use simple gypsum to fill the engravings and colored them with a marker. I tried to use a similar color as the original but the results were not convincing so I just repainted all of them. Not as nice as the original but it's a compromise.
The top row with the orange legends gave me the biggest headache. They were too small to color with a marker so I used ordinary watercolor. The problem was that I couldn't get the orange watercolor off the top of the keycaps so I had to sand it off with 1500 grit sandpaper while trying to protect the legends. You can see the results, not good. After some consideration I just decided to leave it instead of risking further damage. I could have used stickers but I wanted a more or less original look. In the end I used a thin layer of colorless matte lacquer finish to protect the keycaps, logo and the bottom plastic from yellowing back, maybe it will work.
The red keycaps also faded even though the peroxide concentration was lower. I painted them with red matte acrylic paint and used white tempera for the letters.
The whole project took 3 days but it felt like a week.

Attachments

  • DSC_0525.JPG
    Filename
    DSC_0525.JPG
    File size
    333.95 KiB
    Views
    514 views
    File license
    Fair use/fair dealing exception
  • DSC_0549.JPG
    Filename
    DSC_0549.JPG
    File size
    359.35 KiB
    Views
    514 views
    File license
    Fair use/fair dealing exception

Reply 4 of 9, by Miphee

User metadata
Rank Oldbie
Rank
Oldbie

My conclusions:
It's very easy to cause irreparable damage to the plastics even though they are very high quality, especially the top and bottom parts. The harsh environment barely damaged them.
Only ever touch multicolored keyboards if they have severe sun damage because imitating the original color of the keycaps and legends is difficult. If you mix the paint yourself do it all at once to avoid uneven colors. If you don't want to use paint, don't use peroxide on colored plastics.
Colored parts will fade even if you use low concentration and leave them in peroxide for a shorter period of time. Plan ahead.
Don't rush things. It's true that higher concentration of peroxide and direct sunlight greatly accelerates the release of oxygen but when the reaction is too fast it can damage the plastic and cause it to become unnaturally white. Be patient.
Oxygen release can force a cracked plastic to crack even more (see letter O).
Bleaching with peroxide causes the plastic to become porous and absorb paint that can only be removed with further bleaching or sandpaper. Even ordinary watercolor or felt-tip pens leave a permanent stain. Not much room for errors!
Engraved legends are a pain to work with but they are more durable. It's much easier to paint symbols on a flat surface but you can also use custom made stickers. When it's engraved then you have no choice but to work with it.
Chasing perfection sometimes leads to disaster. I kept messing the > symbol up so I tried again and again until it cracked a little as a result. I let it go and let some of the symbols remain "dark-greenish black" instead because a compromise is better than a total failure.
Sometimes stickers fall victim to the process no matter how careful you are. Try saving it if possible but don't be discouraged if you can't. Always make good quality photos or try finding photos of the sticker online so you can reproduce it later.
If you don't have enough peroxide to submerge the part completely make sure you let each side soak for an equal amount of time. You don't want uneven bleaching. Try to use a transparent plastic container that allows natural light in. A black container isn't suitable for this.
The released oxygen will keep the plastic afloat unless you put a weight on it. The best weight is made of glass. Don't use metals or dark plastics that block the path of light. It will cause uneven bleaching.
If you put more than one item in the peroxide bath make sure you turn them every few hours.
That's all folks, hope it will be of help to somebody in the future!

Attachments

  • bkroa.jpg
    Filename
    bkroa.jpg
    File size
    84.15 KiB
    Views
    514 views
    File license
    Fair use/fair dealing exception
  • DSC_0556.JPG
    Filename
    DSC_0556.JPG
    File size
    635.78 KiB
    Views
    514 views
    File license
    Fair use/fair dealing exception

Reply 7 of 9, by Miphee

User metadata
Rank Oldbie
Rank
Oldbie

Thanks guys!
The display is still a mess so I have a lot of work to do. Can these 25 pin serial/parallel keyboards be used with a modern computer somehow?

Reply 8 of 9, by imi

User metadata
Rank l33t
Rank
l33t

somehow? sure, everthing that is a switch can be made into a working keyboard ^^ question is how much work it is.

you could either reverse engineer the protocol (or find it somewhere) or just read out the switches via a custom keyboard controller.

Reply 9 of 9, by Miphee

User metadata
Rank Oldbie
Rank
Oldbie

Well, that's beyond my capabilities at the moment. Somehow I thought I could just use an adapter of some sort.
These old terminal keyboards often used this 25 pin dsub connector, even IBM terminals.