VOGONS


Reply 20 of 31, by RockmanZ3R0

User metadata
Rank Newbie
Rank
Newbie

Success! The processor came out as mentioned and I retrieved the hidden cap information. I will update the progress whenever anything significant comes up. Still waiting on Amazon to ship my flux + soldering iron. Also awaiting the capacitors I ordered.

Reply 21 of 31, by evasive

User metadata
Rank Oldbie
Rank
Oldbie
RockmanZ3R0 wrote on 2020-07-03, 01:24:

That was the ticket. With them gone it lifted out of the case with no issues. Now all I need is to verify some of the caps ratings and order away. Thank you!

You're welcome. Been there done that. Sounded familiar.

Reply 22 of 31, by RockmanZ3R0

User metadata
Rank Newbie
Rank
Newbie

Just a small progress update. I should probably post this elsewhere. But for now

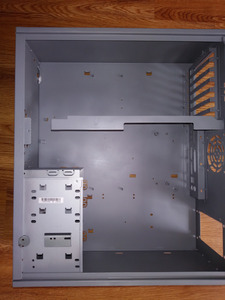
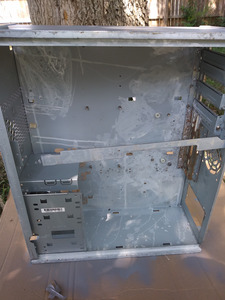
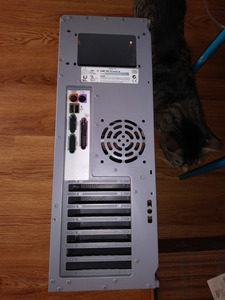
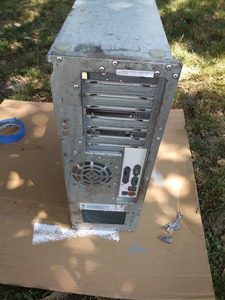
Before and after. I got rid of the rust with CLR. Started coming back, got rid of it again but this time I gave everything a nice couple thin layers of anti-rust coating and enamel. Not a whole lot but enough to do its job. I feel like it came out pretty nice.

Attachments

Reply 24 of 31, by RockmanZ3R0

User metadata
Rank Newbie
Rank
Newbie

So, got the iron, put the finer tip in. Tried to solder and unsolder using a test board the kit came with. Seemed totally fine. However, the board itself is proving to be a headache, and i don't mean the soldering fumes. ha.

I cannot either, 1. get the iron hot enough to melt.. or 2. I lack the proper tools still. So far ive managed to make no impact on the leads and old solder on the old capacitors. Ive tried but cannot get that sucker to melt enough to suck it up. At this point im afraid im just going to break the board as there are traces very close to the caps. Tried using liberal amounts of flux, changing to a chisel tip, applying new solder and flux. Still nothing. I'm missing something here, or lack the skills atm to get them out. Ive thought about the seemingly very gosh awful method of pulling the caps off from the top and then working on the leads but that's sloppy to me and still doesn't help really. Idk.

Any thoughts???

Reply 25 of 31, by ykot

User metadata
Rank Newbie
Rank
Newbie

Caps that are connected to the ground might require quite some amount of heat. Make sure to use largest tip you have, to enable better heat transfer. Clean the tip well (it should have a shiny metallic look) and apply solder to it before touching the caps. However, try not to touch cap contacts for prolonged intervals to avoid damaging the vias and traces nearby. As soon as the solder on the contact melts, pull the cap from the other side gently to extract the pin, then do the same for the other pin. It is better to start with pins that are not connected to ground.

By the way, what iron and tip did you get?

Reply 27 of 31, by ykot

User metadata
Rank Newbie
Rank
Newbie

From the 4th picture of that Amazon item, I would use either 3C or 2.4D tip, add solder to it so it so it'll have contact with the solder of the capacitor pin. An important point to consider is a power of the solder iron - according to the description, it's 60W so should be enough for that kind of board.

I must admit, however, the iron does look somewhat tiny for the advertised 60W - for me it looks more like a 10-15 real watt iron (for visual comparison, look at Hakko 70w station), but who knows, maybe they are making them more efficient these days. In the past, I had difficulties unsoldering caps from an Asus graphics card (multi-layer PCB with a lot of copper) with a 120W Weller station and largest tip, but in contrast, I've never had issues melting solder in old motherboards using my 50W station that I got from SparkFun years ago.

Also, for cleaning iron tip, I'd suggest getting coiled brass. When working, the tip should appear as shiny metal, not black or gray.
Reply 28 of 31, by RockmanZ3R0

User metadata
Rank Newbie
Rank
Newbie

I finally figured out a technique (unorthodox as it were) and got the capacitors out. I didn't damage the board or islets as far as I can see, there are no scorch marks or missing rings. Essentially what I wound up having to do was rip the capacitors off their leads and then I sorta, worked them out by heating up the solder and pushing/pulling. It was infuriating work, no matter what tip I used the old solder didn't really want to budge. But with a crap ton of flux, new solder and persistence I am now ready to put the new caps on. Ultimately the finest tip I had and pressure is what got the islets to melt through and with the vac I sucked the hole from the other side. This seemed to work well.

Fingers crossed this works because this took way longer than I expected and if it doesn't work. I am going to beg(cry) for help finding a good replacement board.

Reply 29 of 31, by RockmanZ3R0

User metadata
Rank Newbie
Rank
Newbie

Alright! I got the new caps on and loaded the board into the case. Got the power supply, a video card, ram and tried it. Nothing happened, no POST, no beeps. I plugged in the HDD and got this error code. a long beep followed by two short beeps.
Audio uploaded. I will be looking this up when I get the chance but decided it would be a good idea to archive/share it too in the event someone knows right away what it meant.

Attachments

  • Filename
    error code.mp3
    File size
    117.35 KiB
    Downloads
    38 downloads
    File license
    Public domain

Reply 30 of 31, by RockmanZ3R0

User metadata
Rank Newbie
Rank
Newbie

"1 long, 2 short Failure in video system- An error was encountered in the video BIOS ROM, or a horizontal retrace failure has been encountered" Does this sound right?

I swapped the video card out with the extra I had on hand from the previous troubleshooting attempt. It no longer makes the error code beep.. But no beeps at all, no post. HDD turns on at least xD

Reply 31 of 31, by RockmanZ3R0

User metadata
Rank Newbie
Rank
Newbie

Alrighty, I have given up on this motherboard. It was a gamble in my mind that the replaced caps would work. Now things seem more screwed up than before with it. At least I tried eh 🤣.

I am going to start a new topic and work from it now in regards to getting a new mobo and so forth for this case. After all my efforts i'd rather not ditch the classic case unless I can get a generic looking one like a 90's era looked like.
Thank you all for your suggestions and help this far.