VOGONS


Reply 20 of 30, by hmmmmmmmmmmz

User metadata
Rank Newbie
Rank
Newbie
imi wrote on 2022-06-08, 21:48:

where are you from if I may ask? or rather where did you get that board... might also help to look for local brands

Netherlands and got it 'untested' from an online marketplace also in the Netherlands - could even be from Germany as the seller lived fairly close to the border.

I did specifically ask for more details on the board, so received some pictures which all looked in good shape (except for the oxidized crystal).
Decided I would take the guess as it came at a fair price (25 euros, ex shipping) and you don't see much 386 on offer or for prices I can't afford.
Part of the fun after all is getting it to work. Did not expect I would have so much trouble finding any information about the board.

The two memory banks next to eachother seems to me a unique feature as I haven't found other 386 boards that have this layout.

Reply 22 of 30, by konc

User metadata
Rank l33t
Rank
l33t
imi wrote on 2022-06-09, 03:42:

ding ding ding

Wang EXEC 3131
https://www.youtube.com/watch?v=0S1P1h5bOkc

Nice find! The camera is retro itself (and sharp exhale through the nose after reading the video title)

Reply 23 of 30, by imi

User metadata
Rank l33t
Rank
l33t

it was already really late yesterday so only watching the video myself now, but yeah it seems the 8pin DIN is indeed the keyboard, idk if a normal AT keyboard will work, may be possible because the extra 2 pins seem to be for a speaker inside the keyboard as seen here: https://deskthority.net/viewtopic.php?t=7672
edit: nvm that keyboard there only has 5 pins, the speaker is connected internally, I'm tired 😁 so I'm still not sure about the 8 pins.

deciphering the dip switches from the video it seems to be correctly set to external VGA (second one up) 1 and 4 which are down in your picture seem to be some "security features" ? could try putting them up too, and maybe put 2 down and try the onboard VGA.

another thing is check how the ram is populated in the video, could try the same arrangement.

Last edited by imi on 2022-06-09, 10:59. Edited 5 times in total.

Reply 24 of 30, by weedeewee

User metadata
Rank l33t
Rank
l33t

Clearly this board is worthy of an addition to the ultimate retro pages. @Deksor

edit: after the photo has been corrected to show the correct rom/kbc placement. 😀

Last edited by weedeewee on 2022-06-09, 09:26. Edited 1 time in total.

Right to repair is fundamental. You own it, you're allowed to fix it.
How To Ask Questions The Smart Way
Do not ask Why !
https://www.vogonswiki.com/index.php/Serial_port

Reply 25 of 30, by imi

User metadata
Rank l33t
Rank
l33t

oh 🤣, your ROM is in the wrong socket apparently, in the video the ROM with the System/VGA label is in the bottom socket.

ayup, your ROM and keyboard controller are swapped, they have the same VCC/GND pins, so may still work x3 ...hmm VDD on the keyboard socket controller might be an issue though :x

also there's an internal speaker in the video too, so there should be some speaker connector on the board itself... J14 seems to be the speaker connector according to the label

J5 is the battery connector, can clearly see some corrosion around that area, can determine the pinout with a multimeter

Reply 26 of 30, by hmmmmmmmmmmz

User metadata
Rank Newbie
Rank
Newbie
imi wrote on 2022-06-09, 03:42:

ding ding ding

Wang EXEC 3131
https://www.youtube.com/watch?v=0S1P1h5bOkc

Awesome find! Really amazed you got this, and someone actually uploaded a video of it! Seems like a fairly unique board!

I'll take a look and let you guys know once I completed the video findings!
Definitely will try the internal/external video dip switch!

Let there be light (from the screen of course)

Thank you, thank you, thank you!

Reply 27 of 30, by hmmmmmmmmmmz

User metadata
Rank Newbie
Rank
Newbie

So it's been a while as I've not been able to work on the system. After some steps in between, I was able to get it to function fairly properly last week. For archiving purposes I'll provide an update and attach some files that helped me out.

The system seems compatible with the video @imi posted. From that video I managed to get the following information:
- Settings for the micro switches
- Configuration for the memory banks
- Type of CMOS battery
- Indication of other pin boards (Power led, IDE led, speaker)

Since I still didn't get any visual confirmation or beeps as far as I could tell, the system could at that point be dead.
I refused to give up, so ordered a POST card which turned out to be very helpful - even if it was only to give a sparkle of hope because it showed various POST codes.
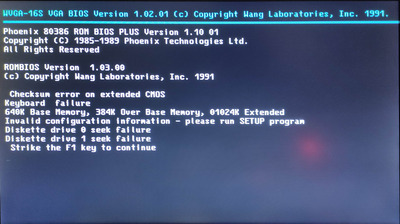
After switching some SIMM's I initially didn't have, I managed to get the BIOS screen displayed - but unfortunately we weren't there yet.
Checksum error; Keyboard failure, Invalid configuration - please run setup; Diskette drive 0 and 1 seek failure, Hard Disk controller failure... Strike the F1 key to continue 😀

Sure enough the keyboard works almost ok with the AT keyboard I have (KeyTronic MPR II) - 2 keys are not which is a minor inconvenience (slash / question mark key and the comma / quote key).
I couldn't solve the on board floppy and IDE controller, but was able to lend one from a friend. Switching micro switches 3 and 5 to off (the rest is on) disables the floppy and IDE controller, thus allowing for another one in one of the ISA slots to function as a primary. This at least allowed me to boot using a floppy drive and use the system for some investigative tools.

The Phoenix BIOS requires to be accessed through a separate DOS program. There seems to be no hotkey (e.g. DEL or F2 or CTRL-ALT-ESC).
I started out with a generic Phoenix AT configuration program (ATSETUP.COM) which allowed me to make some basic changes to solve some of the errors shown.
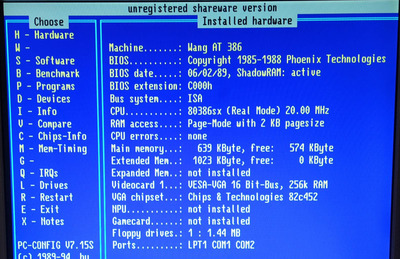
Later on I found on an archived forum (thank you Archive.org) a set of BIOS programs specific to WANG. These allowed me to make further updates to the bios, e.g. correct memory size.

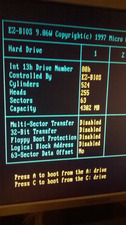
With the ISA multi i/o controller unfortunately I was not able to boot from a hard drive nor a CF card. The CF-IDE adapter I ordered was populated with a 128mb CF card that I still had laying around.
Preconfigured it for DOS on a Pentium 166 system so I know it could work, unfortunately I was unable to get it up and running and gave up (perhaps the ISA controller is not happy with this configuration?).

The one ancient hard drive I did have was an MFM type drive, but also started out with no controller. I found one for a reasonable price (what's reasonable on retro nowadays?) and installed it instead of the multi i/o card.
Floppy still works and after some configuration and reading on MFM drives got that one up and running as well. Unfortunately the drive had to be formatted in order to get it running properly.

From the video the original battery appears to be a Rayovac 844 battery pack.
Buying a 3xAA battery holder to get 4.5 volts and attaching it to the mainboard resolved the final issue of retaining BIOS settings.

I'm not an artist but did my best to document my knowledge of the board best as I could. Hope it helps somebody else one day.

Conclusion:
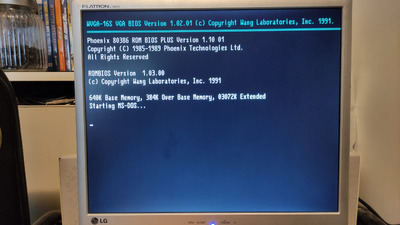
I am now the proud owner of a working 386 running at 20 Mhz! Never had a 386 before so I'm ready to explore what I couldn't do when I was a kid with a 8086.
Next up will be the challenge of finding a case that fits this enormous board and load it with some goodies as for example a sound card.t
Attachments

Reply 28 of 30, by ediflorianUS

User metadata
Rank Member
Rank
Member

you could try a stock IDE hdd if you have . The older the better , I seen on Toshiba that Seagate was more compatibile , but larger WD's do work. you set up a variant in bios , then use floppy with hdd brand tools + or + overlay app to partition properly . (I can confirm a Seagate ST43.... 4.3 gb overlayed and partitioned to 3x1.5gb's fat16 works fine on original bios on 80286 with limited up to 100mb hdd's , I also know a WD120gb works formatted to 100mb so it probably work with overlay app also). if you use fat32 and no windows you can use 1 or 2 partitions without much issues.

My 80486-S i66 Project

Reply 29 of 30, by hmmmmmmmmmmz

User metadata
Rank Newbie
Rank
Newbie

Thanks for the feedback, so how do you do your configuration in the bios? And can you point to some hdd brand tools you refer to?
I'll try to explore some more myself as well. thanks ediflorianUS.

Reply 30 of 30, by ediflorianUS

User metadata
Rank Member
Rank
Member
hmmmmmmmmmmz wrote on 2023-03-16, 20:28:

Thanks for the feedback, so how do you do your configuration in the bios? And can you point to some hdd brand tools you refer to?
I'll try to explore some more myself as well. thanks ediflorianUS.

select max drive available in BIOS , install overlay app from floppy , and zham it works , (seagate for bios closer to toshiba , and WD worke'd fine on 486).

WP_20230203_001.jpg

My 80486-S i66 Project