Reply 40 of 60, by nathanieltolbert
Rank
Member
Okay, this is strange. The voltage read on L54 with the VIO set to 3.4 reads 4.98 on DC. What did I do wrong?
Okay, this is strange. The voltage read on L54 with the VIO set to 3.4 reads 4.98 on DC. What did I do wrong?
I dont know I wasnt there with you soldering 🙁, but you should definitely NOT run it like that, lets hope nothing powered from 3.3 got fried.
1 take a picture of your handywork
2 which capacitors have you replaced?
3 do you have an oscilloscope?
in theory even totally screwing soldering replacement capacitors shouldnt influence DC voltage that much. HIP6012 is regulating output voltage and wont allow such discrepancies.
https://pdf1.alldatasheet.com/datasheet-pdf/v … /HIP6012CB.html
Its possible one of the small smd capacitors like CB115 connecting 3V and 5V rails is shorted? Measure resistance between both pins of CB115 or CB114. Another suspect might be D20, also resistance between its legs.
if reistances arent in single ohm range its fine. Another thing to check is lifting L54 inductor leg closer to the board edge and powering board up _briefly_ just long enough to get a reading of DC voltage on that lifted leg.
Of course all of it on unpopulated board. No ram no cpu no cards.
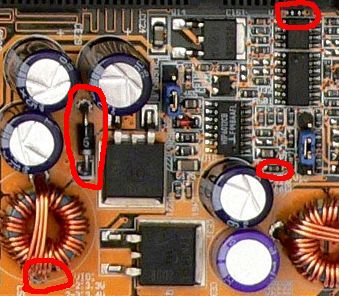
I didn't have time to check the resistances of those parts today, but I did manage to snap a picture. I double checked the original photo and the silkscreen on the board. The caps are installed correctly. I don't see a bridge or short on the back? But my eyes really aren't that good. My soldering skills certainly aren't great, but hopefully it is good enough to not cause additional issues.
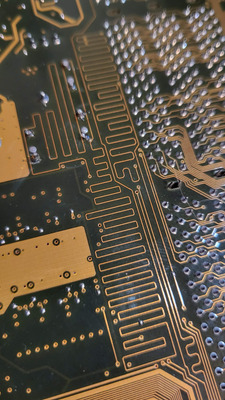
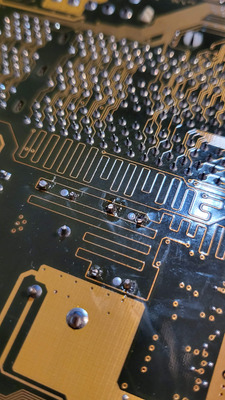
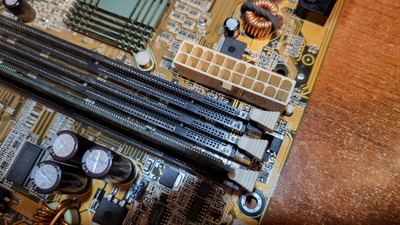
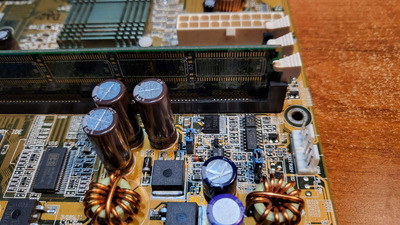
Nothing wrong with those caps, one pin on the back looks like its leaning on a squiggly trace, but on another photo it looks like its not touching. Good job.
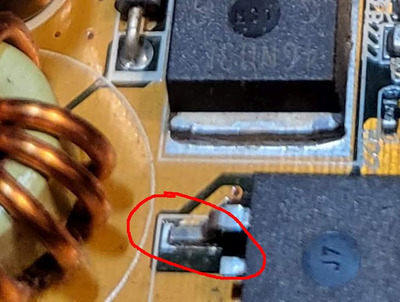
but whats up with that mosfet solder joint, it looks cold/cracked/eroded
Hi,
I only have read the very first post of this thread, so I don't know what you've all tried so far.
Just one thing that instantly came to my mind:
I also bought a K7M some time ago and it had the very same symptoms! 8 Beeps with VGA card installed, and some other beeps without a VGA card. Fans spinning, but it didn't matter what other HW, RAM, etc. was installed it just wouldn't POST. Didn't find any solution in the web, no one seemed to have had this issue before. Beep codes didn't help or did make no sense.
To cut a long story short:
The solution in my case was: reflashing the BIOS.
After that the board worked flawlessly.
Maybe this helps.
Good luck!
OK, now I've read the complete thread. Apparently you haven't done a reflash of the BIOS chip yet.
I RECOMMEND YOU DOING THIS FIRST BEFORE YOU DO ANY SOLDERING ON THE BOARD!!!
I could still be wrong but I'm VERY confident this will solve your issue.
The behavior you describe is just what I have experienced with my board.
I can't tell why it is like it is but something seems to happen to the BIOS that causes these strange behavior.
A reflash will very likely solve this.
BIOS indeed might be the source of the problem, perhaps those 3.3V measurements were done incorrectly?
rasz_pl wrote on 2022-11-04, 09:51:BIOS indeed might be the source of the problem, perhaps those 3.3V measurements were done incorrectly?
That is always a possibility with me. I would hope not, but looking at that one leg you pointed out there is no movement when I use my tweezers on it. It does appear to be solidly connected. I can try to reflow the leg if you think that might help.
The problem with reflashing the BIOS, or flashing a new BIOS is that I don't have a burner. I have been meaning to get one, but things keep popping up. Not to be a downer or anything but the money I set aside for it this month looks like it's going to have to go to my 18 year old cat. It appears from how he is doing that we are going to have to put him down this coming week. As that's an unexpected expense, I will have to delay longer on the T42 programmer. Sorry. I can't help but wonder if one of those voltage regulators has failed. And the reason the numbers were so low before was because the caps were going bad as well? I am unfortunately kind of stuck at the moment.
definitely reflow that pin, it looks dry
You can always try hotswap flashing in another board with same 32pin bios pinout. Some pointers
-prepare bios in a working board to be easily removable, you can for example put a strip of plastic underneath it so its easy to pull out. DO NOT go near working system with metal screwdriver
-avoid more modern boards, those started employing fancy programming lockouts
-mark bios chips with marker/stickers so you dont mistake them 😀
-download uniflash, prepare hdd/floppy with uniflash and bios you want flashed, rename it to 1.bin or something like that so its easy to remember. start uniflash, then remove bios chip and insert blank/bad one, backup old contents, flash your 1.bin, shut down computer, replace chips again
Okay, I know I haven't talked about this in nearly a year at this point, but I finally managed to get a T48 programmer purchased and I pulled the bios on this board. I put the chip in after identifying the type and I had it verify the data on the BIOS chip. Programmer said it was good. I used the Verify function after loading the two different BIOS files that are on TheRetroWeb regarding this board, and the newer bios reports Verify Result(differencequantity): 159318. I have never used one of these before, so I'm not 100% sure what that means? I am going to make an assumption, and probably an incorrect one that it found that number of differences between what is on the chip and what is in the ROM file? Also as a follow up. The weird voltage numbers we were getting? I haven't checked it yet, but I found out a little while later that my battery in the multimeter was low, and that might have been causing that. So I guess if the updated bios format is that different, I should flash it with the new bios? Can I do that with the T48 programmer? I have been watching videos on youtube and apparently I am expected to know something more than I do, because I am lost from the start with the videos and tutorials. Any suggestions and help would be very much appreciated. Thank you for taking a look!
You can do a Read operation and then save the file so you have the original BIOS archived.
Then open your downloaded BIOS rom and program it in your BIOS chip. I always use erase and write. Good luck!
i386 16 ⇒ i486 DX4 100 ⇒ Pentium MMX 200 ⇒ Athlon Orion 700 | TB 1000 ⇒ AthlonXP 1700+ ⇒ Opteron 165 ⇒ Dual Opteron 856
Correct, just do a read from the chip then save the file as .bin or .rom or whatever ending the new file has. It doesn't matter. There are some options in the save dialog but I remember the default settings beeing alright.
Load the new image file, you can see the hex data in the left side of the T48's software, then hit "program".
There's no need to manually erase the EEPROM, the programming step does this on default before writing the data if I remember correctly.
The programming itself should take 5-10s and end with an "all ok" output.
That's it!
I so want to see a pic of the ram count 😀
PC#1 Pentium 233 MMX - 98SE
PC#2 PIII-1Ghz - 98SE/W2K
nathanieltolbert wrote on 2023-07-12, 03:45:Okay, I know I haven't talked about this in nearly a year at this point, but I finally managed to get a T48 programmer purchased and I pulled the bios on this board. I put the chip in after identifying the type and I had it verify the data on the BIOS chip. Programmer said it was good. I used the Verify function after loading the two different BIOS files that are on TheRetroWeb regarding this board, and the newer bios reports Verify Result(differencequantity): 159318. I have never used one of these before, so I'm not 100% sure what that means? I am going to make an assumption, and probably an incorrect one that it found that number of differences between what is on the chip and what is in the ROM file? Also as a follow up. The weird voltage numbers we were getting? I haven't checked it yet, but I found out a little while later that my battery in the multimeter was low, and that might have been causing that. So I guess if the updated bios format is that different, I should flash it with the new bios? Can I do that with the T48 programmer? I have been watching videos on youtube and apparently I am expected to know something more than I do, because I am lost from the start with the videos and tutorials. Any suggestions and help would be very much appreciated. Thank you for taking a look!
The verify function compares the EEPROM content to the buffer content. I.e. if you loaded a BIOS image you downloaded, it will be compared to the one currently on the EEPROM. If they're not the same (which they probably aren't), the verification will fail, and the programming software tells you how many differences it found. Iirc the specific bytes are shown in red in the buffer window aswell.
Yep, you can do it with the T48 programmer, wasn't that why you got it in the first place? 😉 Seems you've already identified the EEPROM and loaded the correct profile for it. First of all, read the BIOS currently on the chip and save a backup somewhere, just in case. The save and load buttons saves the buffer to disk and reads a file from disk to the buffer respectively, they do no chip operations. Then load the BIOS image you want to program (probably a .bin file, but might have other extensions aswell, the file should be exactly the same size as your backup anyways) into the buffer. As mentioned, the default settings should be fine. Press the write button and wait a few seconds until the programmer says it's done. Then reinstall the chip in the mobo, power it on, and keep your fingers crossed 😀
Since you have the programmer, you got an almost unlimited number of tries in case something goes wrong, so no need for worry at all. Just make sure to choose the correct chip profile in the programmer software, and install the chip the right way in the socket on the mobo 😀
kaputnik wrote on 2023-07-13, 00:34:The verify function compares the EEPROM content to the buffer content. I.e. if you loaded a BIOS image you downloaded, it will be compared to the one currently on the EEPROM. If they're not the same (which they probably aren't), the verification will fail, and the programming software tells you how many differences it found. Iirc the specific bytes are shown in red in the buffer window aswell.
Yep, you can do it with the T48 programmer, wasn't that why you got it in the first place? 😉 Seems you've already identified the EEPROM and loaded the correct profile for it. First of all, read the BIOS currently on the chip and save a backup somewhere, just in case. The save and load buttons saves the buffer to disk and reads a file from disk to the buffer respectively, they do no chip operations. Then load the BIOS image you want to program (probably a .bin file, but might have other extensions aswell, the file should be exactly the same size as your backup anyways) into the buffer. As mentioned, the default settings should be fine. Press the write button and wait a few seconds until the programmer says it's done. Then reinstall the chip in the mobo, power it on, and keep your fingers crossed 😀
Since you have the programmer, you got an almost unlimited number of tries in case something goes wrong, so no need for worry at all. Just make sure to choose the correct chip profile in the programmer software, and install the chip the right way in the socket on the mobo 😀
Yes, I got the T48 programmer for this function and the ability to program other chips. Since I have no experience, I am always concerned over the chance that I might mess up. I am currently recovering from a surgery on my hand due to my chronic illness and I am typing this one handed. I will come back to this once all of my stitches and pins are out. Probably be another month at this rate. The surgery was unexpected.
I wish you all the best! Your health is more important than system health. 😉
i386 16 ⇒ i486 DX4 100 ⇒ Pentium MMX 200 ⇒ Athlon Orion 700 | TB 1000 ⇒ AthlonXP 1700+ ⇒ Opteron 165 ⇒ Dual Opteron 856
ChrisK wrote on 2022-11-04, 06:59:Hi, I only have read the very first post of this thread, so I don't know what you've all tried so far. Just one thing that insta […]
Hi,
I only have read the very first post of this thread, so I don't know what you've all tried so far.
Just one thing that instantly came to my mind:
I also bought a K7M some time ago and it had the very same symptoms! 8 Beeps with VGA card installed, and some other beeps without a VGA card. Fans spinning, but it didn't matter what other HW, RAM, etc. was installed it just wouldn't POST. Didn't find any solution in the web, no one seemed to have had this issue before. Beep codes didn't help or did make no sense.To cut a long story short:
The solution in my case was: reflashing the BIOS.
After that the board worked flawlessly.Maybe this helps.
Good luck!
That's what got mine going as well. Bit rot I guess. I wiped and re-flashed the EEPROM using my programmer and the board posted.
I had a black screen - no display problem with my K7M a few years ago. The cause turned out to be my PS2 keyboard, of all things.
When I unplugged the keyboard, it booted fine. It's the only motherboard I ever encountered that didn't like that keyboard, so there's something uniquely picky about it.
But I don't want to distract you from the voltage question. If your voltages are wrong then that's a critical issue.
I've never really used the board much but this was one of the first motherboards for AMD Athlon, so it might be pretty quirky.
shamino wrote on 2023-07-29, 17:55:I had a black screen - no display problem with my K7M a few years ago. The cause turned out to be my PS2 keyboard, of all thing […]
I had a black screen - no display problem with my K7M a few years ago. The cause turned out to be my PS2 keyboard, of all things.
When I unplugged the keyboard, it booted fine. It's the only motherboard I ever encountered that didn't like that keyboard, so there's something uniquely picky about it.But I don't want to distract you from the voltage question. If your voltages are wrong then that's a critical issue.
I've never really used the board much but this was one of the first motherboards for AMD Athlon, so it might be pretty quirky.
I have never had a keyboard do that, but I have a Packard Bell mouse that will cause a system it is connected to crash in very strange ways. I tried all different ways to test this and I hasn't worked. I got my stitches out of my thumb today, and I have to keep it bandaged and not do anything with it for another 2 weeks or so. We'll see in a couple weeks what happens when I get a chance to pull that BIOS chip again and flash it with a never version of the BIOS. But that is amazing that the keyboard caused you so many issues.
Just got this board myself. Have not tried it yet, but was reading around because I intend to soon. Mine is a V1.02