VOGONS


First post, by majestyk

User metadata
Rank Oldbie
Rank
Oldbie

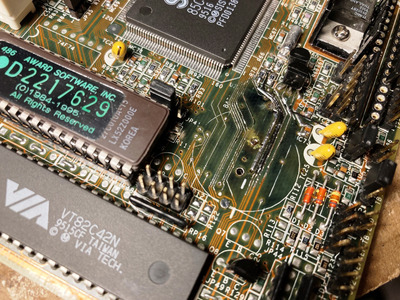
I recently acquired an Abit Socket 3 mainboard with some VARTA damage, it´s very similar to this one:
https://theretroweb.com/motherboards/s/abit-ab-pm4t-rev.-1.0

It´s said to be unable to run an Am5x86:
Help to identify 486 motherboard.

There are also only pictures with 256K L2 cache to be found on the net - either 4 chips 64K x 8 or 8 chips 32K x 8.

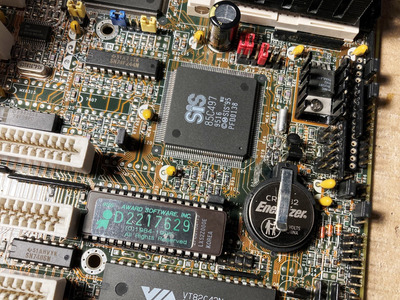
All this is is quite a miserable situation for a PCI socket 3 mainboard with the SiS 496 / 497 chipset!
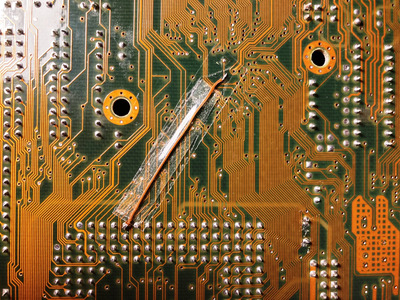
First the traces that got eaten away by the Varta pollution had to be restored. These were quite a few before the mainboard started correctly again.

AB_PM4aa.JPG
Filename
AB_PM4aa.JPG
File size
1.02 MiB
Views
200 views
File license
Fair use/fair dealing exception
AB_PM4ba.JPG
Filename
AB_PM4ba.JPG
File size
909.42 KiB
Views
200 views
File license
Fair use/fair dealing exception

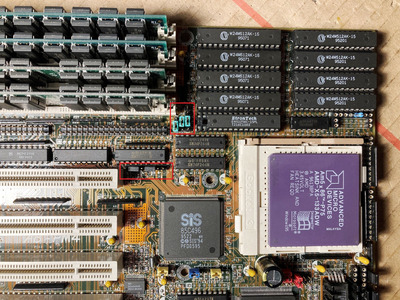
Then I started tinkering a bit. FIrst the (missing) jumpers for 512K and 1MB L2 cache had to be located, populated and jumpered accordingly for 512K. Here you can see what has to be changed. You can also jumper for 1MB.

AB_PM4c.JPG
Filename
AB_PM4c.JPG
File size
1.17 MiB
Views
200 views
File license
Fair use/fair dealing exception

After this issue was solved, it was time to get the Am5x86 working with Write Back L1 and all the other settings it needs. This turned out to be a very time consuming pursuit...
The AB-PM4 is definitely not "ready" for this CPU (and probably also not for the enhanced AMD 486DX4).

Step 1:
Frequency (yellow), core voltage (red) and x4 multiplyer (blue) can be set as the manual for the AB-PM4T describes:

AB_PM4d.JPG
Filename
AB_PM4d.JPG
File size
360.6 KiB
Views
174 views
File license
Fair use/fair dealing exception
Last edited by majestyk on 2023-11-27, 18:36. Edited 6 times in total.

Reply 1 of 1, by majestyk

User metadata
Rank Oldbie
Rank
Oldbie

Step2:
Next the quadruple "bridge-networks" RN6 (not used), RN10 (1-8), RN14 (1-8) and RN17 (5-12) are set like for the regular Intel and AMD DX4 CPUs.

Step 3:
To set the CPU im Write-Back mode at startup / reset (W/B pin-Vcc), a bridge must be inserted in contacts 4-5 of RN6 (this RN is for Cyrix CPUS otherwise). This bridge / resistor can be seen in the pic. above at the right lower corner of the cache chips block. I found no other way for this connection without soldering wires.

Finally I did a lot of tracing and measuring connections to be able to connect the "HITM", "CACHE" and "INV" pins of the 5x86 CPU to the chipset.

- The HITM signal can be connected by simply bridging 1-2 of connector RN16. This shorts the CPUs HITM pin and pin 27 of the chipset (496).

- The INV pin of the CPU needs to be connected to the chipset (W/R# pin of the 496 - this connection already exists) and to the W/R pin of the CPU. Therfore pins 5-6 of RN16 need to be bridged and jumper JP24 must be populated.

- Connecting the CACHE pin of the CPU to pin 70 of the chipset (496) is a little trickier. The CACHE pin of the CPU is connected to pin 3 of RN16. But, although I searched thoroughly, I could NOT find any connetion from pin 4 of RN16 or from ANY other jumper pin to pin 70 of the chipset (496).
Pin 4 of RM16 connects to the CACHE-PODP contact of the CPU socket, though - but that´s all.
So I traced from pin 70 of the chipset to the printside of the PCB and added a wire bridge from there to the CACHE PODP pin:

AB_PM4e.JPG
Filename
AB_PM4e.JPG
File size
1.07 MiB
Views
169 views
File license
Fair use/fair dealing exception

In addition, pins 3-4 of RN16 have to be bridged of course.

The Am5x86 is made completely functional this way and you can even keep the stock BIOS from 1995, if you don´t mind that an Am5x86 @ 160 MHz is identified as a Am486DX4-S @ 150 MHz during POST.
I tried later 5x86 compatible BIOSes from ATC and Chaintech - they also work perfectly and identify the CPU and speed correctly, but performancewise it´s no difference.
The stock BIOS also sets the TAG bus to 7(+1) bits automatically so the dirty bit is available and you can cache 64MB RAM with 512K L2 cache.

Oh, and don´t forget to set the "TURBO" jumper to 2-3, or the sytem will go down to half speed as soon as WB L1 cache gets enabled!
Hope this helps someone in the same situation...