VOGONS

Common searches


Retrobrite + grow light

Topic actions

Reply 20 of 36, by feipoa

User metadata
Rank l33t++
Rank
l33t++

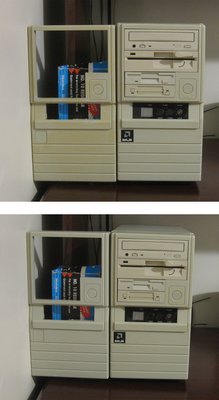
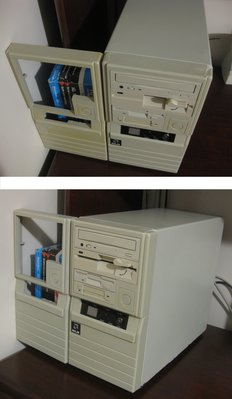
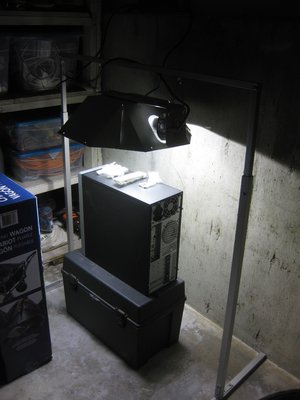
I measured the temperature of the items with an IR thermometer. They were sitting only at 21 C, whereas the bulb itself is more like 220 C.

I'd like to optimise the process for time, so I'm experimenting with moving the items closer to the artificial sun. Seems like the desired temperature is around 70 C, though I'm aiming for 50 C.

EDIT: distance from bulb is 6-9". After 10 minutes, the temperature ranges of the bezels are from 40 to 60 C.
EDIT2: The top of the computer case was getting pretty warm, so I covered it with aluminium foil.
EDIT3: Already noticing some whitening at the pre-2hr mark.
EDIT4: At about 2 hr 45 minutes, its about 80% back to the original, non-yellowed colour.

heat.jpg
Filename
heat.jpg
File size
321.45 KiB
Views
953 views
File license
Fair use/fair dealing exception

Plan your life wisely, you'll be dead before you know it.

Reply 21 of 36, by feipoa

User metadata
Rank l33t++
Rank
l33t++

After 5 hours, the DVD bezel looks back to normal. The 5.25" bezel looks almost there, perhaps 90%. You can still barely see the yellow-to-beige line. The lettering on the Travan 20 tape drive bezel started to bleed and mostly washed off with water. I can still barely see the yellow-to-beige line. perhaps 85% there.

The issue I noticed is that there is some streaking. I noticed that the Salon Care product was mostly evaporated or dried under the plastic wrap. I think when placing bezels in such dry heat that the Salon Care product be replaced after 2 hours or more. I'm trying another run of 2 hours after rebrushing the Salon Care 40 to see if the streaks diminish. The mild streaking is better than the yellowing though.

I think the hot water bath method would offer a far more uniform application.

EDIT: Another idea might be to do 3 hours at 7" distance, reapply, and do another 3 hours at a 2' distance. Obviously, the goal is to achieve the objective with spending the least on electricity and optimising time.

Plan your life wisely, you'll be dead before you know it.

Reply 22 of 36, by xjas

User metadata
Rank l33t
Rank
l33t

Cool, I stand corrected then! That's not far off from how long my Kinesis took in natural sunlight. Glad you got a good result.

Post some 'after' pics if you take 'em. 😀

twitch.tv/oldskooljay - playing the obscure, forgotten & weird - most Tuesdays & Thursdays @ 6:30 PM PDT. Bonus streams elsewhen!

Reply 23 of 36, by feipoa

User metadata
Rank l33t++
Rank
l33t++

After 2 hours of round 2, the 5.25" bezel became quite splotchy. I think having it so close to the bulb is drying the solution way too fast, so the areas with higher concentrations of solution dry the slowest, so the dwell time is longer in those zones. Live and learn. I think I need to keep it at a good 2' from the bulb, where the surface temperature of the bezel is 30 C. I've applied more solution and will let it sit another few hours. I hope the splotchy areas goes away. Do they? I think a heated pot of peroxide water is the way to go for a consistent result.

Plan your life wisely, you'll be dead before you know it.

Reply 24 of 36, by feipoa

User metadata
Rank l33t++
Rank
l33t++

Oh man, I'm having a really difficult time getting the splotching off the 5.25" bezel. You definitely do not want to let the solution dry out. In trying to get the splotching out, I'm reapplying the Salon Care 40 every 45 minutes and putting it back under the light. The splotching goes away, but when I wash the solution off, the splotching returns, but not as strong as when there is dried out solution on the bezel. So I can put the solution back onto the bezel, put it in the light for 30 minutes, and the splotching goes away. I can take the bezel out of the light and let it sit on the table with the solution still on it, and the splotching does not return. The splotching returns when I wash off the solution. It is very curious. Maybe I can let the solution air dry onto the bezel?

Only the 5.25" bezel showed the highly sensitive behaviour to drying. But after so many rounds of trying to remove the splotching, I think the bezel is too white to go into a system. How long does it take to get some yellow back? If I put the bezel back under the light without the solution, how long to get 20% of the yellowing back?

EDIT: I was wondering why the circles of splotchiness appear. Are they areas whereby there was air bubble forming a lens to focus the light down onto a spot on the bezel? Are the splotches areas of non-dried solution? And is there a limit for how bright bezels will get? Can they get much brighter than their original colour? What were to happen if you cut a slice of plastic off, say about 1 mm down. Will this plastic be yellowed, the original colour, or the retrobrited colour?

Plan your life wisely, you'll be dead before you know it.

Reply 26 of 36, by feipoa

User metadata
Rank l33t++
Rank
l33t++

I've watched a few of his videos, but didn't see one whereby he was using a 400 watt grow bulb. Some bulbs (those for flowers) don't have spectral peaks in the UV range, but the one I'm using does. When I had the parts 7" from the bulb, after 2 hours, most of the lightening was complete. How long did 8-bit guy leave his stuff out in the sun for?

EDIT: I did do a run with a new bezel at 2-3' from the bulb and it was mostly whitened after 3 hours.

Plan your life wisely, you'll be dead before you know it.

Reply 27 of 36, by feipoa

User metadata
Rank l33t++
Rank
l33t++

Attached are the results. The tape drive bezel came out fine, as did the DVD drive bezel. They reached a point in which they would not brighten any more. As for the 5.25" floppy bezel, you can see that it ended up splotchy. Depending on how fussy one is, you could call it ruined. I might try sourcing another bezel for it. Anyone with a dead D509V3 floppy drive, please keep the bezel. The lesson here is not to let the solution dry out. The consistency needs to be constantly monitored for uniformity. Of the several videos I watched, nobody had mentioned this. I suspect some plastics are more sensitive to this issue than others.

The 5.25" floppy drive you see inside the case is the untouched whiter floppy drive from the before photos, used as a colour reference.

I found it interesting that the 5.25" closing latch wouldn't lighten as much as the rest of the bezel.

Lineup.jpg
Filename
Lineup.jpg
File size
264.99 KiB
Views
910 views
File license
Fair use/fair dealing exception
Splotchy_5.25.jpg
Filename
Splotchy_5.25.jpg
File size
393.74 KiB
Views
910 views
File license
Fair use/fair dealing exception
Splotchy_5.25_2.jpg
Filename
Splotchy_5.25_2.jpg
File size
226.21 KiB
Views
910 views
File license
Fair use/fair dealing exception
Splotchy_5.25_3.jpg
Filename
Splotchy_5.25_3.jpg
File size
221.14 KiB
Views
910 views
File license
Fair use/fair dealing exception

Plan your life wisely, you'll be dead before you know it.

Reply 29 of 36, by MMaximus

User metadata
Rank Oldbie
Rank
Oldbie

Thanks for this detailed thread with the pictures. I also experimented with different retrobrite combinations last summer as I wanted to take advantage of the sun to whiten multiple parts. Unfortunately I destroyed some items in the process. 😵 I have found out that if you don't monitor the process regularly it's very easy to overcook the items - they get too white, splotchy or worst case scenario they melt a bit and change shape / shrink.

For small items I have settled with 11% liquide clear peroxyde, gently heated up in an old saucepan on a hob (lowest heat setting). I've also done a few case bezels submerged in liquid peroxyde in a plastic container under the sun but you need loads of solution so it's not cost-effective - OTOH it gives much more even results than the salon cream + cling film.

Here are four 5.25" bay adapters - two of them have been in a heated up solution for several hours (no light necessary) the two others have been left untouched for comparison. I haven't been able to get them any whiter for fear of damaging them.

2JI29sfl.jpg

Hard Disk Sounds

Reply 30 of 36, by feipoa

User metadata
Rank l33t++
Rank
l33t++

Stove-top seems to be the way to go if you have plenty of hydrogen peroxide. Perhaps it can be saved up and reused?

Something else I'm noticing is that it may be impossible to get every item in the expansion bays the same colour. Often things like tape drives, PCMCIA readers, floppy drives, CD-ROM's, etc. come from different manufactures and each has their own tint of beige. So even when everything was brand new, it all might not match perfectly. One can play with retro-brite exposure times in attempt to best colour match yellowed items from different manufacturers, but I don't think they will ever be exact colour matches.

I think a uniformly yellow matched case to its expansion bay items (floppy, cd-rom, etc) looks better than a case with items ranging from deep yellow to bright white.

Plan your life wisely, you'll be dead before you know it.

Reply 31 of 36, by feipoa

User metadata
Rank l33t++
Rank
l33t++

I have this yellowed bezel I've been keeping for years, hoping one day to retrobrite it and use it on my case which case cracks on its bezel (the case on the right). After 2 hours in the grow light with some Salon Care 40, this is what it looks like. No splotching. When I hold it up to the painted metal, it looks pretty close.

The case on the right is provided for colour comparison. Nothing was changed on the case bezel.

From top to bottom, the left photo is: before (front view), after (frong view), before (angled view), after (angled view).

If you clicked in the zoomed in photo, you can see that the before bezel was splotchy yellow. Now it is a uniform beige.

Case_front_bezel_before.jpg
Filename
Case_front_bezel_before.jpg
File size
934.78 KiB
Views
873 views
File license
Fair use/fair dealing exception
Case_front_bezel_after.jpg
Filename
Case_front_bezel_after.jpg
File size
904.19 KiB
Views
873 views
File license
Fair use/fair dealing exception

Plan your life wisely, you'll be dead before you know it.

Reply 32 of 36, by xjas

User metadata
Rank l33t
Rank
l33t

Nice going, definitely looks good. Seems like it's just a matter of getting the technique down.

Sorry for talking out my ass earlier about it taking longer under the light. Totally the opposite of what I expected.

twitch.tv/oldskooljay - playing the obscure, forgotten & weird - most Tuesdays & Thursdays @ 6:30 PM PDT. Bonus streams elsewhen!

Reply 33 of 36, by feipoa

User metadata
Rank l33t++
Rank
l33t++

Well, I didn't expect to get it right the first time. I'm still looking for a D509V3 floppy drive bezel though.

The majority of whitening is done in the first hour under the 400 W bulb.

I might whiten my other case bezel shown above with "586" across the case badge.

Plan your life wisely, you'll be dead before you know it.

Reply 34 of 36, by WolverineDK

User metadata
Rank Oldbie
Rank
Oldbie
feipoa wrote:

I watched a video in which the guy used standard fluorescent tube lights, the 40 W kind you find on the ceiling of your garage, and the retrobriting worked. Same for black lights. Those don't emit all that much heat.

You wouldn't happen to think about Adrian Black ? Cause he made this video.

called "A new way to fix yellowed plastics indoors?"

https://www.youtube.com/watch?v=cRlAFnhmPlw

Reply 35 of 36, by feipoa

User metadata
Rank l33t++
Rank
l33t++

Saw that video. He's using bulbs which emit blue or purple light, so perhaps there is UV as well. Need a spectral graph. His youtube page says "without UV", but how do we know those bulbs don't emit any UV?

Plan your life wisely, you'll be dead before you know it.

Reply 36 of 36, by WolverineDK

User metadata
Rank Oldbie
Rank
Oldbie
feipoa wrote:

Saw that video. He's using bulbs which emit blue or purple light, so perhaps there is UV as well. Need a spectral graph. His youtube page says "without UV", but how do we know those bulbs don't emit any UV?

That I have no idea about, but what you wrote made me think of him. And I do enjoy his videos.