VOGONS


First post, by kahuna

User metadata
Rank Newbie
Rank
Newbie

Hello Vogons,

During my free time over the past few months, I've been building my own DOS retro games collection.
Basically, installing all games I love, making sure they work and so on. As you can imagine, it takes time! Of course I'm not done, I'm planning to do the same for Windows 95/98 games, and in this case OS + drivers as well next.

At any rate, I'm always concerned that the drive(s) where I have all of that just fails on me at some point, and while for DOS games I can just essentially "copy - paste" the files and folders on that drive to some other place. I wanted to look for a tool that allowed me to create an image and restore it back to another drive if needed.
Happy to report that I found it! 😁
Not a big secret anyway, we all know about Norton Ghost and similar software.

What took me a little bit of extra time however, was to find a version that works on my K6-III+ based PC and on a VIA C3 system as well. A software that is not too old, but it cannot be the latest release either as it won't run in these machines. The one that checks all the marks for me is (drum roll) Clonezilla 2.2.1-25-i486

I was worried that 128MB of RAM that I have on the K6 were not going to be enough, but it turns out it works perfectly fine, at least with the version above.
In my setup I use the same version for both machines even though the C3 is more powerful and has more RAM (392MB).
Trying different Clonezilla versions, I found that newer ones do not work in the K6 machine, even though they are supposedly compiled for "i586" because the Linux kernel is not configured to support a K6 CPU.

All of that is very good, thanks but... where are we going to store those disk image files? Well in my case, I have a file server at home, that shares/exports several drives to my network over SMB/CIFS and NFS.
You can use whatever you want pretty much, from sharing over SMB/CIFS an external drive you have connected to your modern laptop or desktop, a Synology NAS or similar perhaps; to cloning to another drive directly.
There is always the alternative of getting the drive(s) out of the retro computer and use a SATA/IDE to USB adapter in a modern computer and run Clonezilla there. Honestly, I think this option is not worth it because Clonezilla runs really well at least in K6 / C3 and similar era hardware, unless you don't have a CD-ROM unit or there is no local network connectivity.

Alright, let's get into it. Please note, there are many tutorials on the use of Clonezilla, this is my take on it and this is what works for me. As always, your mileage may vary.
First of all get the software, all versions are available here:
https://sourceforge.net/projects/clonezilla/f … la_live_stable/
The one that I use is inside the "oldfiles" folder. Get the .iso one and burn it to a CD or DVD.

Then configure your retro PC to boot from the CD-ROM drive, you should see something like this:

Clonezilla-01.png
Filename
Clonezilla-01.png
File size
58.97 KiB
Views
512 views
File license
GPL-2.0-or-later

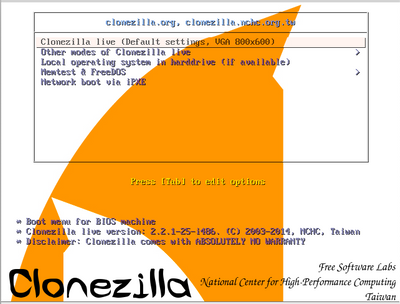
Go with the first one, just hit enter. It will take a few minutes to load. Then you will be greeted with a blue background screen that asks about the language and keyboard map as well.
Then the fun begins, go ahead hit enter on Start Clonezilla, then select device - image work with disks or partitions using images as that's what I/we want to do, create an image of a drive.

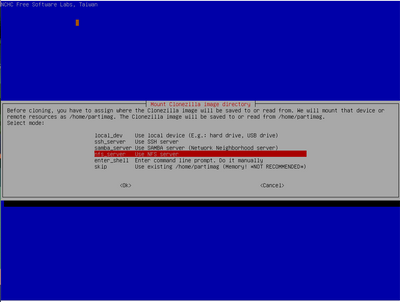
The next one is about where are we going to store the image of the drive(s) Clonezilla is about to create. As mentioned, I have a network file server, so I'm going to connect to it over NFS.

Clonezilla-02.png
Filename
Clonezilla-02.png
File size
19.63 KiB
Views
512 views
File license
GPL-2.0-or-later

The network configuration of our retro PC comes next, so we can push that image to our file server. Automatic DHCP should work in most networks, but you can also specify an IP address manually.
If we go the NFS route (as I normally do), the next screen is going to ask about what version of NFS you use, and what is the IP address of the NFS server and the path where we are going to store those disk images.

Using Windows shares (SMB/CIFS) is similar, if that's what you have at hand. Please note, in the Clonezilla menu this Windows shares option is referred as Samba_server. You will need to input the the IP address of your Windows machine, the user account to connect to the Windows "share" where you want to store the images, the share itself and your account's password of that Windows user account that has access to the share.

The next step is very important, please go with Expert mode. We are experts in all of this, aren't we?
At this point it's going to ask what do we want to do: Create an image of a full disk drive, create an image of a partition, restore a drive, restore a partition...

Clonezilla-03.png
Filename
Clonezilla-03.png
File size
21.69 KiB
Views
512 views
File license
GPL-2.0-or-later

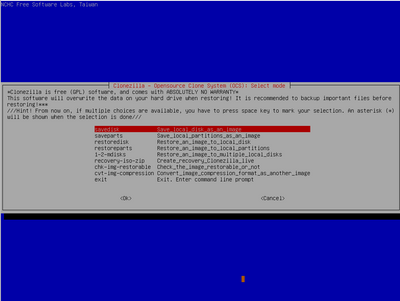
I'm backing up the entire drive, so I selected the first one: save disk.
In the next two steps we can give a name to our image, e.g., dosgames-20240305
And we will we able to select which drive we are going to backup. Use the space bar to mark which drive(s) you want to save. In my case, I always go one by one so I won't mix things up.
We are getting closer to actually start the process. In the following steps it's going to ask about what programs do we want to use to create those images and some advanced options. Just hit enter in both screens to accept the default values as it suggests.

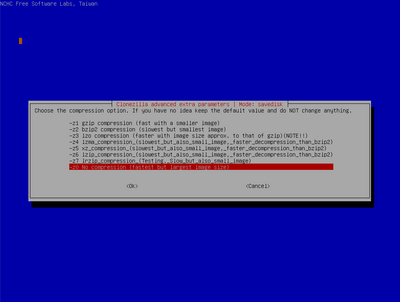
Another important step, specially for our retro PCs, it's about compression. In my case, I don't want to use any compression on the image, I think I will be torturing my poor K6 (or C3) compressing something to try to spare some space... Considering how big current drives are, it's just not worth it. So I went with the last option, no compression.

Clonezilla-04.png
Filename
Clonezilla-04.png
File size
16.98 KiB
Views
512 views
File license
GPL-2.0-or-later

If you want to split a disk image in multiple parts, you can set up a file/part size in the next screen. As I'm not interested in that, I will just put a lot of nines there so it will hit the maximum and it will only create one large file.
Moving on, Clonezilla can verify the integrity of the file system you are about to back up, if you want to. I skip this, my file systems are fine, thank you!

The last two steps before the actual fun begins (yeah looking at a progress bar is fun, isn't it? 😜) will be asking about doing a verification of the created disk image once the backup is completed, and what we want to do once the process finishes.
Finally, a summary screen with the very long command that is about to be run appears on the screen, you can confirm the operation, and it will start right away!

Clonezilla-real.jpg
Filename
Clonezilla-real.jpg
File size
836.51 KiB
Views
512 views
File license
Fair use/fair dealing exception

Congratulations if you read all of the above!
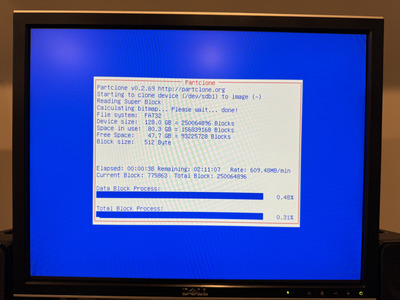
All the previous screenshots were taken on a virtual machine, this one is a photo of an actual backup process on my VIA C3. As you can see, it's actually saturating my 100mbps link. It created an 80GB image in less than two and a half hours.

Hope this is useful for someone, it is definitely for me 😀

Be free!

Reply 1 of 9, by ldeveraux

User metadata
Rank Member
Rank
Member

So this essentially saves a folder backup that can be stored and restored by running CZ again. Then if you want to create a bootable installer ISO, it's another step. There are better options if you're willing to remove the HDD every time to backup with another PC driving, but this is good for same PC unified backups!

Reply 2 of 9, by kahuna

User metadata
Rank Newbie
Rank
Newbie

The same Clonezilla CD you burn to create an image / backup of your disk drive(s) can be used to restore such backup.
I just did that by the way, I restored the image you see on the last 'screenshot' to a different drive. So, I now have all my DOS games exactly the same in both the K6 machine and the C3 one 😀

Let me clarify that in Clonezilla, if you select save disk, you are creating an image of your entire hard disk drive. Which means, if you are doing that for your primary disk where the operating system resides, you are also carrying over the boot sector and everything in the drive. When you restore the image to a new disk drive, that new drive is going to be bootable, you do not need to reinstall the operating system or doing anything at all. That's why so relevant creating images of drives, rather than just copy-paste folders from one place to another.
Also, it's great for testing, if you want to play around with things that tend to have an impact in the OS even after uninstalling them; things like new drivers, DirectX version... you can create an image of your main drive first, if you don't like what you see with that new/old version of whatever, you can just restore the entire disk drive back exactly to how it was like nothing happened, without having to rely in Windows restore points and crappy similar tools.

There are many other options indeed if for whatever reason you have to get your drive out of the retro PC to back it up.
However, I prefer to standardize on something, Clonezilla is open/free software and it's easy to use (well that's my take anyway).
I actually ran the latest version of Clonezilla on my modern Ryzen machine to create an image of another drive hooked up via a SATA to USB adapter, and that also works of course.

Enjoy!

Be free!

Reply 3 of 9, by elszgensa

User metadata
Rank Member
Rank
Member

Does CZ know about, and leave/zero out, unused space inside the partitions (saving some space in the backup) or is it basically 'dd with a friendly TUI'? And how about the other way round, does it write the entire partition (which can take some time) or just the used parts?

Reply 4 of 9, by kahuna

User metadata
Rank Newbie
Rank
Newbie

Just whatever capacity is used for both the backup and restore operations.
The preferred way to create those disk images is 'partclone', it will only use 'dd' as the last resort if it doesn't understand the filesystem that is on that drive.

This is what Clonezilla wrote to my network file server:
82G /mnt/data/partimag/2024-03-05-08-dosgames-img/
If you take a look at the last 'screenshot' above, you will see that it is a 128GB drive and 80GB are used. The image is just that, eighty something gigabytes. Remember, I'm not compressing the resulted backup image, so the image size is whatever it was in the source drive pretty much.

At roughly 600MB per minute, it took around 2 hours 15 minutes to backup the drive, and the same time to restore the image to a new drive, as the bottleneck I have in my case is the 100mbps network card.
Meaning, if it had to backup / restore the entire drive - even the empty space - it would have needed 3.5 hours, and that was not the case.

Be free!

Reply 5 of 9, by Zup

User metadata
Rank Oldbie
Rank
Oldbie

The worst parts about Clonezilla are:
- The inability to restore in smaller disks (even if it isn't 100% full). That's a pain in the ass when you're trying to restore a 120Gb SSD image onto another 120Gb SSD disk... and you discover that the new disk is a few blocks smaller than the old one.
- It's impossible (or at least, very difficult) to extract a single file from an image without having to restore the entire thing.

OTOH, having all those repair, checksum and rescue features makes it better than other cloning options.

I have traveled across the universe and through the years to find Her.
Sometimes going all the way is just a start...

I'm selling some stuff!

Reply 6 of 9, by Errius

User metadata
Rank l33t
Rank
l33t

Yes that's aggravating. Endless annoyances trying to clone 250 GB laptop HDDs onto 250 GB SSDs. I had to get 256 GB SSDs for it to work.

Last edited by Errius on 2024-03-07, 19:34. Edited 1 time in total.

Is this too much voodoo?

Reply 7 of 9, by ldeveraux

User metadata
Rank Member
Rank
Member
kahuna wrote on 2024-03-06, 19:47:
The same Clonezilla CD you burn to create an image / backup of your disk drive(s) can be used to restore such backup. I just did […]
Show full quote

The same Clonezilla CD you burn to create an image / backup of your disk drive(s) can be used to restore such backup.
I just did that by the way, I restored the image you see on the last 'screenshot' to a different drive. So, I now have all my DOS games exactly the same in both the K6 machine and the C3 one 😀

Let me clarify that in Clonezilla, if you select save disk, you are creating an image of your entire hard disk drive. Which means, if you are doing that for your primary disk where the operating system resides, you are also carrying over the boot sector and everything in the drive. When you restore the image to a new disk drive, that new drive is going to be bootable, you do not need to reinstall the operating system or doing anything at all. That's why so relevant creating images of drives, rather than just copy-paste folders from one place to another.
Also, it's great for testing, if you want to play around with things that tend to have an impact in the OS even after uninstalling them; things like new drivers, DirectX version... you can create an image of your main drive first, if you don't like what you see with that new/old version of whatever, you can just restore the entire disk drive back exactly to how it was like nothing happened, without having to rely in Windows restore points and crappy similar tools.

There are many other options indeed if for whatever reason you have to get your drive out of the retro PC to back it up.
However, I prefer to standardize on something, Clonezilla is open/free software and it's easy to use (well that's my take anyway).
I actually ran the latest version of Clonezilla on my modern Ryzen machine to create an image of another drive hooked up via a SATA to USB adapter, and that also works of course.

Enjoy!

You do you, I'm not trying to dissuade you. I don't find CZ at all easy to use, I feel it sacrifices usability for robustness. And it's slow and clunky. And I've never been able to disable that cursed double beep when it boots!
I prefer a modern offline backup system because It allows you to browse OR restore the image. I'll pay for something I feel is worth it, but that's just me.

Reply 8 of 9, by kahuna

User metadata
Rank Newbie
Rank
Newbie
ldeveraux wrote on 2024-03-07, 16:11:

You do you, I'm not trying to dissuade you [...]

But of course!

kahuna wrote on 2024-03-06, 05:21:

[...] Hope this is useful for someone, it is definitely for me 😀

Having fun, enjoy what you build! That's the point, anyway.

Be free!

Reply 9 of 9, by ccronk

User metadata
Rank Newbie
Rank
Newbie

I got a cloneziila dvd with some magazine I bought around 5 years ago. It resides permanently in my external dvd drive. Never havento look for it that way. I have created and restored multiple Win 10 and Win11 installations. It's never let me down. I cloned an earlyish non updated Win10 drive (did it with on the go error correcting and without it, let me be clear, made 2 different images. The 1 with error correcting didn't work). Restored it, all seemed good. Been using it for a couple years I guess.

CZ is intuitive-adjacent. I can rarely make heads or tails of what I'm doing LOL LOL. But have always made/restored successful images. Like with most things, I don't read the ferkin manual (where is it even?). I wing it, use my gut, and am almost always successful. I am using an older version. But I have to wonder if the somewhere on the spectrum linux idiots/geniuses have worked on the UI at all. Something tells me no.