What about initializing the card before it boots into Windows?
Or... what happens if you run SETUPDS /S
That should initialize it and then you can run SETUPDS to go into the GUI configuration utility and you can set the settings and test the card in there.
What about initializing the card before it boots into Windows?
Or... what happens if you run SETUPDS /S
That should initialize it and then you can run SETUPDS to go into the GUI configuration utility and you can set the settings and test the card in there.
Worth a shot, but it won't change the PCI device ID , so I do not hold out much hope .
You also need to make sure you use drivers for the proper codec chip (Analog Devices AD1819A) . The drivers between the different codecs will not install properly on another codec chip. At the time we were going stir-crazy until we matched the boards with the actual driver CDs from the same batches. Has been an issue on more than one model.
evasivewrote on 2020-06-09, 10:17:manual:
http://www.elhvb.com/mboards/intel/files/manu … ls/72698401.pdf
http://www.elhvb.com/mboards/intel/files/manu … ls/73824 […] Show full quote
You also need to make sure you use drivers for the proper codec chip (Analog Devices AD1819A) . The drivers between the different codecs will not install properly on another codec chip. At the time we were going stir-crazy until we matched the boards with the actual driver CDs from the same batches. Has been an issue on more than one model.
If that is the issue, that board must be from a rare batch as even the Dell provided drivers for the T__ series (as Dell call it) do not match that PCI device ID.
evasivewrote on 2020-06-09, 10:17:manual:
http://www.elhvb.com/mboards/intel/files/manu … ls/72698401.pdf
http://www.elhvb.com/mboards/intel/files/manu … ls/73824 […] Show full quote
You also need to make sure you use drivers for the proper codec chip (Analog Devices AD1819A) . The drivers between the different codecs will not install properly on another codec chip. At the time we were going stir-crazy until we matched the boards with the actual driver CDs from the same batches. Has been an issue on more than one model.
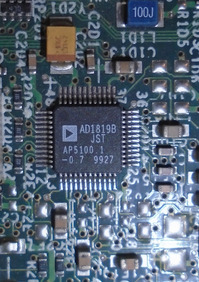
Ugh, sounds plausible. My board has an AD1819B codec...
Could you recommend which of the drivers listed here would match that?
evasivewrote on 2020-06-09, 10:17:manual:
http://www.elhvb.com/mboards/intel/files/manu … ls/72698401.pdf
http://www.elhvb.com/mboards/intel/files/manu … ls/73824 […] Show full quote
You also need to make sure you use drivers for the proper codec chip (Analog Devices AD1819A) . The drivers between the different codecs will not install properly on another codec chip. At the time we were going stir-crazy until we matched the boards with the actual driver CDs from the same batches. Has been an issue on more than one model.
Ugh, sounds plausible. My board has an AD1819B codec...
Could you recommend which of the drivers listed here would match that?
I already checked. As far as I can tell, none of them did.
I have one last idea to try regarding driver inf modding. I will post back soon .
Afraid I'm not bringing much to the party answer-wise 🙁 as my installation went without a hitch.
Again, stuck to minimal kit so board, 3 x 128MB PC133, P3 500/512, TNT2 M64 and basic 98SE install. Didn't install graphics drivers and went straight to the audio package from @chinny22 which worked fine (Gameport, Legacy & PCI).
Ran PCILIST and oddly my Subsystem ID was different, 5345h, and was shared on IRQ9 (with USB). Then I booted from the Yamaha Diagnostics DOS floppy to check the settings & sound tests which all worked OK, and which also confirmed the Subsystem ID as 5345h.
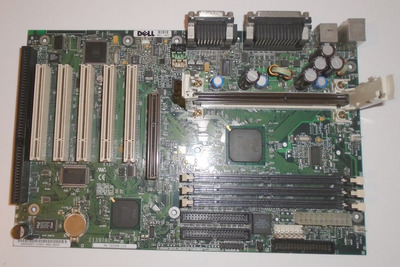
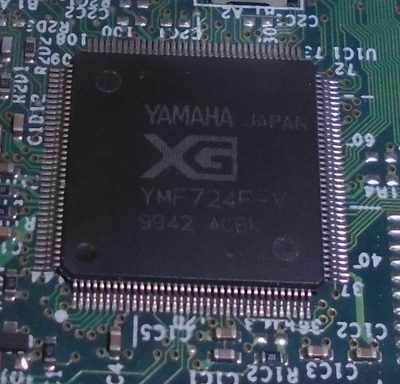
As mentioned, my board is AA 722394-112 Rev A01 with the latest A11 bios - here's a pic of the board and audio ICs
Vendor ID 1073h (Yamaha)
Device ID 000Dh (Yamaha Device, DS-1)
Subsystem ID 5332h (IHV ID???)
Revision 03h (for DS-1)
Class code 4.1 (DS-1 Base.Sub-Class)
Subvendor ID 8086h (Intel)
...that can be written to the chip is the Subsystem ID register (by the bios POST), maybe a re-flash of A11 might fix either an incorrect or corrupt value (can't imagine its another vendors code)
In that case, maybe it's an SE440BX-3 that has been force-flashed with an SE440BX-2 BIOS .
That would explain why the subsystem ID matches that of a YMF740 variant, but the device ID is that of a YMF724 .
EDIT: If that's the case, updating to the correct BIOS would fix it indeed .
In that case, maybe it's an SE440BX-3 that has been force-flashed with an SE440BX-2 BIOS .
That would explain why the subsystem ID matches that of a YMF740 variant, but the device ID is that of a YMF724 .
EDIT: If that's the case, updating to the correct BIOS would fix it indeed .
Tried the YMFtest - unfortunately same result as last time: Windows accepted the driver, but as soon as the daughter devices were being detected it hung again.
As for the board, it's 722394-109, with BIOS string 4S4EB2X0.86A.0023.P16, which is indeed what looks like the Intel (not Dell) SE440BX-2 BIOS 🙁
Next problem: the update util XPST_A11.EXE refuses to run. It just flashes the screen (maybe a message, it's gone too fast to see) and there's no way I can see to extract the file to flash with a different util. Later Dell BIOS utilities have various option flags you can set (like -forcetype), but I've not been able to find any that work here.
dionbwrote on 2020-06-11, 23:01:Tried the YMFtest - unfortunately same result as last time: Windows accepted the driver, but as soon as the daughter devices wer […] Show full quote
In that case, maybe it's an SE440BX-3 that has been force-flashed with an SE440BX-2 BIOS .
That would explain why the subsystem ID matches that of a YMF740 variant, but the device ID is that of a YMF724 .
EDIT: If that's the case, updating to the correct BIOS would fix it indeed .
Tried the YMFtest - unfortunately same result as last time: Windows accepted the driver, but as soon as the daughter devices were being detected it hung again.
As for the board, it's 722394-109, with BIOS string 4S4EB2X0.86A.0023.P16, which is indeed what looks like the Intel (not Dell) SE440BX-2 BIOS 🙁
Next problem: the update util XPST_A11.EXE refuses to run. It just flashes the screen (maybe a message, it's gone too fast to see) and there's no way I can see to extract the file to flash with a different util. Later Dell BIOS utilities have various option flags you can set (like -forcetype), but I've not been able to find any that work here.
IMHO, your best would be to
a) Backup your BIOS using uniflash AND make plans for using an external EEPROM programmer or hotflashing in another board if this plan fails
b) Ask another Dell SE440BX-3 board owner to provide a BIOS dump (using uniflash, for example)
c) Flash the provided BIOS using uniflash
d) If all went well, enjoy your working Dell SE440BX-3
PC Hoarder Patrolwrote on 2020-06-11, 23:52:You'll probably need to 'force flash' in recovery mode (the corner jumper near the speaker)...should be silkscreened on the boar […] Show full quote
You'll probably need to 'force flash' in recovery mode (the corner jumper near the speaker)...should be silkscreened on the board somewhere -
1-2 Normal
2-3 Maintenance (forces setup to run on boot)
No Jmpr puts the board into recovery mode, ready to load bios from a boot floppy like
BXPST_11.zip
but don't try till we've double-checked the process
This may well be how the wrong (Intel) bios got on as well.
Will that work with a self-extracting-programming executable ?
dionbwrote on 2020-06-11, 23:01:Tried the YMFtest - unfortunately same result as last time: Windows accepted the driver, but as soon as the daughter devices wer […] Show full quote
In that case, maybe it's an SE440BX-3 that has been force-flashed with an SE440BX-2 BIOS .
That would explain why the subsystem ID matches that of a YMF740 variant, but the device ID is that of a YMF724 .
EDIT: If that's the case, updating to the correct BIOS would fix it indeed .
Tried the YMFtest - unfortunately same result as last time: Windows accepted the driver, but as soon as the daughter devices were being detected it hung again.
As for the board, it's 722394-109, with BIOS string 4S4EB2X0.86A.0023.P16, which is indeed what looks like the Intel (not Dell) SE440BX-2 BIOS 🙁
Next problem: the update util XPST_A11.EXE refuses to run. It just flashes the screen (maybe a message, it's gone too fast to see) and there's no way I can see to extract the file to flash with a different util. Later Dell BIOS utilities have various option flags you can set (like -forcetype), but I've not been able to find any that work here.
By the way, I'm pretty sure it's not a self-extractor, but the actual flashing utility with embedded BIOS that needs to be run from pure DOS, not under Windows .
The same floppy can either work for a normal bootable update, or in recovery mode (without video) when the protected bios boot-block loader attempts a blind recovery.
How do I load the BIOS using the BIOS recovery method?
Create the BIOS disk according to the directions in the BIOS download file. Create two disks (one as a backup) in case something goes wrong and the disk gets messed up.
If you have the manual for your motherboard, use the procedure for recovering the BIOS :
1. Turn off the computer
2. Remove the configuration jumper to set recovery mode
3. Insert the bootable BIOS disk in A:
4. Turn on the computer and let it boot
5. Listen to the speaker:
two beeps and the end of activity in A: indicate successful recovery
a series of continuous beeps indicates failure. Return to step one and try again.
6. If recovery is successful, turn off the computer.
7. Put the configuration jumper on pins 1 and 2 to set normal mode for setup
8. Leave the BIOS upgrade disk in A: and turn on the computer.
9. Perform the BIOS upgrade as normal.