First post, by AnimeFunTV

- Rank
- Newbie
So first off, my hats off to everyone here Creative PnP EEPROM collection.
Big thanks to Tronix for providing a good EEPROM dump of the CT3670.
This guide is based on using Windows 10
There are a few things you'll need to purchase.
Hardware
1. CH341A Programmer kit - very easy to find and low cost, Amazon or eBay. Just make sure the kit comes with the jaws. Note: There will be no software/drivers provided in the CH341A Programmer kit, you'll download that here soon.

2. Breadboard Jumper Wires - again very easy to find and low cost, Amazon or eBay. You'll need to purchase a set where one end is male and the other end female.

3. USB extension cable (USB-A to USB-C may be needed if all you have is USB-C) - You'll need this because the programmer plugs directly into a USB port but you'll have to have the programmer closer to the Soundblaster card so having an extension would make that easy. Again you can find it cheap on Amazon or eBay, 3ft to 5ft depending on where you keep your nearest USB hub.

Software
1. NeoProgrammer (I used version 2.2.0.10) - This will have both the software and the drivers for the CH341A Programmer.
2. HxD - This is a hex viewer/editor. we will not be making any changes to the hex we just need to view it.
3. Download the rom dumps provided by Tronix
I'm going to try and be as thorough as I can for noobs.
Once you get your CH341A Programmer and jumper wires delivered, you'll download NeoProgrammer.
Extract NeoProgrammer zip onto its own folder, but remember where you placed it, there is no installer for this software.
You'll next plug the CH341A Programmer into the USB.
Windows will more than likely fail to automatically install the drivers. You'll need to manually update the drivers. If that happens follow the steps below.
1. Right-click on This PC Icon on your desktop and click on Manage.
2. Computer Management will appear. Under System Tools, click on Device Manager.
3. You'll see the CH341A Programmer listed with a yellow exclamation point.
4. Right-click on the CH341A Programmer then click on Properties
5. From there you might see the Update Driver grayed out.
6, You'll have to click on Change Settings to bypass that. You'll be asked to give permission to make changes, and once you do, you'll see the Update Driver is no longer grayed out.
7. Click on Update Driver.
8. You'll want to browse for your own drivers, click Browse, and look for the NeoProgrammer folder. Expand that folder and you'll see a folder named Drivers. Expand that folder and you'll see another folder named CH341A. Select CH341A folder and click Okay.
9. Click Next and Windows should install the drivers for the programmer.
With all that out of the way...
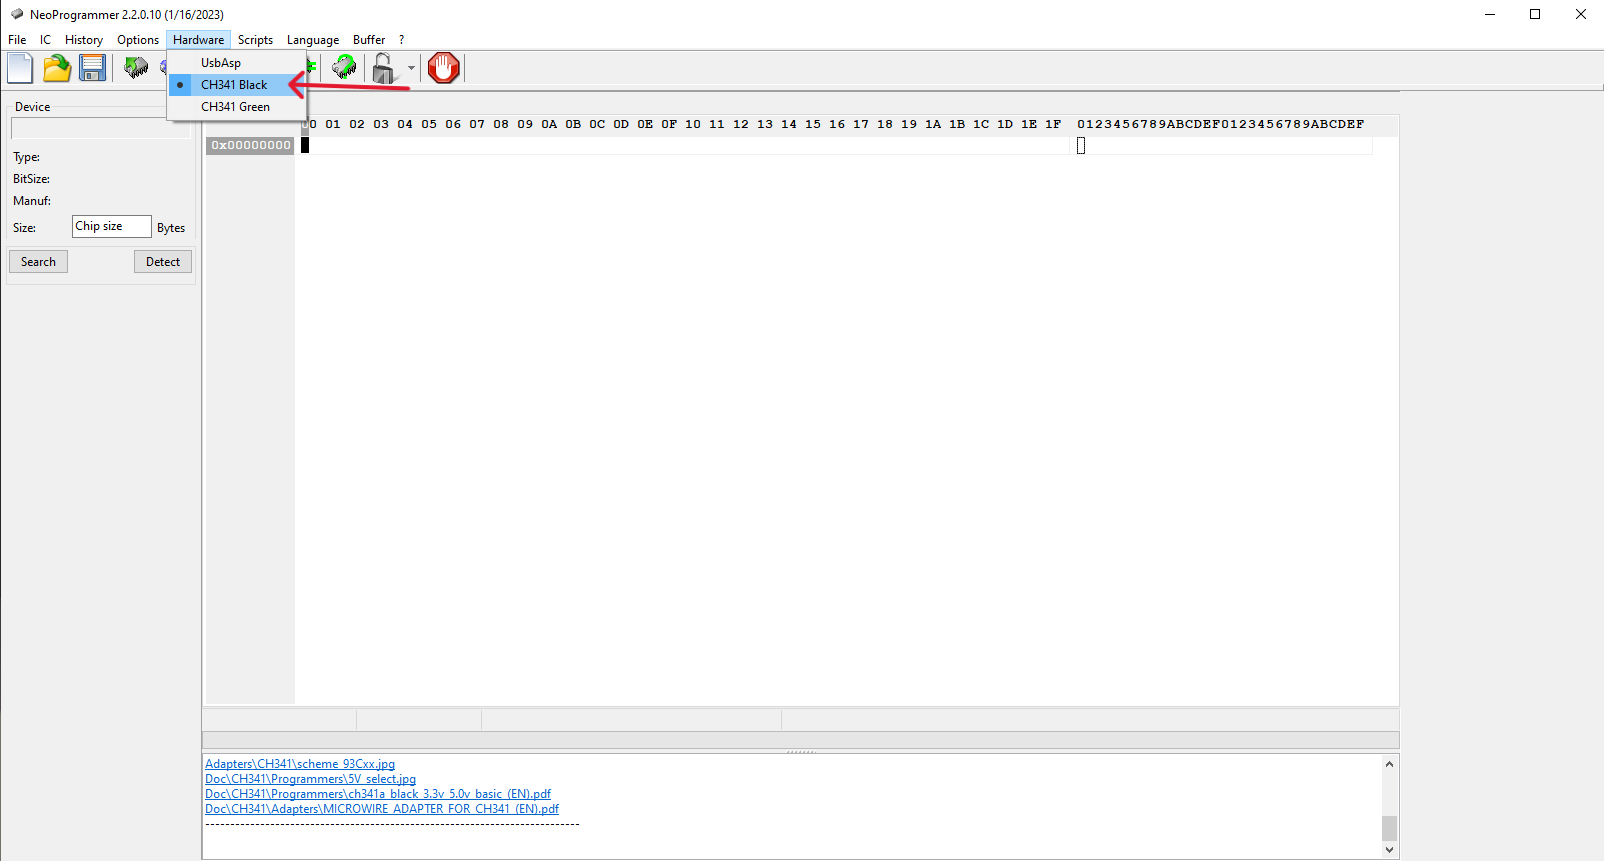
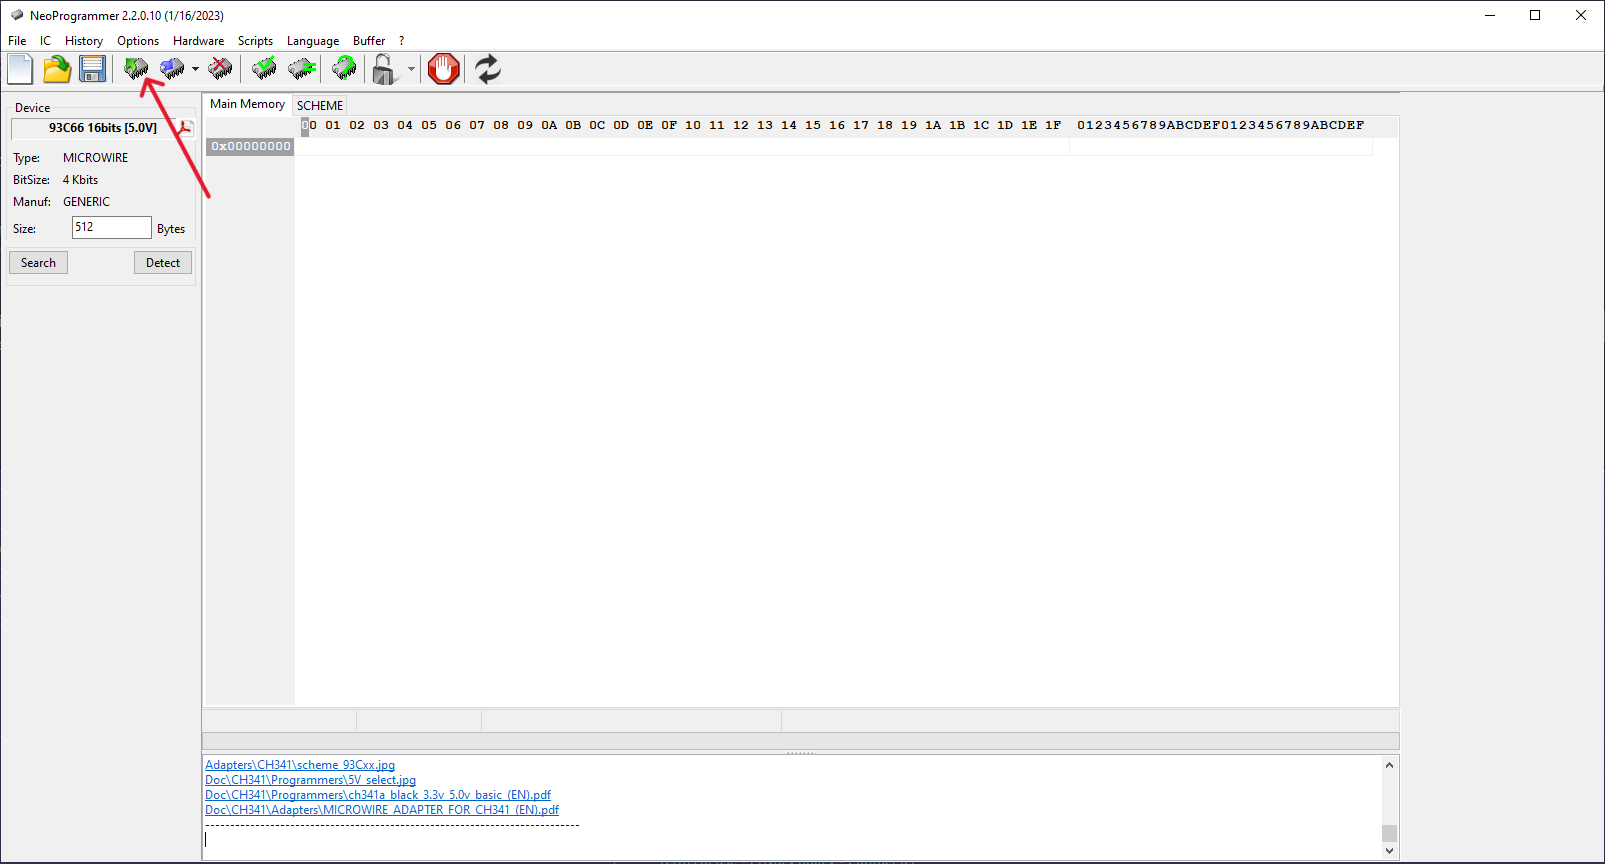
1. Go to the NeoProgrammer folder and open NeoProgrammer.
2. On the top menu selections, click on Hardware and make sure you have CH341a Black selected.
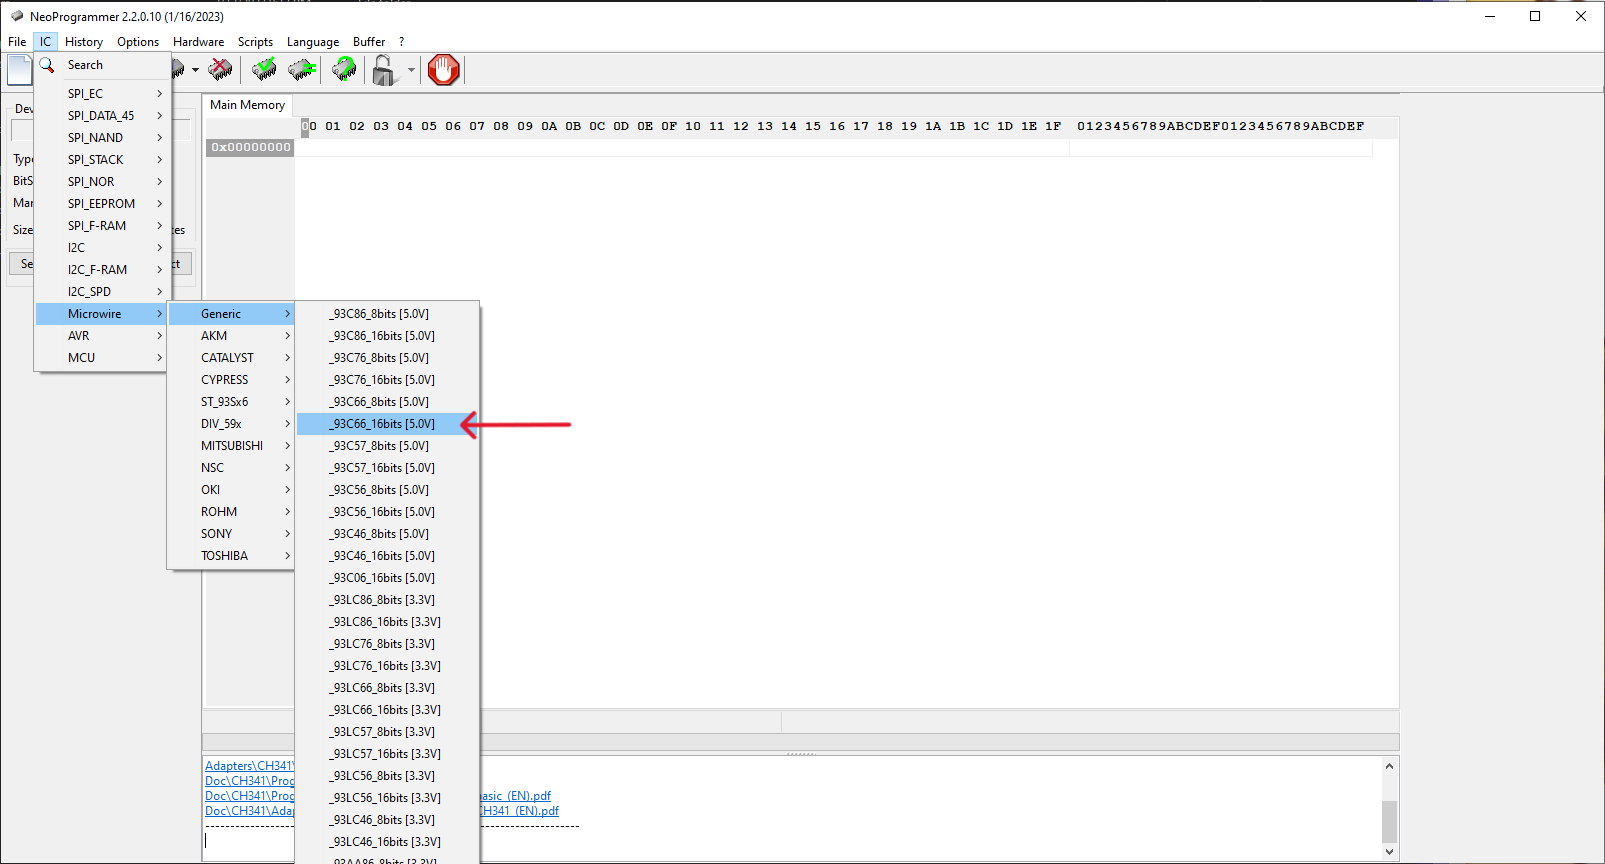
3. Next, we have to tell the programmer what chip we are going to program. The Soundblaster CT3670 uses a Microwire ST93C66 EEPROM chip, but this has been superseded with M93C66 (according to the datasheet). However, NeoProgrammer does not have this, but what it does have is a generic _93C66.
Click on IC on the top menu bar, and hover down to Microwire, it will expand and you'll see Generic, hover over Generic and it will expand with a long list of chips. You'll want to click on _93C66_16bits [5.0v] which should be the 6th from the top of the list.
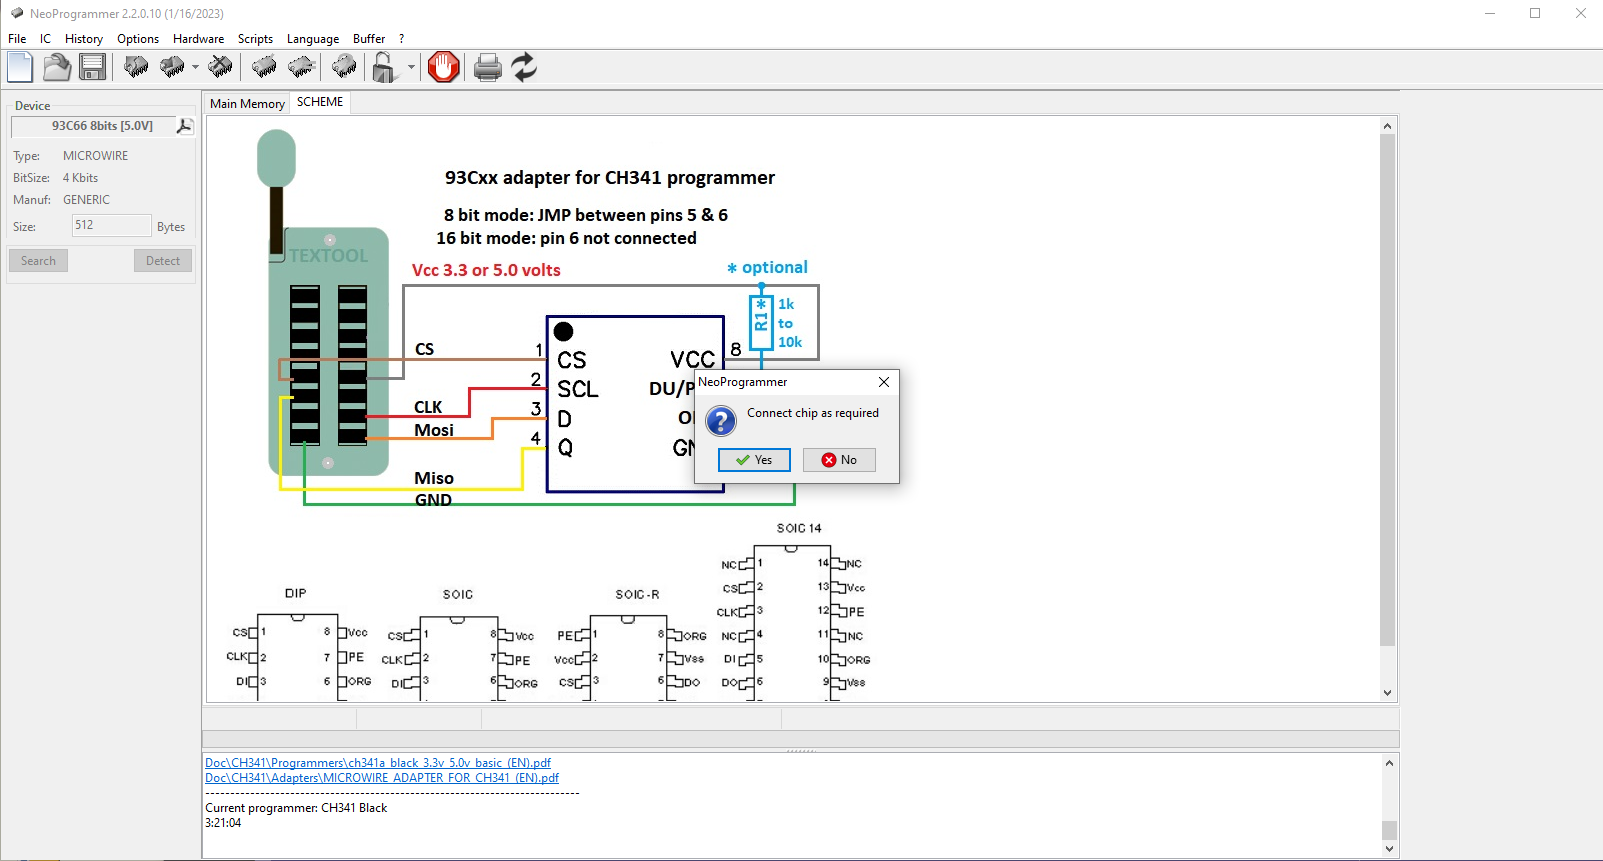
4. At the bottom, you'll see a few links, the one you want to click on is MICROWIRE_ADAPTER_FOR_CH341_(EN).pdf
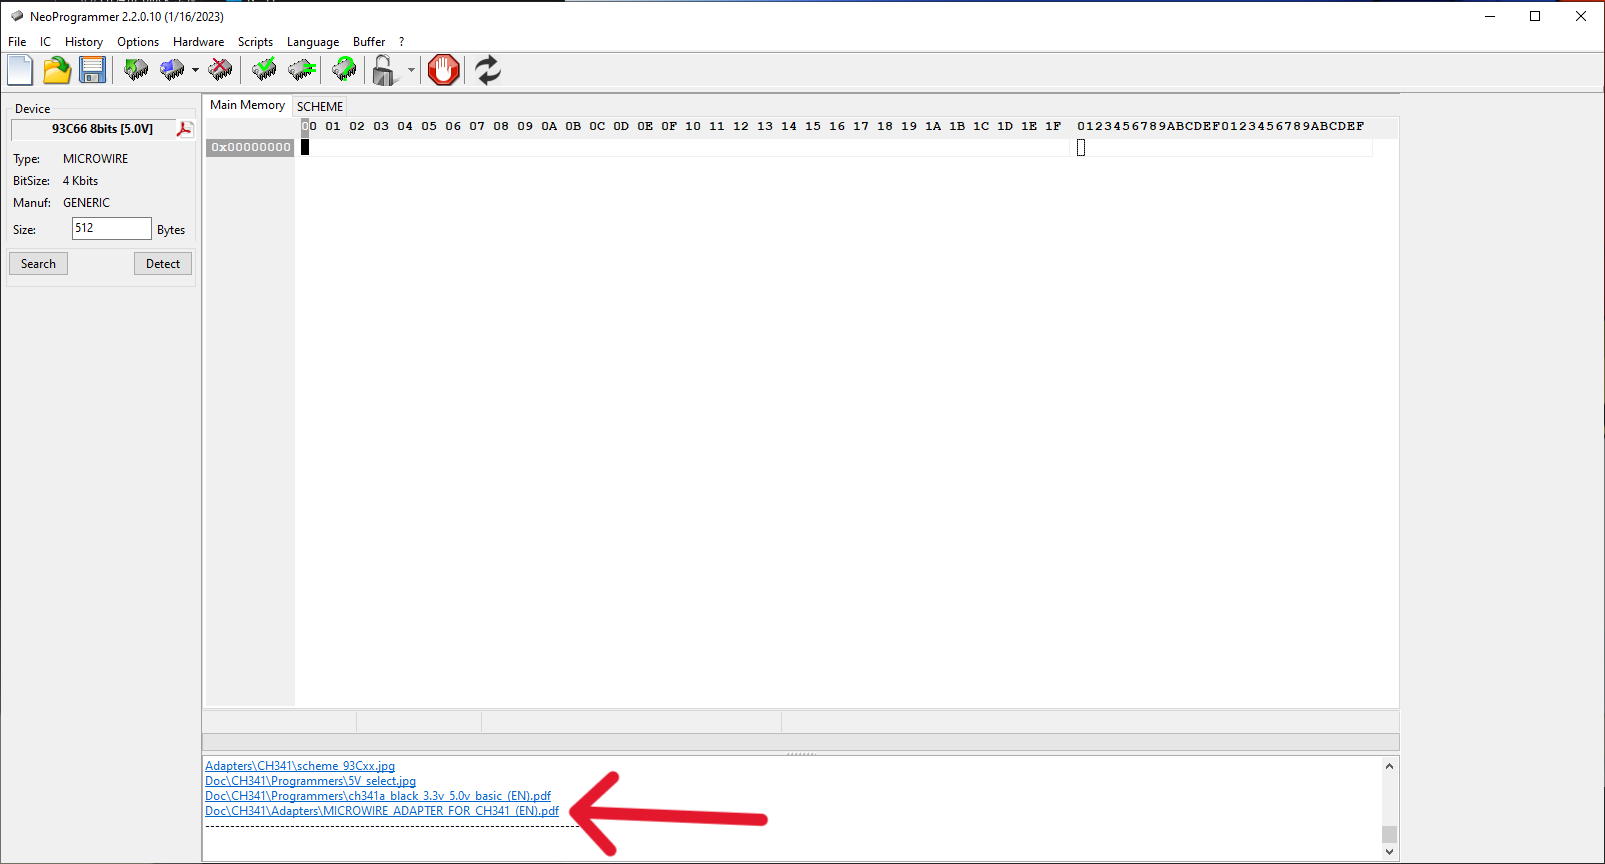
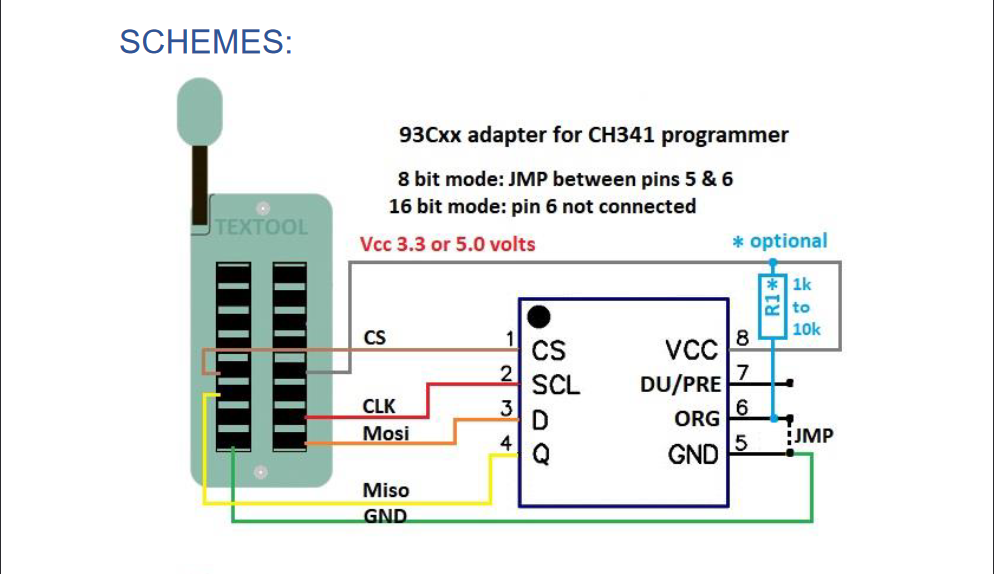
5. When it opens, you can ignore everything other than page 3. This is how you will have to wire up the CH341A Programmer to the EEPROM on the CT3670.
6. Leave NeoProgrammer open. Unplug your CH341A Programmer from the USB.
7. Grab the breadboard jumper wires which have one end male, and the other end female. Peel 6 of the breadboard jumper wires individually, and straighten out the wires if you need to.
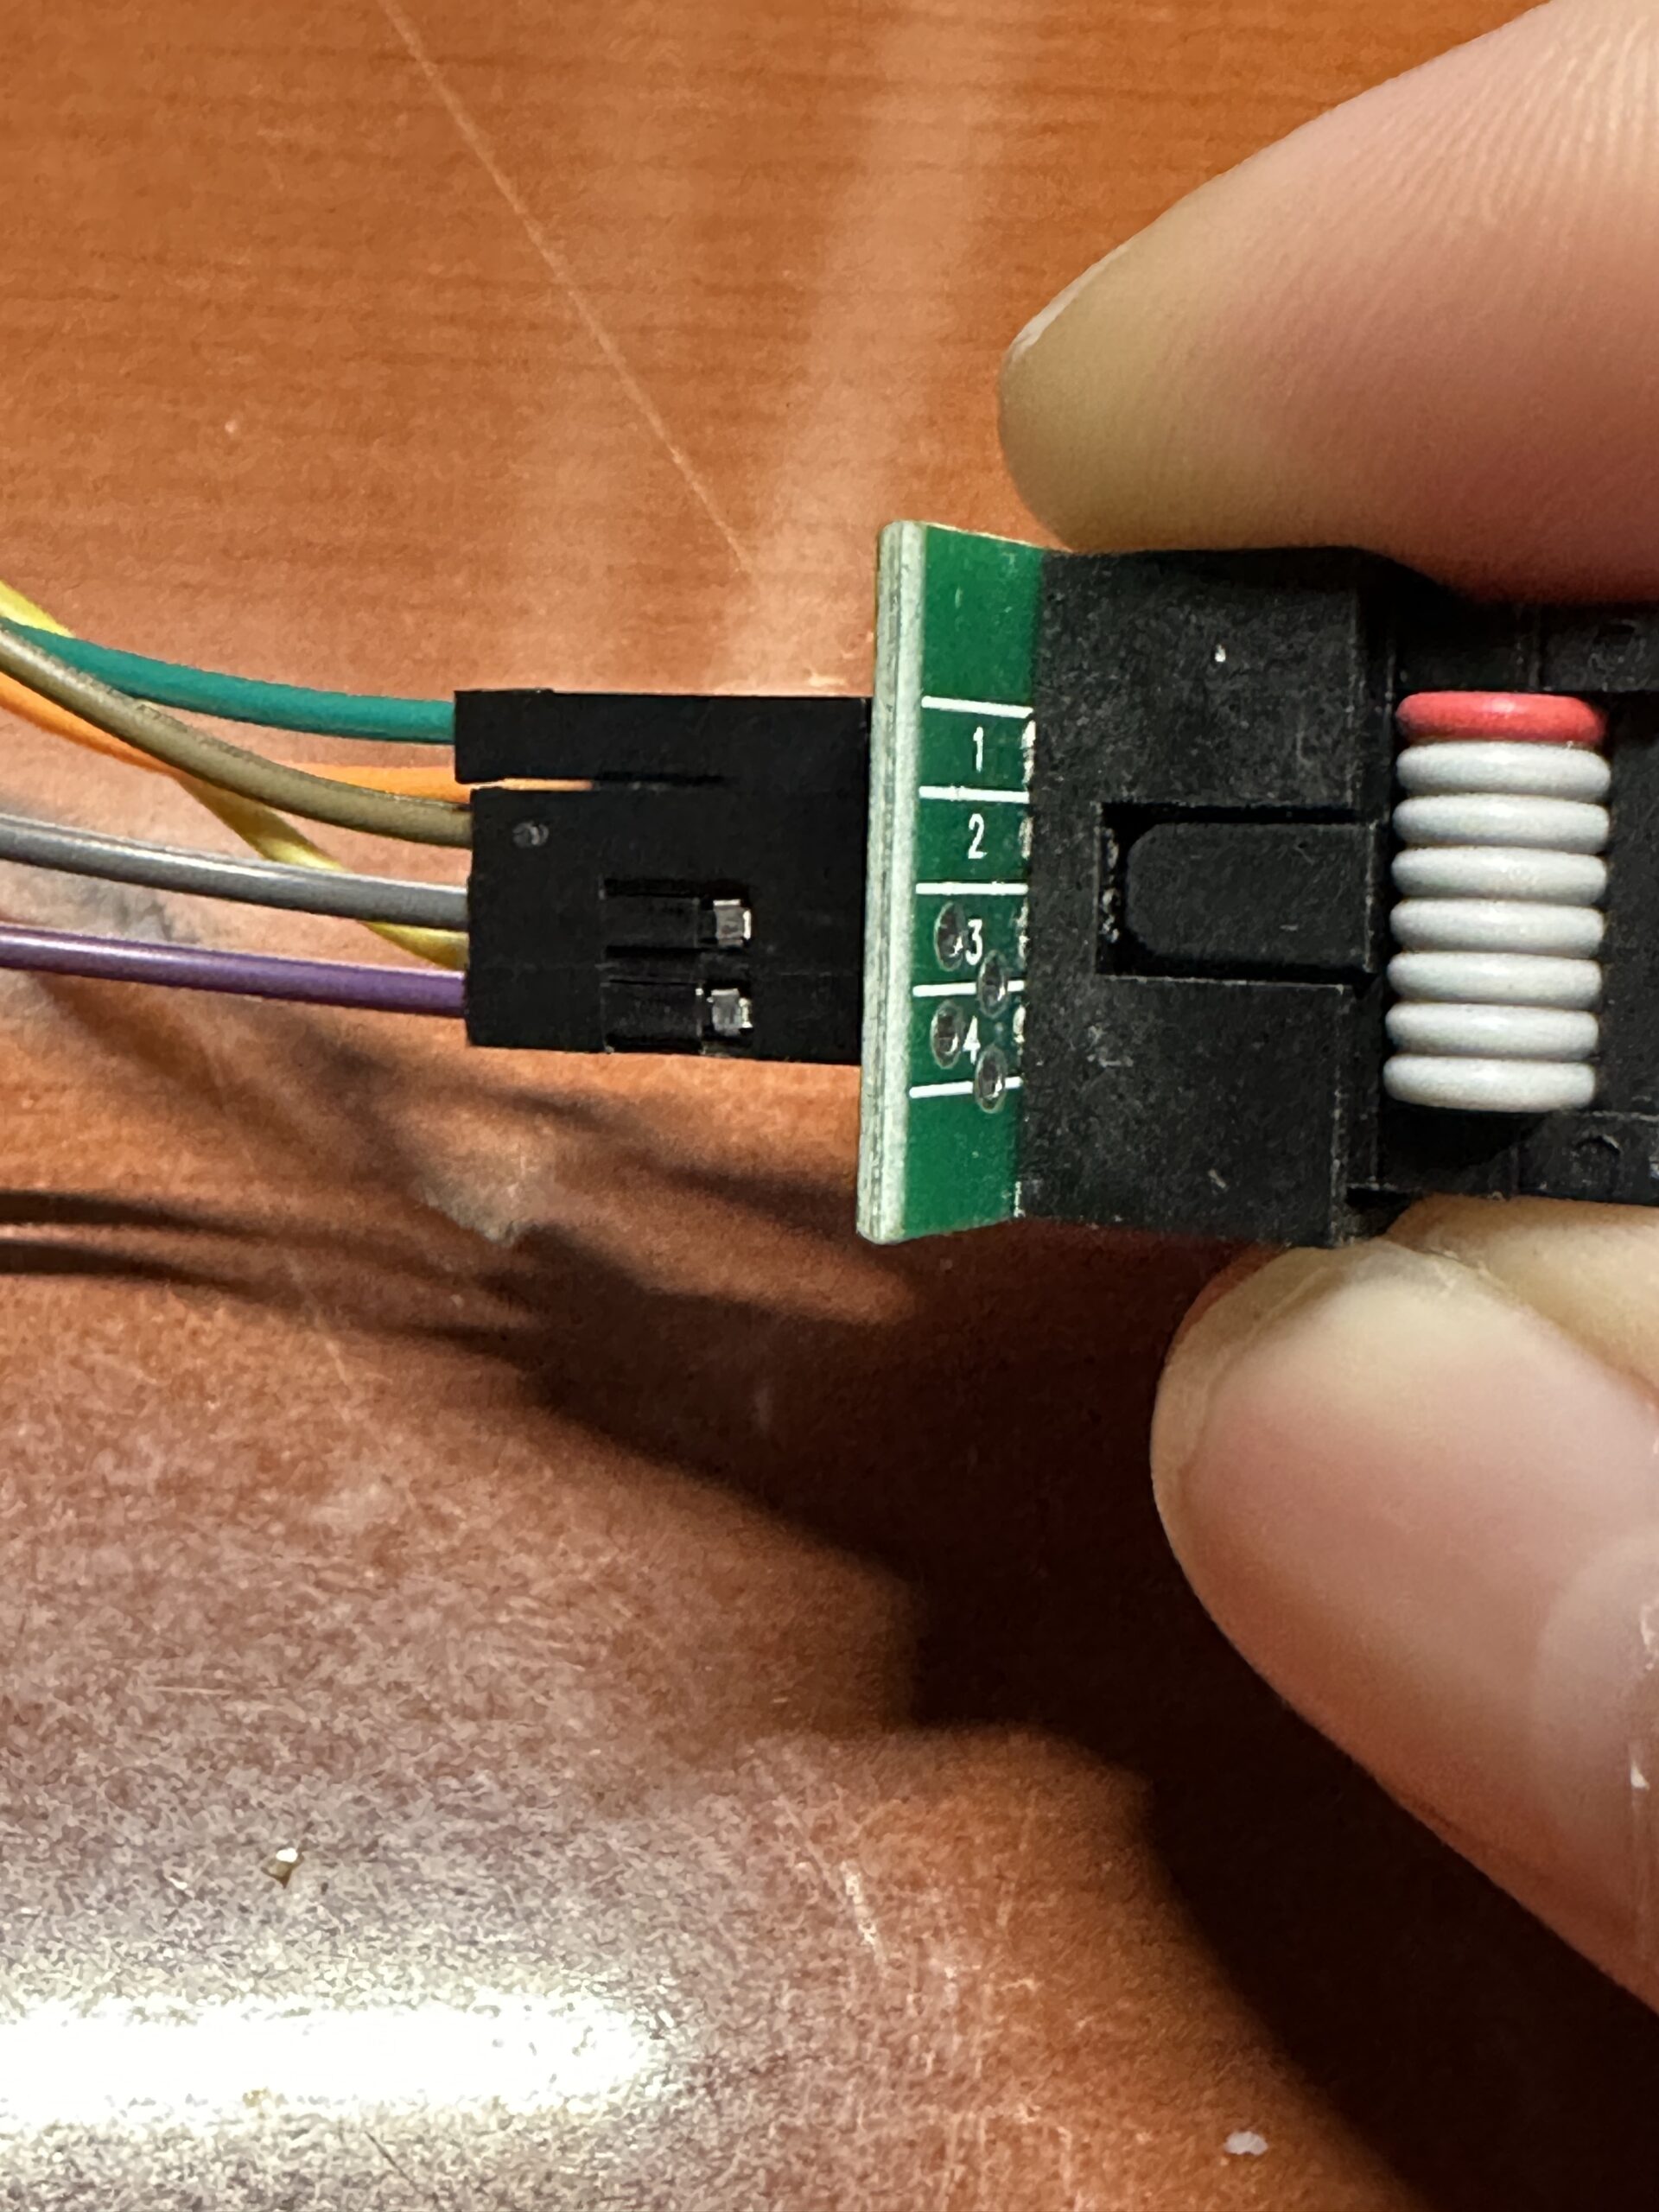
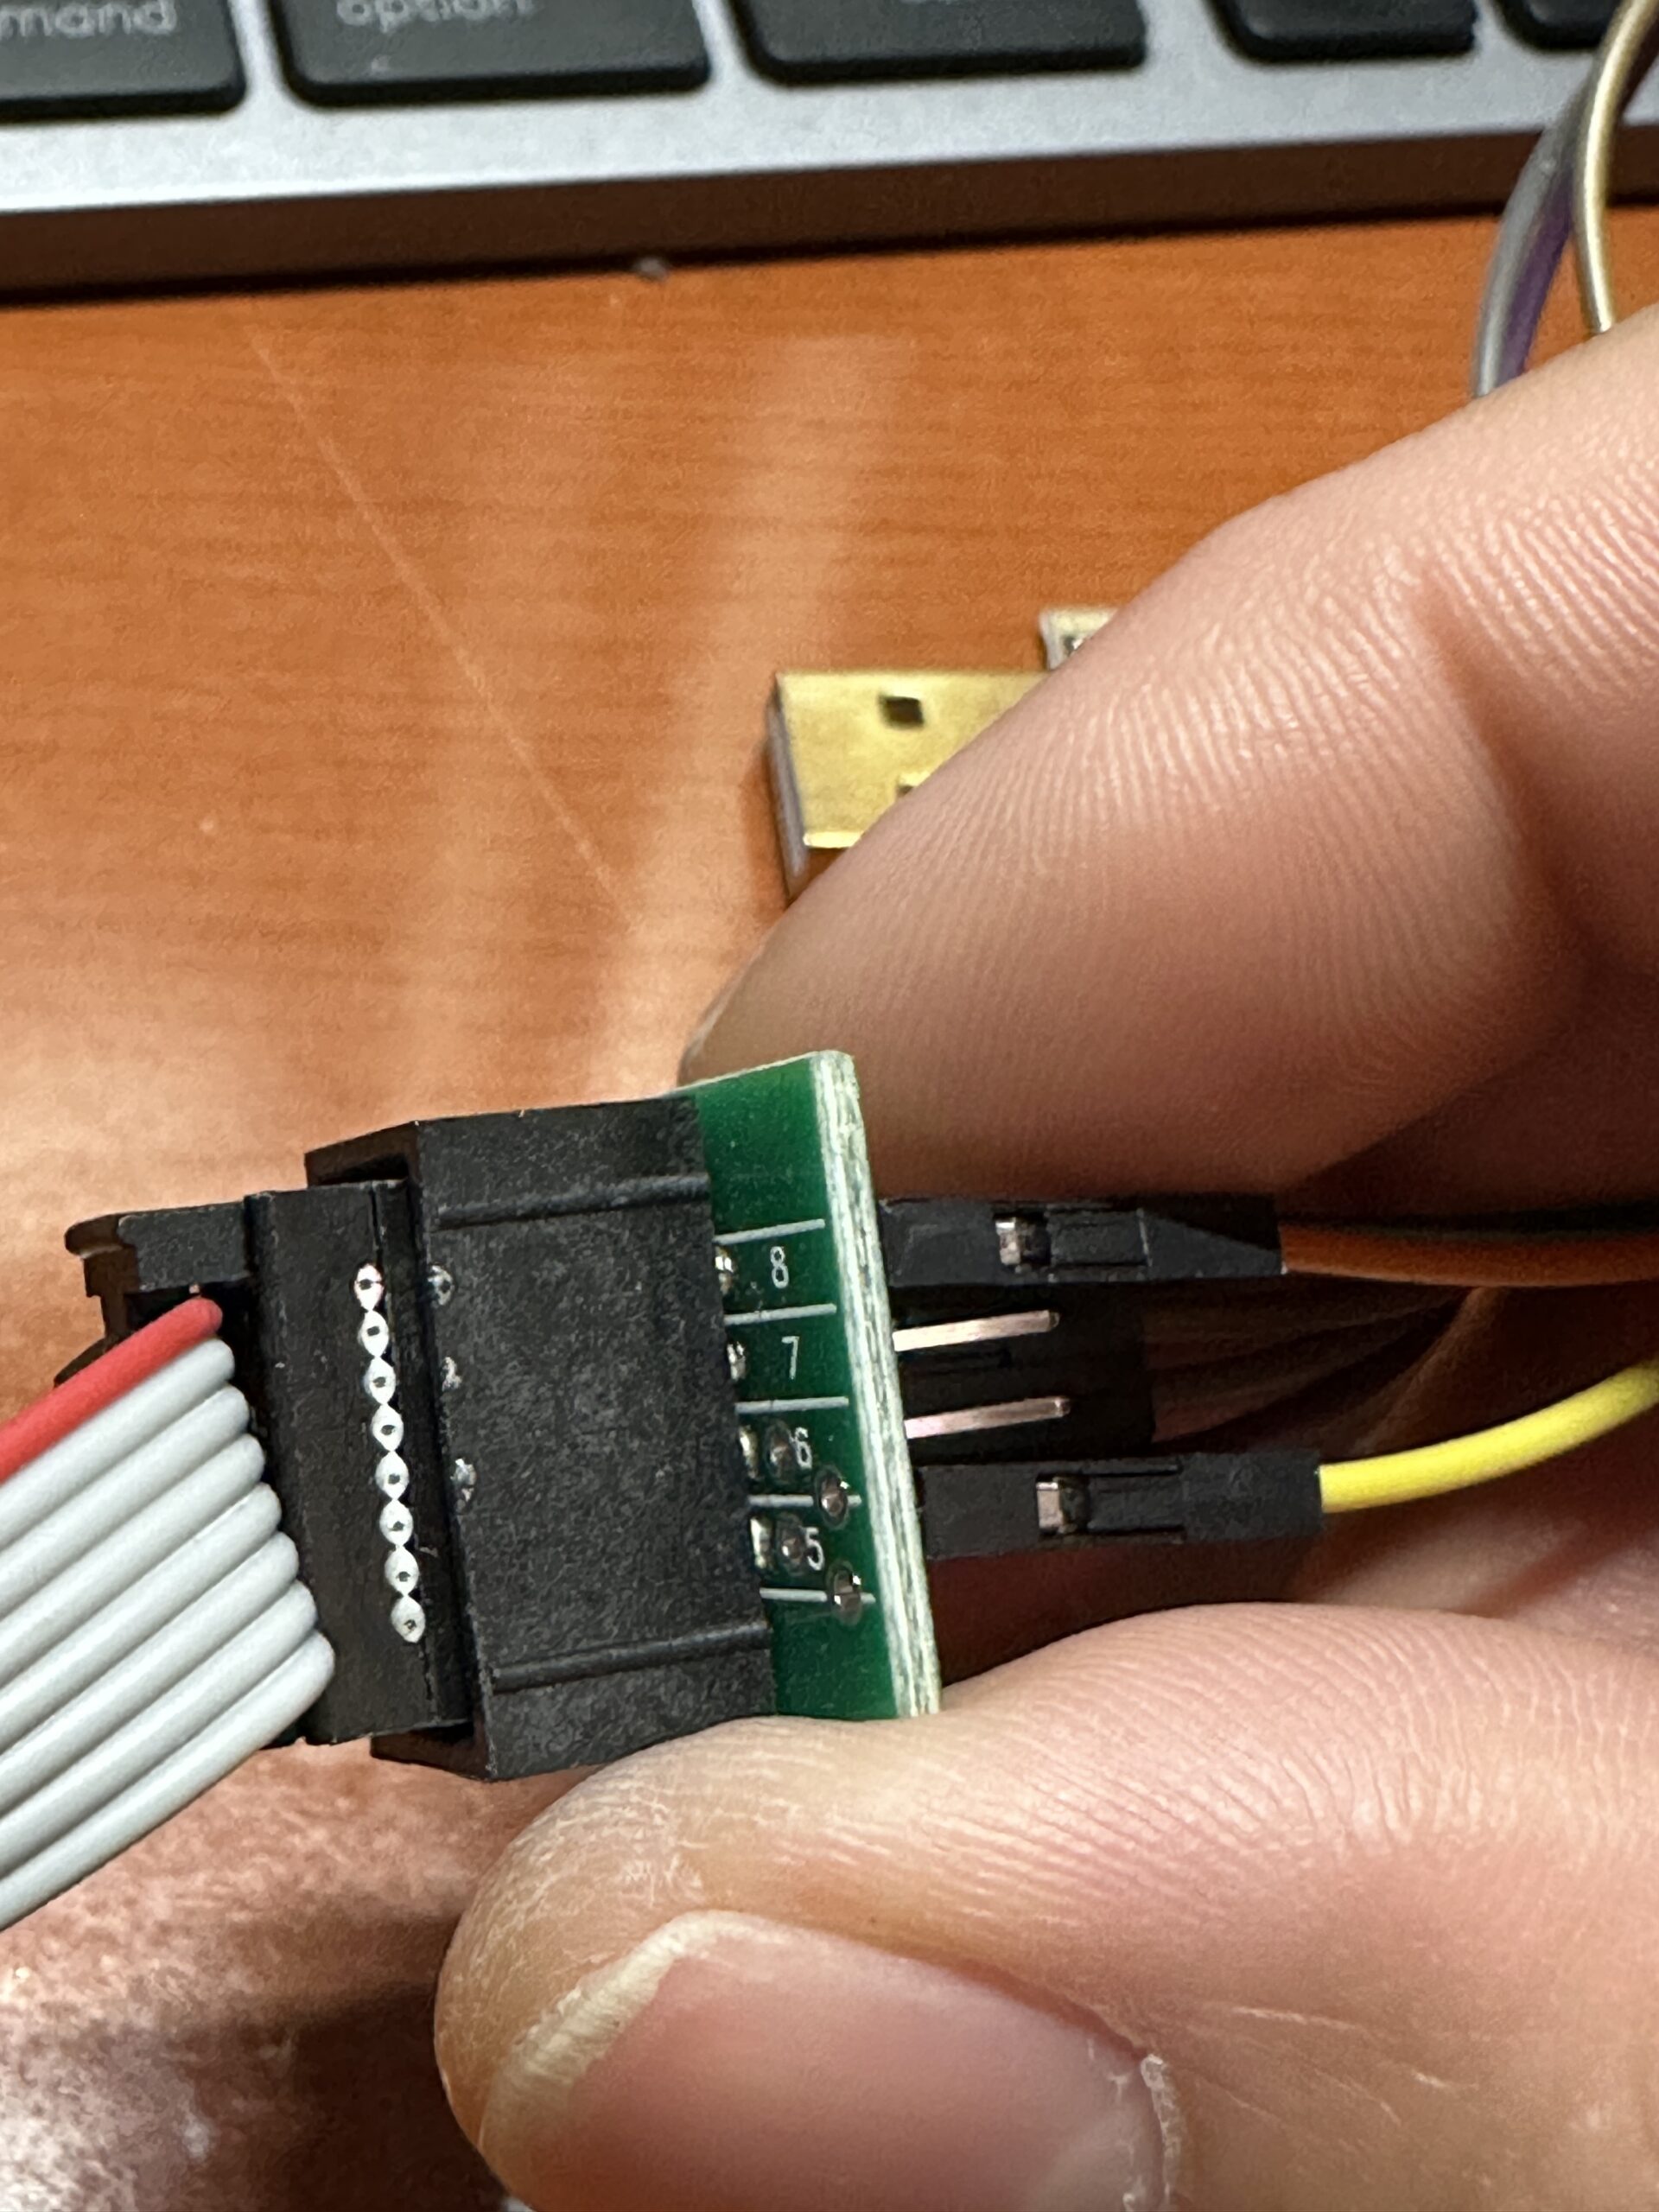
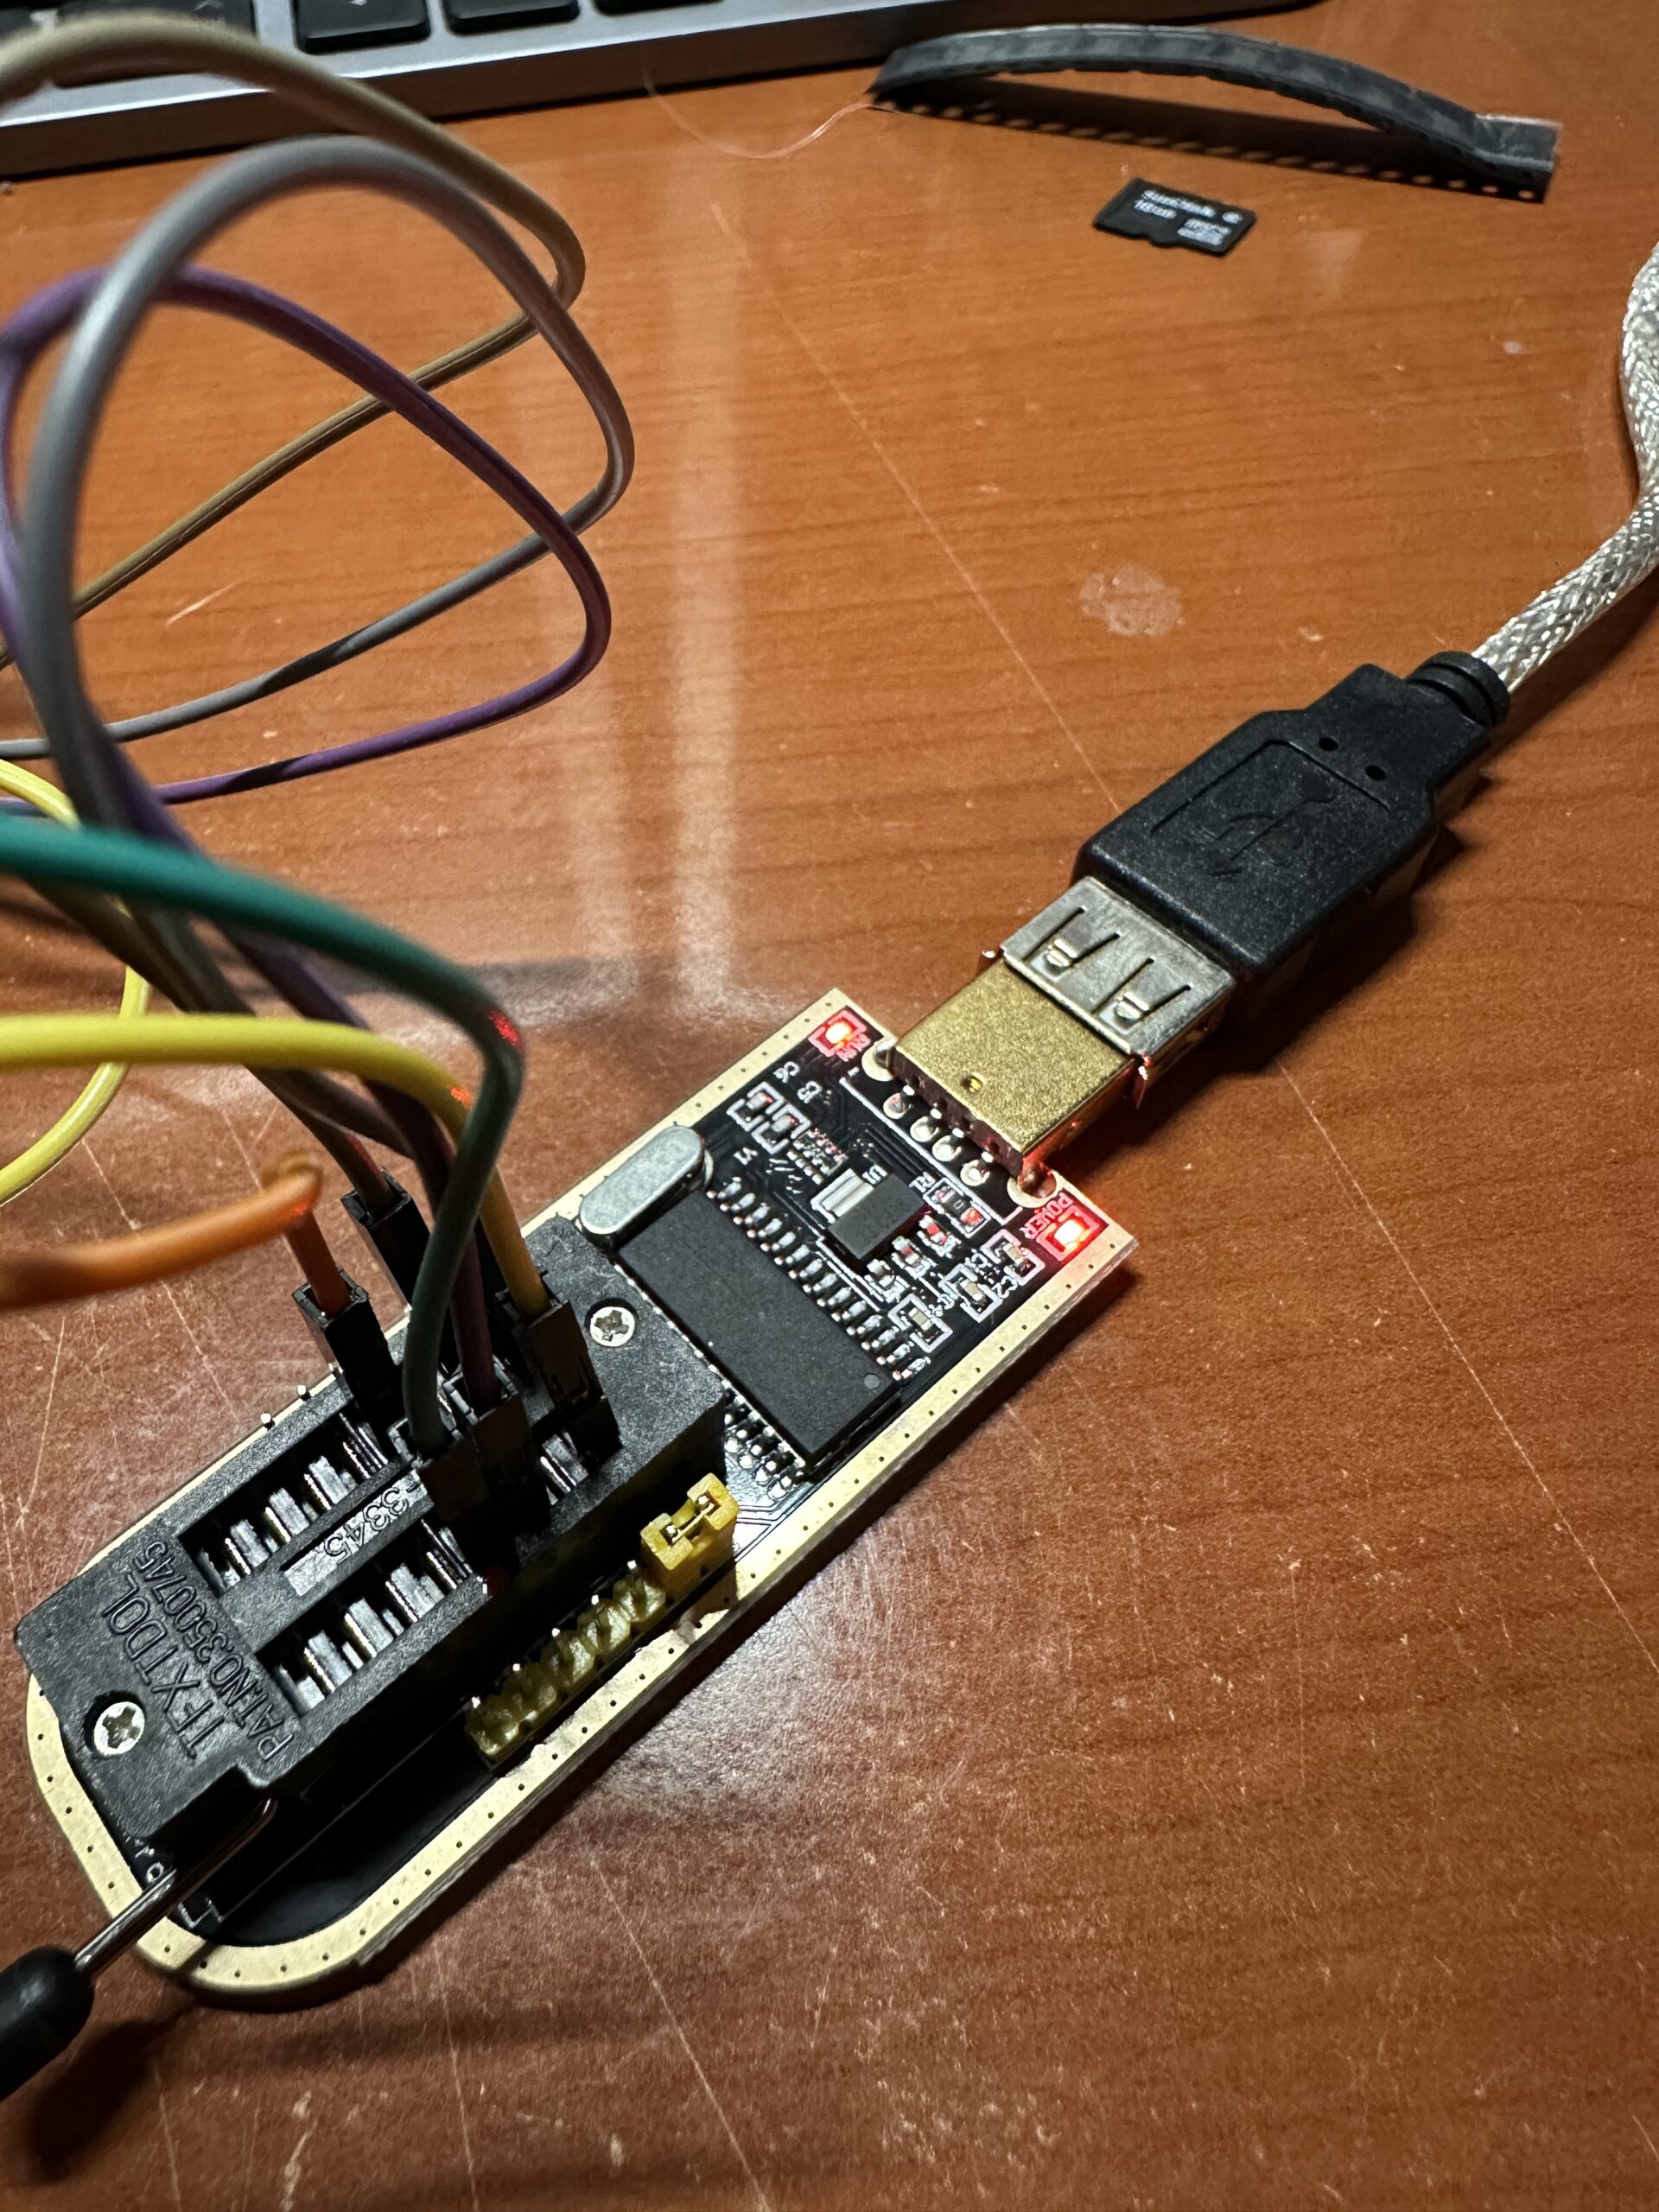
8. Get the jaws that came with the CH341A Programmer. There will also be a PCB that will attach to the end of the jaws, attach that PCB onto the cable of the jaws, it is keyed and will only attach one way. At the PCB with pins, you will see labels 1 through 8. Imagine this as the EEPROM pinout and what you'll have to connect to the CH341A Programmer.
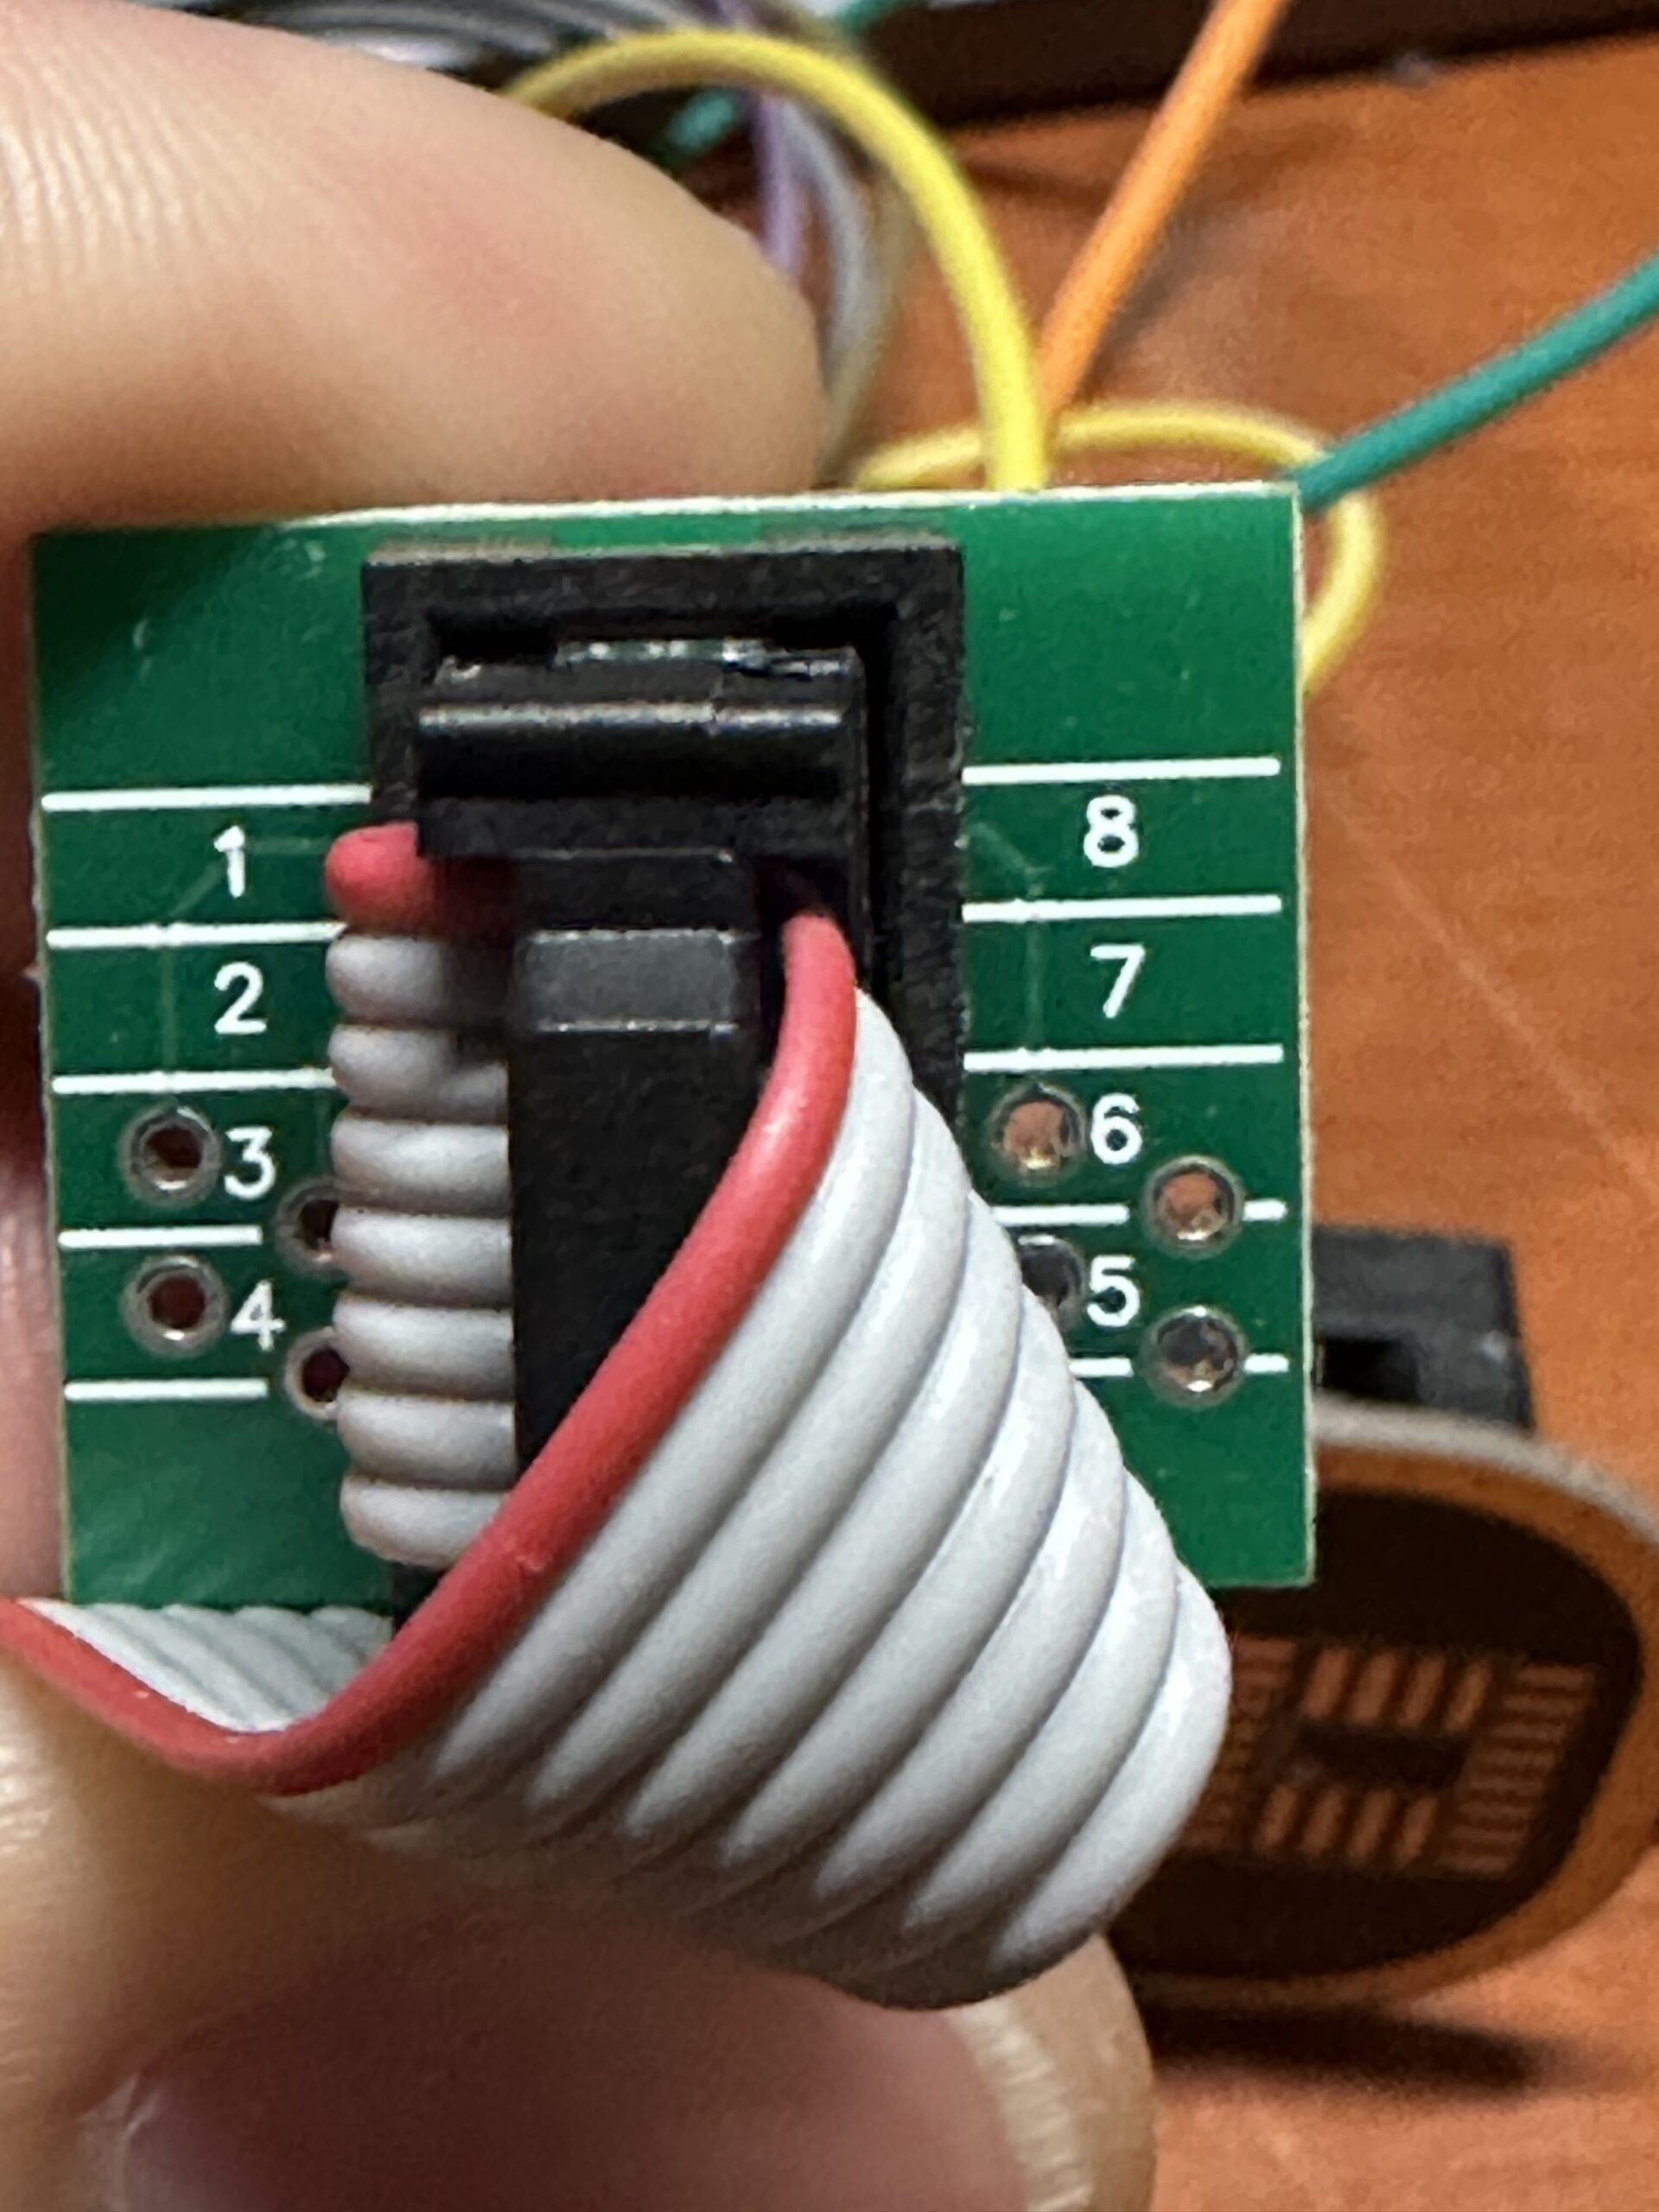
9. Install the jumper wires onto pins 1, 2, 3, 4, 5, and 8 onto the PCB. (Pins 6 & 7 will not be used. Additionally, no resistor is needed as well)
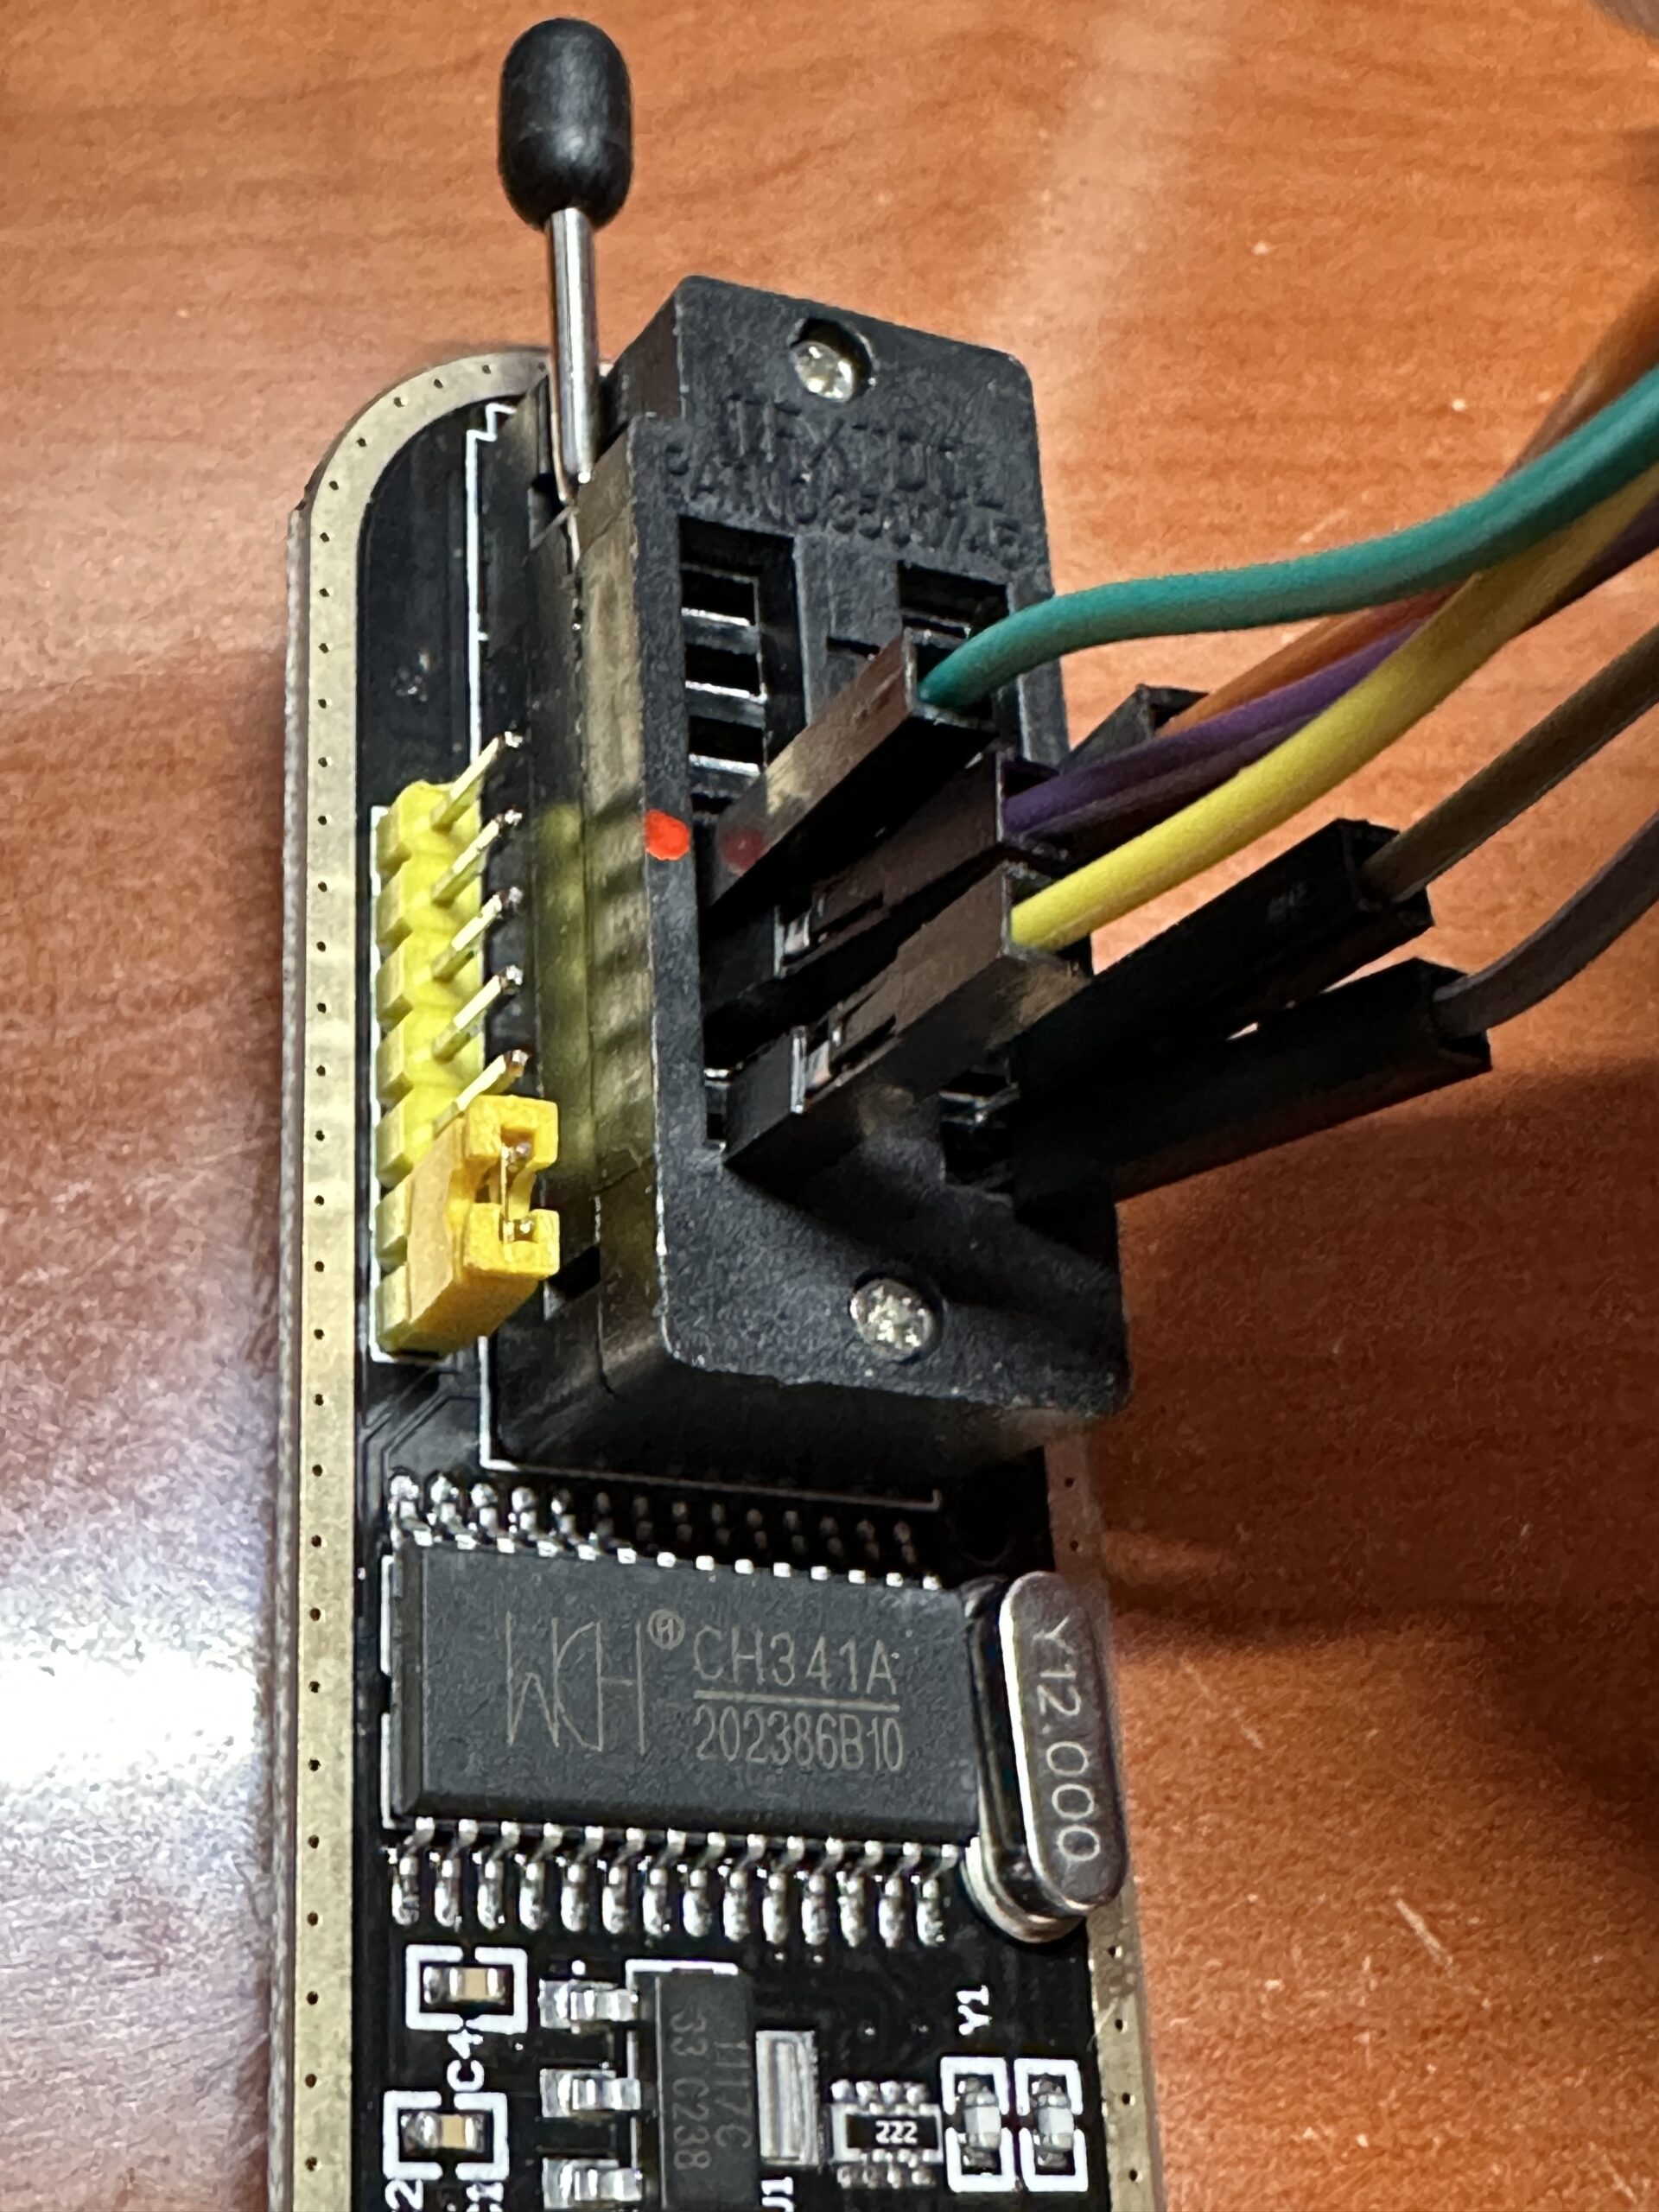
10. This part is a little tricky but can be done, with the lever in the unlocked position, begin to place each wire at a time into the CH341A Programmer in relation to the instructions. (On my board I panted a Red dot on Pin 1)
Take your time, once you have them all pinned you can move the lever down to lock all the wires into place. Take your time and make sure you have the pins from the PCB on the jaws properly going to the CH341A Programmer via the diagram.

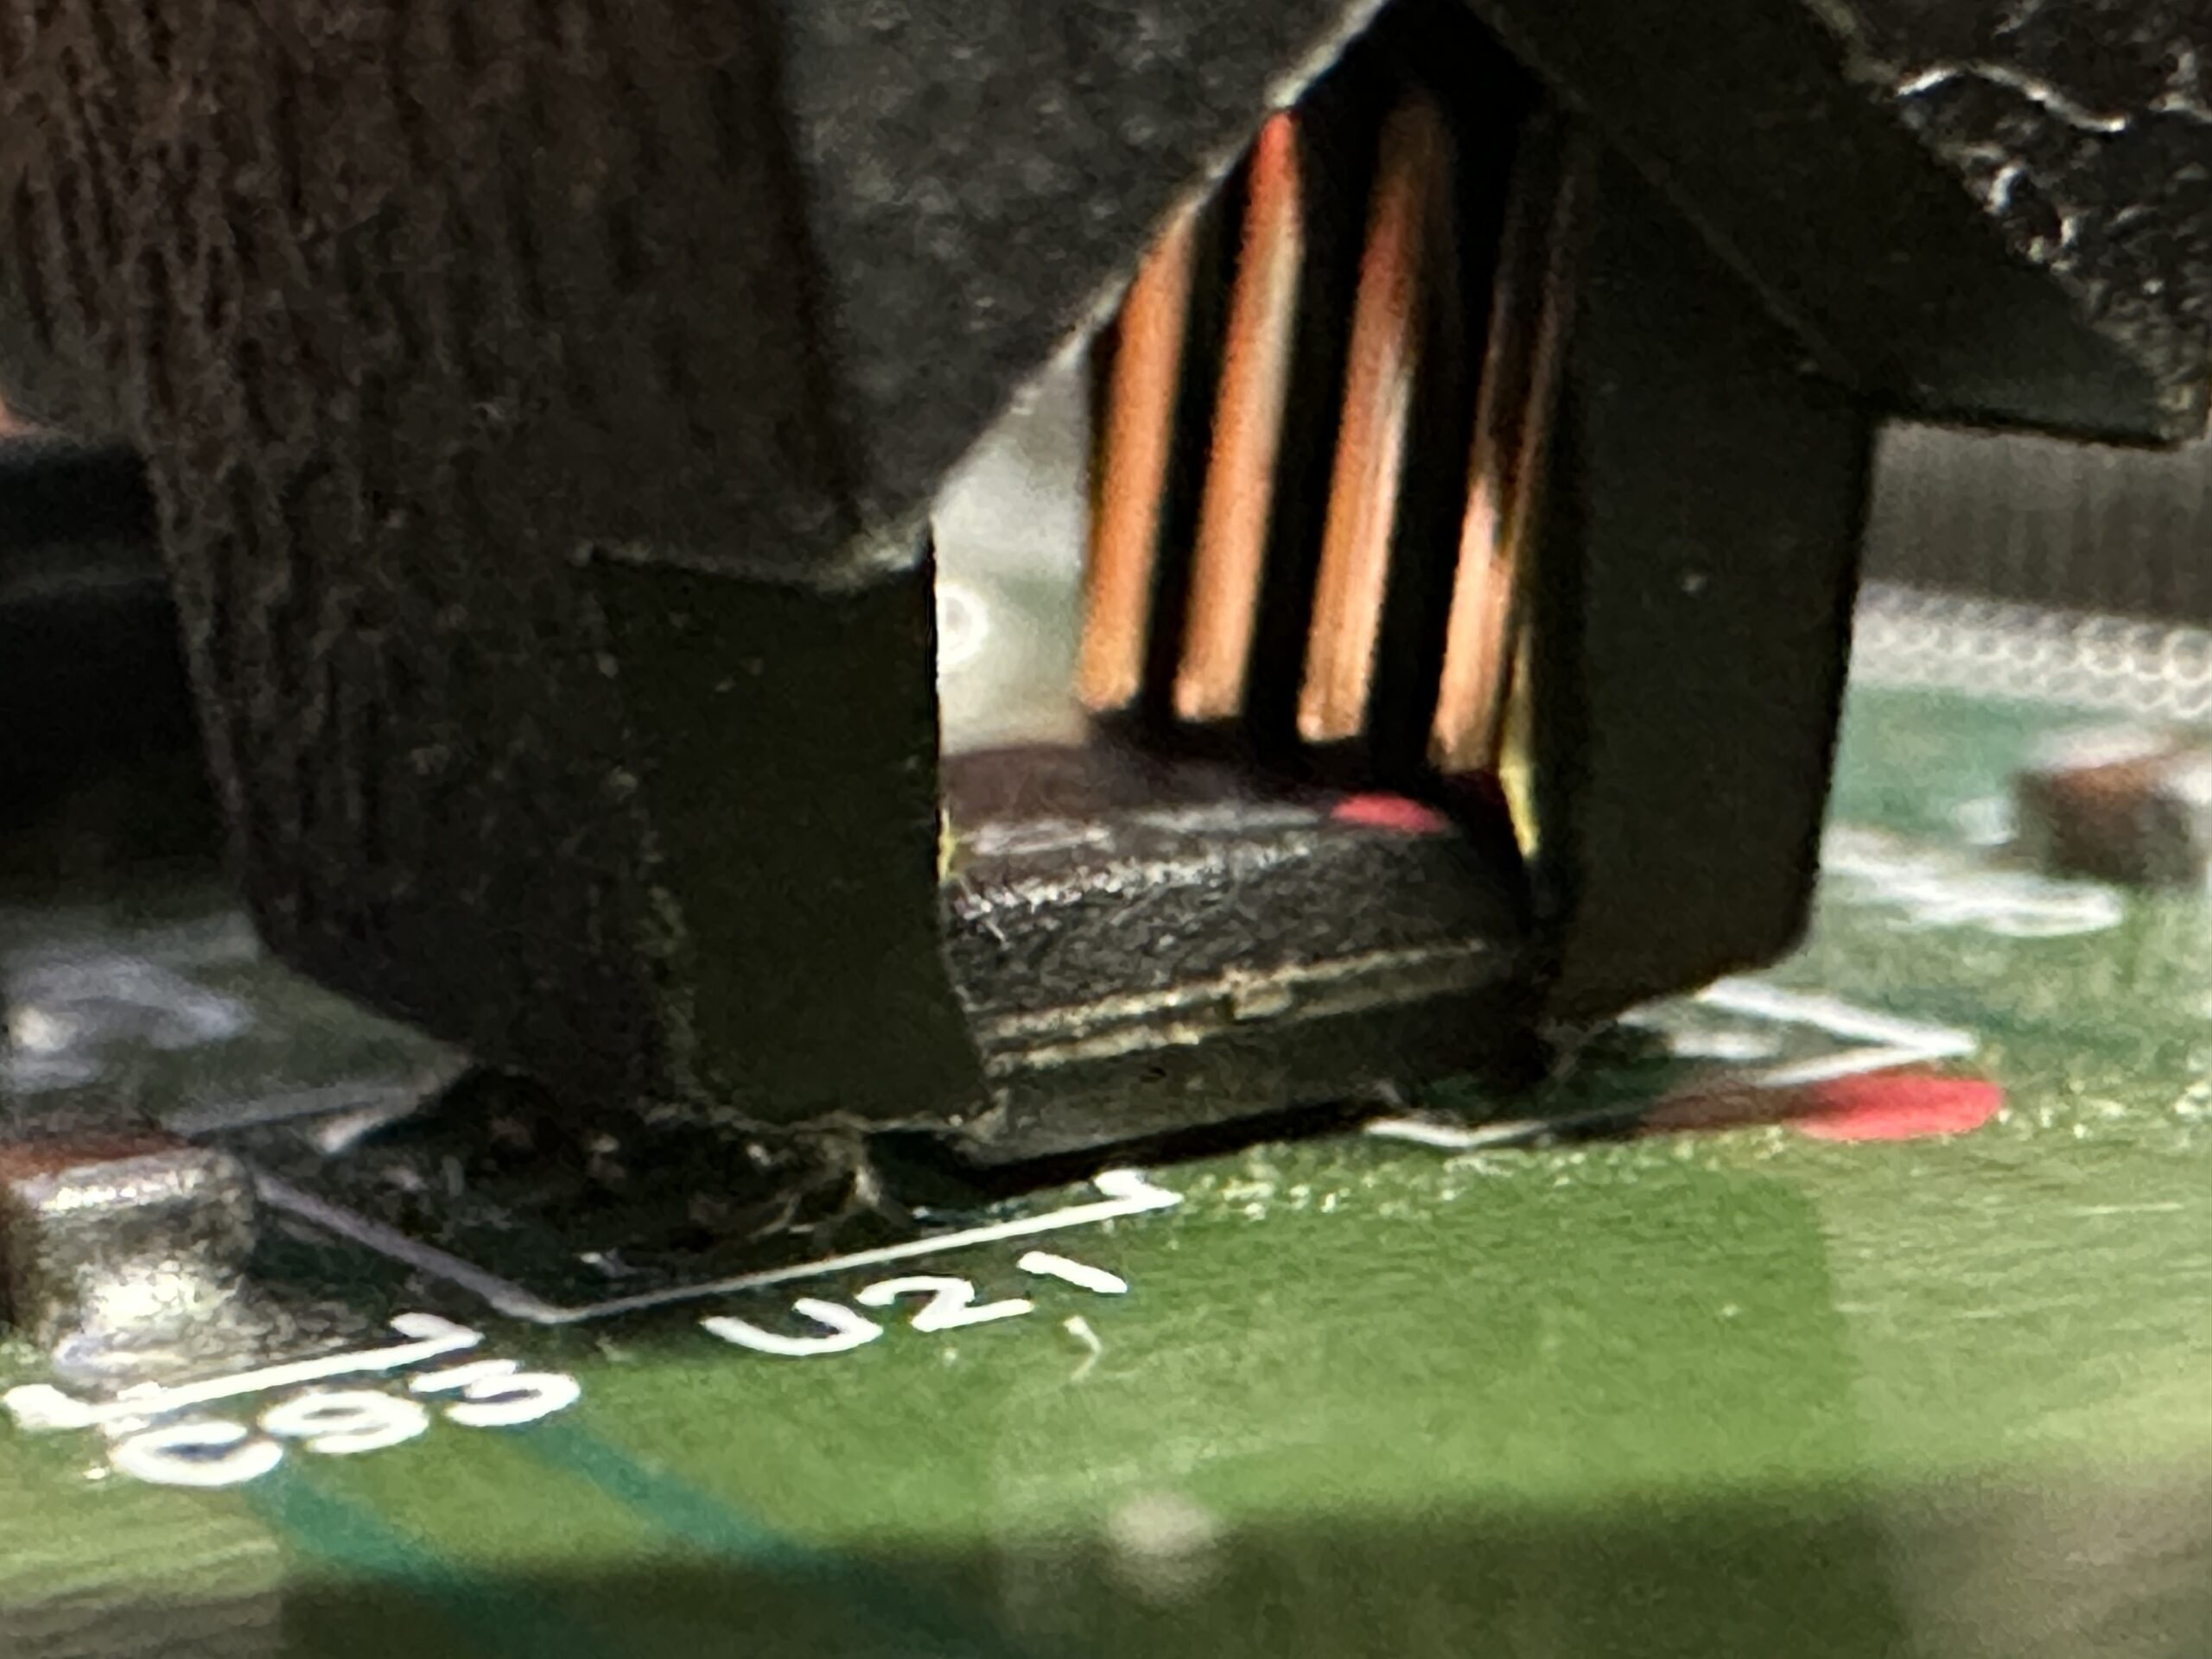
11. Now you'll take the CT3670 and locate the EEPROM, it will be labeled U21. I painted a red dot on the EEPROM to identify pin 1. Take the jaws and clamp them onto the EEPROM, make sure that the red wire on the jaws is aligned with pin 1 on the EEPROM.
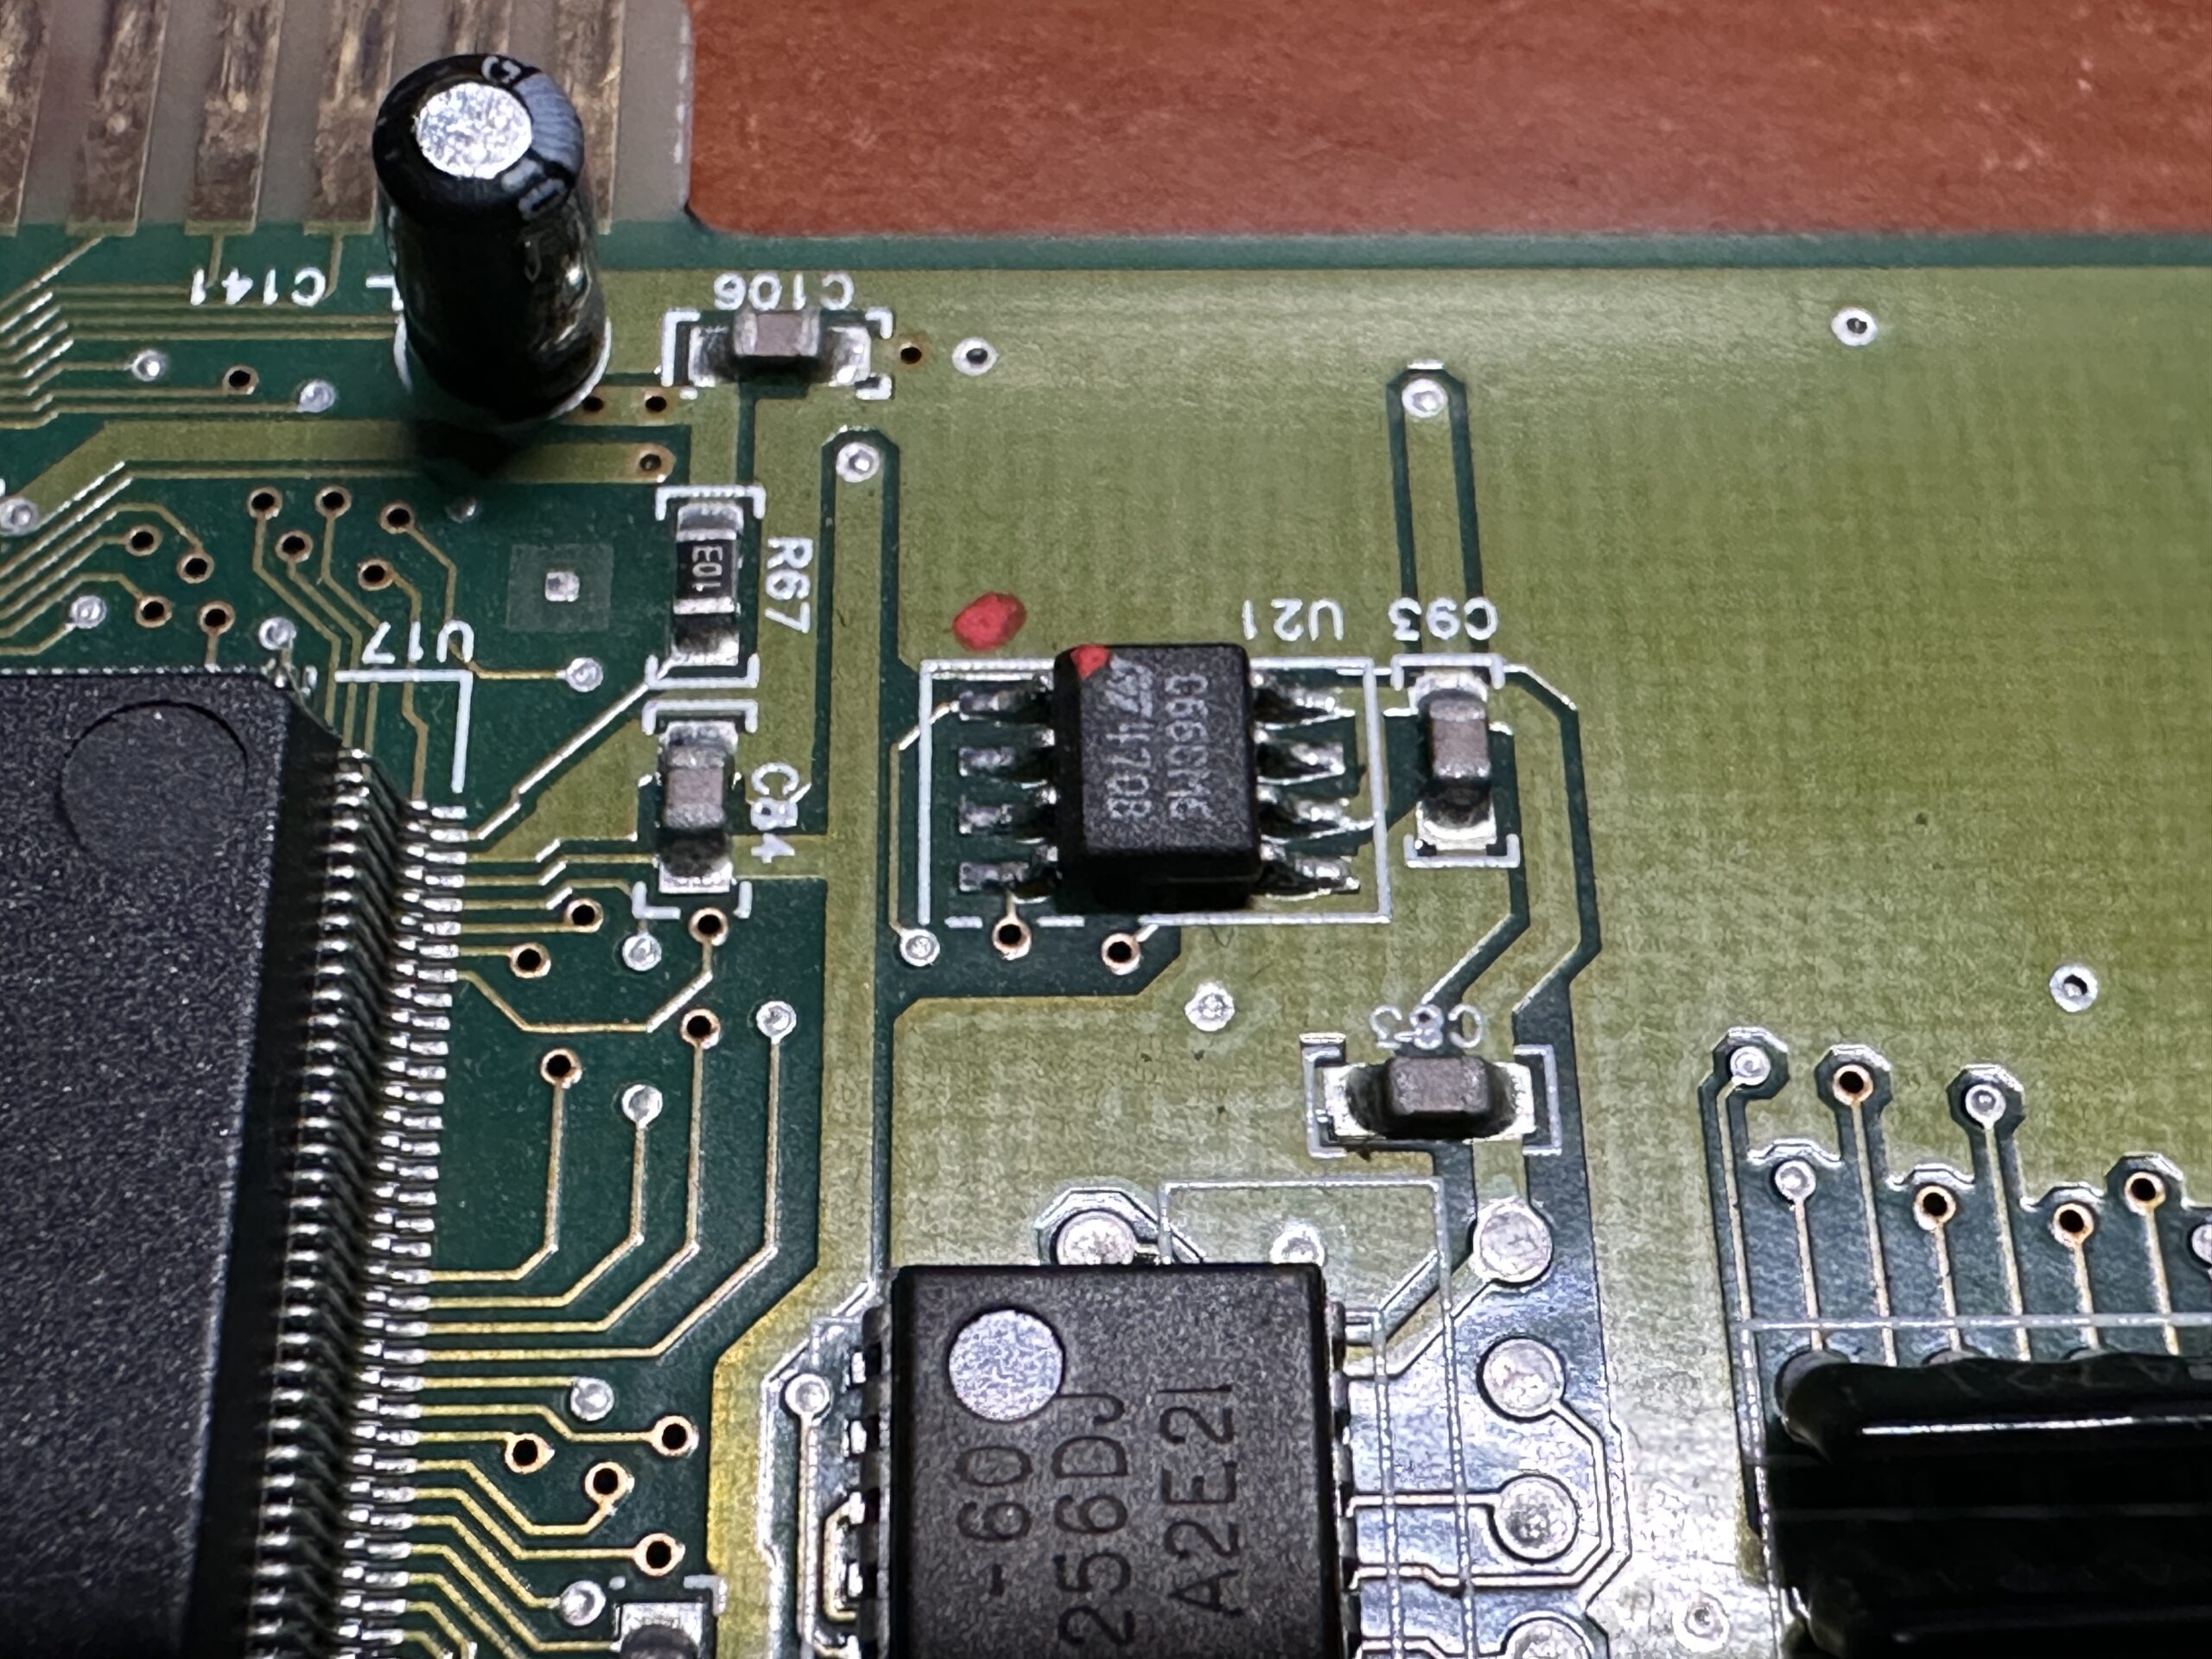
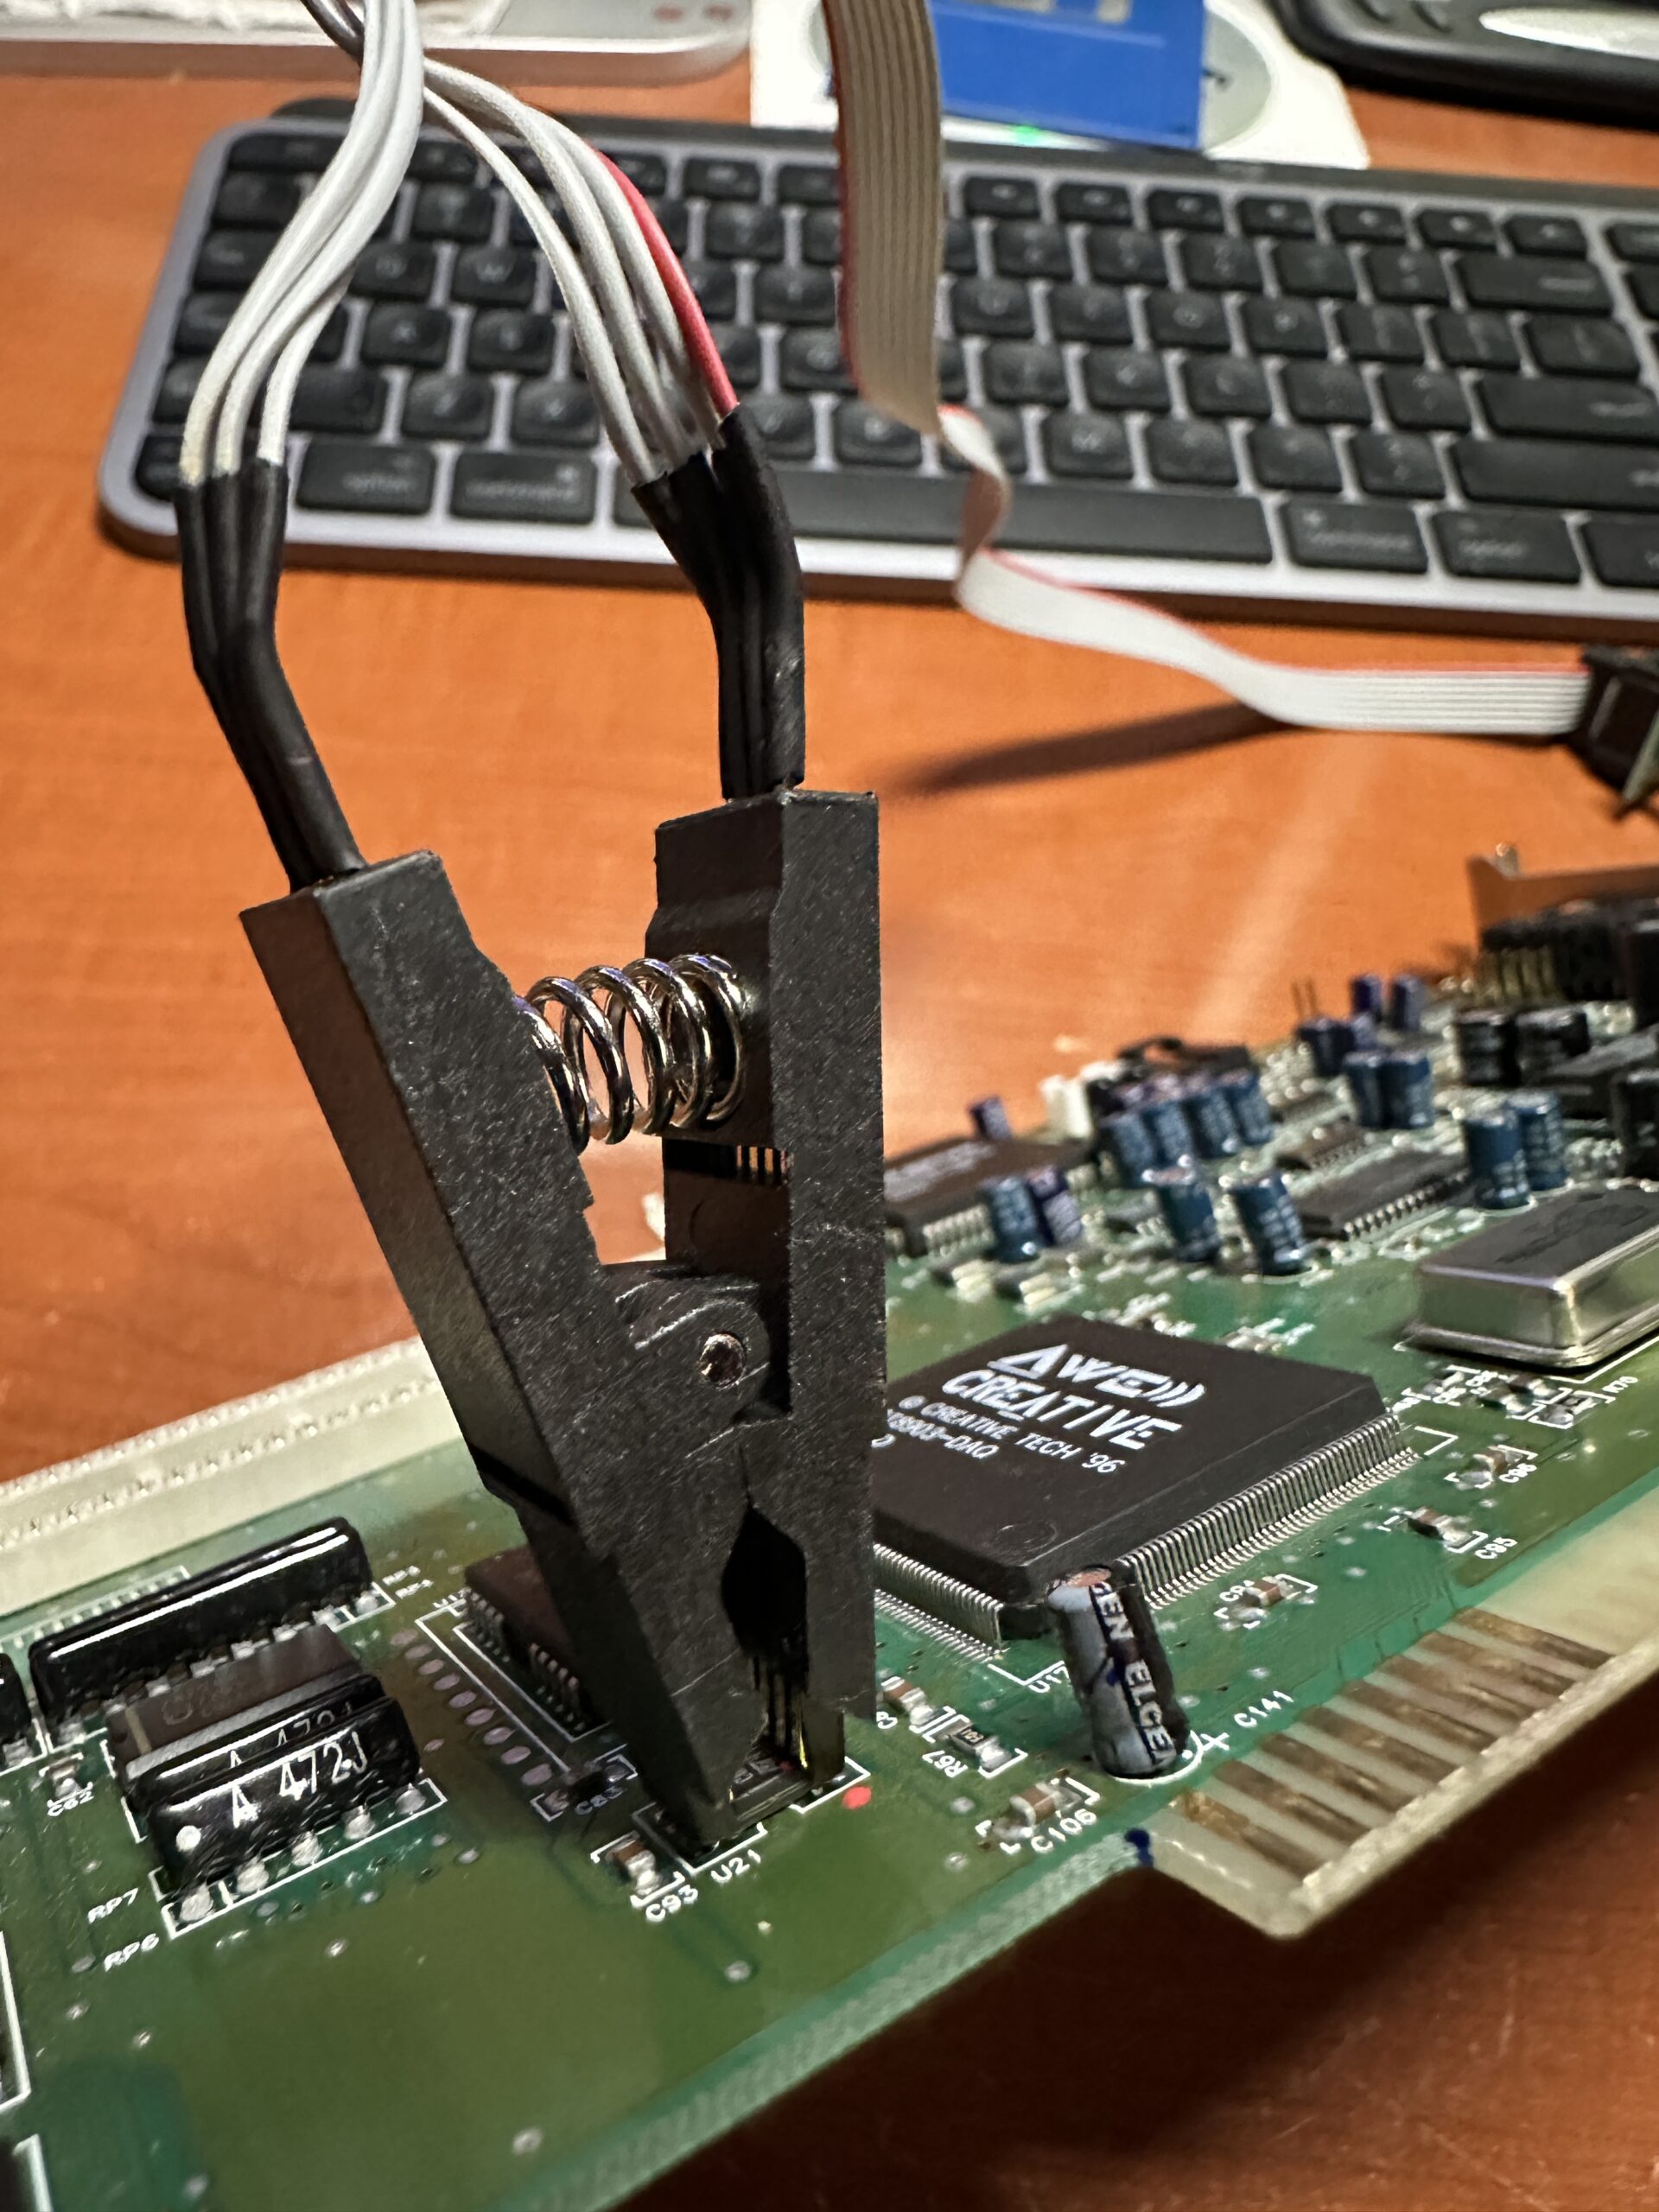
Note: make sure the jaws fit correctly and snuggly on the EEPROM
12. Now connect your CH341A Programmer to your USB cable. BOTH lights should light up. If only one light is on, recheck the jaw alignment with the pins of the EEPROM.
13. Once you get both lights lit, it's time! Going back to NeoProgrammer, and on the icon menu click on Read IC. It will prompt you to ask if you have correctly wired the EEPROM to the CH341A Programmer. It doesn't hurt to double-check. Once you checked, click Yes.
14. If it all works you will see the data from the EEPROM followed by a Successful prompt at the bottom. Note: If NeoProgrammer fails to read, check the jaws on the EEPROM, even though both lights can be lit one or two pins might not be connected correctly. You can gently pinch the jaws tighter onto the EEPROM or remove them and re-attach them. The jaws are not always going to attach to the EEPROM at first try.
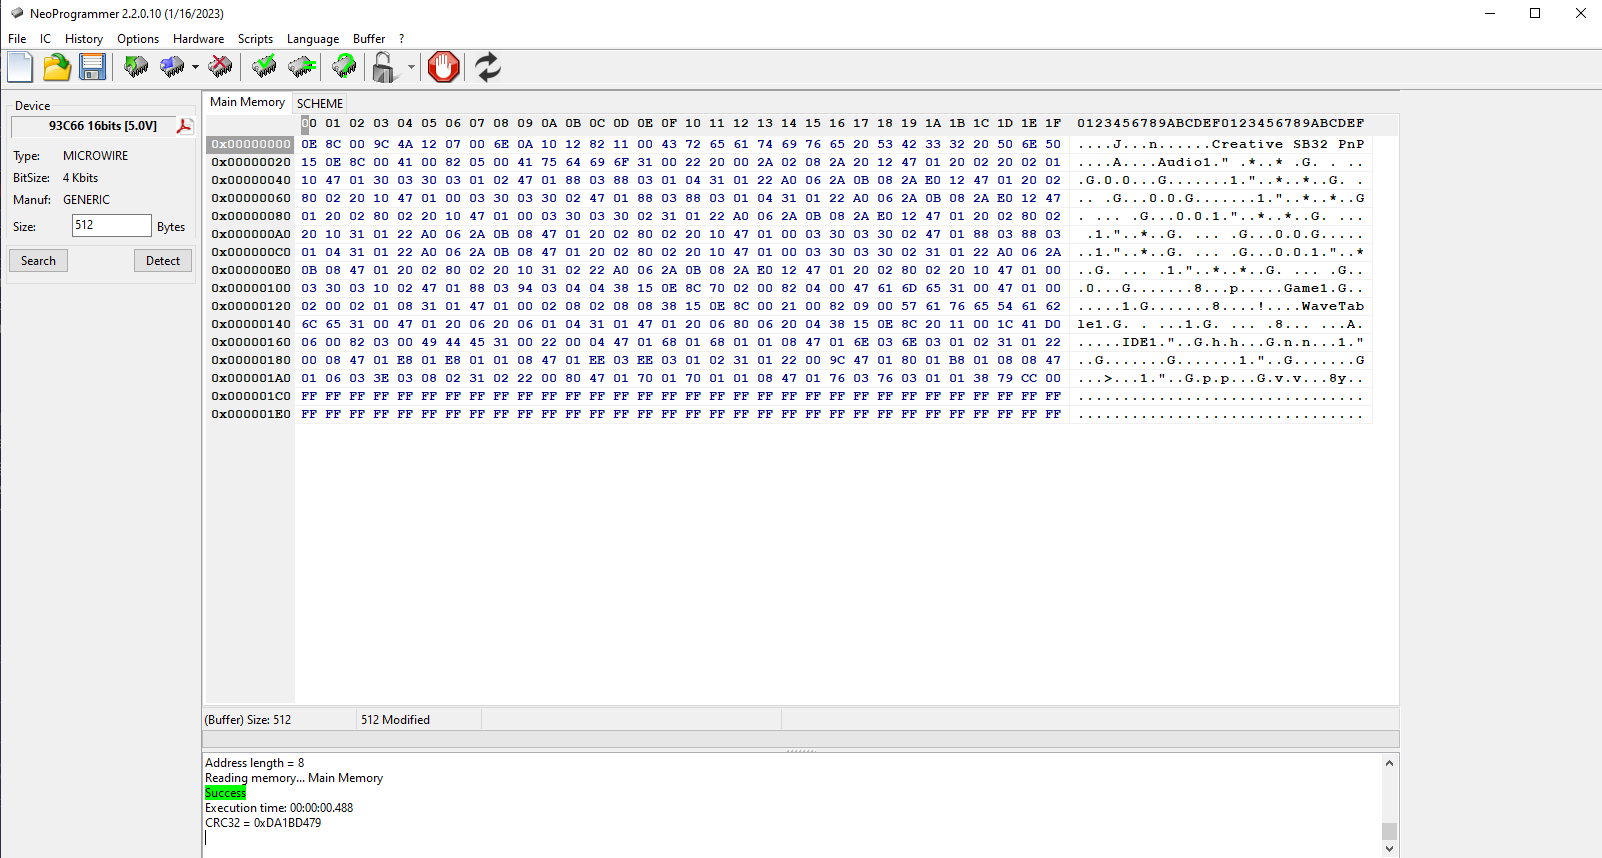
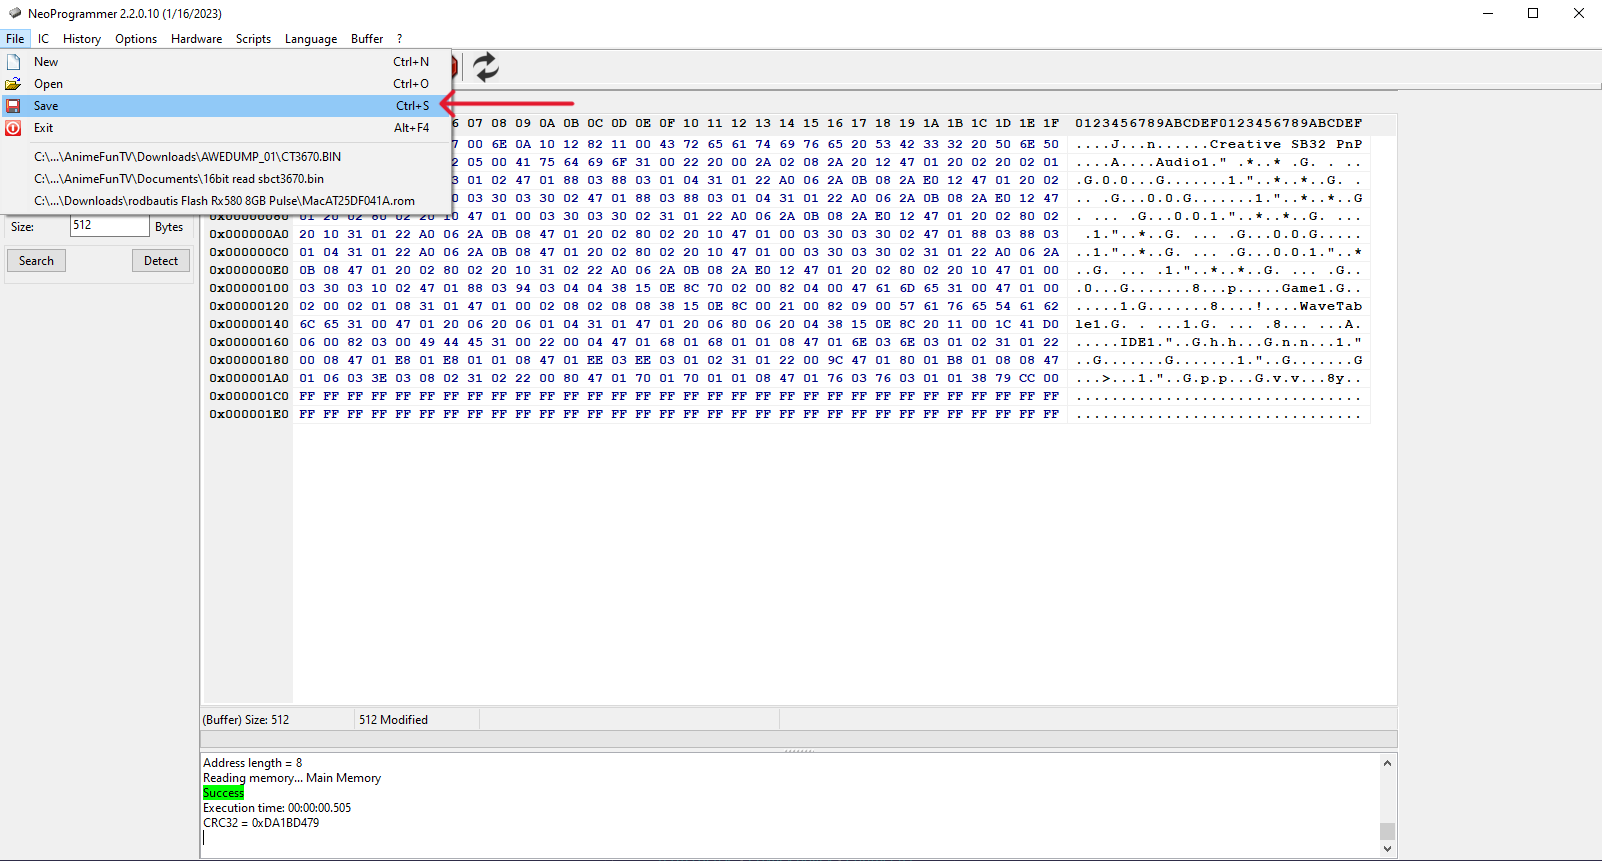
15. Save the EEPROM as Bad CT3670.bin
Leave everything connected if you had a good rom dump.
Next, let's take a look at the good CT3670 rom dump (provided by Tronix) and compare it to the bad CT3670 rom.
1. Unzip AWEDUMP_01.ZIP and place it into its own folder.
2. Install Hxd, and open it.
3. Open CT3670.BIN
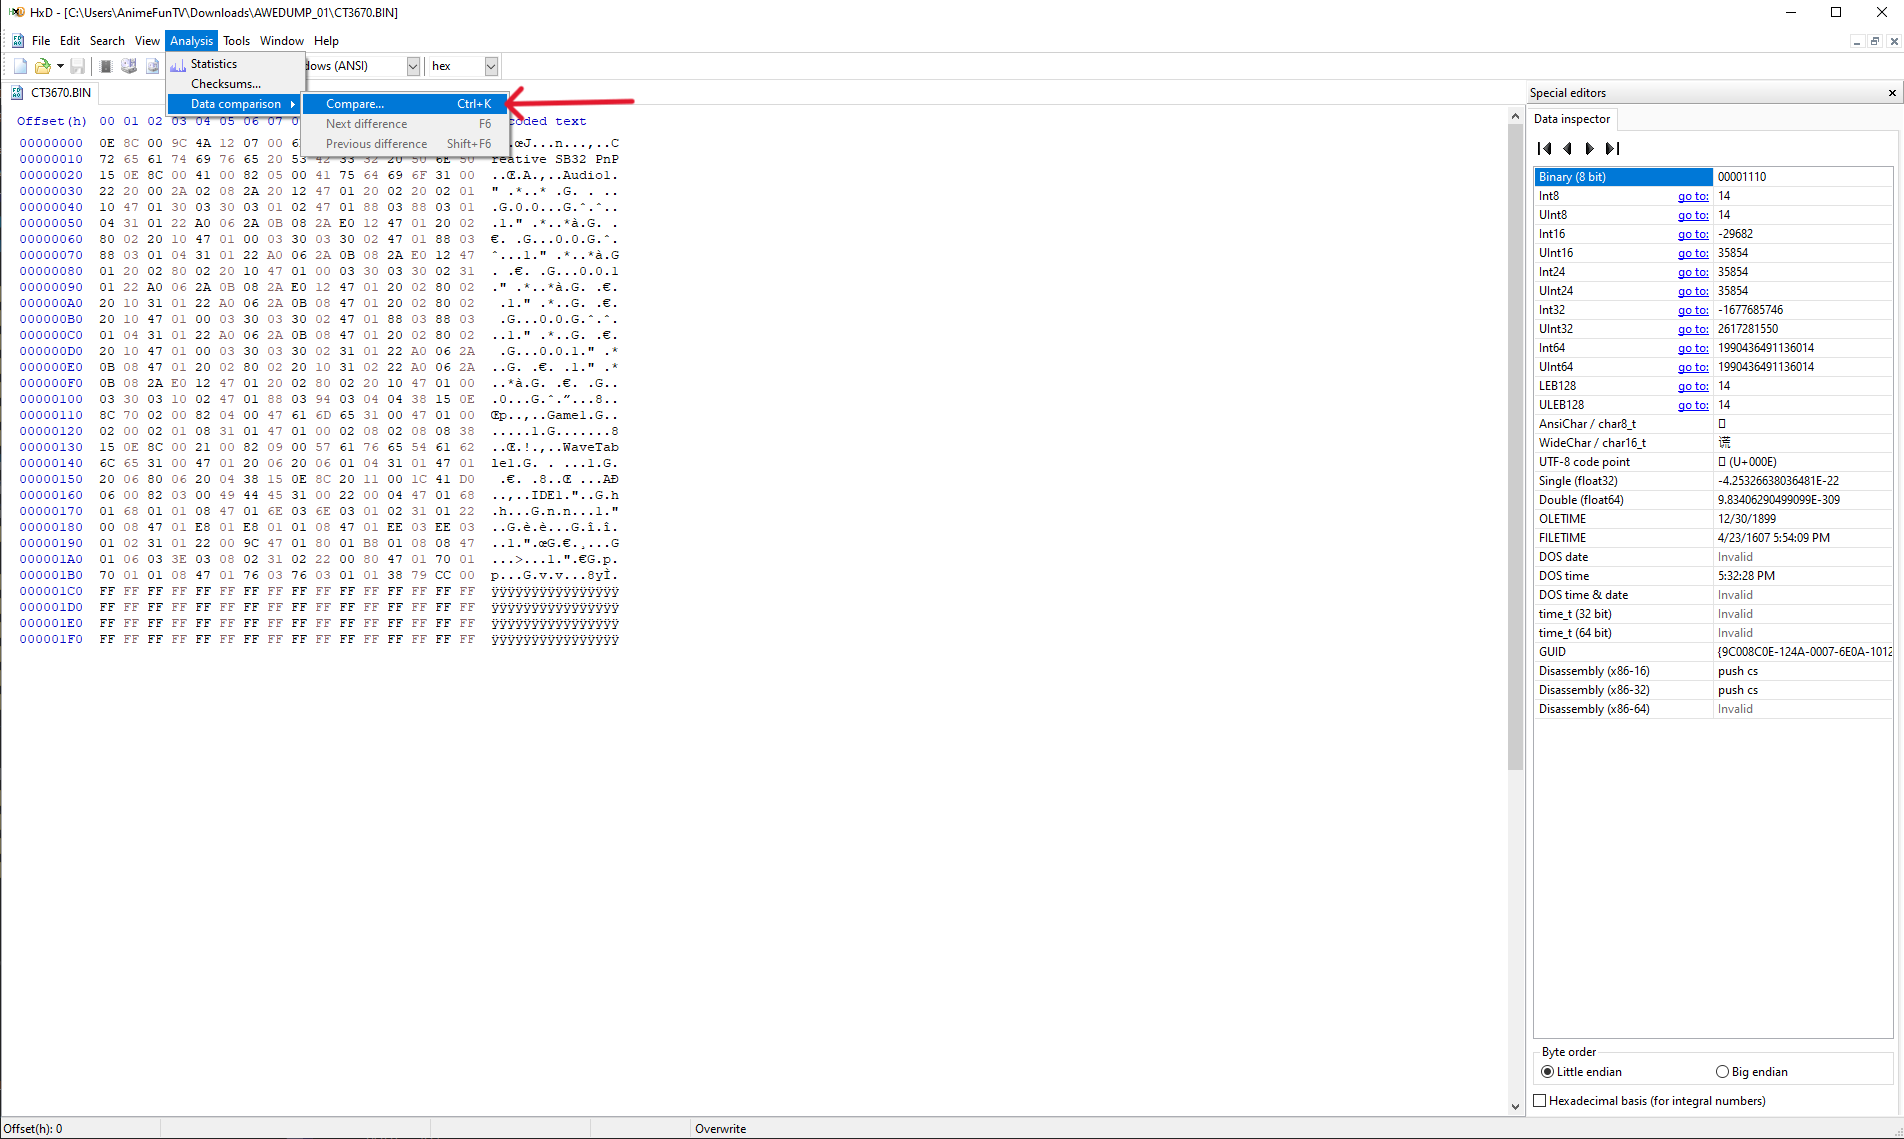
4. On the menu bar, click on Analysis, hover over Data comparison, then click on Compare
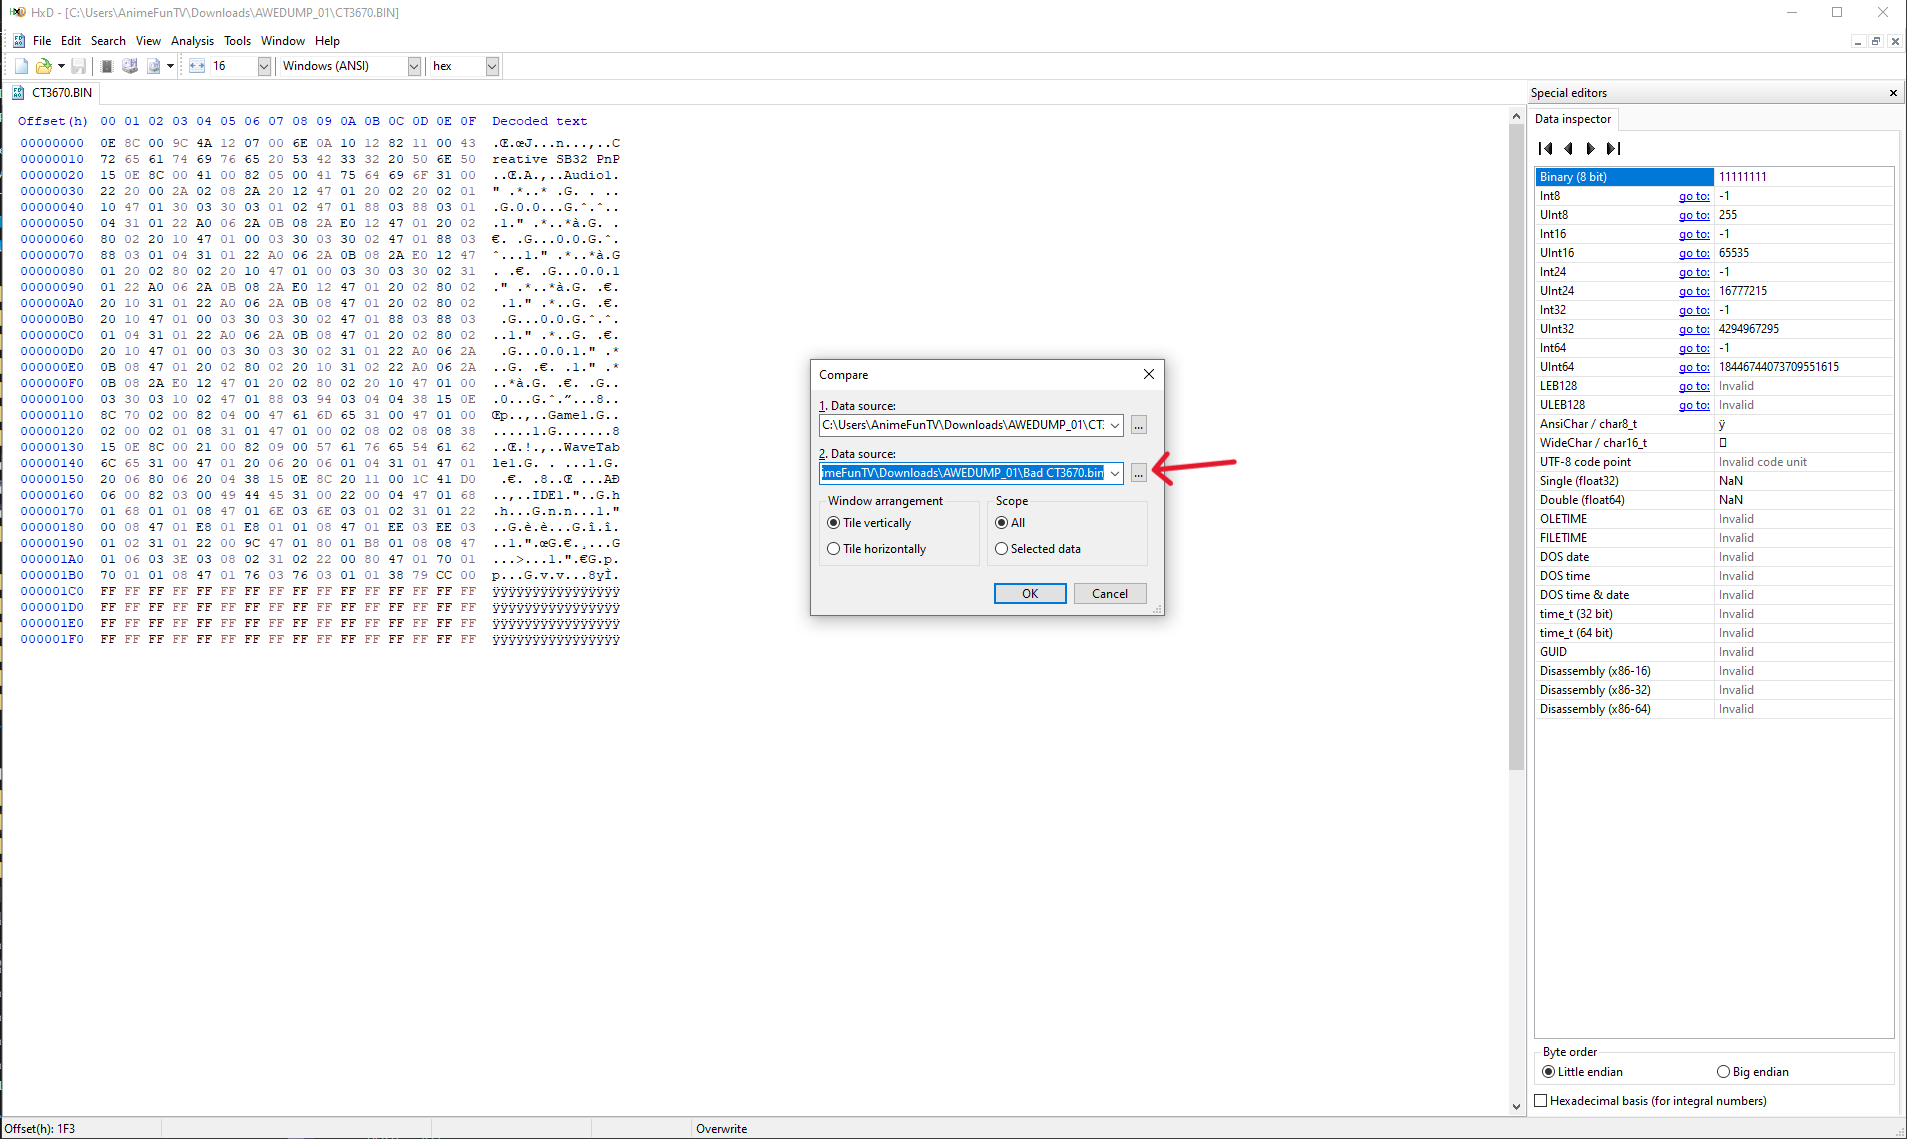
5. On the 2nd Data Source, click on the '...' to select the Bad CT3670.bin file we just saved with NeoProgrammer.
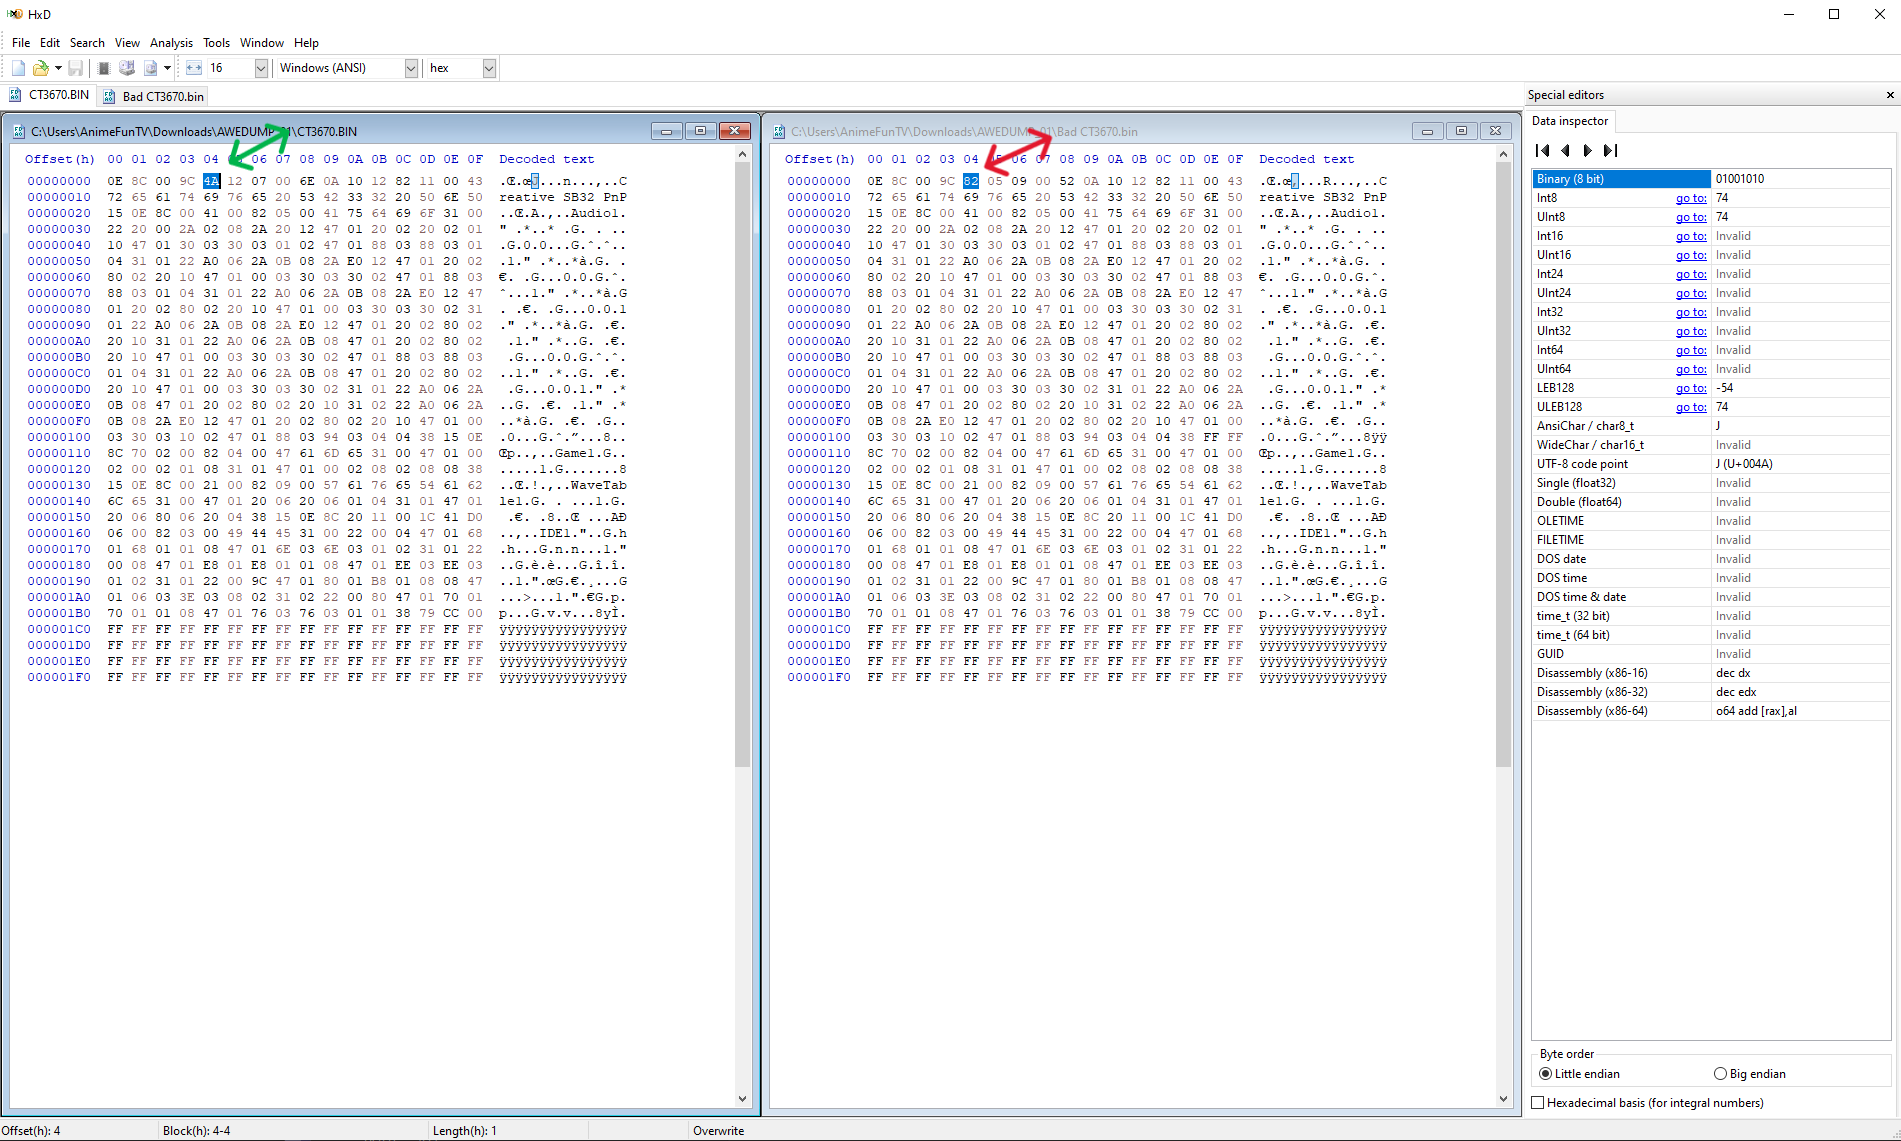
6. Hxd will then identify which bits are different (ie. corrupted) from your rom dump and a clean dump. As you can see in my case, all it took was one bit to completely make my CT3670 complety dead.
Now that we confirmed we had a corrupted EEPROM, it's time to write the clean rom into the CT3670. This is pretty straight forward thankfully.
1. Go back to NeoProgrammer and open the CT3670.BIN.
2. Next to the Write icon, you'll see a drop-down arrow. Click the arrow and make sure Write is selected.
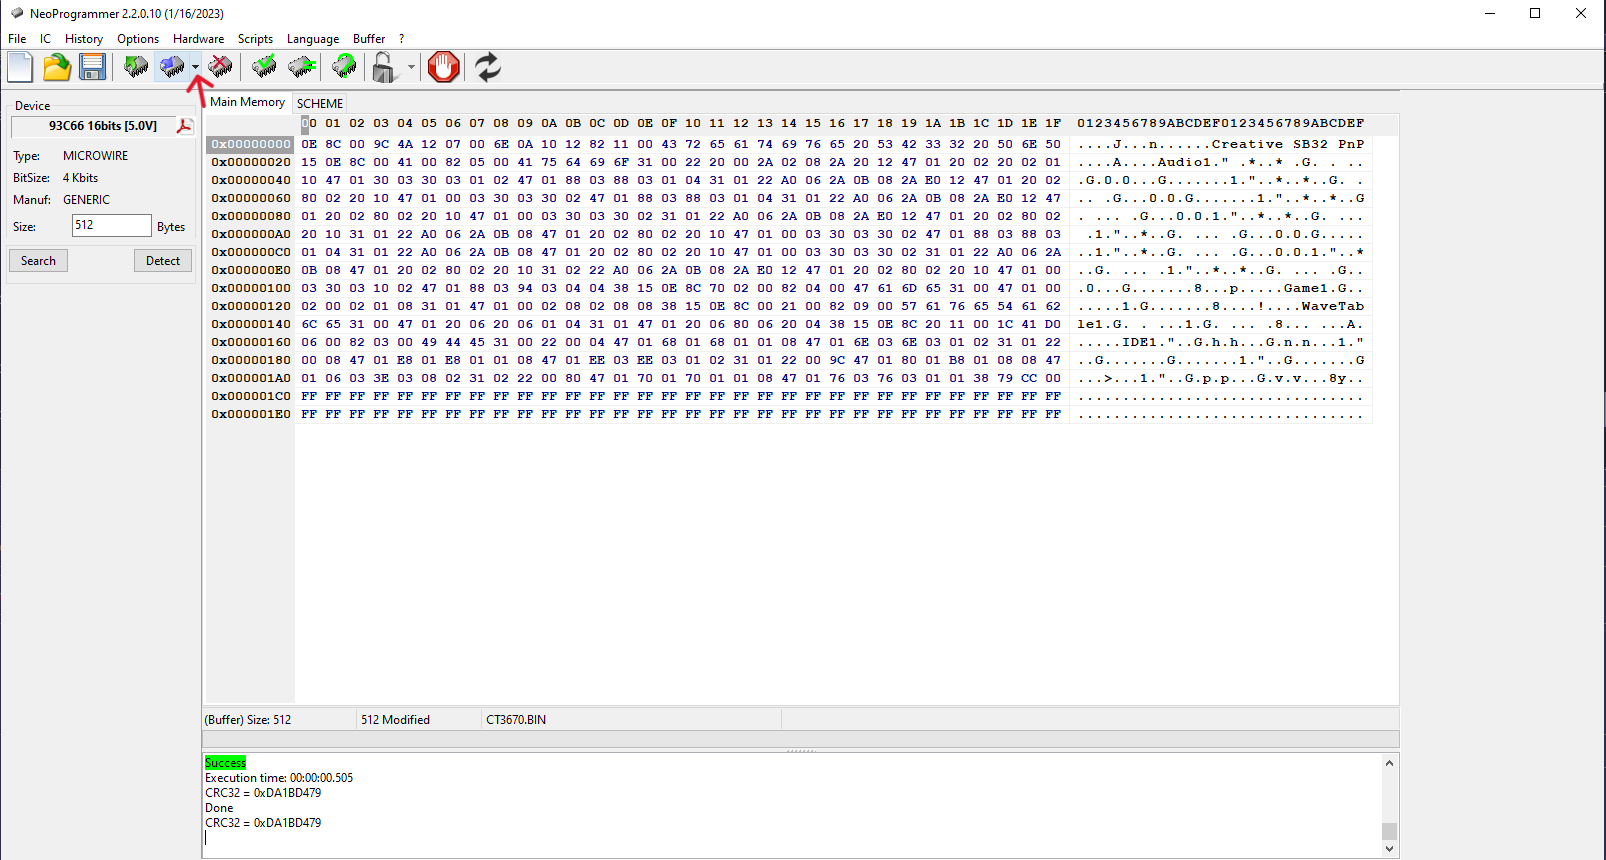
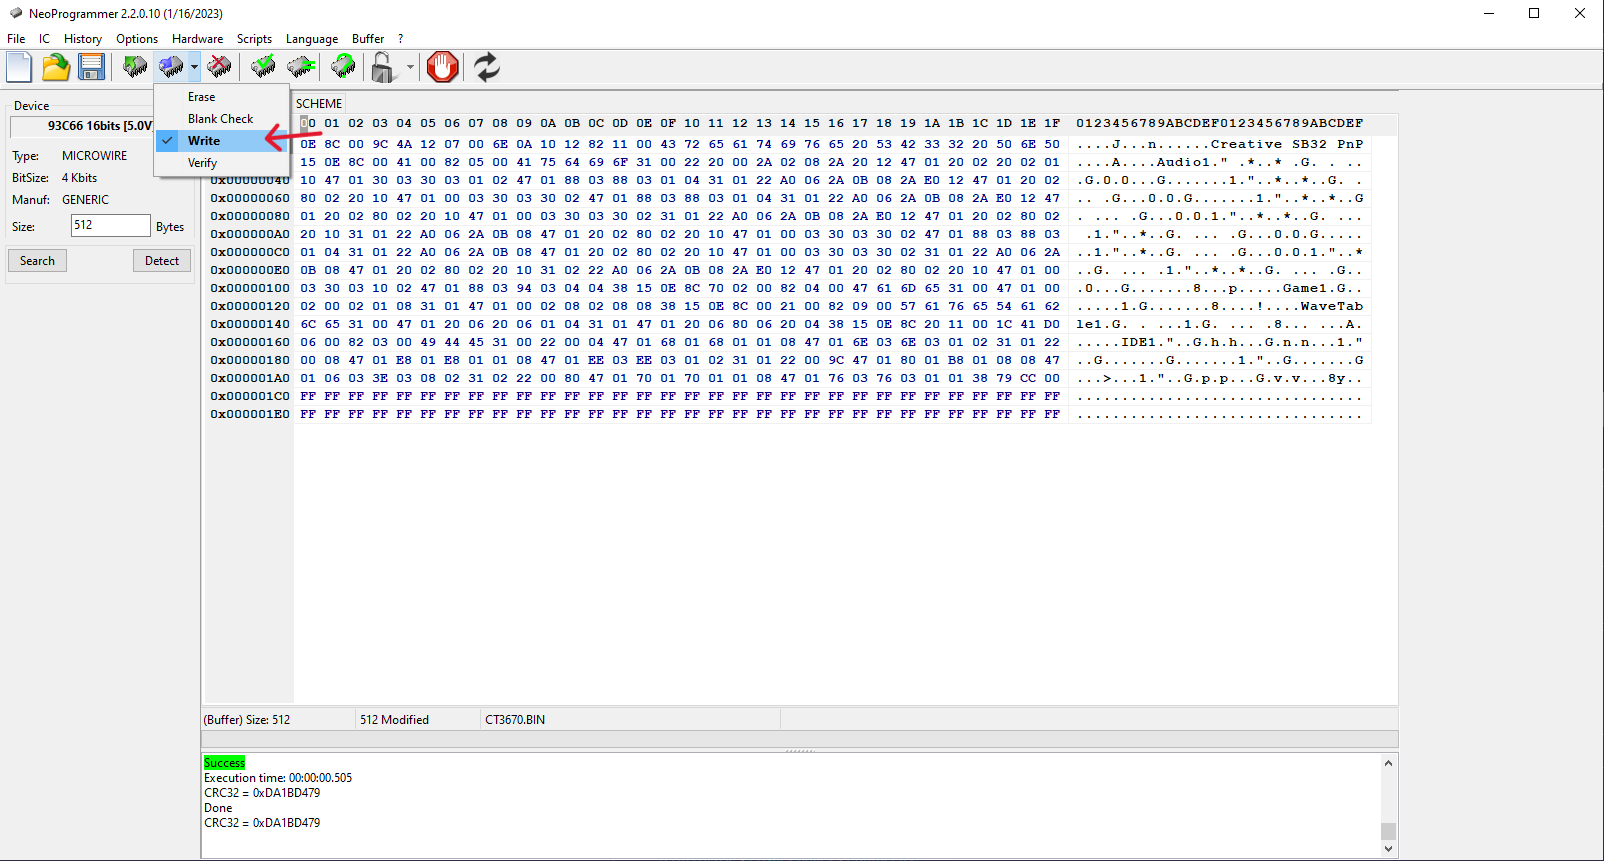
3. Now click Write to write the good CT3670 rom into the EEPROM. If successful you'll see it at the bottom.

Unplug the jaws from the EEPROM and place the card back onto your computer.
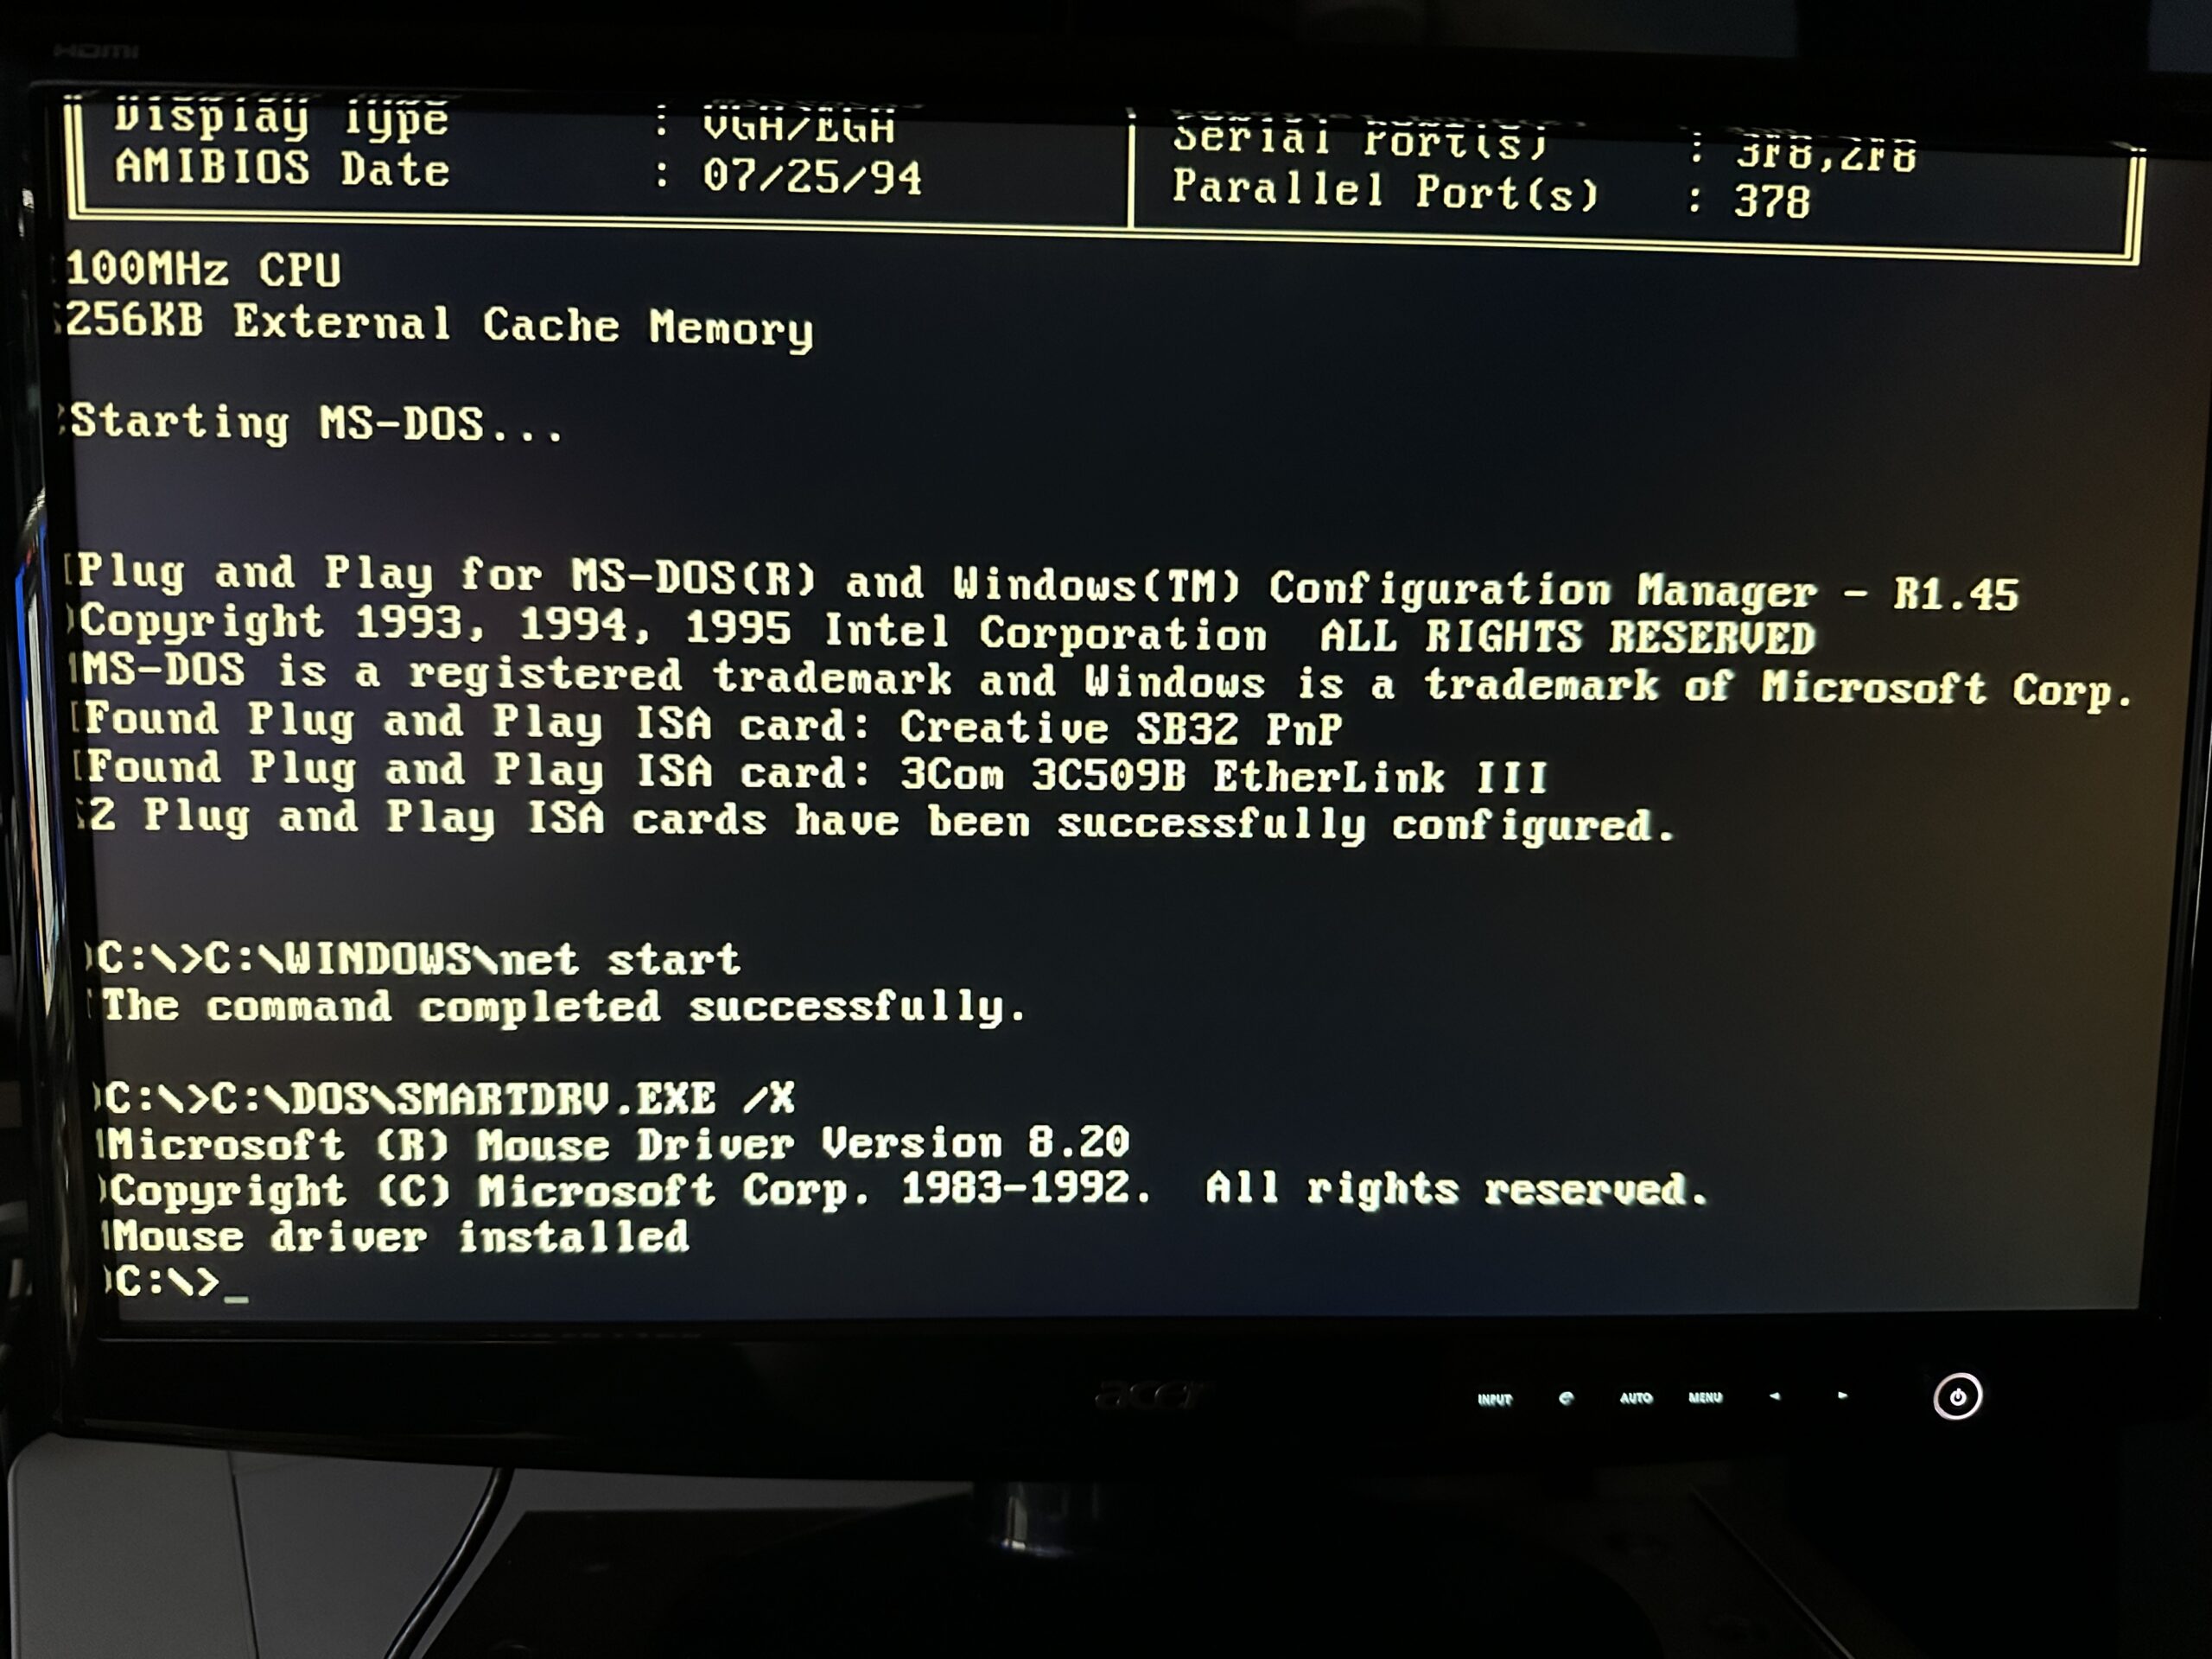
If it all goes well, you should now have a fully revived CT3670!
In my case when the PnP manager loads, it would lockup as the bad EEPROM crashes it. Now with the clean rom, it fully reads it!
I used the SB utilities and verified everything looks to be in working order. I have yet to test out the IDE. I need to eventually because I did not want to give that up (ie. flashing it into an AWE64) in my case I want to keep the IDE from my controller card for both my mechanical HHD and a Flashcard HD and have the IDE on the SB for my CD ROM.
Good luck!