First post, by anetanel
I watched this video (https://www.youtube.com/watch?v=BQ759oY5EKg) showing a dedicated cheap PC as a multi MIDI emulator, and it got me thinking. Wouldn't it be cool if you could change the emulator running without switching the active display, and without messing with the mouse?
Something like a remote control, or a small LCD with menus an buttons...
So I took a few hours and learned enough Arduino programming to make this happen.
First I bought this cheap Arduino clone with a 2x16 LCD display and buttons.
In his video, Phil created desktop shortcuts for each emulator, and I'm doing the same but the shortcut will not be to the emulator (MidiPlayer.exe), but to a simple script. The script simply closes any instances of MidiPlayer.exe, and starts a new one:
taskkill /f /fi "imagename eq midiplayer.exe"start C:\Users\netanel\Desktop\MIDI\%~n0\MidiPlayer.exe
Note that I've used a simple batch trick that takes the file name (e.g SC-55.cmd) and starts the emulator from a folder with the same name. This way the script is the same for any emulator, just the name of the folders and files needs to match.
Next thing is to assign each shortcut for each emulator a "Shortcut Key". Simply right click the shortcut, go to properties, and set a shortcut key. I used Ctrl + Alt + M for MT-32, Ctrl + Alt + S for SC-55 etc...
Test your shortcut keys and make sure that each shortcut key combination opens the desired emulator.
Now to the hardware part.
This Arduino can be used as a USB keyboard. The problem is that it needs a special firmware to do so, and while this firmware is loaded, it can't be programmed. So each time you want to change the code, you need to flash the original firmware.
One you know this, the flashing and reflashing process takes 20 seconds. But it is still a pain in the...
You'll need:
1. The keyboard firmware (Arduino-keyboard-0.3.hex)
2. The original firmware (Arduino-usbserial-uno.hex)
3. The arduino code to make all the magic happen (MIDI.ino)
These can be downloaded from my GitHub repo:
https://github.com/anetanel/ArduinoMidiKeys
4. The Arduino IDE (https://www.arduino.cc/en/Main/Software)
5. The AMTEL Flip programmer (http://www.atmel.com/tools/FLIP.aspx)
Install the Arduino IDE and the Amtel Flip.
Connect the board to your computer, and make sure the drivers were installed. It should be identified in the device manager under "Ports (COM & LPT)" as "Arduino Uno" and a COM number. Make note of this COM number.
Double click the MIDI.ino file to open it in the Arduino IDE.
You can change the keys used:
// define needed keys here according to the keyboardpage table: http://www.usb.org/developers/hidpage/Hut1_12v2.pdf#define KEY_M 0x10#define KEY_C 0x06#define KEY_S 0x16#define KEY_Y 0x1c#define KEY_COMB KEY_LEFT_CTRL + KEY_LEFT_ALT
And the list of emulators. Make sure to change the numOfEmulators value according to your list size, and that the emulators array correspondes to the shortcutKey array.
//set number of emulators, names and shortcut keysconst int numOfEmulators = 4;String emulators[numOfEmulators] = {"MT-32", "CM-32L", "SC-55", "YAMAHA"};int shortcutKey[numOfEmulators] = {KEY_M, KEY_C, KEY_S, KEY_Y};
Once you're happy with the changes, go to Tools -> Ports and make sure that thecorrect COM port is selected. click Verify and then Upload.
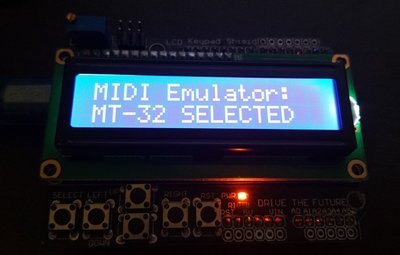
The LCD screen should show some text and the Up and Down buttons should scroll through the emulators list.
If you're not seeing text, try to turn the contrast knob on the top left corner with a small screwdriver.
Use the Select button to select the emulator. It should blink and show "SELECTED".
You may have noticed that although the LCD and the buttons work, nothing is happening on the computer. This is because we havn't flashed the keyboard firmware yet. So:
While the board is plugged to the computer, we need to short the RESET and GND pins:

With the LCD on top of the board, it is a bit tricky to get to the pins:
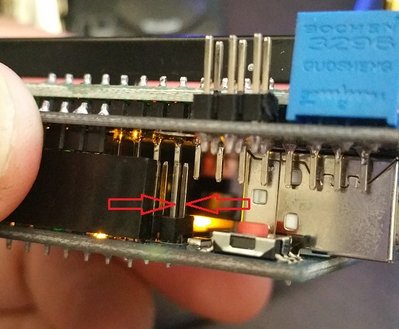
I used a small wire I had laying around, but you could use a screwdriver or whatever.
Once the pins are short, the board will switch to Device Firmware Update (DFU) mode.
It is possible that windows will not find the drivers to the board in this mode. If so, the drivers can be found in the ATMEL Flip installation folder.
Once the drivers are installed properly, make note of the name that the device was given. In my case it was ATmega16U2.
Now head over to ATMEL Flip.
Click the "Select Target Device" Icon, and choose the appropriate device (in my case ATmega16U2).
Click the USB cable Icon and select USB.
Click Load HEX File.
Select the Arduino-keyboard-0.3.hex file.
Make sure all 4 checkboxes on the left are checked and click Run.
If all of the checkboxes are green, make sure the "Reset" checkbox on the bottom right is checked and click Start Application.This only takes a fraction of a second.
Disconnect the USB cable from the board, and reconnect it after a second or so.
The board should identify simply as "keyboard".
Now, finally, select the desired emulator from the list, press Select, and hopefully the desired emulator will pop up.
I really hope that you'll find the guide useful and give this a try.
I had fun doing it, even though I'm sure that any half decent C programmer will faint at the look of my code 😀