Reply 480 of 844, by verysaving
Rank
Newbie
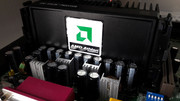
Awesome work on the MS-6168.
for the solder joint I suggest you to use a good amount of soldering paste for each pad, you'd be amazed of the result!
Awesome work on the MS-6168.
for the solder joint I suggest you to use a good amount of soldering paste for each pad, you'd be amazed of the result!
Thanks verysaving. I still need to emprove my soldering procedure. I used a liquid flux but later I switched to gel which stays better in place. Because the tip of my soldering gun was bigger than needed, I had to use more solder as I feared I might damage the laquer or the PCB. I learned a lot after the recap of the MS-6168.
When I'll post the next episode you will see that the solder job is looking even better. The EP-7KXA that will be featured, is one of the best around if I may so. I don't like to brag but I dont think that someone is mad like me and is recapping a EP-7KXA at this moment. After I finished repairing the 7KXA I felt so good inside. The feeling was better than anything. I felt the taste of success sort to speak of. After I powered it up, all was even better. Who needs drugs when you have this kind of hardware. 😁
One thing is certain though, I need a soldering/hot air station for future repairs.
I think I still have my 7KXA buried in a mountain of boards ranging from 386 all the way up to FM1. Mine is recapped though - Panasonic and Sanyo mostly, with smaller (1000uF) caps being OST (they're not that bad actually, don't see the reason people diss them so much. Don't run them with a crap PSU and you're fine.).
I moved onto a Acorp 6BX/VIA/ZX81 that I also recapped (1500uF 6.3v 8x15, Panasonic FL caps) and for which I got hold of a Slotket as well (though a no-name one that I have no idea if it supports Coppermines)
"Enter at your own peril, past the bolted door..."
Main PC: i5 3470, GB B75M-D3H, 16GB RAM, 2x1TB
98SE : P3 650, Soyo SY-6BA+IV, 384MB RAM, 80GB
Stayin' Alive
Some time ago, my highschool buddy, which happens to still be my best friend, Mr. R., informed me that an acquintance of his, has an old PC which he wants to throw out. Nothing out of the ordinary until here. Right?
At first, I was told that it might be a Pentium system which might've been upgraded at some point, so I said BRING IT ON!
A month or so later, when I returned from work, I received a phone call from Mr. R and he told me that he had the PC in the trunk of his car and he wants to bring it over to my place.
BRING IT ON! I said. FREE STUFF IS ALWAYS WELCOMED!
When I received the PC I saw that it wasn't a Pentium era system as it had PS/2 ports and an ATX form factor, so I "dumped the junk" in the trunk of my car together with the Samtron 55E CRT monitor and the keyboard which was kind of meh.
ATX motherboard...tsk tsk tsk...I said to myself...Pentium...yeah right...
At that moment I didnt even want to see what was inside the case. The funny thing is that at that time I was wondering when I was going to get my hands on a Slot A EPOX EP-7KXA motherboard and a 650MHz Slot A CPU as a few months earlier, I missed an opportunity to get one because I didnt want to pay the asking price.
The next day I took "the junk" out from my trunk. 😁
I opened up the case and all this time I was visualising an EPOX EP-7KXA motherboard. I looked inside. Unbelievable! A Slot A EPOX EP-7KXA motherboard. Well I'll be F....D! I looked at the CPU and I was thinking about frequencies over 800MHz...wet dreams with 1000MHz popped up before my eyes...I checked the information on the CPU cartridge and I saw that in fact the CPU was a 650MHz model. Pretty neat don't you think? I wanted a EP-7KXA+CPU 650MHz combo and I found one in an unexpected fashion. The cherry on top: it was free. Now I own all the Slot A CPUs with frequencies netween 500MHz-800MHz (500,550,650,700,750,800). The only one which is dead/hanging is the 750MHz model. The fact that matters though is that I have it. Some of you might remember the state in which it came but even so I have a plan to save that which cannot be saved. 😁 Some time in the future I'll try the recovery of the unrecoverable...Why? Because nothing is finished until I say so!
The CRT monitor and the keyboard were not in great shape . The monitor still had traces of the double sided tape which was used to fix the radiation filter made from glass, like the one I used to have back in the day. It still worked well but the refresh was low and it gave me headaches. The resolution was also low, 1024x768, so I decided to bring to the Recycling Center. The case also went to the Recycling Center, together with the BenQ 52X CD-ROM unit.
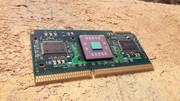
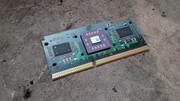
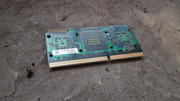
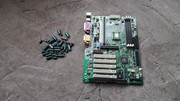
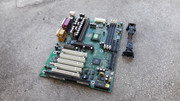
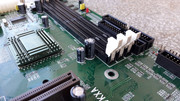
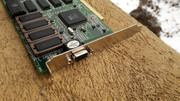
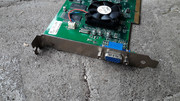
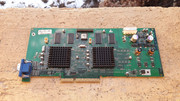
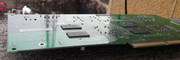
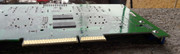
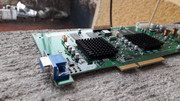
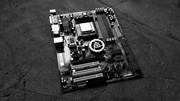
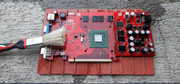
The rest of the components, 2 HDDs, the FDD, the RAM, the nVIDIA Riva TNT2 M64 graphic card, the Epox EP-7KXA V0.4 motherboard, the 650MHz CPU and the cables were kept.

I must say that I felt some "disconfort" when I decided to bring the monitor, the case and the ODD to the Recycling Center. You can't save them all, as I used to say more easily back in the past...
Let's return to the matter at hand.
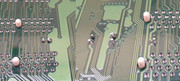
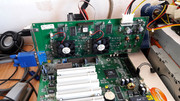
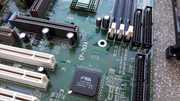
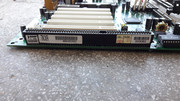
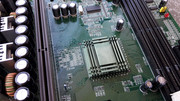
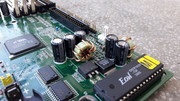
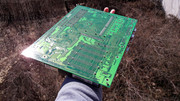
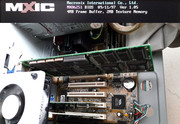
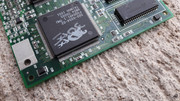
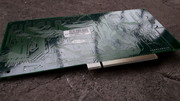
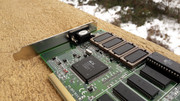
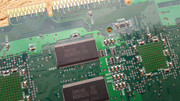
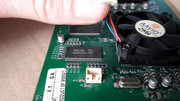
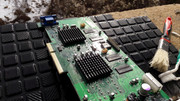
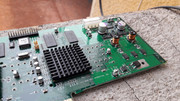
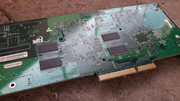
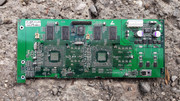
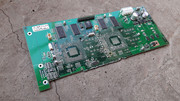
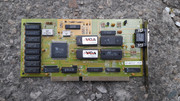
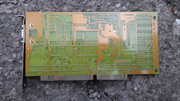
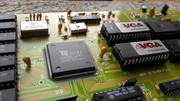
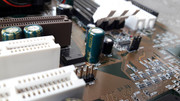
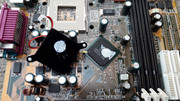
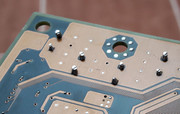
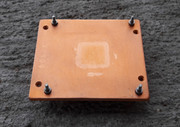
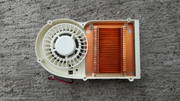
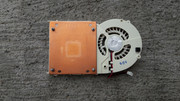
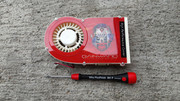
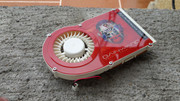
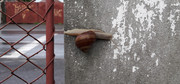
When I opened up the case I saw that the EPOX EP-7KXA motherboard has seen better days. A capacitor has lost its head and a few were swollen. BAD CAPS ERA in all its glory. A dead wasp was also inside...

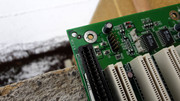

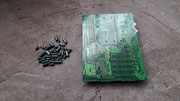
I knew I had my work cut out for me so I decided to replace all the capacitors regardless of the state in which they were. A ticking bomb is still a ticking bomb.
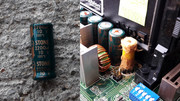
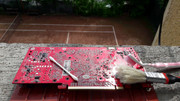
First, I removed the 2200uf 10V caps. I washed the motherboard with vinegar made from grapes and IPA 99%.
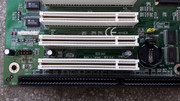
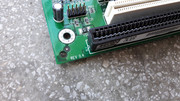
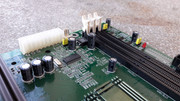
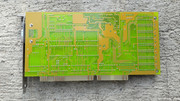
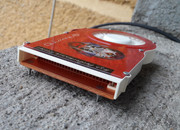
After this procedure I was greeted by good news as the PCB was in excellent shape. There were no corroded areas, the traces, the silk screen and the lacquer were impecable. The residues were cleaned easily. Thank You BAD CAPS ERA capacitors for being well behaved and not damaging MY PRECIOUS! 😁

I prepared a list with the requried caps.
A few hours were lost in my attempt to find caps on the online shops from my country. As I wasnt able to find all the caps from a reputable brand and with the required size, I decided to buy them from Poland http://www.tme.eu. From TME I bought exactly what I wanted. I was like a kid in a candy store.
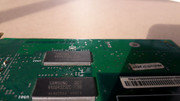
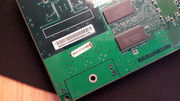
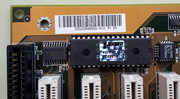
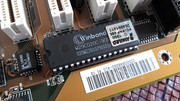
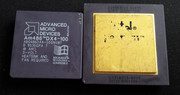
While I waited for the PANSONIC FR caps, I concentrated on the BIOS chip. It was cleaned and programmed with the latest BIOS version. I had to remove the sticker to get a better look at the model. I applied 0.2 mm double sided tape to put it back and I also recreated the black marker line which was removed by IPA 99%. Attention to detail is paramount.

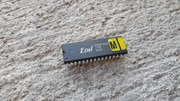
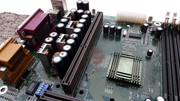
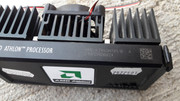
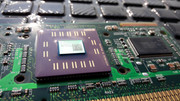
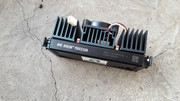
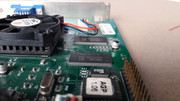
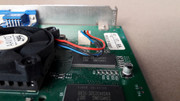
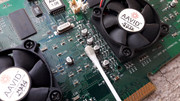
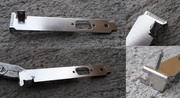
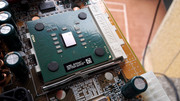
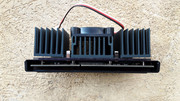
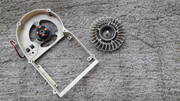
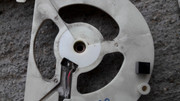
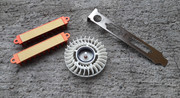
Soon came the moment when I tackled the Slot A 650MHz CPU - AMDK7650MTR51B A.
Right of the bat I found a problem. The retaining metal clips of the heatsink were too close for comfort and they almost touched a couple of resistors on the PCB of the CPU. What the F..K?!?!
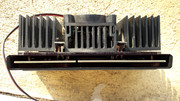
The initial state of the 650MHz CPU. Just a day at the office.
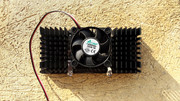

When I removed the heatsink I saw another problem. What the F..K?!?!
Thermal transfer @ 100%!!! For sure we are dealing here with a brain fart of the one designated to assemble the system...
YUCK!!!
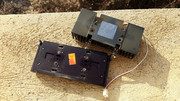
Bubble bath.

I opened up the cartridge of the CPU. I can do this in my sleep. I open them with my bare hands and the damage to the case is ZERO. I have a infallible method which requires force but at the same time patience.

Spick and Span!
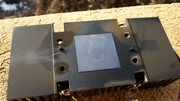
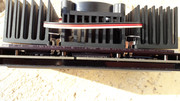
Some assemblies required!

I arranged the ends of the retaining metal clips.

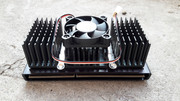
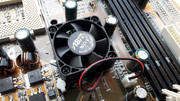
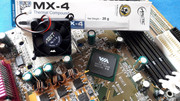
The ensure that the CACHE chips have a good contact with the heat plate I fabricated custom thermal pads made from ARCTIC Thermal Pad Blue (soft). Details about this procedure can be found in the previous episodes dedicated to Slot 1/A systems/CPUs. However, I didnt end there and I took it to the next level. To ensure the heat transfer from the heat plate to the heatsink I used two additional thick thermal pads. I had them from an AC Accelero Xtreme 9800 VGA Cooler. The 650MHz CPU didnt have them from the factory.

For a good thermal transfer I used ARCTIC MX-4 between the CPU die and the heat plate and between the heat plate and the heatsink! AC MX-4 FTW!!!
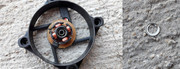
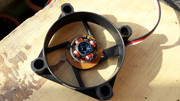
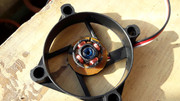
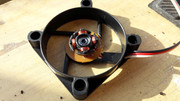
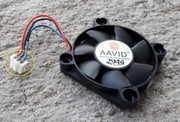
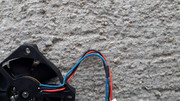
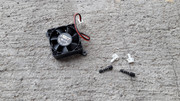
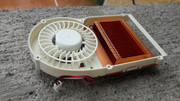
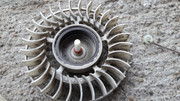
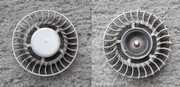
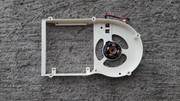
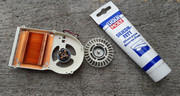
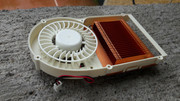
After this, I looked at the fan. At first I wanted to use a new one as I didnt want to clean it but soon I came to my senses and I said to myself: Don't forget the authenticity. Try and see if you can recover the fan.
I cleaned the fan a little and I powered it up. It ran horribly. The ball bearing was past its prime...
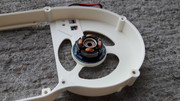
I read somewhere that it might be possible to add or change the grease from the small ball bearing and I wanted to try it out. Said and done. As I didnt know what to expect I used a needle that was a little too thick and I also used too much force but in the end I was able to remove the dust cover from the small ball bearing and add a little grease. Ideally I should've used a finer needle and way less force.
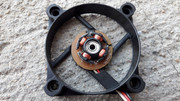
After a quick test I received good news. The fan ran way better but I might've introduced some dirt inside the ball bearing as a grinding noise was present.
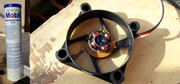
To get rid of all the old grease from inside the ball bearing I decided to wash the entire fan with IPA 99%. I left the fan imersed in IPA 99% for about an hour.
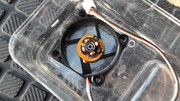
I packed the cleaned ball bearing with MOBIL Mobilgrease XHP 222 NLGI2. I had this grease laying around so I used it. I reckon that it might be enough for a few ball bearing fans. 😁
As I was afraid that the dust cover might touch the balls of the bearing I "vandalized" it a little. Not looking pretty but it works. After all of this I gathered a lot of information and now I know how to perform this operation better.
After I packed the ball bearing with fresh grease and I attached the dust cover I used a cotton stick to turn the bearing and eliminate the excess grease. I also powered up the fan and I left it running for a few minutes and after that I opened it up again and checked if some of grease came out. All was ok.
PERFECT! Timpuri Noi - Perfect

PERFECT AGAIN! Timpuri Noi - Perfect


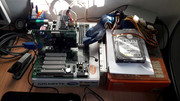
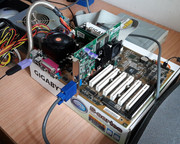
I was curious to see if the CPU was still alive so I took out from storage my PC CHIPS/PcCHIPS/PC-CHIPS M800LMR V1.3A motherboard and I powered that sucker up. 😁
PERFECT! ALL IS WONDERFUL!!! 😁

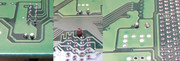
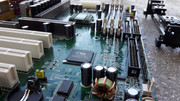
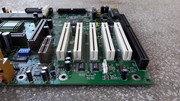
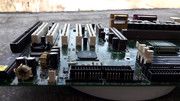
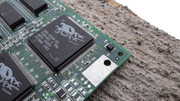
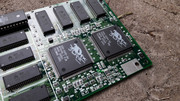
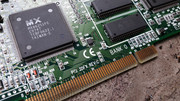
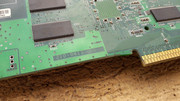
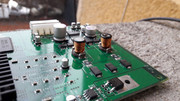
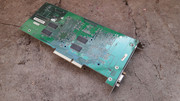
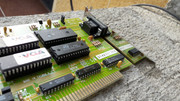
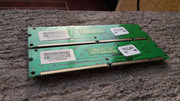
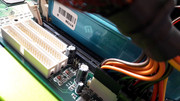
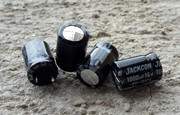
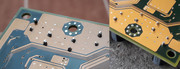
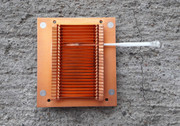
Meanwhile the caps have arrived. TIME TO INJECT MYSELF!

I removed all the caps.
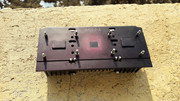
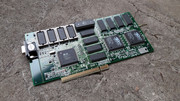
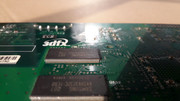
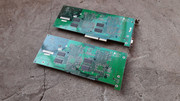
The specs of the original caps can be seen in the picture bellow.
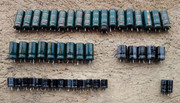
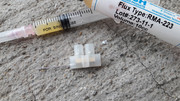
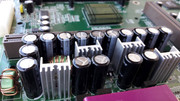
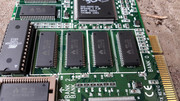
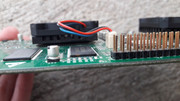
For the replacement of the caps on the MS-6168 motherboard I used a liquid flux, Topnik RF800. For the EPOX EP-7KXA recap, I decide to use a flux in a gel state AMTECH RMA-223 (FAKE Made in China).
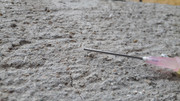
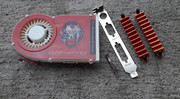
As I didnt have a way to dose the Amtech flux I used a syringe and I cut the tip of the needle. I also made a tool, as I saw on the Internet, from a terminal strip and a stainless sewing needle, which I used to open up the holes in the PCB so that I could insert the new caps. Pretty sketchy but it works.

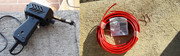
I bought 1.5 mm copper wire and I made a few custom tips for my soldering gun. I used the same soldering gun and tips for the MS-6168 recap.
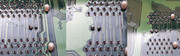
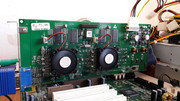
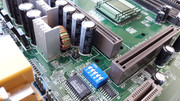
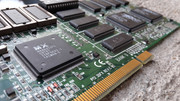
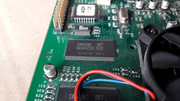
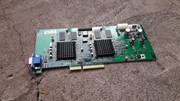
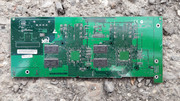
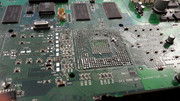
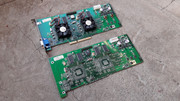
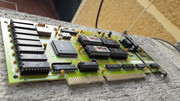
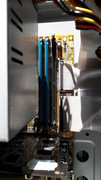
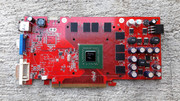
All done!
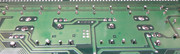
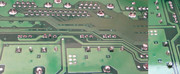
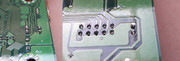
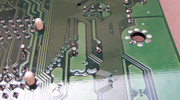
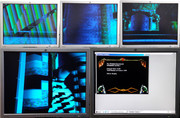
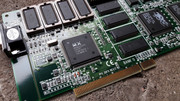
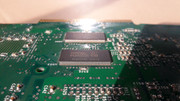
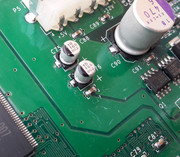
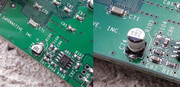
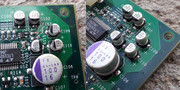
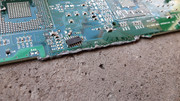
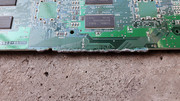
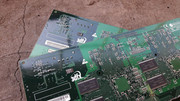
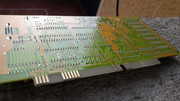
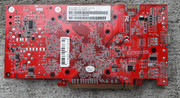
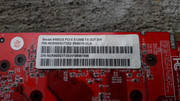
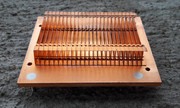
I present the pictures with the solder job. In the case of the MS-6168 I didnt have too many problems while I replaced the caps. In the case of the EPOX EP-7KXA I had a little more work to do. The limits of my soldering gun and custom tips were out in the open. Even so, I soldiered on. In the end I got decent results. I must say that I do not intend to perform this kind of operation too soon. A good soldering station and tips will be needed. All in all I replaced 48 caps on the 7KXA vs 35 on the MS-6168. The finger used to press the trigger of the soldering gun was again numb for a couple of hours. MAXIMUM TENSION!!!
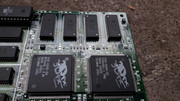
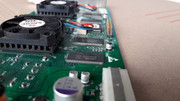
All the solder joints were inspected with a magnifying glass and there were no problems detected even if some of them didn't have an ideal shape. Hmmm the ideal shape... I'm still searching for it...
In the pictures, on the solder joints there can be seen the reflexions of my black phone and of my hands. The PCB was like mirror, just as I like it.


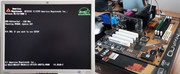
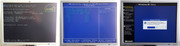
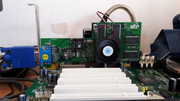
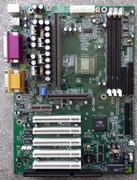
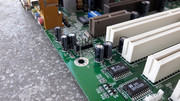
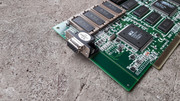
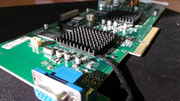
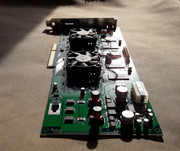
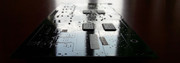
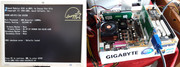
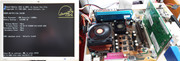
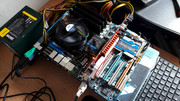
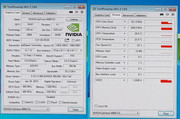
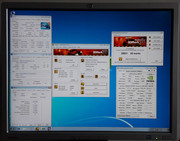
I cleaned the motherboard well and the next day was powered up.
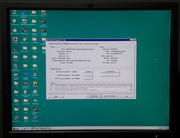
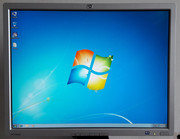
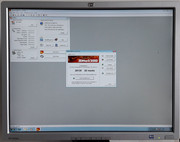
THE BIG DAY! Did the motherboard work? He He He...Timpuri Noi - Perfect
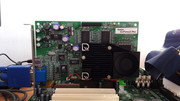
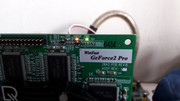
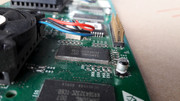
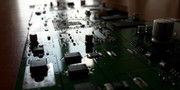
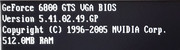
During testing I used the Leadtek Winfast Geforce 2 PRO 64MB DDR 2842 PCB REV:B graphic card. Then I tried the 1/2 VooDoo 5 5500 to see if maybe the second chips works...still no change...I also tried my VooDoo 4 4500 L-shaped which ran irreproachable.


GLASS!!! Handle with care!


PERFECT!
This is how I found my EPOX EP-7KXA / Slot A 650MHz combo. With effort and patience I brought them up to my standards. NO HALF MEASURES HERE!!!
Stayin' Alive - THIS KIT IS HERE TO STAY!
Slot A stuff is close to my heart but I guess that you somehow knew it already 😀 .
gallery: https://postimg.cc/gallery/3bqw07du0/
More later.
VooDoo RUSH, such a rush...NOT!
Back in the day, in highschool, when I was reading IT magazines(CHIP/Game Over) between classes and I could not afford a 3dfx card, I used to drool when I saw the VooDoo Graphics, Rush, Banshee, VooDoo 2/SLI adds. I saw price tags of thousands of $ for systems equipped with such graphic accelerators and I knew that they were waaaayyyy out of my reach.
This has made me consider 3dfx cards to be a mystical thing. Unobtanium can have this side effect on you. 😁 20 years after the moment I was telling you about, I got my hands on a 3dfx VooDoo RUSH - MX86251FC - 6MB card. I was expecting this first contact to be quite a RUSH...but I better not spill the beans just yet.
In theory, the VooDoo RUSH should've been the next best thing after sliced bread. Reality was an entire different matter.
In essence, the VooDoo Rush is an attempt made by 3dfx to give gamers an all in one solution. A 2D core and the 3D part from VooDoo 1/VooDoo Graphics on the same card. To enjoy a VooDoo 1/VooDoo Graphics you also had to have a 2D card and you needed a cable to make the link between the 2D card and the 3D card. A solution that is not so elegant. 3dfx didnt have a 2D core so they used solutions from other manufacturers.
On paper all was fine and dandy but in reality VooDoo RUSH used two mediocre 2D cores: Macronix MX86251FC and AT3D/Alliance ProMotion AT25/A-Trend ATG2476P. To make matters worse, because the 2D and the 3D components were on the same PCB we can talk about a BUS FIGHT on the PCI BUS as each o them was competing for bandwidth. There are more facts to be mentioned but I think that it would be better that you read the mini review in the link. http://vintage3d.org/3dfx2.php#sthash.FeIounB6.FqCf3viP.dpbs
There are single planar but also dual planar(with a daughteboard) VooDoo RUSH implementations. In some instances dual planar models have been withdrawn from the market and exchanged with single planar models.
Now, many years later, when all these aspects are known, I'm sure that I might've not been too happy to spend my parents hard earned cash on a VooDoo Rush, so maybe it was for the better that I wasn't able to afford one.
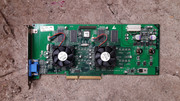
Let's meet the star of this episode. The VooDoo Rush.

The card doesnt sport the logo of a manufacturer and it may be just a generic model: PCI 3DFX REV:C.
The card arrived dirty, with scratches on its back and many of the chips, with dried dirt on the memory chips, a dull bracket, some corrosion on the pins of the 3dfx chips and bent pins on the 2D core and 3D chips. I guess that just about covers it. 😁
First, I cleaned the card a little, I straightened all the bent pins and I powered it up.
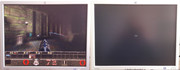
It was alive and kicking. In Windows the image wasnt so crisp and the colors were a little overbright. This didnt bother me at all. The Macronix MX86251FC chip isnt known as a king in regard to the 2D output.
I installed the stock drivers and this was the beginning of my ordeal.
https://3dfxarchive.com/rush.htm


After many hours I was ready to give up and throw in the towell. This card is too much trouble for its worth.
To blow off some steam I decided to clean the card.
Some spit and polish. 😁


I didnt remove the four memory chips from their sockets as I'm pretty sure that they would've crumbled . Observe "the belly" on them. On an ET6000 card the sockets were wrecked when I removed the memory chips as the plastic was brittle and old. Since then I leave the memory chips alone when I consider that the probablity to damage something is too great.
After I cleaned the card I tried another set of drivers: "3dfx Mancuso Mix 2.0" but this didnt change a thing. The same problems that I've ecountered with the stock drivers were present.

I might try other video BIOS versions which can be written with the MiniPRO TL866A programmer but the chances are that this try wont bring anything new. Finding other BIOS versions is also problematic. I'll leave this card as it is.
I dont know if the card is damaged or if this problematic behaviour is normal. When I'll get another card I might give the RUSH another try.
VooDoo RUSH, such a rush...NOT!
More later.
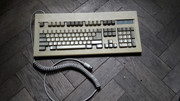
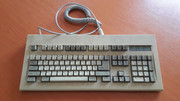
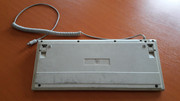
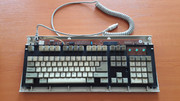
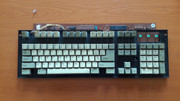
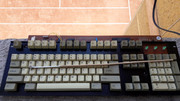
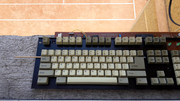
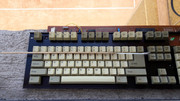
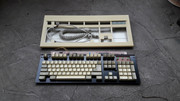
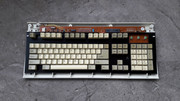
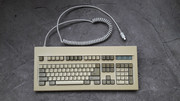
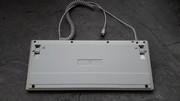
A KEYBOARD STORY
The moment when I had to tackle a keyboard came in the end...
I had to take care of an old keyboard found in an old building...true story. 😁 The owner of the keyboard asked me to clean it as a gift for his birthday. So, this story was born. A keyboard story.
I wasnt able to identify the model exactly and we may be faced by a clone. This isn't exactly a bad thing as this is a product of the 80s-90s? when even a clone was something solid and well put together.
What I found on the internet in regard to the model: Orientec CSK-1101? Costar CSK-1102S ver 1.5?
https://imgur.com/caam6qd
Orientec CSK-1101
https://www.reddit.com/r/MechanicalKeyboards/ … heres_more_out/
Costar CSK-1102S ver 1.5
https://deskthority.net/viewtopic.php?t=13871
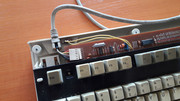
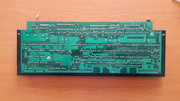
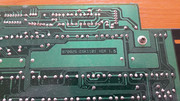
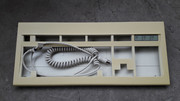
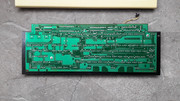
On the PCB of the keyboard all I could find was this string: 870825 CSK1101 ver 1.5. The label on its back is long gone.
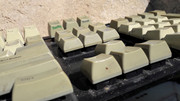
The keyboard is solid and heavy. The keys are clicky but I dont fell a bump when I press them.
At a first glance I thought that this keyboard might be a rubber dome or buckling spring model but I was wrong on both counts. 😁
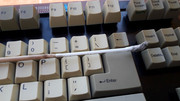
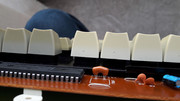
I tried to remove several keycaps but they were held in place so well that I gave up for fear that I might damage something. From internet pictures we may be dealing with switches/clones ALPS or OMRON. After so many miles under the hood I'm amazed that it still fell nice to type on.
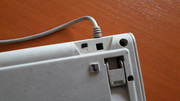
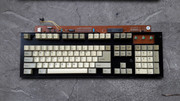
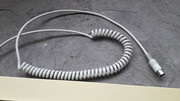
I had to buy DIN 5 - PS/2 and USB - PS/2 adapters. Now it can be used on any PC or laptop.
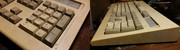
As I wasnt able to remove the keycaps in a safe way I had to clean the inside as best as I could. It required a lot of elbow grease but the results were spectacular.
The case was scrubbed with CIF cream and washed with hot water and dish soap. The cable was also cleaned with CIF cream and washed with hot water and dish soap. While I washed the cable I held the connectors in such a way that they didnt make contact with the water. It took me about an hour to properly clean the cable. The keys were cleaned with Clin Lemon/Window Cleaner and many, many, many cotton sticks and a soft brush. I didnt use IPA 99% for fear that the writing might be removed or damaged even if I did some test that have showed that I had no reason to believe this. The grime from under the keys was cleaned with an improvised tool made from a long bamboo stick and a cotton stick after I used an air compressor to remove the loose dirt, hairs and who knows what else was there. The PCB was superficially cleaned and I didnt use IPA 99% as I feared that the displaced dirt might get inside the switches and that I would have problems given the fact that the keyboard isn't mine.
I wanted to RetroBright the keyboard but I decided to do this on another project. The owner liked the yellowing of the case and keys.
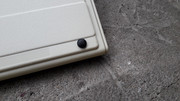
I fixed the cable properly as it was loose in its groove and I found two rubber feet that were a perfect fit.
The final results were accordingly with the work put in. Some battle scars have remained but this keyboard is good to go for another million kilometers. 😁
On a first test, the keyboard didnt work properly but the Num Lock, Scroll and Caps Lock leds lighted up. In the end I found on the back a switch that sets the keyboard in AT or XT mode. I set the switch on the A(AT) position and the keyboard behaved as it should.
This was a learning experience. I consider the results of my first keyboard restoration as a baseline and the future results will only get better.
And now the pics. 😀


gallery: https://postimg.cc/gallery/ki96y57s/
More later.
MY VooDoo 5 5500!
While I write down these lines I still can't believe that in my collection I have a 3dfx VooDoo 5 5500. About four years ago, when I started my journey into the past, I thought that it will be some time before I would get my hands on this legend. After I obtained this card, there was also a downside, as in a way, I lost my "Guiding Light" as it doesn't get any better than this. Inside me there still burns fire and passion but I got to a point where I was faced with the all important question: "Where do I go from here?". I still havent found the answer to this question...
I had several opportunities to buy a VooDoo 5 5500, one was even boxed, but I wasnt decided enough to pay the asking price even if I could afford it. One had been repaired and I didnt want it so badly to buy it. Another one was from a seller that just teased me and in the end nothing came to fruition. Others who had several pieces didnt want to sell one to me no matter what. I wasnt going to buy one from the all known auction site or from other ones like it. VooDoo 5 5500 after VooDoo 5 5500, slipped through my fingers. At one moment I felt that they run away from me and they like to taunt me.
Finally, in January 2019, I received a WhatsApp message, from my best supplier of retro HW, Mr. X 😁, in which I was asked this question: How's this for the start of the year? In pictures were featured a bunch of 3dfx cards among which were the VooDoo RUSH from the previous episode and the VooDoo 5 5500 from todays episode. At that moment I didnt know that they will be mine and I thought that I will have to fork BIG $$$ to have them. In a way I knew that this is the "the end of the line". Initially, Mr. X said that the VooDoo 5 5500 was not for sale, so I said to myself: there goes another one...
A few days later I found out that the VooDoo 5 5500 had a problem. It wasnt working with both of the VSA-100 chips active. With just the main chip selected it ran without a hitch.
I said to myself that this is my chance and I accepted Mr. X's offer to send me the VooDoo RUSH and VooDoo 5 5500 cards, and sort out the payment later.
I received the package and indeed, the VooDoo 5 5500 had problems and the VooDoo RUSH was quite temperamental. Even so, I wanted both of them. Like a thirsty man in the desert, tired to run after mirages, I paid a fair price and they were mine.
Sweet release. I felt freed from my obsession and a weight lifted from my shoulders.
At a first glance the card had a rusty bracket, the fans had different numbers on them: 2944, 2946 and the AGP hook had been cut. Before I received the card I thought that the removal of the AGP hook would represent a problem but the cut had been executed nicely even if it wasnt as straight as I would've liked.
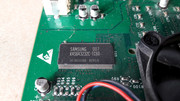
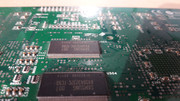
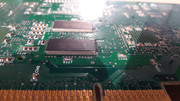
3dfx VooDoo 5 5500 AGP 64MB 210-0413-001 REV A Week 21 Year 2000 Samsung Memory Chips
When I took these first pictures the card had already been superficially cleaned.

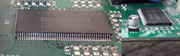
I inspected each and every SAMSUNG 007 K4S643232C-TC60 KOREA video memory chip. One was a little worse and the other chips beared just superficial marks. One thing was certain: this card wasnt handled with gloves.


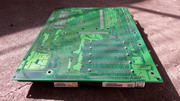
One fact become obvious while I conducted the inspection of the memory chips. At one moment, someone tried to repair this card. A bunch of SMD 10uf 16V caps and one OS-CON 470uf 6V cap showed signs of being resoldered. It is quite visible that the solder joints arent up to factory spec. Also, around the caps I could see an oily residue that had the consistency of leftover flux. I dont know if it really was flux that hadn't been cleaned or if it was electrolyte from the caps. After I cleaned the area there were no more traces of that liquid while I powered the card. Also I didnt feel the smell of electrolyte solution.
Picture with factory solder joints. You can clearly see how the feet of the caps "float" on solder and arent covered by it.

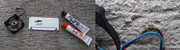
The close visual inspection revealed other facts. The blue wire from one of the fans had been repaired and the insulating coating of the wires was cracked in the area around the fan connector. The coating lost its elasticity and it felt like a tough plastic.
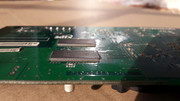
One of the memory chips, the one that had a series of deeper scratches, also had a slightly rusty pin and a viscous deposit at one of its ends. I cleaned the area well with IPA 99% and while I was doing this I saw that a spot of rust was forming in that region. It took several tries but in the end I managed to remove all the traces of rust and of the viscous deposit.
Typical VooDoo 5 5500 thermal adhesive application. A really sloppy job.

I cleaned the fans a little and I oiled them.
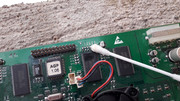
After all these intermediary stages, when I was about to power up the card, I found another problem. A ceramic capacitor on the back of the card was hanging for dear life. I still don't know how it didn't fly off. I soldered the cap well and finally I was at the point where I felt confident to power up the card.
START YOUR ENGINES!!!
As expected, the card didnt run with both of the chips active. Rows of vertical red lines were present on the screen and the PC hanged.
With just one chip active (the main one) the card ran well.

I searched for solutions. The most common one was to set to Disabled the Guardband Clipping setting. I tried many combinations of settings but to no avail. This measure can work in some instances. Unfortunately it wasnt the case for me. Different driver versions brought nothing new.
I didnt perform a BIOS update as I'm pretty sure that this problem isnt BIOS related.
I didnt want to order and replace the SMD caps, as after I read many posts on many forums, the symptoms showed by my card arent capacitor related.
In the end I decided to celebrate this card for what it is, a 3dfx VooDoo 5 5500 in the flesh.
I was going to restore it as well as I could and use it as a show piece.
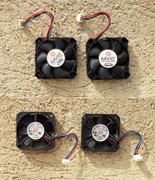
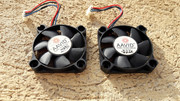
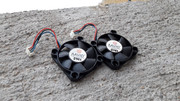
I removed the fans that had been just superficially cleaned. They were in for a complete rejuvenation procedure.
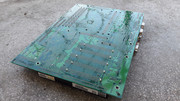
The PCB was still dirty even if it had been cleaned before I powered the card.
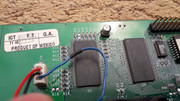
The PRODUCT OF MEXICO sticker which was a little damaged, was taken off and I prepared 0.2 mm double sided tape to attach after I cleaned the card.

I cleaned the bracket as best as I could. I knew from previous attempts that I would not be able to remove the pitting.
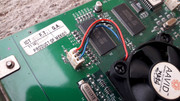
Some problems with the wires from one of the fans.
I cleaned the fans well. No effort was spared. I had to reconstruct the coating of one of the wires as it was pinched. I used Poxipol and I covered it with a permanent black marker. Because the AAVID stickers from the top of the fans had lifted edges I decided to remove them completely and attach them back with 0.2mm double sided tape.


The results.

Something still bothered me. I didnt like the 2944 and 2946 numbers so I decided to remove the number 6 and draw a number 4 as best as I could. I also redrew the 3944 numbers on the back. I used a fine tip marker which is made to write on DVDs and CDs.
The moment for the IPA 99% wash. The labels and other stamped ink markings that were still on the board were protected with Orafol Stone Guard film.


I performed several fine detailing passes until the card was up to my standards.
Final results.

Ready to be put back together.

Like GLASS!!!
Glamour shots.

After I restored the card I tried again to see if it would work with both of the chips active.
Still just a flatline...
I put the card in an ESD bag and it will stay there for some time.

While I restored the card I also became aware of its fragile nature. One phrase came into my mind: Still only "human"...
These cards are almost 20 years old, so, in a way, I think that they shouldn't be used as daily drivers and just be celebrated for what they are. This is why I decided to buy this card even if it had a lot of problems. The chances that a fresh bought V5 5500 might "blow a gasket" are quite high and POOF bye bye hard earned cash. I consider the price I paid for the card as the lowest admission fee into the club. This makes me feel special, even if I have "only" one VooDoo 5 5500.
Some time after I bought this card, I found at the local flea market another VooDoo 5 5500 card. The state of this one was worthy of a horror movie. The card was mutilated, the AGP had been cut for gold recovery, the graphic chips had been removed in a barbaric way, many components were MIA, what could I say...horror story. Many people dont know the value of these cards and I'm pretty sure that many exotic parts had suffered the same treatment over time.
All is not lost though, as the PCB still holds many parts that can be used to revive other V5 5500 cards in need of a transplant. Now I have no restraint to take components from this card. 😁 I'm sure that another V5 5500 in need of my attention is out there.
I also tested the VooDoo 5 5500 on my freshly restored slot A EPOX EP-7KXA motherboard hoping that something might change. Still the same. This new test wasnt for nothing as I became aware that the OS-CON 470uf 6V cap didnt warm up at all during the session. Guess what. On the mutilated V5 5500 both of the OS-CON caps are present. 😁 That dead V5 5500 might help my V5 5500, who knows...
I might try something at a later date. I could buy the required OS-CON caps but for now I have all I need for one more try when I decide to do so.
For now I will keep the card in the ESD bag only to take it out and feel its weight in my hands while I ponder of the effect it had on me.
Maybe in the future I'll send the card to be repaired. Who knows...


Even if I didnt own a 3dfx card back in the day and I am a little late to the party: 3dfx, gone but never forgotten!
gallery: https://postimg.cc/gallery/lsp1x414/
More later.
Cleaning keyboards it's hard hard work, and very time consuming.
Hope you manage to completely fix that voodoo 5 in the future 😀
@peido - I hope that I will repair the V5 5500 some time in the future too. It is not a priority just now.
Iris - Somn bizar (Official Music Video) - 1996
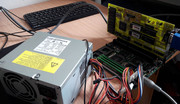
SDRAM Adventures
As it was the case in the past, this came out of nothing. Like a spiral of cosmic dust, a few scattered bits and pieces have gathered together to make a whole.
You might say that at the root of this episode is my need to find a definitive answer to a question. Once I decide to do something, I level everything in my path. Nothing seems out of my reach and nothing makes me back off. Days spent with my mind between two worlds. Sleepless nights. Questions that eat my mind...the full menu. 😁 I think that you know that I'm talking about my passion in regard to PC Hardware but I feel that I should underline this. Don't get another idea. 😁
Some time ago I said that once I'll post the VooDoo 5 5500 episode I'll be taking it easy and I will take a break from old PC components. Well, I did take a break and I'm still on my break. That doesnt mean that I dont keep an eye for interesting pieces or I fall prey to stuff that others wont take a second look.(Beauty is in the eyes of the beholder). So, I decided to increase the interval at which I post something and see if this keeps me in check or it will only make my addiction stronger. The breakneck pace at which I was "working" cant be sustained anymore and one thing that made it so it is called: TIME. Lately my free TIME dedicated to retro HW has gone up in smoke. The reasons are multiple and shouldnt be discussed here. 😁 It is nothing too serious or problematic don't worry.
The last month or so, I kept going each Saturday and sometimes even on Sundays at the local flea market. Like an addict I still go there only to see what I can find. The admission fee is trivial and in return I get a "free show". The people are colorful and sometimes you can eavesdrop at what they discuss. You increase your haggling skills. You meet new people. Sometimes you find awesome pieces. All in all it makes me feel alive. Maybe it's just me but when I go there, for little over one hour, I disconnect from reality and after I leave the market I feel like coming back from a parallel universe. My eyes are trained to look for PCBs. I dig through boxes and then I put everything back. It's not good business to upset the vendors. 😁
I'm almost fully immunized but every once in a while I find something that makes me say: HOW MUCH IS THIS ANCIENT PIECE OF TECHNOLOGY? So, my stash gets bigger. As it goes, beauty is in the eye of the beholder. What I like might not be someone else's cup of tea. We aren't the same. Thank God! 😁
Let's return to the matter at hand.
The flea market Gods have bestowed their blessings. A couple of trips have yielded this loot:
The list looks unimpressive but as one thing leads to another, you will understand the meaning of "it came out of nothing".
The SDRAM was the one that made me buy a motherboard just for testing duties. My Intuition said something. The Reason said the opposite. In the end I took the sensible route: ALL IN! 😁
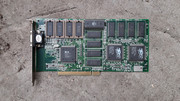
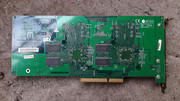
First I handled the Tseng ET4000AX.
The card was in excellent shape and it had only a few scratches. My eyes popped out when I saw that it was in a ESD bag. A very uncommon thing at out local flea market. 😁
-I asked how much it was and I received a straight answer of around 8 EUROS.
-I said 4 EUROS.
-8!(aggressively). IF YOU DON'T WANT IT PUT IT BACK FROM WHERE YOU TOOK IT! said the vendor.
At such an answer someone might've given him a piece of its mind but since I'm not 20 anymore I took the card out of the bag and stared at it.
6 EUROS! I said that it had some scratches here and there and we dont know if it works or not.
We shaked hands. 6EUROS. (6 EUROS for an ET4000AX with the maximum video memory of (1MB) is very little.)
She's purring like a kitten. Immortal piece of technology! These old cards have offered me great satisfaction over the years and they keep on working even knee deep in the dead.


gallery: https://postimg.cc/gallery/2jtmsse5k/
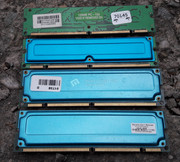
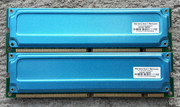
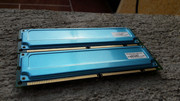
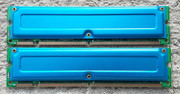
SDRAM 2x128MB PC150 with blue heatspreader *** SDRAM 2x256MB PC133 with blue heatspreader - 256UCURTWGBA
For the four SDRAM sticks I paid 6 EUROS too. Haggled from 8 EUROS. I know the gipsy seller well and I know when he wants to reduce the price or not.
I have tens of SDRAM sticks with capacities ranging from 16 to 512MB. These SDRAM sticks with heatsinks reminded me of RAMBUS memory and they got under my skin so I had to have them. Quite predictible I might say...
After I bought them, nothing was foretelling that I will have to spend an additional sum of 38 EUROS just to get an answer to a question. 😁
The SDRAM sticks were in great shape with very little signs of damage. Being protected by heatsinks they had a big chance to still be alive and kicking.
One of the memory kits, the 2x128MB, is rated to run at 150MHz. This is not a standard JEDEC speed. If we think that 17MHz over 133 represents an increase of 12.7% in a time when maybe DDR 1 was in its beginnings, my decision to buy the kits was an inspired one. It is certain that some PC133 sticks were able to be overclocked at PC150 but nothing beats looking at those fancy PC150 stickers. 😁 You will see later that I was able to run them at their rated speed.
First, I cleaned well all of the SDRAM sticks.

The moment for testing came soon. I was well aware that I had limited choice in regard to motherboards capable of using SDRAM sticks with a capacity greater than 128MB. I knew this fact as I already Read The F...ing Manual. 😁 . Also the boards are very picky when they are presented with 256MB sticks. Bummer...
I tried a few motherboards to see what's what:
Testing on Amptron/Jamicon/FastFame 650B-ATX Rev1.1 / KM650B / 440BX.
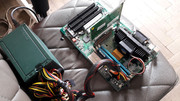
None of the above motherboards were able to use the 256MB sticks. 😁 So, I was left trying to see if the 128MB sticks work. Unfortunately, the results were mixed. At one power up the sticks were detected. At another start I received just beeps. The behaviour was inconsistent.
I was already thinking that the "mighty" 2x128MB PC150 kit was dead...Something was still nagging me though. One word was coming in my mind: INCOMPATIBILITY. What if it is just a case of an incompatiblity? I said to myself. This was not uncommon back in the day. Hmmmm...
As a last resort I tested the two PC150 128MB sticks in my PIII 800/bus 100MHz - LuckyStar 6VABX2 VER. 2.0. In this case the memory ran at a pedestrian pace of 100MHz. The board knew nothing about 256MB sticks SS or DS so I was already kind of pissed...


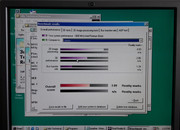
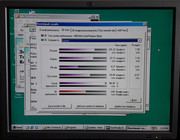
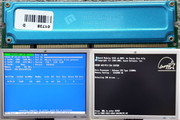
I entered the BIOS and I set up some relaxed timings and I was ready for a session of MEMTEST86.
I received some bad knews. Error at 113.9MB. I switched the sticks. Again error at 113.9MB. I may be on to something. Which were the odds to get the same error at the same area of 113.98 on another 128MB stick? I tell you: extremely low.

I enetered the BIOS again and I set up some super relaxed timings and I was able to complete a MEMTEST86 run withou errors. I used Windows 98 for a while and all was nominal.
Error! Error! Error!
MEMTEST86 run completed without errors after entering the required settings in BIOS.

All this detective work didnt provide the answers I needed so I decided to buy a motherboard from the last generation to use SDRAM memory. This way I had better chances of success. I must end this ONCE AND FOR ALL!
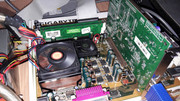
I searched on the national OLX site the string "Abit". Immediately I got some results. One in particular was enticing. It was about an Abit KT7 motherboard with the KT133 chipset for AMD Athlon CPUs on a 200MHz(2x100MHz) bus. If it was equipped with the KT133A would've been better, but if we look from another angle, this motherboard is a part from the first generation of Socket A platforms after the Athlon Slot A/KX133. In essence it is the KX133 chipsest in its form for the Socket A aka KT133.
I liked the board a lot so I contacted the seller soon. I managed to reduce the asking price a little, from around 32 EUROS to around 28 EUROS. With the cost of shipping and the tip for the courier I ended up at 38 EUROS. Not a small sum of money. One of my HW suppliers pulled my ears as he said that I overpaid for it. What's a few EUROS + or - when you like something. He should know this better than me. 😁
The KT7 was untested and this fact was specified by the seller. From the pictures I knew that this board will be my first NIB/NOS component. It arrived just in time for Easter. Perfect timing. 😁

As you know, this board was manufactured during the era of bad capacitors. Bad Era Capacitors / Capacitor Plague. A period between 1997-2007 when many manufactures used low quality electrolytic capacitors, which were mainly manufactured by Taiwanese companies. To cut costs, inferior capacitors were used. This "economy" had a ripple effect that led to costs many times greater than the cost of using "good" capacitors. Let's think for a moment at how many motherboards had problems related to capacitors. RMA's. Products returned to factories for capacitor replacement. Well engineered components that have failed just because bad capacitors were used. You already have seen two of my recapping jobs performed on MSI MS-6168 and Epox EP-7KXA. No manufactured was spared by the capacitor plague. The right choice is always the hard choice. Why do a good job when you can cut corners?
https://en.wikipedia.org/wiki/Capacitor_plague
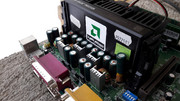
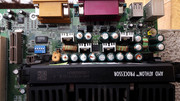
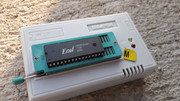
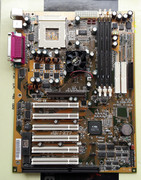
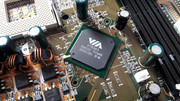
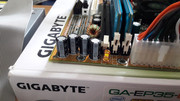
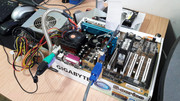
As expected, the Abit KT7 V1.02 arrived according to the rules of the 2000 electronic fashion. Full of TEAPO and JACKCON caps. La creme de la creme...the brown type. I updated the BIOS with the latest version, A9, using my MiniPro TL866A programmer and I braced myself for the testing session that lay ahead.
I was aware that I might wake up in a world of pain...I stared at the capacitors and I waited to see what was in store for me.
On Easter day, Sunday, I decided to go where I keep my parts. At 08.30 nobody was on the streets. A pleasure to drive fast in town. 😁
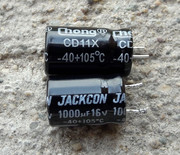
I powered up the board but the extasy was short lived... As soon as I pressed the button I sensed a funny smell. I thought that it was the smell of the board on its first power up but it wasnt so. Soon I found the culprit. A cluster of JACKCON 1000uf 16V caps were swollen.
I used the board for a few minutes after I saw the bulged caps just to see if the SDRAM stricks were detected. The results were encouraging. The 2x128MB PC150 and the 2x256MB PC133 kits were seen on the first try. YAY! My gut was right all along!
With my heart pounding I inspected the motherboard closely, to see if more caps have lost their head. More good news. The rest seemed or looked OK! (Empirically speaking)
Huh! I really dont want to do another full recap job! 😁
I searched in my bag for some 1000uf 16V caps but I only had 1000uf 6.3V/10V caps...the shops were closed. Bummer...I have to get my answers after Easter...Damn...
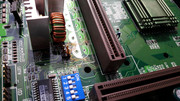
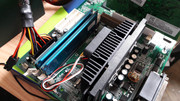
Before I was ready to pack all the stuff and go back home I decided to inspect the NB cooler. The plastic push-pins looked kind of...plastic. 😁
I removed them because they didnt hold the heatsink well.
Underneath, shock and awe! What the Fuu.......K IS THAT!? I corrected the error with AC MX-4 and two heavy duty spring loaded push-pins.
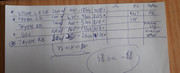
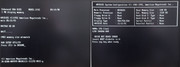
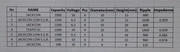
The list of the caps that were on the board. The specs (ripple current and impedance) are an aproximation as I wasnt able find the exact models and I cross-referenced different spec sheets.
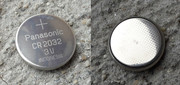
The original CMOS battery. Drained. NIB/NOS Baby!
Well made in Taiwan??? Really? "Good" caps too bad for the board...

After Easter I found at the local shops only Mr. Chong the same guy that wispered to me in the past: ME FIX YOU! ME HELP YOU! TRUST IN ME! 😁 I paid under 1 EURO for the caps. I used this brand in the past and they are "good" if you are in a pinch. If we pause and think a little, the irony is that I put on the board the same "special caps" as I wasnt about to hurt the motherboard's Feng Shui. I might've had an uprising on my hands and I would've had to change them all. 😁 One thing is certain: at one point I WILL REMOVE ALL THE JUNK and solder some JAPANESE CAPACITORS!

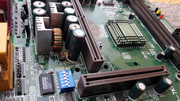
After I bought the Abit KT7 I saw that I didnt have a single Athlon 200MHz bus CPU. As I didnt fancy a Duron I decided to use an Athlon XP on a 266MHz bus (2x133MHz) with a Palomino or Thoroughbred core. They work on this board even if they arent officially supported.
In the end I settled on a Athlon XP AXDA2000DKV3C CPU rated at 1.667GHz 12.5x133MHz. Due to the limitations of the board it ran at 1250MHz aka 12.5x100MHz and I had some wiggle room when I was about to run the SDRAM at 150MHz.
http://www.cpu-world.com/CPUs/K7/AMD-Athlon%2 … A2000DKV3C.html
The moment for answers came soon. Were the SDRAM kits still alive and kicking? An existential question!
Strike 1!

Strike 2!

I played with some graphic cards:
I installed Windows XP. Here I had a few hiccups as the original CD was scratched and a one hour job turned into a four hour job...installs and (re)installs...fun times with old stuff.
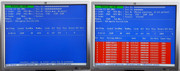
2x128MB PC150 @ PC133
SPD 2x128MB PC150 - I wasnt able to determine the manufacturer of the chips but the sticks are smaller than the 256MB sticks. Probably BGA KINGMAX, TONICOM?

SPD 2x256MB PC133 - Equipped with MICRON chips probably TSOP.

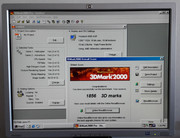
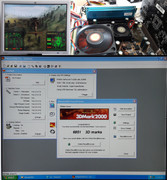
3dmark2000 2x256MB PC133 - stock GF4 Ti4200. No tweaks.
Preparation for SDRAM @ 150MHz - FSB 110. SDRAM 110MHz
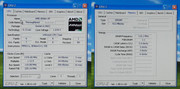
Preparation for SDRAM @ 150MHz - FSB 117. SDRAM 117MHz

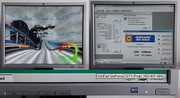
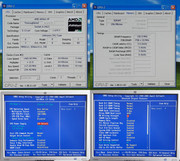
SoftMenu III was a dream to use. The multitude of BIOS settings allowed me to achieve stability and the magic number of 150MHz for SDRAM. I didnt try for more as this wasnt my goal.
After many hours of usage I didnt encounter more problems related to capacitors. This is not an indication that I wont have headaches in the future tough. For now, I will leave the KT7 to rest in the box.
The motherboard preformed admirably during the several days of testing. After I exterminated some gremlins as this is a requirement of an authentic "retro" experience, all was just smooth sailing.
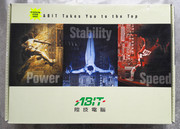
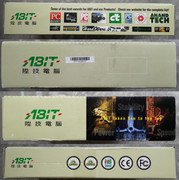
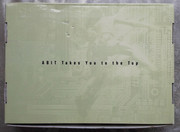
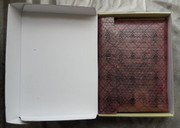
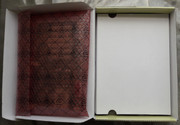
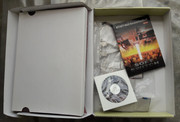
Did I overpay for the Abit KT7? I think not. It was a case of NO BRAINER! The full box offered me an authentic experience and if I didnt have near me, my Lenovo I7 2600, the HP LP2065 monitor or my smartphone, I could've thought that I was back in the glory days of Good Ol' Socket A. The smell of a new motherboard. The untouched manual. The immamculate CD with drivers. The sealed accessories. The ESD bag that covered the motherboard... What could I say...After I clened the box of dirt and old tape it became shiny and it was a pleasure to touch it. I also managed to "sweeten" some dents and marks that were present on the box and in the end the complete package looked incredible.
My Abit KT7!
Look at how much I had to tell you and all started with a humble kit of RAM. You never know where the road will take you. These retro adventures have a charm that continues to be irresistible to me.
gallery: https://postimg.cc/gallery/1utq6b0ko/
More later.
Just want to say that I was channeling your hardware-whisperer troubleshooting technique a while back. I got an immaculate Asus P4T-M socket 423 board and it wouldn't power up. Then I noticed I had accidentally plugged in the wrong 12V power connector -- the one meant for PCIe, not ATX-12V. It fit fine, but the pinout is opposite. Thought I had killed the board in less than the blink of an eye, because after swapping cables, it showed no signs of life. There didn't seem to be any damage though. Maybe it never worked at all? Hmm..
I couldn't find another one online, but I did find a similar board -- one from a Sony PC that looked like it was just an OEM rebadge of the same P4T-M. The only difference I could see was a slightly different front panel pin header layout. So I bought it. Guess what. Same deal. DOA. OK, one dead board I can accept. But two? That seems unlikely.
It wasn't until many weeks later, after that nagging feeling like there just had to be something else wrong, that I decided to try again. Still no heartbeat on the new board. But then I bumped the battery, which I guess wasn't seated all the way(?), and to my surprise it sprang to life without even having to touch the power switch.
That entire time, it was just that simple. The board won't power up without a good battery. On the original board, the battery it came with was long since dead, then I had been running it without one. So I tried that first board again, with a new battery, and it spun right up! I've never seen that before. Who knew.
But that wasn't the end of my trouble. The board was stuck in a reset loop. The piezo speaker would click about once a second, and the IDE optical drive would continually make its resetting noises and light up the access LED. Hm.. I tried swapping the RAM with the other board and it made no difference. Uh oh. Maybe the board is dead after all? I guess it could be the CPU. But how often do you see a dead CPU? It can happen, I suppose, so I took out the 1.6GHz CPU I had installed and tried a 1.7GHz CPU I had picked up before I knew the board would arrive with its own. No dice.
Well, two dead CPUs is unlikely. So I tried board #2, which had successfully booted with the 1.3GHz chip it had come with. I tried both the 1.6GHz and 1.7GHz chips and BOTH WORKED. So there's something else with that first board.... On a whim, I tried the 1.3GHz CPU on it. It worked! Successful POST! Whew! Two good boards, three good CPUs, eight good sticks of RDRAM. But why would it not start with the faster CPUs? The traces looked fine, the socket was in good shape..
Meanwhile, I kind of wanted to flash the Sony OEM board with a stock Asus BIOS image, since it had come with a Phoenix BIOS that wasn't quite as nice as the usual Award BIOS that Asus would normally use. The Award flash utility wasn't having any of that, since it wasn't an Award BIOS -- I guess I'll have to remove the flash chip and use a programmer. Then I started to wonder if maybe I should try updating the original board's BIOS... maybe that would help its compatibility with the faster CPUs?
10 minutes later, it was up and running at 1.7GHz with 1GB RDRAM and purring right along in Windows 2000 Setup. WOO! I couldn't help but think of this thread, and the systematic elimination of possibilities. Just thought I would share, and say thanks for the inspiration. 😀
I'm glad that you managed to sort out those S423 motherboards. 😀 Now you are the proud owner of TWO of those babies. 😀 Thank You for sharing your findings. 😀
I remember that I read in the manual of my Gigabyte GA-8TM that there was a part that underlined the importance of the CMOS battery. That fact stuck in my mind. When I read that information I thought it was superfluous but it seems it is not the case. Unfortunately my GA-8TM is dead as it has a bad SB chipset.
When your work with old parts you always have to take it step by step, the methodical approach is the only one that can guarantee success. 😁 I know it by experience. More often that not, problems can be solved in an easy manner and it is better to keep it simple. As I said in the past, if sometimes you cant solve a problem, take a step back and re-evaluate everything. In certain cases a good night's sleep was all that was required to find a solution. The mind works in mysterious ways. 😁
Hardware-whisperer - I like that. 😁
In other words, I managed to gather some material for several episodes. Expect some X58 stuff, A Gainward Wonder, Some Abit, My Intel Batman finally got a P60 CPU as it was set up for it. Some newer parts will be featured but you will see that I applied the same "technics" as I did when I dealt with older parts. Cleaning more complex parts seemed daunting at first but in the end it is not different than dealing with simpler ones. Now I can say that I can restore any component no matter the complexity. Tall words I know, but after hundreds of restored parts I think I that I know what I can do. 😁 😀
The rate at which I will post the next episodes will not be like in the past as I dont have so much free time. Another fact is that I already kind of did all that I wanted and I'm searching for my next goal to achieve. One thing is certain: my passion is still off the scale and who knows what fate has in store for me. 😁 Even when I said that I will slow down I still fill box after box with shiny trinckets. 😁

More later.
wrote:Timpuri Noi - Perfect […]
Soon came the moment when I tackled the Slot A 650MHz CPU - AMDK7650MTR51B A.
Right of the bat I found a problem. The retaining metal clips of the heatsink were too close for comfort and they almost touched a couple of resistors on the PCB of the CPU. What the F..K?!?!
Pretty sure those clips are ment to poke out on the top side.
The heatsink is probably on upside down!
Uhhh silly me! 😁 You might have something there! 😁 I'll see if it is possible to switch the clips around. The heatsink doesnt fit the other way around and the clips come off easily. If I try to mount the heatsink the other way around, the holes where the clips go do not align properly. While I saw other deficienices this one got out of my sight and I mounted them as they were when I got the CPU. Even as they are they dont interfere with something on the board.
Thanks! 😀 I'll post pics after I switch them. 😁
Great stuff Robert - slowly becoming a retro superpower!
@amadeus777999 - you have the most awesome comments this side of vogons! 😁
I still remember this one:
wrote:New victims for Robert's dungeon... lots of "torture cleaning" ahead. 😁
I switched the retaining clips on the heatsink of the Slot A CPU cooler but I kind of liked them in the "wrong" orientation as they were only a couple of mm longer than the cartridge. In the correct position they look kind of funky. 😁 After I grumbled a little I left them in the correct position as this is the Law of the West! What's right is right. 😁 😀
I managed to finish a new episode called: Another Gainward wonder which will be posted soon. 😀
More later.
SVET. feat. SevenEver - Is It Love
Another GAINWARD wonder ... is it love?
"Is it love, love, love
Love, love, love that I'm feeling?"
Oh boy ... here we go!
Before everything I must confess an obvious secret...I'm a sucker for Gainward cards. 😁 I'm referring to the cards released during their glory days and not about the husks we can find on the market today.
Even now I can "feel" the aura emanated by top Gainward cards when back in the day I used to read about them on the internet. Unobtanium in its purest form. You see, back then, I was never able to buy a top of the line Gainward card when they were at their peak. It only took a peek at the painted face or a glimpse of the red PCB and you already knew with whom you were dealing with. Today? Who the F..K is Ali.. ops Gainward...just a shadow of its former self as it is the case with many big names that I grew up with ...
My first Gainward card, took the shape of a Gainward Geforce4 MX460 Golden Sample 64MB AGP and the moment when I took it out of its bag was exhilarating. Good Times! The card came in bulk form but that didn't bother me at all. The PCB color, the coloured heatsink, the sticker bearing the GS initials, the scent, have been stuck in mind ever since. I'm sure that I wont feel the same even if today I would buy a diamond studded 2080 RTX Ti. You see, there is a first time for everything... so you should make it count! If possible ... 😁
Is it love, love, love ? YOU BETCHA!!! Soooo REEEEEDDDD!!!
The moment when I found a new Gainward card was celebrated accordingly. (The details about how I got this card will be presented in full when I'll post the episode dedicated to Abit KN8.)

"How can I do this?
I've never felt this way before
You keep on staring at me
And I can't take it anymore
But I want you to know
I'm looking for a place where we can go
And I can say the words as I'm tryin break through
But you already know that I really want you?
Is it me or is it getting kind of hot in here? Enough lyrics for today! 😁
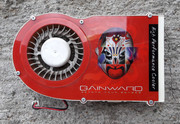
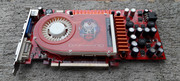
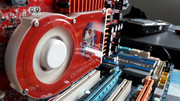
Let's meet the beauty: GAINWARD Model 6800GS PCI-E 512MB TV-OUT DVI / P/N:NE/6800SXTD52-PM8070-GLH
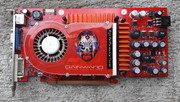
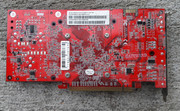
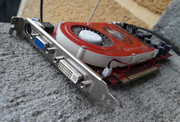
Some of you might have already seen past the bling bling and maybe frowned a little when they saw the PCI-E connector. Not me! I'm still blinded by love at first sight so my opinion might be "a little" biased...PCI-E or not, for me, this card has a scent of retro. The card is around 14 years old and even if we like it or not, this is a long time ago. Getting older SUX BIG TIME!
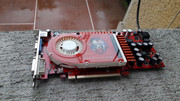
The card was in relative good shape. Dusty and dirty. Just another day at the office for me. Status unknown.
I managed to contain myself and I didn't power up the card to see if it is alive as I was set on getting it restored first. As is stood, the card coul'd've already been dead but I didnt take this into consideration for even a second and I just wanted to recreate the hypothetical moment when another me took the card out of its box and plugged it into the motherboard slot, happy for the purchase.
Even if the 6800GS wasn't top of the line, I still love this card to bits, no matter what. To spice thing up, we are dealing with a GLH model aka Goes Like Hell!!! with higher working frequencies than stock models. Core 485MHz vs 425MHz stock / Memory 1300MHz DDR3(650x2) vs 1000MHz stock. Also, the video memory is 512MB vs the usual 256MB. All in all, this card is a keeper!
Dust bunnies!
Dirt? CHECK!

You can leave your hat on!
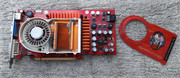
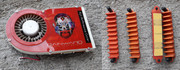
The cooling system is one of the attraction points of this card. The white fan gives it a distinctive note.

Ready to be made GREAT AGAIN!!!
The first task was the cleaning of the cooling system.
Adherent grime everywhere! To make things worse, cleaning the white fan was quite a challenge but that was just the tip of the icebreg. Don't think that the other white plastic bits were easier to clean...Nooooo SiiiiiiiiiiiRRRR!!!

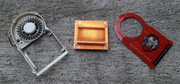
When I removed the white sticker from under the fan I was met by a dilema. I saw the thick white axle of the fan and I thought that I'm dealing with a layer of white grease under which I expected to see the metal axle but to my amazement I saw that I have met my first fan with the axle made from plastic. The dilema was if it was necessary to take apart the fan or to leave it as it was. It still spun easily and quietly. After a failed attempt to clean it properly without dismantling it, I took it apart and all went better.
As the adherent fine layer of grime wasn't fazed by the IPA 99%, I washed the fan motor and the entire white frame, with hot water and Fairy Lemon dish soap. I took great precautions not to damage the fine copper wires of the coils. The propeller underwent the same treatment. Just to be safe, I also washed the motor with IPA 99%.
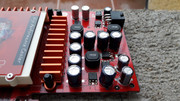
The bracket was cleaned with polishing paste and a soft rag. I also cleaned the memory heatsinks.
The results were beyond my expectations.

I put great accent on the cleaning of the plastic shroud of the cooling system. Hot water and Fairy Lemon plus a soft microfiber cloth. I don't need more scratches!
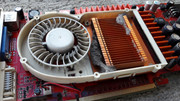
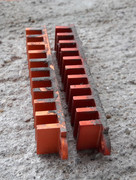
I cleaned each fin of the copper heatsink. Nothing was left to chance.
I mentioned above something about results beyond expectation ...
While I stripped the card down I saw that a white plastic washer that it is used with the nuts that hold the heatsink, was missing, so I took the required actions and I cut a thicker one in two. Problem fixed.
Ready for assembly!
The right amount of silicone grease.
Almost there...
Fine tools needed!
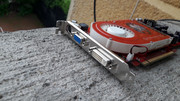
Done and done!
Stored until further orders!!!

The work went at a snail's pace and I enjoyed every moment.
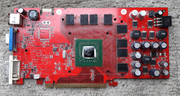
The main course.

Mirror like! Robert B (TM) 😁
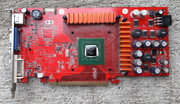
Video memory.
While I was cleaning the PCB with IPA 99% one of the labels on the back fell down so I took the required measures to restore the "equilibrium".
Nothing is complete without the utmost attention to detail. Because I was lazy and I didn't protect the ink stamped serial number on the back of the heatsink, from the action of IPA 99%, I had to recreate it. Almost perfect aka As good as it gets!
And now for the Grand Finale!


Better than new!
After a lot of work I held into my hands, the object of my desire, my passion and my love. Soon, the most important question presented itself: Was it all worth it?
Only one way to find out. Fire it up!
Because the Abit KN8 proved incappable to offer what the Gainward card requested, I used the BFG aka the Big F..k..g Gun aka GA-EX58-EXTREME which just had a case of a miraculous recovery. This was a match made in Heaven... The rest is history ...

Ultra Durable indeed!
I absolutely love Gainward cards but at the same time I also like many other components. My passion is all consuming!
I could go on and on and lay down many lines of text but I think that it is better to keep it short. You can read between the lines all that I wanted to say. 😀
Gainward, Beyond Your Senses!
Cya later with the next episode(s).
More later.
wrote:"Is it love, love, love
Love, love, love that I'm feeling?"
Is this the love
that I've been searching for
Is this love
or am I dreaming?
This must be love
'cause it's really gotta hold on meeeeeeeeeeee
wrote:Ready to be made GREAT AGAIN!!!
You can leave your hat on!
A Make Gainward Great Again hat? 🤣
wrote:A Make Gainward Great Again hat? 🤣
I think that Made to be Great Again in general is my kind of hat. 😁 😀
Ahmet Kilic & Eyup Celik Snap VS Freddie Mercury - Living On My Own (Massive mashup)
THE SLEEPER!
😀 😀 😀 😁 😁 😁 😀 😀 😀
This PUPPY will be made GREAT AGAIN! Full restoration in progress!!!
Time capsule. Untouched. What's in store for me? Hardship or Smooth sailing? Only time will tell!!! 😁
More later.
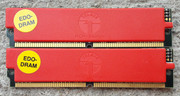
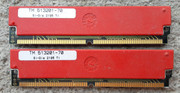
Check this out! Funky EDO RAM 2x4MB
TELBUS MCM Design - TM 513201-70 / Si-Die 2195 TI - 03.1995
The casing is made from a hard plastic. The SLEEPER is full of surprises. 😀
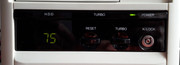
All systems NOMINAL!
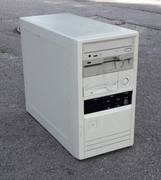
I've got that same case around my Pentium MMX 166 build. 😀 Good condition, except missing the translucent black panel. It's a... uhm... ok, no need to sugar-coat it. It's a cheap case with shoddy construction. (Like all of them I saw in shops around that time!) But I love it. It's just right for the mid 90s.