First post, by Artex

- Rank
- l33t
Greetings All!
I hope this thread will find everyone happy and most importantly, healthy in these unprecedented times. Like most of you who are sheltering in place, I have been trying to keep my sanity with both my wife and I working from home and trying to keep our 4 year old entertained. Fortunately I was able to set aside some time to finally get to a little retro project I've been wanting to tackle for some time now - upgrading my trusty old Lenovo T61 laptop. The fan has been slowly dying and the build of Windows 10 on there was running a little clunky and was garbaged up with a bunch of testing software, etc.
Let's start with the parts:
* Ordered replacement 9-Cell 33++ Battery (43R2499) - $30
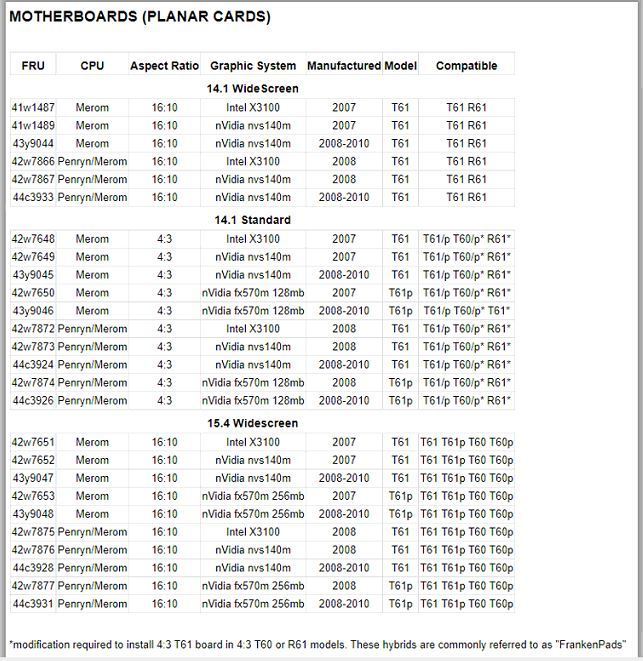
* Ordered 2 x Lenovo 44C3933 motherboards (one extra for a backup if something gets effed). This is a newer version of the original motherboard installed in the Lenovo T61 - $37.98
* Ordered New CPU Fan Heatsink Discrete for IBM Lenovo Thinkpad T61 T61P R61I R61 42w2460 - $17.14
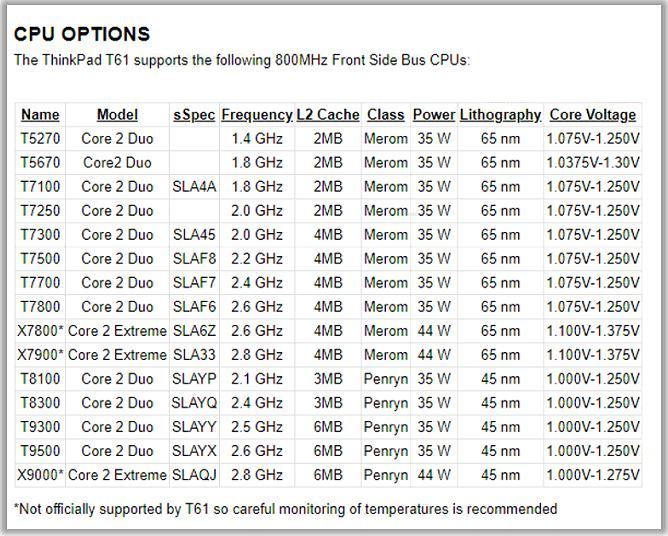
* Ordered Intel Core 2 Extreme X9000 SLAQJ 2.8GHz Dual-Core CPU Processor - $73.64
Total Expenditure: $158.76
The laptop came preinstalled with an Intel Core 2 Duo T7300 processor that runs at 2Ghz on a 65nm process. It’s an Intel Merom family processor having a 35W TDP, sitting in a mPGA478/mBGA479 socket and has an 800Mhz FSB. The motherboard chipset is an Intel PM965 (Crestline-PM) + ICH8M-E that accepts a maximum of 2x4GB of RAM. The laptop was flashed with the latest Lenovo-provided firmware to update the Embedded Controller (EC) to version 1.8. The chipset uses an embedded NVIDIA Quadro NVS 140M GPU that runs at 1.15-1.2V. An Intel Centrino Ultimate-N 6300 AGN 3x3 HMC WiFi Adapter was installed as well to support 5Ghz Wifi (more on that later). A Samsung SSD 840 Series SSD was installed as well.
Upgrade process:
From the factory, the the T61 (14.1 Widescreen) system came with the following motherboard:
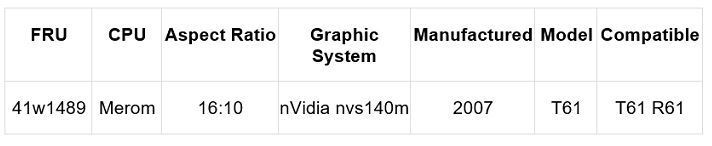
And processor:

I decided to upgrade to a Lenovo motherboard model/FRU # that fully supports the Penryn chips natively while still using the same embedded GPU. I also don’t know if the system would accept a motherboard from the 14.1” standard (i.e. 4:3) series of laptops with the nVidia fx570m 128mb..
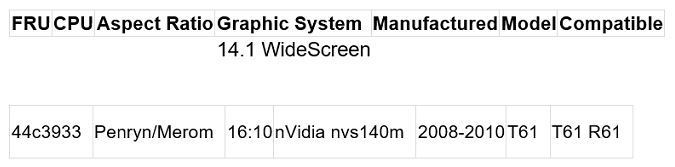
...and decided to max out the processor by using an unlocked Intel Core 2 Extreme X9000 Penryn that has 6MB onboard cache, runs at 2.8Ghz with a 14x multiplier, has a TDP of 44W and sits on a 45nm process. AND it can run at a lower voltage to boot. Other have put quad core procs in these T61s with motherboard modifications but I didn’t want to mess with that.

The laptop was disassembled and I removed the existing heatsink/cooler that was toast and making a loud noise (and on occasion preventing the laptop from booting due to a fan error). I swapped the old motherboard for the newer 44C3933 which took about an hour.
Installation of the X9000 was easy as it’s a pin-for-pin drop in for the mPGA478 socket. I cleaned off the old thermal grease on the GPU and removed the existing thermal grease on the replacement HSF. I left the thick thermal pad in place on the HSF as this covers the MB northbridge and should be sufficient (thermal paste would be too thin). I applied Arctic MX-4 to the new GPU and NVIDIA GPU, and dropped in the new HSF.
I ended up dropping the previous 33++ battery (woops) on the basement concrete floor and it failed to boot with it in place so I removed it and plugged it into AC power for now.
BIOS FLASHING
I learned about the Middleton BIOS (https://thinkpads.com/t61 or http://www.thinkwiki.org/wiki/Middleton%27s_BIOS) version 2.29-1.08 to enable the WIFI PCIe whitelist and SATA-II speed for the Samsung 840 SSD I installed. This BIOS also has SLIC 2.1 tables and a fix for thermal sensor issues when using a Penryn CPU on a motherboard that only supports Merom (shouldnt be a problem since I upgraded to the MB that natively supports Penryns).
Middleton BIOS
Phoenix BIOS Flasher WINPHLASH16.exe or PHLASH16.exe
The BIOS flashing ended up being more problematic than I would have liked. As it turns out, the flashing utility bundled with the BIOS updates requires a 32-bit version Windows 7 OR a bootable DOS USB stick. I tried using a Windows PE image based on Windows 7 (I think it was version 3.0 of PE) and attempted the Windows WINPHLASH16.exe utility, but it low and hehold it would NOT flash without a battery and threw an error. SIGH.
See: Updating without battery or with dead battery
I didn’t feel like installing Windows 7 JUST for a flash, so I tried my hand at the bootable USB stick using “Easy2Boot” and the provided bootable DOS .ISO images included in the ZIPs for the 2.29 Middleton BIOS. Normally I have no problem using bootable ISOs in combination with Easy2boot, but these would not boot through to completion for some reason and landed at a weird A> prompt (???) that would not accept any commands. No idea..
After giving up on these pre-configured bootable DOS ISOs, I decided to try the DOS flashing method using PHLASH16.exe. This method requires a bootable DOS floppy, a copy of PHLASH16.exe and a BIOS .ROM file of your choosing. I tried modifying a DOS 6.22 .ISO I had, cracking it open with ISOBuster and PowerISO to add the BIOS to the image (for an all-in-one bootable solution) but I could not re-save the modified .ISOs at all.
I then decided to use a bootable DOS 6.22 .IMG file (which Easy2Boot handles natively) and booted with that – which ALSO loads MSCDEX and device driver to enable CD support. So... I grabbed a re-writeable CD and threw the Middleton BIOS .ROM file and Phoenix PHLASH16.exe file on there so A) I would USB boot the DOS image and B) change to the CD drive letter (R: in my case) and run the utility from CD.
I booted the USB image, changed to the CD drive letter, and entered the command for flashing:
PHLASH16.EXE _01AF000.ROM (which is the name of the BIOS file) but I immediately got an error about the HIMEM.SYS memory manager being present. So.... I had to go back and modify the DOS 6.22 boot .IMG by REMing out the HIMEM.SYS line of the Config.sys file and re-saving the image. Once doing this, I was FINALLY able to flash the Middleton BIOS 2.29-1.08.
After all was installed, the BIOS correctly identified the new processor and BIOS Rev. I installed Windows 10 Pro and when I was finished, I realized the system SATA controller was in “compatibility” mode through the BIOS and despite all my efforts, I could not change it to “AHCI” within Windows without a reinstall of Windows 10 – so that’s what I did (sigh). The Middleton BIOS’s wireless PCIe whitelist worked as well and I was able connect to my 5Ghz wireless network without issue.
I also installed the replacement battery and it holds almost 5 hours of charge in new condition. (9-cell 7800mAh 10.8V - 43R2499)
CPU and GPU Undervolting
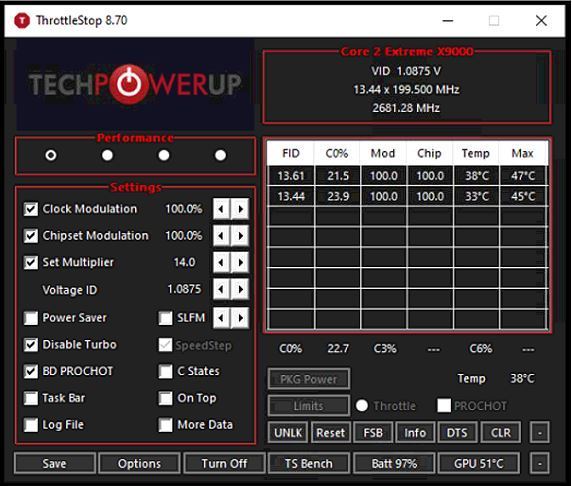
I installed TPFanControl to ensure the HSF was kicking in at the stated temp thresholds as well and CPU temps looked good – low to mid-40s at idle, even dipping into the 30s. I did some digging and found that many people have used ThrottleStop to lower the CPU voltage while maintaining the CPU multiplier at 14x. So I installed it, lowered voltage to 1.0875 and off I went! Note, this CPU does NOT support Dual IDA mode like other Txxx Core2Duo processors, so this option will be grayed out and the Disable Turbo button will be checked.
From the ThrottleStop article
Disable Turbo allows you to easily disable the turbo boost feature of your CPU. Core 2 CPUs call turbo boost Intel Dynamic Acceleration (IDA) but this works very similar to the Turbo Boost feature in the Core i CPUs. If this box is checked and clicking on it does not change anything then that means your CPU does not support turbo boost. EIST stands for Enhanced Intel SpeedStep. This needs to be enabled so ThrottleStop can control your CPU. If this box is grayed out, that means the bios has locked this feature so it can not be turned on and off which is common for most laptops.
GPU temps were hovering between 50-60 degrees at idle so I did some more research and found another person had created modified BIOS files (based off the Middleton BIOS) which gives you an option to lower the GPU voltages from the stock 1.15v to .9, .95, 1.0 and finally 1.05 based on the BIOS .ROM file you choose.

Undervolted BIOS Files
I decided to try my luck with the .95v undervolting BIOS so I grabbed the T61-BIOS(0.95).ROM file and threw it on my previously used Middleton BIOS flash CD with PHLASH16.exe. I ran the same command but this time I got a real cryptic IBM table error (don’t have the exact verbiage). It turned out that I need to use a newer version of the PHLASH16.EXE flashing utility -1.7.0.21 that I grabbed from the website.
This version worked right off the bat and I can see using HWInfo64 on Windows 10 that the voltage is correct at .950v (and stable) and lowered temps a bit too. Given the known heating/premature failure issue of the NVIDIA GPUs in these, anything I can do to lower GPU temps (and overall temps) and prolong the life of the hardware is good in my book.
So here we go! I don't plan on doing a bunch of overclocking although people have had some insane success getting these unlocked mulitpliers cranked up while managing voltage with ThrottleStop and TPFanControl to regulate fan speeds to keep temps down due to the increased voltage. So yeah, I could have went with a T9300 or T9500 which could easily boost to 2.8Ghz using IDA but I kinda just wanted to max it out without physically modifying the board. With the new CPU upgrade, HSF, and 8GB of RAM, it's running Windows 10 well enough and sits along side my T430 (also modded with a newer Corei7, keyboard, SSD and 16GB of Memory) as well as my latest Lenovo T460P.
Can you tell I like Lenovo!?!?
I hope you enjoyed the read and most of all, stay safe and be smart!

My Retro B:\ytes YouTube Channel & Retro Collection