VOGONS


First post, by vutt

User metadata
Rank Member
Rank
Member

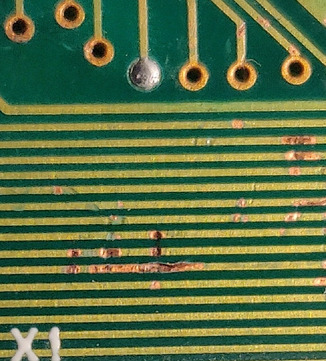
So I managed to score working Sound Blaster CT3670 with visible damage (see attached pic) but fully working card.

First thought. Use electric contact cleaner, then flux and solder exposed tracks over with help of desoldering braid. My concern here is also how to clean tracks so solder will stick.
Then again I may cause more harm by doing so. It is working card after all.

Damage doesnt seem to be mechanical. It looks like some sort of chemical rotting. Will rotting progress by itself if I leave it as it is. Maybe pour over some liquid tape to seal exposed copper?

Any suggestion?

pic.jpg
Filename
pic.jpg
File size
243.3 KiB
Views
261 views
File license
Public domain

Reply 1 of 3, by Doornkaat

User metadata
Rank l33t
Rank
l33t

From the rest of the scuffs this looks like mechanical damage to me but of course you've seen it directly.
Anyway I usually go over damages like those with a lot of flux and a bit of solder on the tip of a flat iron then check for shorts and finally use nail polish to seal it. I never needed soldering wick - the solder sticks to the iron much better than to the thin trace.
The soldermask will prevent the solder from forming a bridge if you're not using excessive amounts of solder.
My completely unbacked theory is the flux will remove surface corrosion, the solder will fill up the little groves + reinforce the trace and the nail polish will secure everything a bit better.
But honestly for data lines as long as there's continuity those repairs are probably mostly for peace of mind and don't fix anything so you could've just left it as is.

It's a whole different story with corrosion from NiMH battery electrolyte. You have to remove the green stuff because it will keep reacting under air humidity and continue corroding the copper. That's why sometimes you have to remove the corrosion and ideally seal it up.

Last edited by Doornkaat on 2020-05-30, 11:25. Edited 1 time in total.

Reply 2 of 3, by quicknick

User metadata
Rank Oldbie
Rank
Oldbie

To me it looks like mechanical damage (scratches). Two tracks in particular are looking bad, you may check them for continuity with a multimeter by following them and finding their ends or by scraping away a bit of the solder mask on both sides of the apparent cut.

Thin copper wire is best for bridging them if indeed they are broken.

To protect the repaired area, uv-curable solder resist can be found on the 'bay, or as a less elegant solution you can use clear nail lacquer.

Reply 3 of 3, by vutt

User metadata
Rank Member
Rank
Member

Well I made my move. Good news - it's still working. Bad-ish news - solder didn't stick uniformly. I need to find a way how to clean traces and/or practice more SMD soldering. It's probably more about latter 😉
Also i realized that it could be good to add some sort of microscope to my working bench.

Fore the moment I'll leave it as it is. Multimeter shows clear connections and I have pushed my luck enough.
Thanks Doornkaat and quicknick for your recommendations.