VOGONS


First post, by Atlantis

User metadata
Rank Newbie
Rank
Newbie

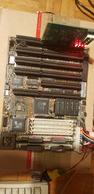
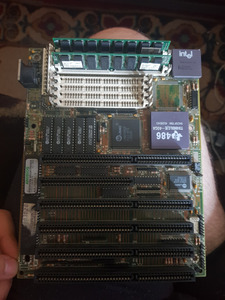
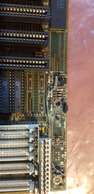
Few weeks ago I bought old 386 motherboard on local auction site. It was described as "in working condition" by the seller, but after receiving order I found out it was repaired rather poorly. Damaged VARTA battery had been removed, but the area wasn't cleaned from the most of the corrosion. Few wire bridges had been soldered and instead of original VARTA battery there was a small li-pol accumulator! I removed it and replaced with standard CR2032 with diode. I cleaned battery area with an IPA cleaner.
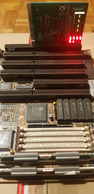
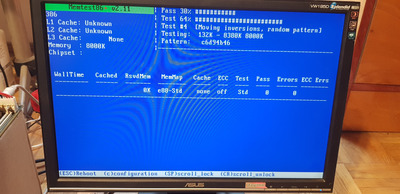
Board worked maybe for a week. I've been running different games and programs for few hours each day to be sure it is stable. Unfortunately yesterday it ceased to work. Unfortunately it happened when I wasn't in the room, so I don't know how exactly it happened and if there was any smoke. I just know there is no any activity: no image on the screen, no POST, no beeps, diagnostic ISA card shows two dashes. Card shows voltages on power line, but there is no activity in CLK line and RDY line. RST diode lights all the time and there is no reaction after shorting RESET pins together.

Any ideas where to start? It wasn't super expensive (considering the fact I bought it with memories, Trident VGA Card and Winbond I/O card) but I'd like to make it work again.

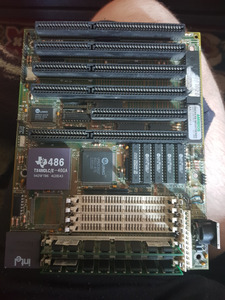
BTW it is possible to remover SMD CPU and replace its with a socket? There is a place to solder on but I am not sure if it is a drop in replacement, of if it requires some additional changes in board design...

Attachments

Reply 2 of 10, by PcBytes

User metadata
Rank Oldbie
Rank
Oldbie

Did the keyboard work on yours? I have the same board as you (but with a socket instead of soldered CPU) and I've been bashing my head back and forth getting the KB to work. Same exact issue - corrosion from VARTA battery, but mine did POST (came with a TI 486DLC) and stop with a Keyboard error, even after redoing most of the traces on the bottom with wires (since my soldering iron wasn't up to snuff for doing trace work) it still complains about no keyboard.

2020-07-10 17.04.46.jpg
Filename
2020-07-10 17.04.46.jpg
File size
1.73 MiB
Views
513 views
File comment
Same board, but with socketed TI 486DLC/E-40GA and 80387DX-33
File license
Fair use/fair dealing exception
2020-07-10 17.06.11.jpg
Filename
2020-07-10 17.06.11.jpg
File size
1.89 MiB
Views
513 views
File comment
Same board, reversed direction (kinda like your pics)
File license
Fair use/fair dealing exception
2020-07-10 17.07.44.jpg
Filename
2020-07-10 17.07.44.jpg
File size
1.91 MiB
Views
513 views
File comment
Backside wires. All are KB traces mostly.
File license
Fair use/fair dealing exception

And to answer your question, yes, it seems it's possible to replace the soldered CPU. Checking against mine, you'd just need to remove the soldered CPU and add a socket, since the needed components for the socket are already there.

"Enter at your own peril, past the bolted door..."
Main PC: i5 3470, GB B75M-D3H, 16GB RAM, 2x1TB
98SE : P3 650, Soyo SY-6BA+IV, 384MB RAM, 80GB

Reply 3 of 10, by imi

User metadata
Rank l33t
Rank
l33t
Atlantis wrote on 2020-07-10, 04:14:

Few wire bridges had been soldered and instead of original VARTA battery there was a small li-pol accumulator! I removed it and replaced with standard CR2032 with diode. I cleaned battery area with an IPA cleaner.

wouldn't have needed to replace the battery, the connector right below it is a connector (J6) for external battery 😉

https://www.arvutimuuseum.ee/th99/m/S-T/32636.htm
please disregard the cache placement in TH99 it is wrong. yours is already correct.

Reply 4 of 10, by Atlantis

User metadata
Rank Newbie
Rank
Newbie

Thanks for all the suggestions. I removed some elements nearby the CMOS battery. There are in fact some signs of corrosion. I will try to clean it with vinegar and then IPA, check continuities and tin traces.
Is there a way to fin a trace that is most probably responsible for this issue? Is there high possibility if rescuing that board?
By the way, someone needs BIOS image? EPROM was soldered, but i removed it due to inspection and made an backup image. Now of course I will socket it.

Attachments

Reply 5 of 10, by kalohimal

User metadata
Rank Member
Rank
Member

There is a 386 BIOS image collection thread if you like to upload your BIOS image. As for the traces, my suggestion is to check all traces near the corroded area. But if you would like to start with the reset line, you can start tracing it from the ISA slot, pin B2. Please see ISA pinout here. Don't forget to check the traces underneath the discreet components too, I usually lift just one leg to clean and check underneath, so I don't have to remember which component is at what place. 😀

I think you should have no problem saving this board, the corrosion is largely localized near the battery area, so with some good cleaning and connecting back the traces, it should be fine.

Slow down your CPU with CPUSPD for DOS retro gaming.

Reply 6 of 10, by Atlantis

User metadata
Rank Newbie
Rank
Newbie

ISA RESET signal (B2 pin) should been connected directly to the CPU/Chipset RESET lines? It isn't.
I also assume LT38C41 is strict, pin compatible equivalent of 8042/8242 chip and its 4th pin is RESET signal? There is no continuity, but it makes sense as it is active low.

Reply 7 of 10, by kalohimal

User metadata
Rank Member
Rank
Member

Not sure about 486s, but usually CPU's reset line is generated by the chipset. For example, here is one for the Pentium 4. The reset button/circuitry sends a signal to the south bridge, south bridge relays the reset to the I/O slots and north bridge, and the north bridge sends a reset to CPU. Since your POST card's reset LED stays on, I'm suspecting there are some broken traces or short circuit caused by the corrosion, since pin B2 is very close to the end of the ISA slot.

p4.jpg
Filename
p4.jpg
File size
65.63 KiB
Views
446 views
File license
Public domain

Slow down your CPU with CPUSPD for DOS retro gaming.

Reply 8 of 10, by Atlantis

User metadata
Rank Newbie
Rank
Newbie

UPDATE: I found and patched two more broken traces leading to first cache chip. It didn't help.
Any hints how to locate broken reset trace? 😀

EDIT: Board works. It turned out to be a power supply issue.
I spotted some other problems while testing this board with Checkit. Board restarts itself after executing memory test, but only with certain SIMM sticks. Does it mean those memory modules are broken or just somehow incompatible?
How long does it take to test entire (8MB or 16MB) memory ?

Reply 9 of 10, by PcBytes

User metadata
Rank Oldbie
Rank
Oldbie

At least on mine, the RAM count goes pretty fast (~2 or 3 seconds?) before throwing the keyboard error.
(not sure if it's the KB chip being bad, or I didn't trace my wires correctly.)

"Enter at your own peril, past the bolted door..."
Main PC: i5 3470, GB B75M-D3H, 16GB RAM, 2x1TB
98SE : P3 650, Soyo SY-6BA+IV, 384MB RAM, 80GB

Reply 10 of 10, by Atlantis

User metadata
Rank Newbie
Rank
Newbie

Ok, I was able to run memory test with few different programs. It turned out to be a protected mode fault.
Now I noticed another issue. It looks like there was no cache at all. None of the programs is able to see it: I tried Checkit, CacheCheck and MemTest86+ 2.11..
I also can't locate cache related options (enabling/disabling) in BIOS.
I've heard about infamous PCChips 486 boards with fake/inactive cache chips. Were there also such 386 devices?
This would be a good explaination for wierd observation I made - there were two broken traces leading to one of the cache chips (effect of battery acid leak) but board had been working. Nothing had changed after I patched them up.

Is it likely that cache is not detected due to battery leak related damage, which I wasn't able to locate, or was it always that way and this cache is "fake"?

EDIT: Ok, now i see there are cache enabling disabling options in BIOS. But internal cache is permanently disabled and changing external cache setting doesn't seem to have any effect.

Attachments