VOGONS


Slot 1 water cooling options

Topic actions

First post, by dionb

User metadata
Rank l33t++
Rank
l33t++

What do you do when you have already "done it all"?

Watercool it!

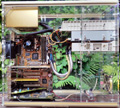
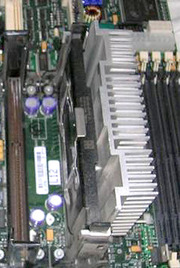
Additional reason is that I have an impressive Compaq i840 dual slot 1 board. Wonderful board, but typically Compaq they have it engineered for a proprietary cooling solution, with passive heatsinks on the CPUs and a hood with big fan to cover them. Great, but I don't have the original case. It's not possible to use regular HSFs as the CPU slots are closer together than on a normal motherboard, and the passive heatsinks don't cool sufficiently without the dedicated hood over them. Also I have a big Zalman Reserator in the corner of the room not doing anything sensible at the moment, which is a waste.

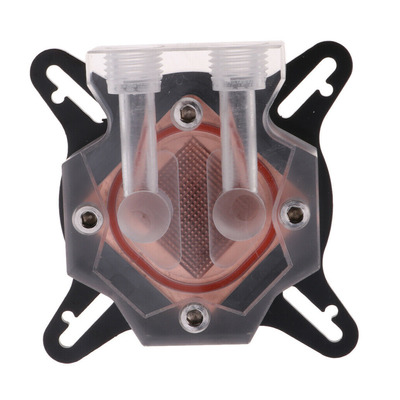
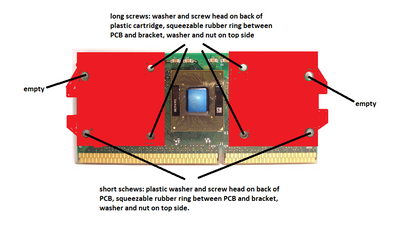
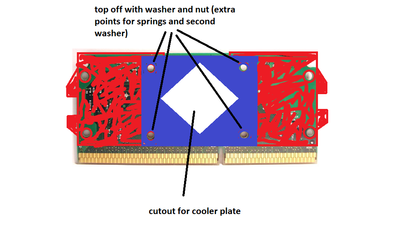
So, what am I looking for: some kind of CPU cooling block I can fix onto an SECC2 Slot1 CPU. Back in the day these were rare enough, today pretty non-existent unobtainium. Additional requirement (due to cramped placement) is that the water tubes need to be connected to the side, not to the top.

I was wondering if any other Vogons water cooling Slot 1 CPUs and particularly what kind of water block you are using and how you attach it to the SECC2 CPU module. Experiences with So370 on slockets also welcome - I'd prefer using native slot 1 CPUs (I have a nice pair of P3-866EB) but if there is a much easier way to get things working with So370, in that case I just need to source a second MSI MS-6905 slocket for my dual P3-1000EB FC-PGA.

Reply 1 of 21, by PC Hoarder Patrol

User metadata
Rank l33t
Rank
l33t

Wasn't aware they ever used a hood / duct system for cooling the standard passive sinks (certainly not on the AP550 with dual 1GHz), and I don't see it as an option in the parts list?

RadicalVision Compaq AP550.jpg
Filename
RadicalVision Compaq AP550.jpg
File size
264.22 KiB
Views
776 views
File license
Fair use/fair dealing exception

Most of the best slot 1 water cooling options I've seen were designed and milled for a specific board layout.

Reply 2 of 21, by Oetker

User metadata
Rank Oldbie
Rank
Oldbie
PC Hoarder Patrol wrote on 2021-06-02, 08:51:

Wasn't aware they ever used a hood / duct system for cooling the standard passive sinks (certainly not on the AP550 with dual 1GHz), and I don't see it as an option in the parts list?

RadicalVision Compaq AP550.jpg

Most of the best slot 1 water cooling options I've seen were designed and milled for a specific board layout.

Loving that huge speaker.

Reply 3 of 21, by dionb

User metadata
Rank l33t++
Rank
l33t++
Oetker wrote on 2021-06-02, 09:08:
PC Hoarder Patrol wrote on 2021-06-02, 08:51:

Wasn't aware they ever used a hood / duct system for cooling the standard passive sinks (certainly not on the AP550 with dual 1GHz), and I don't see it as an option in the parts list?

RadicalVision Compaq AP550.jpg

Most of the best slot 1 water cooling options I've seen were designed and milled for a specific board layout.

Loving that huge speaker.

I *do* have that speaker 😀

But regardless, even if Compaq didn't use the duct, I'm not happy with passive cooling performance and I want to use that Reserator.

Reply 4 of 21, by PC Hoarder Patrol

User metadata
Rank l33t
Rank
l33t

Possibly something like this mod (slocket-based but I guess adaptable to native slot 1, and with both top & side port options)

https://web.archive.org/web/20011120144221/ht … ps197/index.asp

Reply 5 of 21, by cyclone3d

User metadata
Rank l33t++
Rank
l33t++

For waterblocks that have the ports on the side instead of the top, just do a search on ebay for....
waterblock

And then sort by price.

There are a bunch of different ones from China that are like that.

You just need to make sure that you match the material of your radiator with the waterblock so you won't get galvanic corrosion going on.

You will also need to come up with your own mounting mechanism but that is easy enough. For slot-1, you could either remove the heatspreader, make some metal straps and then drill and tap the heatspreader to bolt the waterblock in place or possibly even just use some bolts/nuts with washers through the standard cooler mounting holes.

Slot-1 and Slot-A is really easy to adapt to pretty much any type of cooler because of that huge heatspreader.

Last edited by cyclone3d on 2021-06-04, 01:13. Edited 2 times in total.

Yamaha modified setupds and drivers
Yamaha XG repository
YMF7x4 Guide
Aopen AW744L II SB-LINK

Reply 6 of 21, by DundyTheCroc

User metadata
Rank Member
Rank
Member

I have AP550 with 2 CPUs and stock cooling, CPU temp never reaches more than 40 degree C. Water cooling is overkill, you just need one big fan on rear panel and custom made cover.

Last edited by DundyTheCroc on 2021-06-03, 10:55. Edited 1 time in total.

Reply 7 of 21, by Miphee

User metadata
Rank Oldbie
Rank
Oldbie

Which Reserator model do you have? To be honest it was a failed construction.
80 C° with a 3,2 non-overclocked Prescott @ 100% is outrageous and that was in 2005.
Since it's a hobby project it doesn't really matter anyway, just not worth the hassle for a CPU with 29 W TDP even a small fan can manage.

Reply 8 of 21, by Doornkaat

User metadata
Rank l33t
Rank
l33t

If you're handy with a saw and drill you can make your own adaptor plate to use a recent CPU waterblock on Slot 1 CPUs.

Watercooling was still very niche on Slot 1 and I have personally never seen a premanufactured cooler. A classmate's older brother had a diy watercooler on his Slot 1 PIII that he made from an SECC2 cooler and ~6-8mm copper pipe. He'd bend the pipe to make a few loops, then he'd cut off the aluminium fins on the cooler and sand it down to a flat plate. He'd then flatten the pipe a bit where he'd want it on the heatsink (leaving the ends round to connect the tube) and solder it onto the aluminium heatsink plate. I think he used an oil cooler from a motorbike as a radiator and an aquarium pump.

Reply 9 of 21, by dionb

User metadata
Rank l33t++
Rank
l33t++
Miphee wrote on 2021-06-03, 09:18:

Which Reserator model do you have? To be honest it was a failed construction.
80 C° with a 3,2 non-overclocked Prescott @ 100% is outrageous and that was in 2005.
Since it's a hobby project it doesn't really matter anyway, just not worth the hassle for a CPU with 29 W TDP even a small fan can manage.

The original one, which isn't great for keeping stuff cool but is for being quiet and looking good.

Then again, 80C with 3.2GHz Prescott non-OC sounds like something was wrong somewhere. I've seen good reviews of that thing getting a 3GHz Prescott down to 33C at load, and 41C at load OCd to 3.6GHz.

I'm expecting little trouble in keeping two P3s under 40C and am even considering adding the video card to the circuit.

Doornkaat wrote on 2021-06-03, 10:54:

If you're handy with a saw and drill you can make your own adaptor plate to use a recent CPU waterblock on Slot 1 CPUs.

Watercooling was still very niche on Slot 1 and I have personally never seen a premanufactured cooler. A classmate's older brother had a diy watercooler on his Slot 1 PIII that he made from an SECC2 cooler and ~6-8mm copper pipe. He'd bend the pipe to make a few loops, then he'd cut off the aluminium fins on the cooler and sand it down to a flat plate. He'd then flatten the pipe a bit where he'd want it on the heatsink (leaving the ends round to connect the tube) and solder it onto the aluminium heatsink plate. I think he used an oil cooler from a motorbike as a radiator and an aquarium pump.

I'm awful with plumbing, have had to replace my kitchen floor twice already over the last five years due to leaks, so definitely want to keep the bits water flows through ready-built. Adapter plates sound interesting though. The challenge as I see it is the four push-through pins connecting heatsink to CPU package. Do you have a diagram outlining what approach the adaptor would have?

Reply 10 of 21, by Miphee

User metadata
Rank Oldbie
Rank
Oldbie
dionb wrote on 2021-06-03, 11:10:

The original one, which isn't great for keeping stuff cool but is for being quiet and looking good.

Maybe you are right. The first model was excellent but the second model was notorious for overheating here. We even had a huge topic about it because it was ridiculously expensive but it's performance was poor. Anything is possible. To be honest it was way beyond the price range of the average gamer so people relied on (sometimes paid) reviews. I also have to note that it's often over 35 C° (95 F°) here in the summer so that certainly doesn't help.

Reply 11 of 21, by Doornkaat

User metadata
Rank l33t
Rank
l33t
dionb wrote on 2021-06-03, 11:10:

Do you have a diagram outlining what approach the adaptor would have?

I didn't but now I do. Sorta. 😅 I drew up some quick scetches using only professional graphics editing software. 😁
If you buy one of those cheap GPU coolers from Ebay (pic1) you'd probably need three additional parts: Two identical brackets (red, pic2) to go into the CPU retention frame and one bracket (blue, pic3) that replaces the black bracket on the cooler.
Obivously I didn't take any measurements but that would be my initial concept.

Attachments

  • s-l1600.jpg
    Filename
    s-l1600.jpg
    File size
    108.88 KiB
    Views
    597 views
    File comment
    pic1
    File license
    Fair use/fair dealing exception
  • retention mount.png
    Filename
    retention mount.png
    File size
    188.47 KiB
    Views
    597 views
    File comment
    pic2
    File license
    Fair use/fair dealing exception
  • cooler mount.png
    Filename
    cooler mount.png
    File size
    142.47 KiB
    Views
    597 views
    File comment
    pic3
    File license
    Fair use/fair dealing exception

Reply 13 of 21, by PARKE

User metadata
Rank Oldbie
Rank
Oldbie
dionb wrote on 2021-06-03, 11:10:

Adapter plates sound interesting though. The challenge as I see it is the four push-through pins connecting heatsink to CPU package. Do you have a diagram outlining what approach the adaptor would have?

The simplest approach seems using a 'clip-on' style SECC 2 heatsink like f.e the Foxconn 135638-003 C:

sidesm.jpg
Filename
sidesm.jpg
File size
62.49 KiB
Views
583 views
File license
Public domain

Have the centre fins removed and the resulting surface milled to get the desired flatness for a tight fit with the waterblock. Mounting a block as in the link posted by PC Hoarder Patrol is relatively straightforward.

Reply 14 of 21, by cyclone3d

User metadata
Rank l33t++
Rank
l33t++

Why bother with hacking up the original heat spreader? The tdp of these CPUs don't warrant that.

Yamaha modified setupds and drivers
Yamaha XG repository
YMF7x4 Guide
Aopen AW744L II SB-LINK

Reply 15 of 21, by dionb

User metadata
Rank l33t++
Rank
l33t++
Miphee wrote on 2021-06-03, 11:57:
dionb wrote on 2021-06-03, 11:10:

The original one, which isn't great for keeping stuff cool but is for being quiet and looking good.

Maybe you are right. The first model was excellent but the second model was notorious for overheating here. We even had a huge topic about it because it was ridiculously expensive but it's performance was poor. Anything is possible. To be honest it was way beyond the price range of the average gamer so people relied on (sometimes paid) reviews.

The review I was looking at for the 1 was legit (I know the reviewer), and I managed to buy it for EUR 25. For that price it was "grab first, think of what to do with it later" 😜

I also have to note that it's often over 35 C° (95 F°) here in the summer so that certainly doesn't help.

Yes, I remember the one summer I spent in Budapest. Fondly, but that was due to other reasons for getting sweaty 😉

Doornkaat wrote on 2021-06-03, 12:02:
I didn't but now I do. Sorta. 😅 I drew up some quick scetches using only professional graphics editing software. :D If you buy o […]
Show full quote
dionb wrote on 2021-06-03, 11:10:

Do you have a diagram outlining what approach the adaptor would have?

I didn't but now I do. Sorta. 😅 I drew up some quick scetches using only professional graphics editing software. 😁
If you buy one of those cheap GPU coolers from Ebay (pic1) you'd probably need three additional parts: Two identical brackets (red, pic2) to go into the CPU retention frame and one bracket (blue, pic3) that replaces the black bracket on the cooler.
Obivously I didn't take any measurements but that would be my initial concept.

Hmm, yes, I can see how that would work. A bit worried about a copper block with my aluminium reserator though...

Miphee wrote on 2021-06-03, 12:02:

Maybe this will help if you haven't seen it already.
http://www.dansdata.com/senfu.htm

Tnx. Had spotted it earlier, but discarded it because Athlon Slot A used SECC1. However on re-reading it it also mentions SECC2 lower down.

The thing that worries me is reliably ensuring contact when mounted. Particularly with the cheapest aluminium blocks like these:
https://www.ebay.nl/itm/282445758166?hash=ite … ncAAOSwkShY~kQB
s-l1600.jpg

So dirt-cheap I can easily buy a couple on the off-chance it actually works in a non-leaking way. But keeping it pressed onto the core is another matter.

Reply 16 of 21, by cyclone3d

User metadata
Rank l33t++
Rank
l33t++

That is why you attach the waterblock to the stock heatspreader plate. There is no reason at all with these CPUs to mount the waterblock directly on the CPU die.

Yamaha modified setupds and drivers
Yamaha XG repository
YMF7x4 Guide
Aopen AW744L II SB-LINK

Reply 17 of 21, by dionb

User metadata
Rank l33t++
Rank
l33t++
cyclone3d wrote on 2021-06-03, 21:30:

That is why you attach the waterblock to the stock heatspreader plate. There is no reason at all with these CPUs to mount the waterblock directly on the CPU die.

OK, but how do you attach it? Soldering would probably only give me contact round the edges...

Reply 19 of 21, by cyclone3d

User metadata
Rank l33t++
Rank
l33t++
dionb wrote on 2021-06-03, 22:45:
cyclone3d wrote on 2021-06-03, 21:30:

That is why you attach the waterblock to the stock heatspreader plate. There is no reason at all with these CPUs to mount the waterblock directly on the CPU die.

OK, but how do you attach it? Soldering would probably only give me contact round the edges...

I already said how to up above:

You will also need to come up with your own mounting mechanism but that is easy enough. For slot-1, you could either remove the heatspreader, make some metal straps and then drill and tap the heatspreader to bolt the waterblock in place or possibly even just use some bolts/nuts with washers through the standard cooler mounting holes.

If the radiator is copper, you want a copper waterblock. If the radiator is aluminum then you want an aluminum waterblock. This is to avoid galvanic corrosion which will lead to the waterblock and/or radiator becoming clogged.

Yamaha modified setupds and drivers
Yamaha XG repository
YMF7x4 Guide
Aopen AW744L II SB-LINK