VOGONS


First post, by dura-zell

User metadata
Rank Newbie
Rank
Newbie

Hi

I recently started my endeavor to recreate some of my computers from my childhood. I'm not aspiring to recreate the exact machines I had back in the days - this would be nearly impossible - but more the look and feel of the old days - and also I'm looking forward to a fun learning experience. My first project is an 486DX-33 based System. I bought an old machine which according to the seller has been in a basement for several years.

According to an first "inventory" I got the following:
CPU: 80486DX-33 / SX419
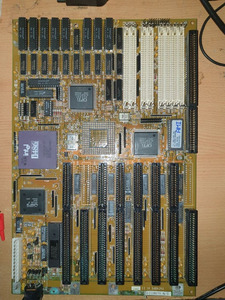
Board: Unidentified, PAT48PX, Likely this one: https://stason.org/TULARC/pc/motherboards/T/T … 86-PAT48PX.html
Mem: 4 MB
Graphics: Cirrus Logic / 256K
Sound: ESS Audiodrive
CD-ROM: Future Domain - some generic IDE CROM Controller Card
I/O: 2 Serial/parallel Cards based on Winbond Chips, one has a Gameport connector
HDD: Not sure yet as its still mounted in the case

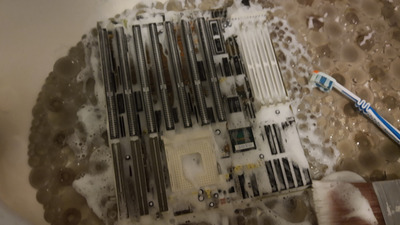
The PSU seems to be fine (checked the rails) but needs a thorough cleaning, the case too. Also the expansion cards seem to work fine. The machines does boot and even loads from the hard disk.
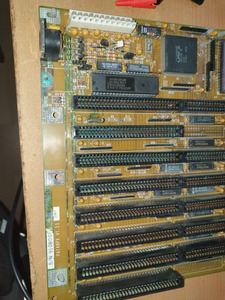
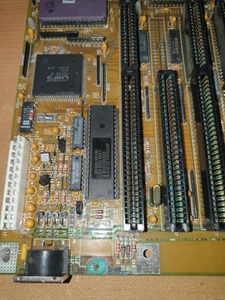
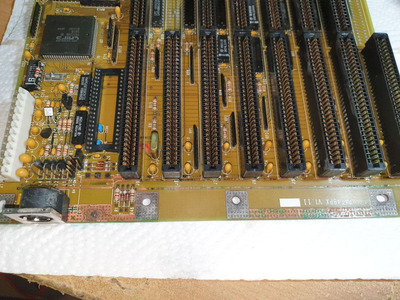
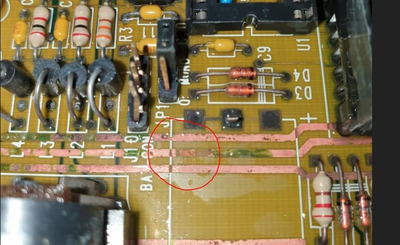
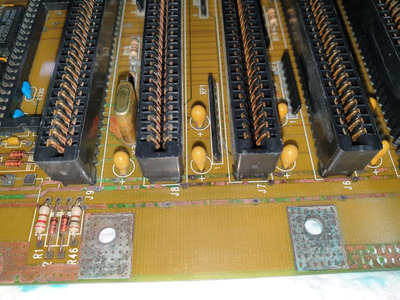
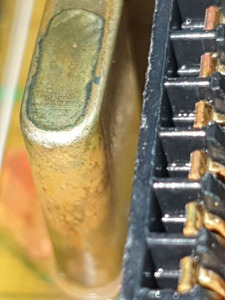
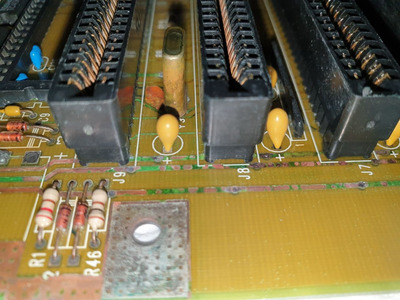
Unfortunately the mainboard suffered from severe battery leakage - it had one of these barrel batteries spilling its guts all over the place. I removed the battery and prepared an external case for AA batteries (mainboard has a connector for this). I also removed the corrosion as good as possible with vinegar & alcohol but it looks like some of the traces got eaten completely. I have (very) basic experience with soldering and I might be able to make a jump wire for one or two connections but replacing entire traces is a bit above my head. Also I was not able to completely clean up the ISA slot affected. See pictures attached.

So my question: What do you folks think - Is it possible to fix this somehow (and if so: what would be the best approach) or should I look for a replacement board. If the latter: Can someone confirm if this is a socket 3 CPU? According to CPU world it is, but I never have seen one with this kind of socket for socket 3 CPU's.

Thanks in advance for any replies

dura-zell

Attachments

Reply 1 of 18, by AlexZ

User metadata
Rank Member
Rank
Member

I would give it away for free to someone who has the skills to fix the acid damage. It's an early 486 without VLB, highly likely no LBA support.

Pentium III 900E, ECS P6BXT-A+, 384MB RAM, NVIDIA GeForce FX 5600 128MB, Voodoo 2 12MB, 80GB HDD, Yamaha SM718 ISA, 19" AOC 9GlrA
Athlon 64 3400+, MSI K8T Neo V, 1GB RAM, NVIDIA GeForce 7600GT 512MB, 250GB HDD, Sound Blaster Audigy 2 ZS

Reply 2 of 18, by dionb

User metadata
Rank l33t++
Rank
l33t++

If the motherboard actually works in this state, you could keep&use it yourself.

But...

That cleanup does need completing, there is still residue all over the place that is still eating into your hardware. I see what looks like a toothbrush in your pic, if so you already have everything you need. Just get that vinegar (I'm assuming it's cleaning vinegar and not balsamico 😉 ), slosh it on the toothbrush and keep scrubbing. What I do in really bad cases (and this may be one) is to first put paper towels soaked in vinegar on the board, pressed down onto the offending bits. Leave that for an hour or two, then get scrubbing with the toothbrush.

Not convinced alcohol is needed, after the residue is gone, just thoroughly rinse with clean water to get rid of the (equally corrosive) vinegar. If your local water is hard (lots of minerals in it), you want to do the last rinse with distilled water to avoid residue from the water, particularly on anything with connectors (those ISA slots).

Reply 3 of 18, by kikipcs

User metadata
Rank Newbie
Rank
Newbie

The towel paper method, as dionb described above, works wonders for expansion slots, like that greenish ISA slot you have there.

The traces look definitely as if the soldermask is eaten, could be even more. Traces like to corrode the most just before vias/holes - since the soldermask doesn't cover a slight bit of the trace there during the production process.

Good news for you: the traces are few and thick. You could strip the soldermask off of them, clean it again, see where the traces are damaged, and solder in stripped pieces of wire / use a cut soldering tip and cover them with solder. You should be thankful they are not the thin type like in later 486 boards. 😁

Bad news: looks like the motherboard was placed vertically during those years in storage/neglect, so the battery guts leaked down. This means you have to keep in mind that corrosion may be present underneath those ISA slots, which may need to be desoldered in order to verify & rectify this. The area near the silver clock crystal looks bad, too. Some other things to check are the keyboard controller & its socket, and I'd also consider replacing visibly affected components like R3, D3, D4, C9 etc.

I'd say you either give it away to someone to fix, as it's a bog-standard 486 ISA board, or take it head-on and try to fix it - you'll gain some experience with soldering/repair.

PS The socket is "Socket 1" - the first 486 socket before Intel started naming them, pretty much. Present in early 486es. The CPU will fit in a Socket 3 though if that's what you want to know.

Reply 4 of 18, by BitWrangler

User metadata
Rank l33t++
Rank
l33t++

If you are super nervous about soldering and can see on the surface all the eaten parts of the traces, you can try hitting up automotive suppliers and asking for "defogger repair paint" which is a conductive repair paint, for mending the burned out bits of rear windshield defoggers on cars. Might need to use tape to mask off thin traces from the others and do like one a day so it gets hard enough to tape over for the next one. It was getting hard to find a decade ago though, so not sure about your chances. Conductive paint pens can be ordered online. But if you're willing to broaden your skillset soldering is the best option.

Unicorn herding operations are proceeding, but all the totes of hens teeth and barrels of rocking horse poop give them plenty of hiding spots.

Reply 5 of 18, by dura-zell

User metadata
Rank Newbie
Rank
Newbie

Hi all

Thanks for all your input. Regarding the Board itself: I agree - this is not something special. And it shouldn't be. It would be quite sad if I got myself something special and the ruin it because of some stupid mistake due to lack of experience. Nonetheless: its "my" board and so - if it is fixable I will try to fix it. Worst thing that can happen is that I can't fix it which wouldn't be different to "now". If left like this I think it wont work for long with all this corrosion. But putting it away and getting another one would sort of giving up. At least at this point I don't want to do this. I also know that the cleaning is not completed. The pictures show "progress" of several cleaning sessions. I abbreviated my process a bit in my last post. The complete process looks like this:

1. soak it in vinegar (no, no balsamico 🤣 - its cheap and clear stuff from the grocery store)
2. scrub it with the toothbrush. Scrub even more and after that: scrub it.
3. clean the vinegar & any residue with alcohol
4. rinse with destilled water
5. dry it
6. assess the results, goto 1

I added the soaked towels now - these were giving quite good results, actually it looks like there's copper left on the "bad" traces - thanks for this tip 😀

@kikipcs: You're right - the board was mounted in a big tower case and therefore "standing". I removed the Keyboard Controller - this looks not bad. The Pins are clean and neither on or under the socket is corrosion visible. I'm more concerned about the area above it - this contains a bunch of components - making it difficult to clean.

Again, thanks for the input - already could take some valuable hints from this and also a bit of reassurance to continue 😀

greetings,
dura-zell

Reply 6 of 18, by kikipcs

User metadata
Rank Newbie
Rank
Newbie

dura-zell, a cool trick to help with removing corrosion is using the magic eraser rubber - you'll destroy it in the proces but its slightly abrasive qualities will work wonders on the more corroded "pits" that may be left behind.

One ThinkPad motherboard I worked on in the past that had some extensive corrosion (wish I was more knowledgeable and handy with a soldering iron tbh) which I scrubbed, and scrubbed, and scrubbed, and even then some green residue remained. It'd be good practice to take an X-acto knife and very gently scrape it off. You're going to be working on the area and any foreign substance/oxidation may compromise the whole deal.

Keep us updated!

Reply 7 of 18, by Miphee

User metadata
Rank Oldbie
Rank
Oldbie
kikipcs wrote on 2021-08-05, 13:39:

This means you have to keep in mind that corrosion may be present underneath those ISA slots, which may need to be desoldered in order to verify & rectify this.

Very true. It looks like an easy project (find trace solder joints, solder a wire to them) but it's quite difficult when the damage is extensive. Soldering a multi layer PCB is not a beginner's task and removing chips&connectors require proper tools.
I'd just buy a working socket 3 board with a 2032 battery.
It's all up to OP.

Reply 8 of 18, by dura-zell

User metadata
Rank Newbie
Rank
Newbie

Hey

Making progress: letting it soak a while with kitchen towels did the trick for now. I got more green stuff removed than during the other attempts where I only used the brush.
Still need to clean the lower ISA slots and the areas between all of them where I didn't reach with the toothbrush. I'll see how these "magic erasers" are called here and if I can get hold of some.
And of course you're both correct: there might be corrosion beneath the ISA slots. Guess I'll find it out when testing the board. I'm not sure if I'm able to desolder these and definitely won't try this preemptive.
For now I'll let it dry and tomorrow I'll do the next scrubbing session.

Miphee wrote on 2021-08-05, 19:36:

I'd just buy a working socket 3 board with a 2032 battery.

This would mean to give up without trying whats possible (for me). And it would take the fun away. Getting a working system is easy after all (but quite expensive as I found out).
For now I'll deal with this one. Learning and even if it doesn't work out: having fun while doing so.

greetings,

Attachments

Reply 9 of 18, by CalamityLime

User metadata
Rank Member
Rank
Member

Take what I say with a grain of salt but it's just what has worked for me and what I would do.

Still a nice bit of green on the board. I see some in the lower ISA slots and over by the chips chip.
Battery juice spreads far and wide some how, I'd recommend covering the area with tissue and soaking that in vinegar then leave it for an hour or something, just to let all the battery juice react away into the vinegar. You'll hear it bubbling, it's like a school science experiment on increasingly scarce and expensive PC parts. You want the bubbles to stop.

Maybe this might seem silly or something but after the vinegar soak, give it a good wash down with fairly liquid (a good dish soap) nothing too silly, the simpler the better. I've done that with a few things and it worked a treat on my on soyo board. Get a simple soft paint brush and just wash the thing down, focusing in on the worst areas with a tooth brush. Rinse it well with water then displace the water from sockets with some IPA, let it dry for a good while.
It kinda looks like the the soldermask took the brunt of the damage. You can replace the soldermask with something like clear nail varnish once you know the area is clean and doesn't need repair.
You could get one of those little fibre glass pens and give the dirty traces a light sand, I do mean a light sand, those pens are very abrasive. If you've never used one before give it a try on some surface to get a feel for it.

Remember, people throw apple boards in the dishwasher to clean the electrolyte from leaky caps. Water is fine so long as it is displaced and the board isn't getting any power.

I wish you the best with your project.

Attachments

Be Happy, it's only going to get worse.
- Projects
Limes Strange 3D models
USB-2-232

Reply 10 of 18, by kikipcs

User metadata
Rank Newbie
Rank
Newbie
Miphee wrote on 2021-08-05, 19:36:

Very true. It looks like an easy project (find trace solder joints, solder a wire to them) but it's quite difficult when the damage is extensive. Soldering a multi layer PCB is not a beginner's task and removing chips&connectors require proper tools.
I'd just buy a working socket 3 board with a 2032 battery.
It's all up to OP.

Luckily it's an earlier type of board, where the trace situation is not too complicated.

dura-zell wrote on 2021-08-05, 23:10:

This would mean to give up without trying whats possible (for me). And it would take the fun away. Getting a working system is easy after all (but quite expensive as I found out).
For now I'll deal with this one. Learning and even if it doesn't work out: having fun while doing so.

That's why we're cheering you up, man!
And a simple 16bit ISA system is a good first step on the ladder of 486 craziness.
Regarding soldering I'd highly recommend to you some Youtube videos on fixing traces; proper execution is the key to avoid headaches here. Ask me how do I know 😁
Regarding the magic erasers: try to search for "Mr. Proper / Mr. Clean Magic Eraser" and you'll get an idea. Otherwise, as suggested above, get a fiberglass pen - those do wonders but be sure to wear gloves as the fibers are literally a pain to remove from skin!

PS That quartz looks kinda concerning now that you've done more cleaning. If anything doesn't work that'd be near the top of my troubleshooting list.

Keep up the good work!

Reply 11 of 18, by dura-zell

User metadata
Rank Newbie
Rank
Newbie

Hey

took the sunny weather for a chance to bring the case into the garden for cleaning - so a bit less time for working on the board.
Made some progress anyway - worked on the lower half of the board - mostly the remaining ISA slots and gave the area around the power connector a second treatment. Now I'm waiting for it to dry. Before I started I did some first continuity tests. Looks like at least 2 traces are broken and if I'm at it I should rewire a third one too. The area around the quartz indeed looks bad too. Not sure yet if the traces are gone too but surely looks like that.
Time to refresh my soldering knowledge 😀 - I also do not know what this quartz has done - looks a bit like it leaked (do quartzes leak?, thought capacitors are doing this).

kikipcs wrote on 2021-08-06, 02:28:

Regarding soldering I'd highly recommend to you some Youtube videos on fixing traces; proper execution is the key to avoid headaches here. Ask me how do I know 😁

Actually I did already - I tried to do my homework so I already knew what can happen when I get such old hardware and to not stumble blindly into this. But watching videos/reading is one thing, fixing it myself another. And getting advise from people who have done this already can never hurt.

I think I might have reached the limit of what can be done using vinegar and toothbrush. The remaining areas are too small for this. Found out that neither the grocery shop nor anything else (in a reasonable distance) has these magic erasers and ordered both: the pen and the erasers (and smaller brushes). I actually know the fibrepens from work, we have something similar for cleaning fibreoptics. Apart from this I'll give the dish soap a try when I start the next scrubbing session. Not sure if time permits to work in it tomorrow (and I need to take a look into the PSU also before trying anything).

greetings,

Attachments

Reply 12 of 18, by kikipcs

User metadata
Rank Newbie
Rank
Newbie

Those traces don't look too bad honestly - you should be able to restore the connection using just solder. If not, a piece of wire will easily stick to such wide traces.

You might want to take a look what's under that quartz - btw, are you able to make out the writing and see what MHz is it?

Reply 13 of 18, by dura-zell

User metadata
Rank Newbie
Rank
Newbie
kikipcs wrote on 2021-08-07, 03:13:

Those traces don't look too bad honestly - you should be able to restore the connection using just solder. If not, a piece of wire will easily stick to such wide traces.

I'm more concerned about the area between the ISA slots. Hard to reach for cleaning and fixing. Still don't want to desolder them if possible. If absolutely needed I might remove (sacrifice) one or two as I don't need all of them.

kikipcs wrote on 2021-08-07, 03:13:

You might want to take a look what's under that quartz - btw, are you able to make out the writing and see what MHz is it?

No - unfortunately not. Any writing on it has been completely eaten by the battery juice. I assume that it is one of the standard 14MHz things but I can't find any docs (to to talk about schematics) for my board.

Attachments

Reply 14 of 18, by zapbuzz

User metadata
Rank Oldbie
Rank
Oldbie

first thing comes to mind is rust converter but how to apply baffles me. I would using a toothbrush of it on the isa slots with it but then i'd probably submerge the whole damn thing in a container of it. I think 10 minutes does the trick. Then afterwards use a toothbrush to remove debree when dry.
Only if i had this situation because i never tried it and rust converter isn't cheap.
Acid affected copper might turn to some kind of tin. "might" because acid changes the composition of copper to lower grade metals that could convert.
This is theoretical and i exclude all responsibility but if i come across this I will post the results.
Of course I have done the dishwasher and that cleans very well but this is rusty too so it can be a 2 phase exercise.
Something I would do a vlog about.
An oscillascope can tell quartz frequency or one of those small frequency counter things found on eBay.

Reply 15 of 18, by kikipcs

User metadata
Rank Newbie
Rank
Newbie

I've also heard about rust converter, however never thought of using it on acid leaks. Some folks also use PCB etchant to clean the board off of oxidation/corrosion. Personally I wouldn't try that and rather scrape the rest off with a fiberglass pen or an X-Acto knife.

OP, perhaps someone more knowledgeable will tell you about that MHz that crystal might be.

Reply 16 of 18, by Tiido

User metadata
Rank l33t
Rank
l33t

it is probably 10 or 12MHz, for the keyboard controller. I don't think the freq is critical but who knows.

T-04YBSC, a new YMF71x based sound card & Official VOGONS thread about it
Newly made 4MB 60ns 30pin SIMMs ~
mida sa loed ? nagunii aru ei saa 😜

Reply 17 of 18, by dura-zell

User metadata
Rank Newbie
Rank
Newbie

Hey Guys

Some personal stuff forced me to take a long break, hence this really late answer. I do not want to revive this necro now, just apologize for not replying anymore.
On the plus side, I now have a proper place for working on this kind of stuff, including workbench and equipment.

But for this machine, I'd like to wrap things up. In the past week I got some more old stuff, including a PAT48SA board which is quite similar to the board above. Luckily the Battery has just started to leak and I was able to remove it before it could do any damage. I decided to pillage almost everything from the Board mentioned above and now I'm almost finished with my "second" first build albeit with another Mainboard (waiting for some diodes at the moment for the battery pack).

I will not scrap the other one but maybe give it a try when I have more experience with fixing stuff like that. As it is cleaned already, the damage wont get worse and as mentioned above: it is nothing special...

Thanks for all the help - this really helped at least with my new build and certainly with the upcoming stuff too.

greetings,
dura-zell