VOGONS


Reply 20 of 41, by anetanel

User metadata
Rank Member
Rank
Member

While I'm waiting for the diodes, I poked around and found something odd.
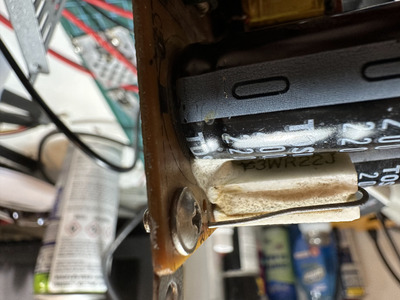
The ceramic resistor (?) near the large caps is shorted.
The mark on the board is THR, so I thought it should be a thermistor, but goggling the part number (W3R22J) brings up results for a resistors with 0.22 ohm resistance...
Measuring resistance shows about 0.3 ohm.
Should it be shorted? Is it a resistor disguised as a thermistore? 😀

Attachments

  • IMG_8015.jpg
    Filename
    IMG_8015.jpg
    File size
    836.32 KiB
    Views
    609 views
    File license
    Public domain

Reply 21 of 41, by zyga64

User metadata
Rank Oldbie
Rank
Oldbie

0.22 Ohm is "almost" a short in fact.

1) VLSI SCAMP /286@20 /4M /CL-GD5422 /CMI8330
2) i420EX /486DX33 /16M /TGUI9440 /GUS+ALS100+MT32PI
3) i430FX /K6-2@400 /64M /Rage Pro PCI /ES1370+YMF718
4) i440BX /P!!!750 /256M /MX440 /SBLive!
5) iB75 /3470s /4G /HD7750 /HDA

Reply 22 of 41, by anetanel

User metadata
Rank Member
Rank
Member
zyga64 wrote on 2023-03-23, 12:30:

0.22 Ohm is "almost" a short in fact.

Yeah, I guess it is working as expected then.
I'm watching a video right now about the thermistor's role in the PSU, and from my understanding it's resistance should be high at first and get lower with time and heat.
A bit weird that this resistor is in place of a thermistor, and with such a low resistance too.

Reply 23 of 41, by Deunan

User metadata
Rank Oldbie
Rank
Oldbie

Well, to be frank this is a rather cheaply made PSU. Minimal input filtering - no caps but at least there's a common-mode choke, some PSUs just put 2 jumper wires and do away with that as well. There isn't a thermistor (or at least I don't see it) to limit initial input surge, there is this resistor. It's in-circuit at all times so it will just drop some voltage and just heat up all the time, lowering the overall PSU efficiency. Because of that you want it to be as small value as possible, at the same time it needs to have enough resistance to limit the surge current. So I guess 0.22ohm was chosen and ~0.3 you measure does match the R22 marking. It's a 3W part but in direct airflow from the fan, one complaint I have (well other than it not being an NTC thermistor) is the proximity to the input caps. But then again these are also close to the radiator fins so...

Reply 25 of 41, by Deunan

User metadata
Rank Oldbie
Rank
Oldbie

Yeah. Higher voltage rating is good, it does usually increase the forward voltage drop but only slightly. Just make sure the 3A part has leads thin enough to fit through the PCB holes. Although that is not exactly a difficult problem to resolve, just drill them a tad bigger if necessary.

EDIT: Do remember to take both transitors out and test them. A diode like this does not die on it's own.

Reply 26 of 41, by anetanel

User metadata
Rank Member
Rank
Member

Progress! 😀
I replaced the faulty diode with the new 3A/1000v one. Also removed the transistors and soldered back the double diode.
Now when powering the PSU, the light bulb lights up and goes dim!
Does this mean that we're back in working order?
Should I solder the transistors back? replace the other diodes?
I'm on fire and the soldering iron is hot 😜

EDIT:
The transistors seems good. at least no shorts. I don't know what else I could check.

Reply 27 of 41, by anetanel

User metadata
Rank Member
Rank
Member

I took a chance and resoldered the transistors.
When powering the PSU with the 12V bulbs and the 60W bulb-cable, The 12v light up a bit, and the PSU fan starts spinning.
The 60W bulb stays lit. Not very brightly, but also not so dim as before I replaced the transistors.
I measured the voltage on the 5v and 12v rails, and it is 1.7v and 4v... too low...
What's next?

Reply 28 of 41, by Deunan

User metadata
Rank Oldbie
Rank
Oldbie
anetanel wrote on 2023-03-23, 18:00:

The 60W bulb stays lit. Not very brightly, but also not so dim as before I replaced the transistors.
I measured the voltage on the 5v and 12v rails, and it is 1.7v and 4v... too low...

The efficiency of that PSU, at light load, might be very poor. Go to 100W bulb. It should be even dimmer than 60W (or pretty much off) and the voltages should be in spec. If so you can try and run the PSU directly from mains - still, I would first let it run 5min or even 10 with 100W bulb and this light load to see what happens. But make sure the fan spins and is pulling at least some air over the PCB.

Reply 29 of 41, by anetanel

User metadata
Rank Member
Rank
Member

I was able to find a 100w bulb. Yiu can't buy new incandescent bulbs any more where i live. Luckily my father in law seems to be a light bulb horder 😝
Anyway, with the 100w bulb and the 2 12v bulbs, the voltage on the 5v rail is about 4.4v and on the 12v rail it is about 10.4v...
The 100w bulb lights pretty bright.
I let the psu rin for couple of minutes but there isnt any change in the voltages or the brightness of the bulb.
It is definitely not dimm...

Reply 31 of 41, by pentiumspeed

User metadata
Rank l33t
Rank
l33t
anetanel wrote on 2023-03-26, 20:13:

BTW, I'm running the PSU on 220v. Is it ok that I used 3A diodes?

No.

Diodes where were put in? And current rating and type of diode is *required* specific to power supply outputs.

On outputs for 5V, 12V etc, you have to exceed the max current of the 5 or 12V output, and if it is a 20A on this 5V for example, you need 30A to 50A and fast switching Schottky, in a two diode array (in three pin TO-220 or larger package) with breakdown rating of 25V to 50V.

On input AC to DC, you need 6A or 10A rectifier bridge diode rated 300V or more break down rating.

Cheers,

Great Northern aka Canada.

Reply 32 of 41, by anetanel

User metadata
Rank Member
Rank
Member
pentiumspeed wrote on 2023-03-26, 20:45:
No. […]
Show full quote
anetanel wrote on 2023-03-26, 20:13:

BTW, I'm running the PSU on 220v. Is it ok that I used 3A diodes?

No.

Diodes where were put in? And current rating and type of diode is *required* specific to power supply outputs.

On outputs for 5V, 12V etc, you have to exceed the max current of the 5 or 12V output, and if it is a 20A on this 5V for example, you need 30A to 50A and fast switching Schottky, in a two diode array (in three pin TO-220 or larger package) with breakdown rating of 25V to 50V.

On input AC to DC, you need 6A or 10A rectifier bridge diode rated 300V or more break down rating.

Cheers,

I replaced the 4 diodes in the rectifier bridge. One of them was shorting.
The original diodes were 1.5A but I could locally find only 3A new ones.

Reply 33 of 41, by pentiumspeed

User metadata
Rank l33t
Rank
l33t

That more clearer.

What is the total load in watts, your bulbs should say amps or watts, load bulbs connected to the output? The regulation feedback is from 5V, rest usually not regulated. Usually leave bulbs on the 5V.

Cheers,

Great Northern aka Canada.

Reply 34 of 41, by Deunan

User metadata
Rank Oldbie
Rank
Oldbie
anetanel wrote on 2023-03-26, 20:08:

Anyway, with the 100w bulb and the 2 12v bulbs, the voltage on the 5v rail is about 4.4v and on the 12v rail it is about 10.4v...
The 100w bulb lights pretty bright.
I let the psu rin for couple of minutes but there isnt any change in the voltages or the brightness of the bulb.

Hm. I think with just 30W load the PSU should work better than this and not pull so much current from mains that the 100W bulb is bright. But then again brightness is subjective and this PSU efficiency at light loads can be 50% or worse.

I'd say go for it, keep the load but use no bulb. Direct connection to mains - after all it does have a fuse and it did improve the regulation going from 60W to 100W current limiter. Perhaps it really needs to see higher input voltage after all.
It's still weird that all it took to work again was one primary side diode... perhaps it was badly unformed input capacitor(s) after all, or it was just marginal diode to begin with.

Reply 35 of 41, by anetanel

User metadata
Rank Member
Rank
Member
Deunan wrote on 2023-03-27, 09:49:

I'd say go for it, keep the load but use no bulb. Direct connection to mains - after all it does have a fuse and it did improve the regulation going from 60W to 100W current limiter. Perhaps it really needs to see higher input voltage after all.
It's still weird that all it took to work again was one primary side diode... perhaps it was badly unformed input capacitor(s) after all, or it was just marginal diode to begin with.

Aaaaaand the fuse blew 🙁
I should have put a camera on it. I think I saw a flash in the general area of the large caps and ceramic resistor, but it may have been the fuse...
I have one last 5A fuse. Should I put it and try to video the failure?
Also, the fuse is a 5A one, and like I said it is the last one I have. I do have several 10A fuses. Is it too much?

Reply 37 of 41, by Deunan

User metadata
Rank Oldbie
Rank
Oldbie

Well, now you need to decide if you want to continue or not - because this will not be an easy case and it very well might turn out to be a lost cause (for example a short in the transformer) which is very frustrating (and so can be the investigation into cause quite frankly, although that is at least a learning experience).

First, the basics and safety rules again: Always wait for the primary capacitors to discharge before working on PSU that was connected to mains (limiting bulb or not). Do not change the fuse for higher rated one. In fact, if anything, for 230V operation a 3A slow-blow fuse should be enough, the 5A one is for 115V. That being said this PSU has poor input surge protection so perhaps 5A fuse is required, otherwise it would eventually blow on its own sometime during power-on. But that's why it should be a slow-blow fuse and not a fast one.
If you don't want to keep changing the fuse then add another one (with a proper holder) into the power cord, just like you added the current limiting lightbulb. This at the very least will be easier to access and replace, and you can even use a household type resetable breaker (but it should be something low rated, lower than 5A in PSU anyway, like 3-4 amps which usually is not available for typical panel fuse holders).

With that being said, if you want to continue (for now anyway): remove PCB from case, inspect both it and case for any burn and soot marks. You find anything like that, investigate. Although a short to case would trip your house breakers before the fuse - at least that is how it's supposed to work. But check anyway, including these mounting standoffs for any possible shorting.

Since you run the PSU with no transistors but capacitors in place, and the bulb went dark, we know it's not the input caps. So check the diodes again, this new overcurrent event could have killed another one again, but other then diodes it leaves you with the transistors, their driving circuits, and the transformer. Transistors could be faulty, not shorted completly but not turning off at higher CE voltages (breakdown voltage degraded in other words). Although this could also be a fault witht he driving circuitry, past the smaller impulse transformer.

Look at the schematic here: http://www.pavouk.org/hw/en_atxps.html
It's complicated but you are only concerned with the driving part now, so upper middle section. There's two identical/symmetric driving circuits: C9, D3, R6-R8 / C10, D4, R10-R12. You need to find these parts (obviously the numbering and exact circuit will not be a 100% match) on your PSU. Of these driving circuits the diode and capacitor must be checked. Even replaced (especially the capacitor) if in doubt. Also R8 and R12 must be in-spec and not too high value. If the driving part check out then the transistors should be replaced with another known good (or new) pair. These might have developed problems that only dynamic, high-voltage testing will find, so replacement is easier.

EDIT: Forgot to add: The snubber parts D1, D2 and R4+C8 should also be checked.

Keep in mind this might still not be it, or if the main transformer is shorted internally (winding to winding short would kinda work, like what you have, but pull way too much current) it's a lost cause unless you can replace it. And for that you need a working donor, then why not just use the working donor intead. To properly diagnose that PSU you need a scope, and let me be clear about this: DO NOT CONNECT SCOPE TO PRIMARY SIDE OF MAINS POWERED PSU unless you know what you are doing. It's not safe for the scope, it's not safe for you, unless you happend to have HV differential probes and know how to use them. That's why I said you might have to decide to throw in the towel, at some point it just might not be safe or economic to continue unless you already have prior experience.
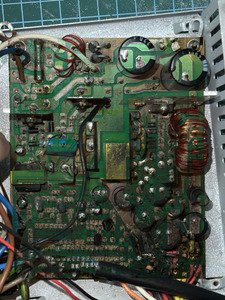
Reply 38 of 41, by anetanel

User metadata
Rank Member
Rank
Member
Deunan wrote on 2023-03-28, 10:10:
Well, now you need to decide if you want to continue or not - because this will not be an easy case and it very well might turn […]
Show full quote

Well, now you need to decide if you want to continue or not - because this will not be an easy case and it very well might turn out to be a lost cause (for example a short in the transformer) which is very frustrating (and so can be the investigation into cause quite frankly, although that is at least a learning experience).

First, the basics and safety rules again: Always wait for the primary capacitors to discharge before working on PSU that was connected to mains (limiting bulb or not). Do not change the fuse for higher rated one. In fact, if anything, for 230V operation a 3A slow-blow fuse should be enough, the 5A one is for 115V. That being said this PSU has poor input surge protection so perhaps 5A fuse is required, otherwise it would eventually blow on its own sometime during power-on. But that's why it should be a slow-blow fuse and not a fast one.
If you don't want to keep changing the fuse then add another one (with a proper holder) into the power cord, just like you added the current limiting lightbulb. This at the very least will be easier to access and replace, and you can even use a household type resetable breaker (but it should be something low rated, lower than 5A in PSU anyway, like 3-4 amps which usually is not available for typical panel fuse holders).

With that being said, if you want to continue (for now anyway): remove PCB from case, inspect both it and case for any burn and soot marks. You find anything like that, investigate. Although a short to case would trip your house breakers before the fuse - at least that is how it's supposed to work. But check anyway, including these mounting standoffs for any possible shorting.

Since you run the PSU with no transistors but capacitors in place, and the bulb went dark, we know it's not the input caps. So check the diodes again, this new overcurrent event could have killed another one again, but other then diodes it leaves you with the transistors, their driving circuits, and the transformer. Transistors could be faulty, not shorted completly but not turning off at higher CE voltages (breakdown voltage degraded in other words). Although this could also be a fault witht he driving circuitry, past the smaller impulse transformer.

Look at the schematic here: http://www.pavouk.org/hw/en_atxps.html
It's complicated but you are only concerned with the driving part now, so upper middle section. There's two identical/symmetric driving circuits: C9, D3, R6-R8 / C10, D4, R10-R12. You need to find these parts (obviously the numbering and exact circuit will not be a 100% match) on your PSU. Of these driving circuits the diode and capacitor must be checked. Even replaced (especially the capacitor) if in doubt. Also R8 and R12 must be in-spec and not too high value. If the driving part check out then the transistors should be replaced with another known good (or new) pair. These might have developed problems that only dynamic, high-voltage testing will find, so replacement is easier.

EDIT: Forgot to add: The snubber parts D1, D2 and R4+C8 should also be checked.

Keep in mind this might still not be it, or if the main transformer is shorted internally (winding to winding short would kinda work, like what you have, but pull way too much current) it's a lost cause unless you can replace it. And for that you need a working donor, then why not just use the working donor intead. To properly diagnose that PSU you need a scope, and let me be clear about this: DO NOT CONNECT SCOPE TO PRIMARY SIDE OF MAINS POWERED PSU unless you know what you are doing. It's not safe for the scope, it's not safe for you, unless you happend to have HV differential probes and know how to use them. That's why I said you might have to decide to throw in the towel, at some point it just might not be safe or economic to continue unless you already have prior experience.

First, huge thanks for taking the time to help. It is very appreciated 😀
I will do as you said and start examining the components to the best of my ability.
I started with overlaying the pcb solder side over the component side so it will be easier to identify each component from the back.
wish me luck 😀

Attachments

  • IMG_8107.jpg
    Filename
    IMG_8107.jpg
    File size
    1015.13 KiB
    Views
    414 views
    File license
    Public domain

Reply 39 of 41, by Deunan

User metadata
Rank Oldbie
Rank
Oldbie
anetanel wrote on 2023-03-28, 10:57:

I will do as you said and start examining the components to the best of my ability.
I started with overlaying the pcb solder side over the component side so it will be easier to identify each component from the back.

If you are not in a hurry you can wash that PCB in running water. Some solid soap and a brush with long hair will help clean the difficult to reach spots. Leave it be for 1-2 days to dry completly in room temperature (you can inspect it during that time but not connect to mains). Cleaning helps spot burn marks and also removes possible accumulation of dirt that could get conductive with enough ambient humidity.

At this point you are most interested in the parts between the smaller transformer and the transistors. The power resistor and a ceramic disc capacitor next to it are most likely the snubber circuit (R4 + C8 per the schematic I've linked). The big blue cap is C7 on the schematic, make sure it's not shorted. This particular cap should in theory prevent a direct short from input rectifier through transistors, if it's shorted it would not do it's job anymore. Although the PSU should regulate the transistor pulses before this capacitor starts limiting, but it might just be the brief power-on phase that it needs to limit.

BTW when the fuses blew, did the load lightbulbs (on 12V and 5V) even blink? If not, if the fuse blew right away, then I'd start checking the blue cap for short as the first thing.