VOGONS


First post, by Thermalwrong

User metadata
Rank Oldbie
Rank
Oldbie

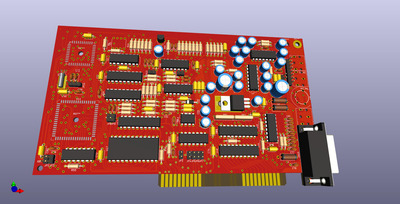
Back in June in the 'what retro stuff' thread, I posted about the CT1350B that I'd got hold of which had its ISA port cut off, here's how it was looking to start with:

ebay-1-ct1350b-portless.jpg
Filename
ebay-1-ct1350b-portless.jpg
File size
576.94 KiB
Views
880 views
File license
CC-BY-4.0

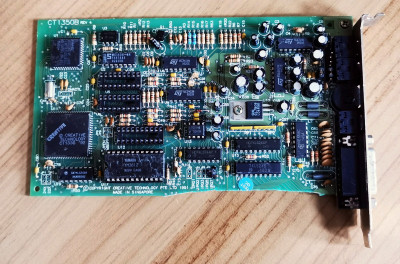
I got it from another collector on thebay but they'd clearly got hold of it from a gold scrapper somehow 😀 The major chips are still there at least.
I could solder / graft on an ISA slot and just use it, but my plan is to get a reproduction PCB made - I'm not the first, chipkin.ru has a reproduction CT1350 PCB, but I wanted to make my own, it's an interesting challenge. I've built one of TubeTime's Snark Barker CT1320 reproduction SB 1.5 cards and made a couple of ISA cards / risers for myself which wor

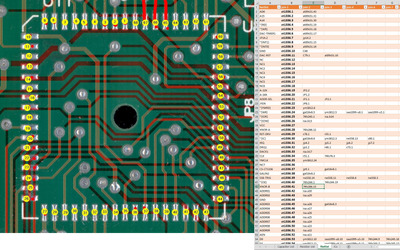
So I thought I'd get started by depopulating the board and measuring the value of every capacitor still present, which was actually pretty much everything, there are 80 capacitors and 51 resistors. Now all recorded in a spreadsheet that I'm using as the working document. That's also got the ICs listed in there because now all the ICs have fallen off:

IMG_2580z.jpg
Filename
IMG_2580z.jpg
File size
1.47 MiB
Views
880 views
File license
CC-BY-4.0

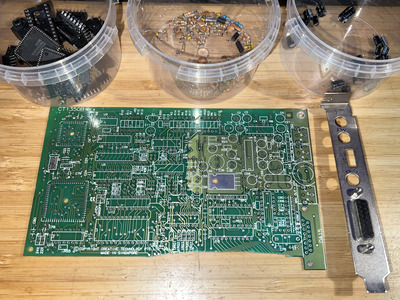
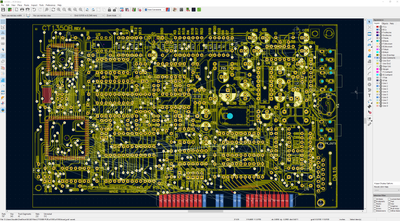
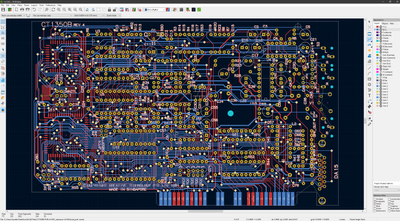
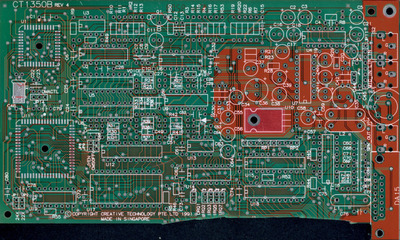
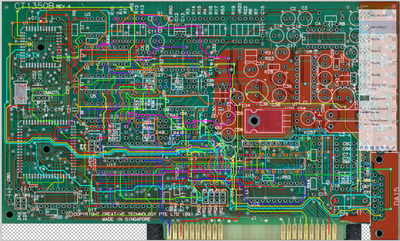
With the PCB depopulated, it could then be scanned with a big 'ol CCD scanner I keep because it does such high res and unlike CMOS scanners, is okay with some depth of field / item distance from glass. The front and rear scans are overlaid since this board has no big ground planes, the lines overlay very nicely and are easy to follow:

ct1350-front&back-softlight (Large).jpg
Filename
ct1350-front&back-softlight (Large).jpg
File size
652.18 KiB
Views
880 views
File license
CC-BY-4.0

If this was more than a 2 layer board, this part would need to be destructive, but it's not so I'll probably use the original PCB as wall art.

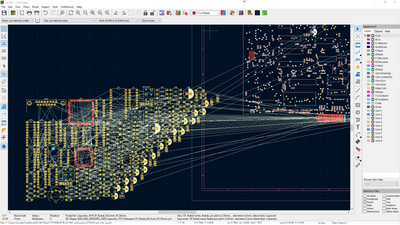
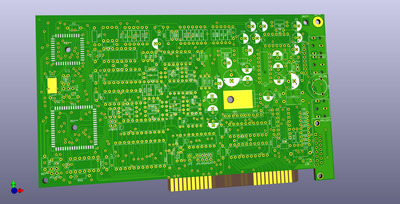
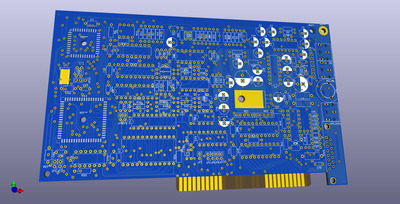
That lead to me making a vector image by tracing the image with Inkscape, which I then imported into KiCAD as the basis for the board / part locations - I was hoping that I could simply make up some components in the PCB and join them up as per the PCB's traces. I got this far, it was looking good:

ct1350 — PCB Editor.png
Filename
ct1350 — PCB Editor.png
File size
373.24 KiB
Views
880 views
File license
CC-BY-4.0

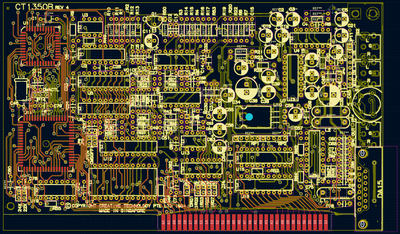
I spent a lot of time on the silkscreen layer, but the noise and high number of vector points resulting from the scan meant that it ended up looking a bit blobby, viewing it on JLC PCB's gerber viewer. But that's easy enough to remake I think.

I had it to the point that most of the front pins were connected up to the pins matching how the original board's traces were.
The further I got, the more I realised that things like minimum trace spacing and design rule checks just weren't going to work right without a schematic. Usually when making a PCB in KiCAD, you'd start from a schematic, generate a netlist and import that into the PCB making tool to determine which parts it has and how they're supposed to link up. But I'd just jumped into the PCB maker. Oh well, it was worth a try.
I have no schematic and it's quite a task to reverse engineer where all the pins go.

So it's sat on the shelf for a few weeks while I avoided looking at it - the path that I think will work is; I need to make a schematic to make the PCB the right way. Without that, there's a possibility of getting boards made with small missed connections here and there, requiring bodges.
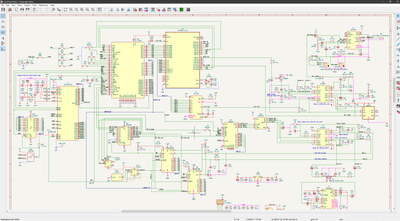
Making the schematic could be tricky because the pinout of the CT1336 isn't listed anywhere or known as far as I'm aware. On the other hand, this is mostly a simplified CT1320 SB 1.5 and there's TubeTime's Snark Barker schematic to refer to, along with the datasheets for all the known parts, so it's possible to work out pretty much everything...

Reply 1 of 8, by Thermalwrong

User metadata
Rank Oldbie
Rank
Oldbie

Now it's a few weeks later and I've regained the mental fortitude to put the time into this.
To start it back up, I've put the front & rear pictures into a paint.net picture so I can make layers for different traces, tracing them out with different colours. The first thing was to get the CT1336's pinout, made up using the datasheets of all the things it connects to - this part has pretty much all made sense, it integrates a lot of the separate logic chips that the CT1320 used. The chip's layout makes sense in terms of positioning the pins optimally for the buses they connect to.

ct1336-pinlocations2.jpg
Filename
ct1336-pinlocations2.jpg
File size
513.25 KiB
Views
865 views
File license
CC-BY-4.0

All of the components are too old to just be in KiCAD, except for the 74LS logic stuff. SnapEDA had the AT89S51 (DAC) though and I use this generator for everything else. I'm still new to KiCAD, but I'm getting the hang of it.

Here's how the board looks where I've traced out different chip's sections on different layers. I don't know a quicker way to do this really:

ct1350b-tracingtime.jpg
Filename
ct1350b-tracingtime.jpg
File size
659.81 KiB
Views
865 views
File license
CC-BY-4.0

Most of the digital stuff is done, though I've just now figured out that this card has two VCC sections so there's some stuff to re-do - probably +5V for digital bits and +5V for analogue bits 😀 (along with also AGND & DGND)

With this and the Snark Barker's schematic to check through, to understand what I'm looking at (which is really well documented btw) it's really coming along! This is the tough part, the rest of it should just be hooking up airwires and checking for mistakes. Once this is schematic is done I can make the netlist, so the PCB site can start to be put together properly:

2022-08-05 22_30_53-_ct1350 [ct1350_] — Schematic Editor.png
Filename
2022-08-05 22_30_53-_ct1350 [ct1350_] — Schematic Editor.png
File size
48.49 KiB
Views
865 views
File license
CC-BY-4.0

My plan is to share the PCB design for anyone else that wants it. I'll probably make the replacement card's PCB with red soldermask, that should look good.

Reply 3 of 8, by Tiido

User metadata
Rank l33t
Rank
l33t

Coloring traces like that is exactly what I do too, it works very well.

This is a nice effort, thänk you very much for doing this ~

T-04YBSC, a new YMF71x based sound card & Official VOGONS thread about it
Newly made 4MB 60ns 30pin SIMMs ~
mida sa loed ? nagunii aru ei saa 😜

Reply 4 of 8, by Thermalwrong

User metadata
Rank Oldbie
Rank
Oldbie

It's been coming along well! I finally got most of the design into a schematic - thankfully I was able to refer to TubeTime's Snark Barker schematic to understand why some parts were the way they are. The further I've got through this, the more it becomes apparent that this really is just a quick re-design (and possibly cost reduced) version of the CT1320, with much of the logic now handled by the CT1336 IC.

Here's the partial schematic - once it's correct I'll be sharing it as a PDF but it's got some mistakes in the joystick/game port section which I'm working through at the moment, the audio and digital sections are pretty much known to be correct since every pin maps to where the traces route on the vector scans:

almost-correct-schematic.png
Filename
almost-correct-schematic.png
File size
157.55 KiB
Views
730 views
File license
CC-BY-4.0

This became the netlist which allowed me to actually place meaningful components and route their connections on the PCB - it took ages to get to the netlist stage but it moves more quickly from here since it's joining the dots. Makes me wonder if having more of a back and forth with partial schematic leading to more PCB routing leading to more schematic connections would've been easier.

join the dots.png
Filename
join the dots.png
File size
273.97 KiB
Views
730 views
File license
CC-BY-4.0
components placed.png
Filename
components placed.png
File size
559.14 KiB
Views
730 views
File license
CC-BY-4.0

Now I've got it to the point where it's mostly routed across the board, just need to make up the analogue ground plane stuff and fix a few mistakes:

mostly-routed.png
Filename
mostly-routed.png
File size
355.57 KiB
Views
730 views
File license
CC-BY-4.0

There's one little problem though, something that I wasn't aware of going in and having built a Snark Barker CT1320 card, was that the original 90s card has a different volume pot pinout than the ALPS RK08H dual 10k that's on the Snark Barker card, which means that the CT1320 original PCB is different from the Snark Barker CT1320 reproduction card in that regard also.
If I make a replica PCB, I'll probably need to change from the original CT1350B PCB design to accomodate the RK08H dual so that if anyone wants to make their own card, they can and it will work.

Since the minimum order quantity is going to be 5 PCBs (and I will have the remaining 4 to sell), it's probably best if I make it to accomodate the volume pot that can still be sourced, right?

Reply 5 of 8, by Thermalwrong

User metadata
Rank Oldbie
Rank
Oldbie

Now the schematic I think is all sorted so here it is in PDF form if anyone would like to peruse it. It's not as tidy as the SnarkBarker schematic but it makes enough sense to me - the joystick area is pretty bad since that's where most of the mistakes were 😀

One feature I'm pretty proud of on this is that the Vias are set up to be as huge as they are on the original card and without solder mask - so apart from being a new PCB and probably a different colour, it'll look really like the original!
(this is a slightly different design from the original though)

The board passed the Design Rules Check in KiCAD which caught some silly mistakes and clearance issues. I'm wondering if anyone can tell from these pictures if I've got the edge connector set up correctly for JLCPCB / PCBWAY to bevel it correctly?

Now to finalise the silkscreen that's going to go on it and decide what colour, I'm liking Blue the most at this point

Attachments

Reply 6 of 8, by Tiido

User metadata
Rank l33t
Rank
l33t

This looks good ~

You should move the ends of the fingers away from edge of PCB by 1mm or so, otherwise the fingers themselves are beveled too and it exposes the copper trace under the gold layer, making it subject to corrosion. I use roughly 1mm clearance from the edge to avoid it and have not had problems with JLC doing things that way.

T-04YBSC, a new YMF71x based sound card & Official VOGONS thread about it
Newly made 4MB 60ns 30pin SIMMs ~
mida sa loed ? nagunii aru ei saa 😜

Reply 7 of 8, by root42

User metadata
Rank l33t
Rank
l33t

Very cool project! Are there any sources for the CT1336? The "DSP" in the upper left is probably easy to replace, as it should be an Intel MCU with the SB firmware. But the CT1336...

YouTube and Bonus
80486DX@33 MHz, 16 MiB RAM, Tseng ET4000 1 MiB, SnarkBarker & GUSar Lite, PC MIDI Card+X2+SC55+MT32, OSSC

Reply 8 of 8, by Thermalwrong

User metadata
Rank Oldbie
Rank
Oldbie

Tiido: Thanks, that clears up what I saw on the JLCPCB site that mentioned about the gold fingers, I'll make them a little smaller so there's a blank space in the bevelled area.

root42: I've only seen the CT1336 on UTsource and only one of the stock levels looks particularly realistic at around 20, but maybe there are lots? Oh, some on Aliexpress too - since it's only going to have come from dismantled cards, the sources aren't gonna be great.
The DSP is an AT89S51-24JU, the PLCC version of the same AT89S51 that's on the Snark Barker as the main chip 😀
That's the datasheet I followed, all the pins matched up with the different ports, midi TX/RX.
I think that's how the original Snark Barker was tested from watching Eric's talk about it, then he found a way to read out the microcontroller's contents - though what was released is the functionally the same code from this Anchor Electronics soundblaster clone: Anchor Electronics - Media Concept 2.0 Souncard - SB 2.0 clone with real OPL2
Which, now I've made the schematic up for the CT1350B - this Anchor card is almost exactly the same as the Creative SB 2.0 card.