VOGONS


First post, by andre_6

User metadata
Rank Member
Rank
Member

Hello everyone,

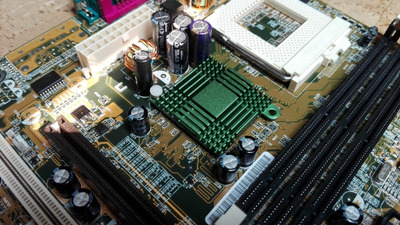
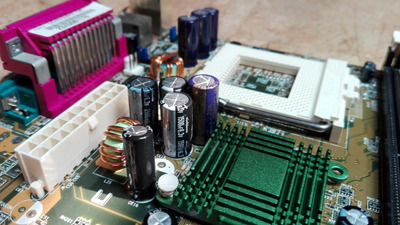
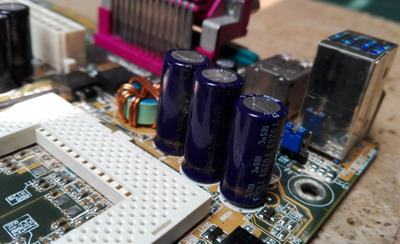
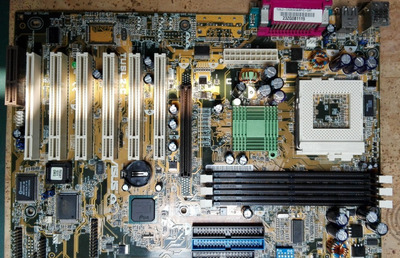
The issues in another thread made me get new PSUs for the remaining computers, and my Tualatin build decided to give me problems in the process.

Beforehand I should precise that this particular problem already manifested itself sometimes, but always went away eventually. If the PC was in its due location and plugged in all would be fine, but it would be more and more common to not POST after I moved it or merely disconnected the cables out of necessity when shuffling around.

When that happened I would always remove the CMOS battery, remove and reseat the GPU and RAM, and try again. Sometimes it would take me one try, other times a few more, but I always got there in the end. Put it back in its place and done, and after that hurdle it always worked every single time, until I needed to shuffle stuff around in the back again.

Recently I was running a game in it and I bumped the case very slightly with my hand, and that slight contact caused the system to hang immediately. Restarted and all was fine again.

Two days ago I was removing its old PSU, put the new one, and it did not POST again. Thinking it was the same old quirk, tried the same solutions again, and this time I got nothing after many tries. Removed the RAM sticks and installed some surplus RAM I had as an experience and it POSTed that one time. Blaming it on faulty RAM, I closed the PC without touching anything inside and tested it one more time, and it did not POST again.

And since then I've been trying different GPUs knowing to be functional, even more different RAM sticks, other CPUs... and nothing. The board power light is on, the CPUs heat up, the GPU,PSU and CPU fans spin, and still nothing.

This is clearly a medium term quirk that now escalated to an apparently definitive problem. Does anyone have a clue to what might be happening?

As always thanks a lot for your help and replies!

Reply 1 of 22, by shevalier

User metadata
Rank Member
Rank
Member

I would recommend checking out cheap polymer capacitor manufacturers such as Samwha, Lelon and Capxon.
As well as the choicing of a simple soldering station.
Yeah, I'm not hinting at anything, if anything.

Aopen MX3S, PIII-S Tualatin 1133, Radeon 9800Pro@XT BIOS, Diamond monster sound MX300
JetWay K8T8AS, Athlon DH-E6 3000+, Radeon HD2600Pro AGP, Audigy 2 Value

Reply 2 of 22, by Minutemanqvs

User metadata
Rank Member
Rank
Member

You could also try to re-flash your BIOS chip (on another board if the chips have the same specs or with a programmer), in a similar case (other motherboard) it solved my problem but in the end the BIOS chip was dead and I replaced it.

Searching a Nexgen Nx586 with FPU, PM me if you have one. I have some Athlon MP systems and cookies.

Reply 4 of 22, by andre_6

User metadata
Rank Member
Rank
Member
shevalier wrote on 2023-06-24, 15:35:

I would recommend checking out cheap polymer capacitor manufacturers such as Samwha, Lelon and Capxon.
As well as the choicing of a simple soldering station.
Yeah, I'm not hinting at anything, if anything.

Minutemanqvs wrote on 2023-06-24, 16:57:

You could also try to re-flash your BIOS chip (on another board if the chips have the same specs or with a programmer), in a similar case (other motherboard) it solved my problem but in the end the BIOS chip was dead and I replaced it.

Grem Five wrote on 2023-06-24, 19:49:

I have seen a fair few of TUSL2-C motherboards that have had their caps replaced, mine as well has had caps replaced so that might be something.

Thank you for your replies and help, I cleaned the CPU and AGP sockets just in case with contact cleaner, and reflowed the joints of all caps as some were a little too loose for my liking. The board has its power light on but now it doesn't even power on at all, let alone all the rest.

I understand it's a more than 20 year old board, but I honestly didn't see even the slightest of bulging caps or any other classic sign, and they're Nichicon/Rubicon caps, so it didn't even cross my mind that was a common problem with these boards.

Anyway having made it even worse I don't trust my beginner skills with a full recap, plus I'm lacking the time for it right now. If you still think a full recap would be worth it I'll prepare to do it in the future, or if you have any other pointers I will be very grateful.

Such a shame, loved this board and build. Bummer...

Reply 5 of 22, by rasz_pl

User metadata
Rank l33t
Rank
l33t

the
>I bumped the case very slightly with my hand, and that slight contact caused the system to hang immediately
is worrying. Thats no cap issue, something is loose or cracked. Might be ATX connector, might be ball under chipset.

Open Source AT&T Globalyst/NCR/FIC 486-GAC-2 proprietary Cache Module reproduction

Reply 6 of 22, by andre_6

User metadata
Rank Member
Rank
Member
rasz_pl wrote on 2023-06-25, 01:19:

the
>I bumped the case very slightly with my hand, and that slight contact caused the system to hang immediately
is worrying. Thats no cap issue, something is loose or cracked. Might be ATX connector, might be ball under chipset.

In fact, 3 years ago the board came with one of its outer tips slightly bumped from the seller at the time, happened during shipping. That tip had the board's layers opening slightly at the end, but it had no traces at all nearby so I didn't think much of it. Maybe the compression of that hit affected something elsewhere on the board along the lines you described that got worse since then. Maybe the removing/installing of the board in the PC case for testing over and over just finished the job.

Makes perfect sense actually. The system hanged that time I bumped it with my hand but didn't switch off/on power, just a fixed image with some horizontal artifacts all along the width on the very top of the screen, so maybe a cracked ball under the chipset like you said? I'll check for the ATX connector, if I don't find anything then it's definitely above my novice skills.

In any event I'll also check for the PC case itself to see if it may also have helped cause this in some way. Thank you so much for your help

Reply 7 of 22, by majestyk

User metadata
Rank Oldbie
Rank
Oldbie

This might as well be caused by some PCI / AGP card not sitting perfectly in it´s slot. Often this is not caused by dust or dirt, but occurs because the case´s non-optimal construction prevents the cards from being inserted completely. Make sure the cards are placed orthogonally and inserted completely (all goldfingers reach the bottom of the slot).
Bad contacts of DIP-switches or jumpers can also cause similar effects. Try reseating the jumpers and toggle the dip-switches a couple of times.

Reply 8 of 22, by Tetrium

User metadata
Rank l33t++
Rank
l33t++
majestyk wrote on 2023-06-25, 05:58:

This might as well be caused by some PCI / AGP card not sitting perfectly in it´s slot. Often this is not caused by dust or dirt, but occurs because the case´s non-optimal construction prevents the cards from being inserted completely. Make sure the cards are placed orthogonally and inserted completely (all goldfingers reach the bottom of the slot).
Bad contacts of DIP-switches or jumpers can also cause similar effects. Try reseating the jumpers and toggle the dip-switches a couple of times.

This got me thinking, OP on top of these suggestions, have you checked to make sure your case is using the correct length motherboard standoffs? If they are too long or too short (or worse, have varying lengths), it may cause issues with expansion cards not being seated properly. It could explain the symptoms appearing with bumping.

Whats missing in your collections?
My retro rigs (old topic)
Interesting Vogons threads (links to Vogonswiki)
Report spammers here!

Reply 9 of 22, by Grem Five

User metadata
Rank Member
Rank
Member
andre_6 wrote on 2023-06-24, 21:54:

I understand it's a more than 20 year old board, but I honestly didn't see even the slightest of bulging caps or any other classic sign, and they're Nichicon/Rubicon caps, so it didn't even cross my mind that was a common problem with these boards.

I dont know if they have a cap problem, ASUS didnt seem to be really known for it like ABIT boards. I was just commenting that when I was looking for my TUSL2-C many of the ones I saw had been recapped.

I would keep looking at your board for any problem that could cause what you are describing.

Reply 10 of 22, by andre_6

User metadata
Rank Member
Rank
Member
rasz_pl wrote on 2023-06-25, 01:19:

the
>I bumped the case very slightly with my hand, and that slight contact caused the system to hang immediately
is worrying. Thats no cap issue, something is loose or cracked. Might be ATX connector, might be ball under chipset.

majestyk wrote on 2023-06-25, 05:58:

This might as well be caused by some PCI / AGP card not sitting perfectly in it´s slot. Often this is not caused by dust or dirt, but occurs because the case´s non-optimal construction prevents the cards from being inserted completely. Make sure the cards are placed orthogonally and inserted completely (all goldfingers reach the bottom of the slot).
Bad contacts of DIP-switches or jumpers can also cause similar effects. Try reseating the jumpers and toggle the dip-switches a couple of times.

Tetrium wrote on 2023-06-25, 08:00:
majestyk wrote on 2023-06-25, 05:58:

This might as well be caused by some PCI / AGP card not sitting perfectly in it´s slot. Often this is not caused by dust or dirt, but occurs because the case´s non-optimal construction prevents the cards from being inserted completely. Make sure the cards are placed orthogonally and inserted completely (all goldfingers reach the bottom of the slot).
Bad contacts of DIP-switches or jumpers can also cause similar effects. Try reseating the jumpers and toggle the dip-switches a couple of times.

This got me thinking, OP on top of these suggestions, have you checked to make sure your case is using the correct length motherboard standoffs? If they are too long or too short (or worse, have varying lengths), it may cause issues with expansion cards not being seated properly. It could explain the symptoms appearing with bumping.

Grem Five wrote on 2023-06-25, 13:42:
andre_6 wrote on 2023-06-24, 21:54:

I understand it's a more than 20 year old board, but I honestly didn't see even the slightest of bulging caps or any other classic sign, and they're Nichicon/Rubicon caps, so it didn't even cross my mind that was a common problem with these boards.

I dont know if they have a cap problem, ASUS didnt seem to be really known for it like ABIT boards. I was just commenting that when I was looking for my TUSL2-C many of the ones I saw had been recapped.

I would keep looking at your board for any problem that could cause what you are describing.

Thank you everyone for your replies, I followed all your suggestions. Unfortunately the board although lighting up doesn't even power on at all.

It transitioned from not POSTing to now this, so either I messed something up with a mere reflow of the caps' joints (which even as a novice I doubt it), or @rasz_pl's indication that something is cracked somewhere was likely correct, and removing the board from the case and reinstalling it in along testing and its many tries concluded the damage that was already there. From the beginning of this occasionally not posting problem that I solved at the time with some components reseating, to not posting at all, to now not powering on, it just seems that it's something that slowly got worse along these 3 years.

Still I reflowed the ATX connector's joints, reseated all jumpers and toggled the switches multiple times. I left the board out in its bare configuration to exclude the PC case causing issues, with a CMOS battery, RAM, CPU and GPU which I made sure was fully flush with the AGP connector. Board lights up with the PSU toggle switch, but doesn't power on at all.

I'm beginning to think that this is beyond my skills but in case someone thinks of something worth trying I'm more than willing to do so. In any scenario thank you everyone

Edit: took a very good look at the empty case, and noticed that there were THREE types of different standoffs ALL at different heights. So I guess this definitely indicates the cause and the problem itself. Being a beginner, at the time I would never have thought that the height would be different between the standoffs, the board always installed without an issue or requiring extra force at all. I have no idea what was in this case before I got it, or maybe someone left the standoffs there just because. I've had some tough lessons as a novice but this absolutely takes the cake. In a way I'm happy to have got to the cause to be able to correct it for the future and keep it as a lesson, all thanks to you, but this one will sting for a while I think. Oh well...

I have another Tualatin capable board that I got as an extra by chance, a DFI CM33-TL/G that supports even the 1.4Ghz P-III-S. But it has onboard graphics with no AGP slot, so I kind of feel that I'm being kicked while I'm down 🤣

Reply 11 of 22, by majestyk

User metadata
Rank Oldbie
Rank
Oldbie

This degrading over time could indeed be a typical case of a capacitor (electrolytic) issue. ASUS is quite inconsistant here - sometimes they used top tier electrolytics, sometimes cheapo stuff.
A good picture of your board would be necessary to judge, if caps could be the culprit here or if they can be safely ruled out.

You can also try to press the two "chipset-chips" down firmly (at the center, at the corners...) while powering the system on. It´s recommended to put some rubber plate or similar under the mainboard before this test to avoid bending the PCB.

Reply 12 of 22, by andre_6

User metadata
Rank Member
Rank
Member
majestyk wrote on 2023-06-25, 20:07:

This degrading over time could indeed be a typical case of a capacitor (electrolytic) issue. ASUS is quite inconsistant here - sometimes they used top tier electrolytics, sometimes cheapo stuff.
A good picture of your board would be necessary to judge, if caps could be the culprit here or if they can be safely ruled out.

You can also try to press the two "chipset-chips" down firmly (at the center, at the corners...) while powering the system on. It´s recommended to put some rubber plate or similar under the mainboard before this test to avoid bending the PCB.

Tried pressing both chipsets to no avail. If something's cracked somewhere along the board's layers it's definitely out of my skills.

Like I said these are Rubicon / Nichicon caps and honestly they seem immaculate, but tomorrow I will take pictures in a better light, you never know

Reply 13 of 22, by shevalier

User metadata
Rank Member
Rank
Member
andre_6 wrote on 2023-06-25, 21:41:

Rubicon / Nichicon caps and honestly they seem immaculate

Well, it's not even Mundorff, Audio Note or Jantzen. What is immaculate about these?
ESR is measured in milli_Ohms, not "brand names".
~15 mOhm is a normal ESR for this size and capacity.

Aopen MX3S, PIII-S Tualatin 1133, Radeon 9800Pro@XT BIOS, Diamond monster sound MX300
JetWay K8T8AS, Athlon DH-E6 3000+, Radeon HD2600Pro AGP, Audigy 2 Value

Reply 14 of 22, by andre_6

User metadata
Rank Member
Rank
Member
shevalier wrote on 2023-06-26, 04:01:
Well, it's not even Mundorff, Audio Note or Jantzen. What is immaculate about these? ESR is measured in milli_Ohms, not "brand n […]
Show full quote
andre_6 wrote on 2023-06-25, 21:41:

Rubicon / Nichicon caps and honestly they seem immaculate

Well, it's not even Mundorff, Audio Note or Jantzen. What is immaculate about these?
ESR is measured in milli_Ohms, not "brand names".
~15 mOhm is a normal ESR for this size and capacity.

Thanks for the value reference, surely visual inspection is a small part of the process too, right? I'm not dismissing any suggestions, I'm just trying to understand things.

When I find the time I'll take this as an opportunity to finally graduate to a multimeter (they can measure caps' ESR too, right?), and even if it's something cracked somewhere along the board's layers then at least I can practice recapping it and see if that did something.

I'm prepared to have a cause that's beyond my skills, but I'll try and learn or practice what I can in the process.

majestyk wrote on 2023-06-25, 20:07:

This degrading over time could indeed be a typical case of a capacitor (electrolytic) issue. ASUS is quite inconsistant here - sometimes they used top tier electrolytics, sometimes cheapo stuff.
A good picture of your board would be necessary to judge, if caps could be the culprit here or if they can be safely ruled out.

You can also try to press the two "chipset-chips" down firmly (at the center, at the corners...) while powering the system on. It´s recommended to put some rubber plate or similar under the mainboard before this test to avoid bending the PCB.

I forgot to ask, in the same way that capacitor issues can cause that degradation over time like you said, do you think that cause is also consistent with the system hanging when I accidentally slightly bumped the case with my hand? Or would that be more due to something being cracked somewhere as it was suggested? Or could these be two different problems (the not POSting more and more over time vs. not powering on at all now)?

To help and recap the situation:

1. As time went on along these 3 years the PC started to not POST consistently every time after I moved it out of necessity for something, unplug it or switch something at the back. I removed and reinstalled the RAM, GPU and CMOS battery, and eventually it always POSTed again.

2. The last time I used the PC I slightly bumped the case with my hand, and it hang with some slight horizontal artifacts from end to end on the very top of the screen.

3. Unplugged it to replace its old PSU, and after that I only managed to POST once out of many, many tries.

4. Cleaned up CPU socket, RAM and AGP slots with contact cleaner, tried different components including CPU, RAM, GPU, CMOS battery, etc., to no avail.

5. Reflowed cap joints and ATX connector, and right after that it never powered on again, it only displays the board LED light on.

6. Tried pressing the chipsets in different positions to try and find a cracked point, nothing as well.

7. Finally checked the PC case itself, and to my surprise found out that it had three different varieties of board standoffs, all at different heights. As a novice the board did not need any type of force to be installed there so I would have never suspected that there were standoffs of different heights in there.

And that's about it. Thank you as always for your help so far. Some pics, the push pin missing from the chipset is from when I was pressing them to check for cracks, such a pain to remove them though:

Attachments

Reply 15 of 22, by andre_6

User metadata
Rank Member
Rank
Member

Remaining ones:

Attachments

Reply 16 of 22, by majestyk

User metadata
Rank Oldbie
Rank
Oldbie
andre_6 wrote on 2023-06-26, 15:36:

I forgot to ask, in the same way that capacitor issues can cause that degradation over time like you said, do you think that cause is also consistent with the system hanging when I accidentally slightly bumped the case with my hand? Or would that be more due to something being cracked somewhere as it was suggested? Or could these be two different problems (the not POSting more and more over time vs. not powering on at all now)?

I had two different issues in mind, capacitors being the reason why the non-starting cases increased over time.

What happened to the second clamp of the northbridge cooler??
What´s the condition of the thermal paste under this (green) cooler?

Reply 17 of 22, by andre_6

User metadata
Rank Member
Rank
Member
majestyk wrote on 2023-06-26, 17:26:
I had two different issues in mind, capacitors being the reason why the non-starting cases increased over time. […]
Show full quote
andre_6 wrote on 2023-06-26, 15:36:

I forgot to ask, in the same way that capacitor issues can cause that degradation over time like you said, do you think that cause is also consistent with the system hanging when I accidentally slightly bumped the case with my hand? Or would that be more due to something being cracked somewhere as it was suggested? Or could these be two different problems (the not POSting more and more over time vs. not powering on at all now)?

I had two different issues in mind, capacitors being the reason why the non-starting cases increased over time.

What happened to the second clamp of the northbridge cooler??
What´s the condition of the thermal paste under this (green) cooler?

I removed it to press the chipset to test for cracks. Granted, I chose the one that was weakest, as the other one was way too strong to remove. The thermal paste under it was totally dry and faint. Do you think the weakest clamp may not have been making enough pressure to join the heatsink to the chipset?

Btw, is there an easy way to remove these ultra tough chipset clamps? My fingers and nails were shot after pressing it inwards and trying to push it past the hole. The ones in GPUs are also a pain but these board chipset ones are really tough

Reply 18 of 22, by aaronkatrini

User metadata
Rank Member
Rank
Member

Have you tried reseating the BIOS chip? It's legs are often corroded from time and it won't make proper contact to the dip socket. Try removing it gently by applying tiny force on both sides with a screw driver (be very patient because often is very hard and when it finally gives up it tends to bent the very last pins). Then use some contact cleaner on the socket and use fine sand-paper to scrape the legs of the Bios chip. Afterwards carefully put it in place remembering to not put it in reverse (check the indication on the PCB matching the notch on the Bios chip).

Also it would be best to have a diagnostic card. One of those cheap chinese ones with PCI/ISA slots and Post codes would be fine.

Reply 19 of 22, by andre_6

User metadata
Rank Member
Rank
Member
aaronkatrini wrote on 2023-06-26, 20:02:

Have you tried reseating the BIOS chip? It's legs are often corroded from time and it won't make proper contact to the dip socket. Try removing it gently by applying tiny force on both sides with a screw driver (be very patient because often is very hard and when it finally gives up it tends to bent the very last pins). Then use some contact cleaner on the socket and use fine sand-paper to scrape the legs of the Bios chip. Afterwards carefully put it in place remembering to not put it in reverse (check the indication on the PCB matching the notch on the Bios chip).

Also it would be best to have a diagnostic card. One of those cheap chinese ones with PCI/ISA slots and Post codes would be fine.

This is it right? Seems so tight I'm almost sure I'd ruin it from even trying!

Attachments