Reply 25700 of 27479, by ElectroSoldier

Rank
Oldbie
- Rank
- Oldbie
Fair enough.
I wouldnt consider it with anything less than RO water myself but if it works it works.
Fair enough.
I wouldnt consider it with anything less than RO water myself but if it works it works.
Activated Win XP through telephone. My first time ever. EVER.
Didn't think that phone number the setup showed would still be in service. It was.
All in all a really straight forward process. Most effort was to pass that trillions of numbers through the phone.
But it worked without issue.
Still amazed.
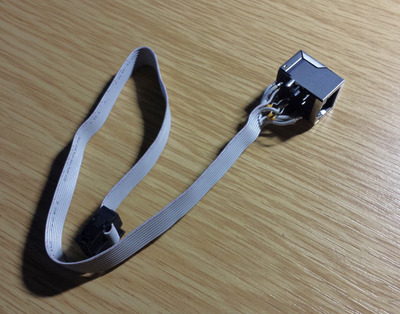
All I actually wanted to do was to function test this home made LAN adapter for an old mainboard which has onboard LAN but requires some breakout board with the actual socket (which was of course missing when I got it). Those breakout boards are still around if you know what you are searching for, but 10 bucks are 10 bucks and all the parts that were needed I had lying around.
It may not be 100% original and period correct but i works and since I'm not really going to use this very much this DIY cable will be fine. Will make it a bit more user friendly when time comes, though.
Even with quite "hard" water, I don't really think you see residues left unless you lie the thing flat with large blobs/puddles on top and it evaporates away totally rather than draining. So shaking the worst off, leaving it where it can drain, and making sure no sockets are "full" is probably fine most of the time. You're still gonna have edge cases, but you can follow up with IPA contact cleaning if you're nervous.
ChrisK wrote on 2023-10-26, 06:54:All I actually wanted to do was to function test this home made LAN adapter for an old mainboard which has onboard LAN but requires some breakout board with the actual socket (which was of course missing when I got it). Those breakout boards are still around if you know what you are searching for, but 10 bucks are 10 bucks and all the parts that were needed I had lying around.
It may not be 100% original and period correct but i works and since I'm not really going to use this very much this DIY cable will be fine. Will make it a bit more user friendly when time comes, though.
I saw a pic of an adapter required for one of my boards with onboard LAN and while it wasn't good enough to tell exact components, there were a lot of components on the PCB as well as the socket. So I was put off the idea of simple IDC header to RJ socket. But I was not thinking at the time about those RJ sockets that have "magnetics" incorporated, all the chokes, filters, inductor things, which may be what is needed. So this socket looks like a bit of a chunkier one, did you pick one with the "magnetics" included or is it a happy coincidence? I am interested to hear how it works. One thing I would be nervous about for vintage setups would be if using a period "hub" rather than a switch as anything putting the signals out of whack slightly might cause the whole segment problems.
Unicorn herding operations are proceeding, but all the totes of hens teeth and barrels of rocking horse poop give them plenty of hiding spots.
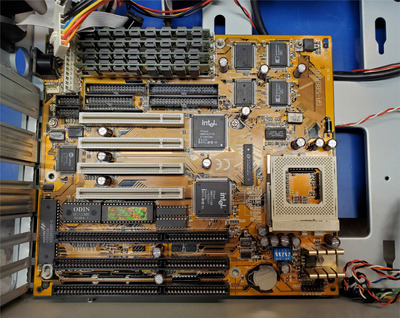
Continued to 'downgrade' my 1995 Pentium 133 by installing a motherboard with a 430FX (Triton) chipset.
Previously I had installed a Gigabyte GA-586ATV which uses the 430VX (Triton II) chipset. The replacement motherboard is the Gigabyte GA-586ATE/P.
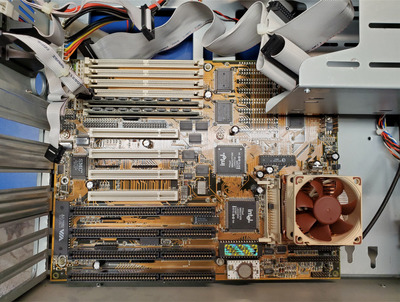
Both motherboards feature turbo switch functionality which is nice. They do seem to throttle to different speeds though. The GA-586ATV throttles to the equivalent of a Pentium 100, whereas the GA-586ATE/P slows down to approximately a Pentium 75. With the turbo functionality and SETMUL to disable L1 cache I can slow the latter system to the equivalent of a 486 DX-33 or 386 DX-40.
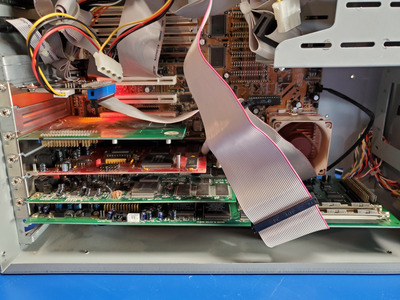
The GA-586ATE/P does have really irritatingly place IDE connectors. Fortunately I was able to wrangle both the cables and the full length AWE32 card and make everything fit.
It also gives me a 4th ISA slot should I decide to install something else.
Shponglefan wrote on 2023-10-26, 16:20:Continued to 'downgrade' my 1995 Pentium 133 by installing a motherboard with a 430FX (Triton) chipset. […]
Continued to 'downgrade' my 1995 Pentium 133 by installing a motherboard with a 430FX (Triton) chipset.
Previously I had installed a Gigabyte GA-586ATV which uses the 430VX (Triton II) chipset. The replacement motherboard is the Gigabyte GA-586ATE/P.
Pentium 133 GA-586ATV motherboard.jpg
Pentium 133 GA-586ATE-P motherboard.jpg
Both motherboards feature turbo switch functionality which is nice. They do seem to throttle to different speeds though. The GA-586ATV throttles to the equivalent of a Pentium 100, whereas the GA-586ATE/P slows down to approximately a Pentium 75. With the turbo functionality and SETMUL to disable L1 cache I can slow the latter system to the equivalent of a 486 DX-33 or 386 DX-40.
The GA-586ATE/P does have really irritatingly place IDE connectors. Fortunately I was able to wrangle both the cables and the full length AWE32 card and make everything fit.
It also gives me a 4th ISA slot should I decide to install something else.
Pentium 133 GA-586ATE-P motherboard 2.jpg
Haha, fantastic cable routing on that, love it!
I added an IDE to SD card adapter to my "Mini ITX" Pentium 90:

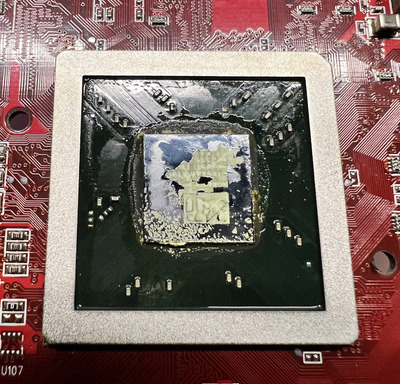
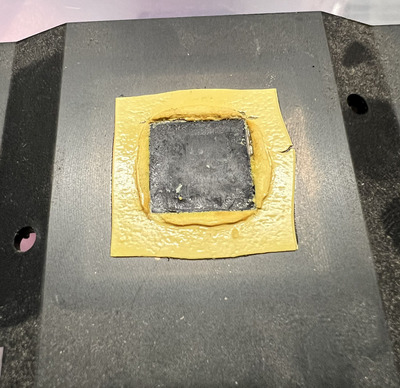
What should I use to dissolve this plastic/wax-like TIM. It's hard as a rock. Had to use the heat gun to get the heatsink off in the first place.
Tried 99% Alcohol, GooGone, neither made a dent.
kingcake wrote on 2023-10-27, 03:48:What should I use to dissolve this plastic/wax-like TIM. It's hard as a rock. Had to use the heat gun to get the heatsink off in […]
What should I use to dissolve this plastic/wax-like TIM. It's hard as a rock. Had to use the heat gun to get the heatsink off in the first place.
Tried 99% Alcohol, GooGone, neither made a dent.
image_67530241.JPG
image_67151873.JPG
Brake cleaner spray in well ventilated area. Scrape off whilst wet
https://www.eurocarparts.com/p/triple-qx-tqx- … rmula-542779000
https://youtu.be/d3Qmm6Tegb4?si=4_8r0vk8_MSy2cBt
"What's all this racket going on up here, son? You watchin' yer girl cartoons again?"
kingcake wrote on 2023-10-27, 03:48:What should I use to dissolve this plastic/wax-like TIM. It's hard as a rock. Had to use the heat gun to get the heatsink off in […]
What should I use to dissolve this plastic/wax-like TIM. It's hard as a rock. Had to use the heat gun to get the heatsink off in the first place.
Tried 99% Alcohol, GooGone, neither made a dent.
image_67530241.JPG
image_67151873.JPG
Heat it up with a hair drier. That should soften it up.
My builds!
The FireStarter 2.0 - The wooden K5
The Underdog - The budget K6
The Voodoo powerhouse - The power-hungry K7
The troll PC - The Socket 423 Pentium 4
BitWrangler wrote on 2023-10-26, 14:04:ChrisK wrote on 2023-10-26, 06:54:All I actually wanted to do was to function test this home made LAN adapter for an old mainboard which has onboard LAN but requires some breakout board with the actual socket (which was of course missing when I got it). Those breakout boards are still around if you know what you are searching for, but 10 bucks are 10 bucks and all the parts that were needed I had lying around.
It may not be 100% original and period correct but i works and since I'm not really going to use this very much this DIY cable will be fine. Will make it a bit more user friendly when time comes, though.I saw a pic of an adapter required for one of my boards with onboard LAN and while it wasn't good enough to tell exact components, there were a lot of components on the PCB as well as the socket. So I was put off the idea of simple IDC header to RJ socket. But I was not thinking at the time about those RJ sockets that have "magnetics" incorporated, all the chokes, filters, inductor things, which may be what is needed. So this socket looks like a bit of a chunkier one, did you pick one with the "magnetics" included or is it a happy coincidence? I am interested to hear how it works. One thing I would be nervous about for vintage setups would be if using a period "hub" rather than a switch as anything putting the signals out of whack slightly might cause the whole segment problems.
Yes indeed it is a socket with all parts integrated. Magnetics, termination resistors and cap, and LEDs.
This is the original breakout board (photo from the net):
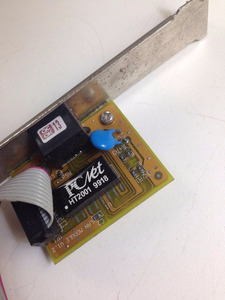
All components are on top side so the "re-engineering task" wasn't too complex.
Most "chip side" components are placed on the mainboard as I had already found out some time before, leaving just the center tap caps on the breakout board.
The "cable side" components are nothing more than four resistors and the big blue cap. All of them including the magnetics are commonly integrated in the connector nowadays.
So all that was to be done was determining which pin on the mainboard connector was TX+/TX-/RX+/RX- and which ones are for the LEDs and connecting everything in the right order to the LAN connector.
For reference:
The mainboard is an Elitegroup K7SEM with a Realtek RTL 8139C LAN chip. Nothing fancy, that's why I didn't want to invest more than absolutely necessary.
https://theretroweb.com/motherboards/s/ecs-k7sem-v1-x
The connector I've used is a Würth 7499010441.
https://www.we-online.com/components/products … /7499010441.pdf
ChrisK wrote on 2023-10-27, 06:40:Yes indeed it is a socket with all parts integrated. Magnetics, termination resistors and cap, and LEDs. This is the original br […]
BitWrangler wrote on 2023-10-26, 14:04:ChrisK wrote on 2023-10-26, 06:54:All I actually wanted to do was to function test this home made LAN adapter for an old mainboard which has onboard LAN but requires some breakout board with the actual socket (which was of course missing when I got it). Those breakout boards are still around if you know what you are searching for, but 10 bucks are 10 bucks and all the parts that were needed I had lying around.
It may not be 100% original and period correct but i works and since I'm not really going to use this very much this DIY cable will be fine. Will make it a bit more user friendly when time comes, though.I saw a pic of an adapter required for one of my boards with onboard LAN and while it wasn't good enough to tell exact components, there were a lot of components on the PCB as well as the socket. So I was put off the idea of simple IDC header to RJ socket. But I was not thinking at the time about those RJ sockets that have "magnetics" incorporated, all the chokes, filters, inductor things, which may be what is needed. So this socket looks like a bit of a chunkier one, did you pick one with the "magnetics" included or is it a happy coincidence? I am interested to hear how it works. One thing I would be nervous about for vintage setups would be if using a period "hub" rather than a switch as anything putting the signals out of whack slightly might cause the whole segment problems.
Yes indeed it is a socket with all parts integrated. Magnetics, termination resistors and cap, and LEDs.
This is the original breakout board (photo from the net):
LAN-Bracket_pcnet-ht2001-9918.jpgAll components are on top side so the "re-engineering task" wasn't too complex.
Most "chip side" components are placed on the mainboard as I had already found out some time before, leaving just the center tap caps on the breakout board.
The "cable side" components are nothing more than four resistors and the big blue cap. All of them including the magnetics are commonly integrated in the connector nowadays.
So all that was to be done was determining which pin on the mainboard connector was TX+/TX-/RX+/RX- and which ones are for the LEDs and connecting everything in the right order to the LAN connector.For reference:
The mainboard is an Elitegroup K7SEM with a Realtek RTL 8139C LAN chip. Nothing fancy, that's why I didn't want to invest more than absolutely necessary.
https://theretroweb.com/motherboards/s/ecs-k7sem-v1-x
The connector I've used is a Würth 7499010441.
https://www.we-online.com/components/products … /7499010441.pdf
Thanks very much for the explanation, yes it's also an Elitegroup/PCChips board I had in mind. I may try this for it sometime, when the big project wheel turns and it gets attention.
Unicorn herding operations are proceeding, but all the totes of hens teeth and barrels of rocking horse poop give them plenty of hiding spots.
kingcake wrote on 2023-10-27, 03:48:What should I use to dissolve this plastic/wax-like TIM. It's hard as a rock. Had to use the heat gun to get the heatsink off in […]
What should I use to dissolve this plastic/wax-like TIM. It's hard as a rock. Had to use the heat gun to get the heatsink off in the first place.
Tried 99% Alcohol, GooGone, neither made a dent.
image_67530241.JPG
image_67151873.JPG
Zippo lighter fluid. That's about the only I've seen remove even the toughest Voodoo3 thermal compound, and I am not even the slightest joking.
"Enter at your own peril, past the bolted door..."
Main PC: i5 3470, GB B75M-D3H, 16GB RAM, 2x1TB
98SE : P3 650, Soyo SY-6BA+IV, 384MB RAM, 80GB
kingcake wrote on 2023-10-27, 03:48:What should I use to dissolve this plastic/wax-like TIM. It's hard as a rock. Had to use the heat gun to get the heatsink off in the first place.
Tried 99% Alcohol, GooGone, neither made a dent.
Leave a puddle of Goo Gone on it and scrape at it periodically when a vinyl spudger. I'm very familiar with this paste used on old ATI cards and it is terrible.
My worst experience was actually in a laptop. The paste had turned into some kind of cement and was so hard that I could only chip away at it with a metal screwdriver.
As I have mentioned, Zippo lighter fluid is the way to go if you need to do it quickly.
There's just something in it that dissolves the toughest of compounds - including the stupid yellow compound found on older ATI/nVidia cards - I have had a Medion FX5600XT with that kind of thermal compound, and a good amount of Zippo fluid got it pretty quickly off with no damages.
I have also used it for stubborn pink compound used on most Intel northbridge heatsinks - a few of the boards I did this on were ABIT IS7-E, Intel Desktop Board D865GLC, and the latest would be a P4Dual-915GL.
"Enter at your own peril, past the bolted door..."
Main PC: i5 3470, GB B75M-D3H, 16GB RAM, 2x1TB
98SE : P3 650, Soyo SY-6BA+IV, 384MB RAM, 80GB
Coleman stove fuel might be about the same chemically if you haven't got zippo fluid around. Though I have heard that what petrochemicals will work as solvents for, so will vegetable oils, you just have to leave them sit longer.
Unicorn herding operations are proceeding, but all the totes of hens teeth and barrels of rocking horse poop give them plenty of hiding spots.
PcBytes wrote on 2023-10-27, 14:49:kingcake wrote on 2023-10-27, 03:48:What should I use to dissolve this plastic/wax-like TIM. It's hard as a rock. Had to use the heat gun to get the heatsink off in […]
What should I use to dissolve this plastic/wax-like TIM. It's hard as a rock. Had to use the heat gun to get the heatsink off in the first place.
Tried 99% Alcohol, GooGone, neither made a dent.
image_67530241.JPG
image_67151873.JPGZippo lighter fluid. That's about the only I've seen remove even the toughest Voodoo3 thermal compound, and I am not even the slightest joking.
Just tried lighter fluid. Didn't make a dent. Even let it sit on the die for a while then gently scraped at it with a plastic razor blade. No go.
Kahenraz wrote on 2023-10-27, 17:22:kingcake wrote on 2023-10-27, 03:48:What should I use to dissolve this plastic/wax-like TIM. It's hard as a rock. Had to use the heat gun to get the heatsink off in the first place.
Tried 99% Alcohol, GooGone, neither made a dent.
Leave a puddle of Goo Gone on it and scrape at it periodically when a vinyl spudger. I'm very familiar with this paste used on old ATI cards and it is terrible.
My worst experience was actually in a laptop. The paste had turned into some kind of cement and was so hard that I could only chip away at it with a metal screwdriver.
In my post I said I tried Goo Gone. Let it sit. Didn't soften it at all.
Acetone? Or maybe oven cleaner?
Alternative would be try chipping it off with a metal razor blade.
Shponglefan wrote on 2023-10-27, 20:44:Acetone? Or maybe oven cleaner?
Alternative would be try chipping it off with a metal razor blade.
Acetone might work. Let me see if I have some.
Guy in the video mentions avoid acetone, methanol as it will cut through the silk screen. My guess is smaller chain alcohols/ketone will do that(?)
"What's all this racket going on up here, son? You watchin' yer girl cartoons again?"
Heatgun + Carb cleaner got a small amount off, bulk of it still there. I'm not brave enough to take a metal razor blade to a die 🤣.