VOGONS


ABIT BH6, is it dead?

Topic actions

Reply 20 of 59, by evasive

User metadata
Rank Oldbie
Rank
Oldbie
retrogamerguy1997 wrote on 2021-05-14, 17:41:
evasive wrote on 2021-05-14, 17:38:

could be a case of 2 bad bios chips or :
a completely flat bios battery.
Put in a new CR2032 coin cell battery from a blister package with an expiry date somewhere in the future.

Well if it was a battery issue, I should still get beep codes or something. But when the system was working the bios settings were able to be saved even after unplugging the machine. and the person did test the bios chip before sending it to me.

On more than one occasion, my personal experience is, if that coin cell is empty, the board will power on, spin the fans and not much else, no beeps, blank screen: exactly like you are describing.
Reply 21 of 59, by Doornkaat

User metadata
Rank l33t
Rank
l33t
retrogamerguy1997 wrote on 2021-05-14, 17:46:
Doornkaat wrote on 2021-05-14, 17:42:
What I mean is for whatever reason your original flash attempt went wrong. The original EEPROM most likely doesn't contain a wor […]
Show full quote

What I mean is for whatever reason your original flash attempt went wrong. The original EEPROM most likely doesn't contain a working BIOS for your board.
We also don't know wether the new EEPROM contains the right BIOS for your board revision. Please look up your board's revision and ask whoever flashed the EEPROM for you what version they used.

Right now we can't confirm there's a working BIOS on either EEPROM which makes remote troubleshooting near impossible.

I don't think there's any recovery method for a bricked BH6 besides removing and reprogramming the EEPROM either. What method were you suggested to try with the floppy drive?

I was given a DOS 6.22 boot disk image. told to remove everything except for the 3 core ms-dos and config.sys to make room. Then add in the flash tool, bios image, and then a premade autoexec.bat. i also had to edit the config.sys to make sure files that were removed weren't listed in there. The tool ran unattended since after the floppy boots the keyboard stops working.

So did the floppy drive read the disk? Of you messed up your flash too badly the board won't be able to boot from floppy.

Also did you put the right BIOS image on the recovery floppy? You said you weren't sure about your board revision.

Reply 22 of 59, by retrogamerguy1997

User metadata
Rank Member
Rank
Member
Doornkaat wrote on 2021-05-14, 17:52:

So did the floppy drive read the disk? Of you messed up your flash too badly the board won't be able to boot from floppy.

Also did you put the right BIOS image on the recovery floppy? You said you weren't sure about your board revision.

yeah the floppy drive read the disk and ran the program. I did put the right revision on the floppy disk. also, right before page 2 of the thread I posed this.

retrogamerguy1997 wrote on 2021-05-14, 17:50:

pulled out the board, the sticker says v1.01 which lines up with what the information I had earlier. Originally the chip had the HN version of the BIOS and was told to flash the SS version of the BIOS. That flash chip I was given later also contained the SS version of the BIOS. both the HN and SS bioses are only for the 1.0x revisions

Reply 23 of 59, by konc

User metadata
Rank l33t
Rank
l33t

Not suggesting that this is the case, but BH6s are notorious for bad capacitors. I haven't seen a single one that hasn't developed issues until now.
Are you sure the timing is not just a coincidence? Just throwing in an idea to consider.

Reply 24 of 59, by Doornkaat

User metadata
Rank l33t
Rank
l33t
retrogamerguy1997 wrote on 2021-05-14, 17:56:
Doornkaat wrote on 2021-05-14, 17:52:

So did the floppy drive read the disk? Of you messed up your flash too badly the board won't be able to boot from floppy.

Also did you put the right BIOS image on the recovery floppy? You said you weren't sure about your board revision.

yeah the floppy drive read the disk and ran the program. I did put the right revision on the floppy disk. also, right before page 2 of the thread I posed this.

retrogamerguy1997 wrote on 2021-05-14, 17:50:

pulled out the board, the sticker says v1.01 which lines up with what the information I had earlier. Originally the chip had the HN version of the BIOS and was told to flash the SS version of the BIOS. That flash chip I was given later also contained the SS version of the BIOS. both the HN and SS bioses are only for the 1.0x revisions

Whoops, missed that, sorry!
So what happens if you try the recovery process with the new EEPROM?

Reply 25 of 59, by retrogamerguy1997

User metadata
Rank Member
Rank
Member
konc wrote on 2021-05-14, 17:58:

Not suggesting that this is the case, but BH6s are notorious for bad capacitors. I haven't seen a single one that hasn't developed issues until now.
Are you sure the timing is not just a coincidence? Just throwing in an idea to consider.

I checked the caps and none of them are bulging

Doornkaat wrote on 2021-05-14, 18:00:

Whoops, missed that, sorry!
So what happens if you try the recovery process with the new EEPROM?

Like I said with the original post when I put in the new chip, fans spun up but nothing appeared on screen. And removing the cards and ram produces zero beep codes when it really should be. Before I was sent the new chip I reseated the chip I had and that's when the blank screen issue started. Before being told to do this and then doing it, there was at least stuff on the screen.

Reply 26 of 59, by Doornkaat

User metadata
Rank l33t
Rank
l33t

I mean what happens when you try to run the recovery with the new EEPROM installed? As far as I understand it you had only tried it with the original EEPROM yet.
I'm not holding my breath for this either but it's hardly any work trying it and basically the last remote troubleshooting suggestion I have. 🙁

Last edited by Doornkaat on 2021-05-14, 18:17. Edited 1 time in total.

Reply 27 of 59, by retrogamerguy1997

User metadata
Rank Member
Rank
Member
Doornkaat wrote on 2021-05-14, 18:15:

I'm mean what happens when you try to run the recovery with the new EEPROM installed?

I mean I physically can't

Reply 29 of 59, by weedeewee

User metadata
Rank l33t
Rank
l33t
retrogamerguy1997 wrote on 2021-05-14, 18:08:
I checked the caps and none of them are bulging […]
Show full quote
konc wrote on 2021-05-14, 17:58:

Not suggesting that this is the case, but BH6s are notorious for bad capacitors. I haven't seen a single one that hasn't developed issues until now.
Are you sure the timing is not just a coincidence? Just throwing in an idea to consider.

I checked the caps and none of them are bulging

Doornkaat wrote on 2021-05-14, 18:00:

Whoops, missed that, sorry!
So what happens if you try the recovery process with the new EEPROM?

Like I said with the original post when I put in the new chip, fans spun up but nothing appeared on screen. And removing the cards and ram produces zero beep codes when it really should be. Before I was sent the new chip I reseated the chip I had and that's when the blank screen issue started. Before being told to do this and then doing it, there was at least stuff on the screen.

FYI, Caps do not need to be bulging to be bad.
and...
Is it possible you scratched the board underneath the bios chips? maybe pushed on a trace and accidentally cut it.

Right to repair is fundamental. You own it, you're allowed to fix it.
How To Ask Questions The Smart Way
Do not ask Why !
https://www.vogonswiki.com/index.php/Serial_port

Reply 30 of 59, by retrogamerguy1997

User metadata
Rank Member
Rank
Member
weedeewee wrote on 2021-05-14, 18:22:

Is it possible you scratched the board underneath the bios chips? maybe pushed on a trace and accidentally cut it.

maybe, but I wasn't able to physically see any damage but idk.

Reply 31 of 59, by snufkin

User metadata
Rank Oldbie
Rank
Oldbie

If the socket is through hole, can you check the rear side of the motherboard under the PLCC socket? Or if it's surface mount, a picture with the chip removed. I'm wondering if when the socket cracked it may have damaged a via or surface mount pad.

Just to recap the steps so far:
1) Was working, but couldn't set IRQ in BIOS (HN)
2) Flashed BIOS to SS, couldn't enter the BIOS (did anything appear on screen at this point? Any beep codes?)
3) Prepared a recovery floppy with the SS BIOS, recovery appeared to take place (disk was read), but no change
4) Removed and reseated chip, after this no display and no beep, just spinning fans.
5) Replaced chip, no change.
Is that right?

Have you got a multimeter you can use to check the voltages on the pins of the chip holder?

Reply 32 of 59, by retrogamerguy1997

User metadata
Rank Member
Rank
Member
snufkin wrote on 2021-05-14, 18:39:
If the socket is through hole, can you check the rear side of the motherboard under the PLCC socket? Or if it's surface mount, […]
Show full quote

If the socket is through hole, can you check the rear side of the motherboard under the PLCC socket? Or if it's surface mount, a picture with the chip removed. I'm wondering if when the socket cracked it may have damaged a via or surface mount pad.

Just to recap the steps so far:
1) Was working, but couldn't set IRQ in BIOS (HN)
2) Flashed BIOS to SS, couldn't enter the BIOS (did anything appear on screen at this point? Any beep codes?)
3) Prepared a recovery floppy with the SS BIOS, recovery appeared to take place (disk was read), but no change
4) Removed and reseated chip, after this no display and no beep, just spinning fans.
5) Replaced chip, no change.
Is that right?

Have you got a multimeter you can use to check the voltages on the pins of the chip holder?

1) Correct
2) Yeah a message did a appear on the screen, no beep codes
3) Yeah it just would reboot show the same message, the disk would boot only for the program to fail again. I failed several times before messaging the user here again and that was when I was told to reseat the chip and if that failed he would send me a new one.
4) Correct
5) Correct

I don't have a multimeter of my own, my dad probably has one for his model train stuff. If he does have one that I can use, how do I test it?

Reply 33 of 59, by snufkin

User metadata
Rank Oldbie
Rank
Oldbie
retrogamerguy1997 wrote on 2021-05-14, 18:46:
1) Correct 2) Yeah a message did a appear on the screen, no beep codes 3) Yeah it just would reboot show the same message, the d […]
Show full quote

1) Correct
2) Yeah a message did a appear on the screen, no beep codes
3) Yeah it just would reboot show the same message, the disk would boot only for the program to fail again. I failed several times before messaging the user here again and that was when I was told to reseat the chip and if that failed he would send me a new one.
4) Correct
5) Correct

I don't have a multimeter of my own, my dad probably has one for his model train stuff. If he does have one that I can use, how do I test it?

Can you recall if there was any message on screen when it failed?

For testing the socket, I'd start with looking up a datasheet for the chip to work out where the ground pin(s) are (if you can post the part number that'll help). Then with the power disconnected, check the resistance between a ground point (screw mounting hole probably a good bet) and the socket pins that should be ground. They should measure roughly 0 ohms. If they all check out ok, then with the chip out, turn power on and measure the voltage from Ground to the power pins. Mind you don't short two pins together when trying to get a reading.

Reply 34 of 59, by retrogamerguy1997

User metadata
Rank Member
Rank
Member
snufkin wrote on 2021-05-14, 18:59:

Can you recall if there was any message on screen when it failed?

For testing the socket, I'd start with looking up a datasheet for the chip to work out where the ground pin(s) are (if you can post the part number that'll help). Then with the power disconnected, check the resistance between a ground point (screw mounting hole probably a good bet) and the socket pins that should be ground. They should measure roughly 0 ohms. If they all check out ok, then with the chip out, turn power on and measure the voltage from Ground to the power pins. Mind you don't short two pins together when trying to get a reading.

Well it would fail and then reboot. The flash tool shown that a portion of the chip couldn't be updated, like the progress bar was color coded and like the first chunk would be color coded to say that a portion of the chip couldn't be written to. after the process was done it would reboot and the process would start over again with the same result.

I don't know where the part number for the chips would be found

Reply 35 of 59, by snufkin

User metadata
Rank Oldbie
Rank
Oldbie
retrogamerguy1997 wrote on 2021-05-14, 19:06:

Well it would fail and then reboot. The flash tool shown that a portion of the chip couldn't be updated, like the progress bar was color coded and like the first chunk would be color coded to say that a portion of the chip couldn't be written to. after the process was done it would reboot and the process would start over again with the same result.

I don't know where the part number for the chips would be found

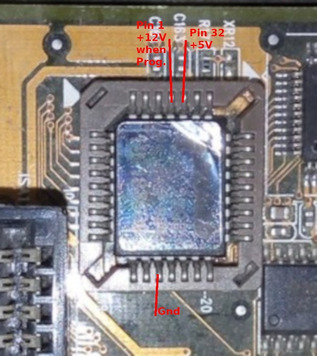
I've had a quick look around and think I found the model of EEPROM that would be on the BH6 and marked the power pins. You can normally find a part number engraved or printed on the top of any chip. Sometimes there'll be a label in the way.

If you can get you hand on a meter, then you can actually measure the voltages on the PSU you used for flashing the BIOS. Check the 12V line particularly since that's needed for the programming voltage pin.

Attachments

  • BH6_EEPROM.jpg
    Filename
    BH6_EEPROM.jpg
    File size
    95.74 KiB
    Views
    376 views
    File license
    Fair use/fair dealing exception

Reply 36 of 59, by chrismeyer6

User metadata
Rank l33t
Rank
l33t

Have you checked your bios battery cause I've had quite a few motherboards that either don't post or act really strange when the battery is low,dead, or missing. My Abit KT7A-RAID is like that if the battery is dead the system won't start untill I replace it.

Reply 37 of 59, by retrogamerguy1997

User metadata
Rank Member
Rank
Member

I was advised by the person I've been in contact with to try running the board outside of the case. So I did that I holding in my hands (since I had no place to put it that wasn't metal) only to then see a small light coming from an area by the keyboard and mouse connectors that flickered off and then started smelling a smokey smell.

Reply 38 of 59, by snufkin

User metadata
Rank Oldbie
Rank
Oldbie

Sounds like some of the magic smoke got out (in case you haven't seen it https://en.wikipedia.org/wiki/Magic_smoke, see also Lucas Wiring Harness Smoke). Likely some component had too high a voltage applied because of a failure somewhere else. Can you get photos of the area? There's a chance that if a voltage spike got through then it might have damaged other components. OTOH, I've had a power FET nearly melt off a board (it slipped sideways, so solder must have melted, and the PCB was brown on the underneath) and it didn't cause any problems once I replaced all the leaking capacitors in the area.

Reply 39 of 59, by retrogamerguy1997

User metadata
Rank Member
Rank
Member
IMG_20210515_081123[1].jpg
Filename
IMG_20210515_081123[1].jpg
File size
964.48 KiB
Views
314 views
File license
Fair use/fair dealing exception
IMG_20210515_081036[1].jpg
Filename
IMG_20210515_081036[1].jpg
File size
964.85 KiB
Views
314 views
File license
Fair use/fair dealing exception