cyclone3d wrote on 2022-02-13, 14:42:
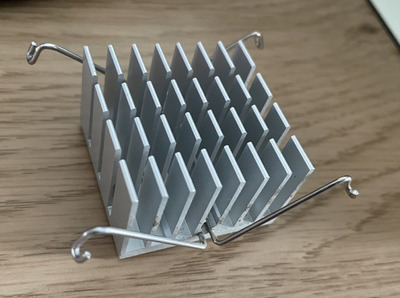
They are through-hole soldered. You could just get some wire, make a u-shape and solder new hold-down arches.
Depending on if there are traces in between the holes where the arches were soldered in, you could even jus use some bailing type wire through the holes and twist it together on the back of the board. Though I wouldn't really trust that long term.
I considered doing this, but if I do try to fix it myself I will probably choose the Epoxy solution mentioned by another user since I doubt it will work in the case of this specific board.
Doornkaat wrote on 2022-02-13, 16:17:
I think I have some of them in my spare parts bin.
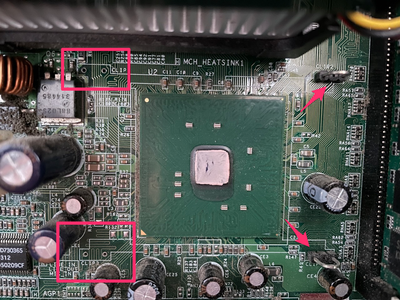
If you're located in Germany you can send me the board with a return label and I would solder them in for you free of charge.
(Other places in the world are fine too but I think the postage will be more than what the board is worth.)
Thank you for the very kind offer. I live in the Netherlands, so depending on your whereabouts it might be close. After I check if the board works well otherwise, I might contact you before trying the epoxy approach.
Repo Man11 wrote on 2022-02-13, 17:01:
Thanks to this post, I'm going to salvage some of those from a dead motherboard I have (that's going to go to ewaste eventually) just in case I ever run into this.
Yeah, seems like a good idea! Mine weren't anywhere to be found, alas.
stamasd wrote on 2022-02-13, 18:01:
Alternatively, you could forego the holding mechanism altogether, and just glue the heatsink to the chipset with some thermal epoxy. I mean, you don't have any reason for removing that heatsink in the future so why not. You can make your own "thermal epoxy" by mixing epoxy glue with thermal paste. I've done it many times.
(approximately equal parts of pre-mixed epoxy and thermal paste, use only a very small amount, make sure the top of the chipset and the bottom of the heatsink are squeaky clean before you apply, put a small weight on it and keep untouched for several hours in a warm place)
Thanks for the instructions, this seems like a good approach if I try to repair it myself.