Reply 40 of 62, by Grem Five

Rank
Member
- Rank
- Member
Just put the whole air flow thing to bed and go with some old school liquid cooling.... vga block, res and an aquarium pump.
Just put the whole air flow thing to bed and go with some old school liquid cooling.... vga block, res and an aquarium pump.
One of the main reasons there are so few of these card around any more is because they over heat.
They over heat and the capacitors start to leak on the PCB and destroy the traces.
Also when they over heat the solder joints break and sometimes the GPU solder ball welds get broken too.
Bad PCB design and Manufacturing process. Also cheap capacitors.
The MOSFET also over heats.
Its mainly the Voodoo GPU chip and MOSFET that over heat causing the PCB to over heat which causes the Capacitors to leak
Onto the PCB and destroy the traces on the PCB.
Also over heating causes the solder joints to break on the surface mount components like ram chips and GPU chip.
Intel486dx33 wrote on 2023-02-17, 10:08:One of the main reasons there are so few of these card around any more is because they over heat. They over heat and the capacit […]
One of the main reasons there are so few of these card around any more is because they over heat.
They over heat and the capacitors start to leak on the PCB and destroy the traces.
Also when they over heat the solder joints break and sometimes the GPU solder ball welds get broken too.
Bad PCB design and Manufacturing process. Also cheap capacitors.
The MOSFET also over heats.
Its mainly the Voodoo GPU chip and MOSFET that over heat causing the PCB to over heat which causes the Capacitors to leak
Onto the PCB and destroy the traces on the PCB.
Also over heating causes the solder joints to break on the surface mount components like ram chips and GPU chip.
I have handled and repaired literally dozens of Voodoo 3s and I've never seen a leaky capacitor or trace damage from cap leakage. In fact, if the caps haven't been snapped off they generally tend to not be a problem at all. (though it's certainly not a bad idea to replace them if you have the skills... It's fairly easy to do)
Also, these cards aren't rare. There are still thousands of them in circulation and many many still in active use in arcade cabinets. You don't find them all the time because they are desirable. They are desirable because they are great at what they do and there is a lot of hype and prestige around them for retro computing. Also because they are still needed as replacements for arcade cabinets when they do eventually fail.
The main modes of failure I have seen with these are physical damage from poor storage or scrappers and a failed/corrupt BIOS. The PCBs definitely get discolored and can even smell burnt if they have been used for years without good air flow, but surprisingly few of the discolored cards I have found appear to have failed due to heat.
Now for some blitting from the back buffer.
Ozzuneoj wrote on 2023-02-17, 15:05:I have handled and repaired literally dozens of Voodoo 3s and I've never seen a leaky capacitor or trace damage. In fact, if the […]
Intel486dx33 wrote on 2023-02-17, 10:08:One of the main reasons there are so few of these card around any more is because they over heat. They over heat and the capacit […]
One of the main reasons there are so few of these card around any more is because they over heat.
They over heat and the capacitors start to leak on the PCB and destroy the traces.
Also when they over heat the solder joints break and sometimes the GPU solder ball welds get broken too.
Bad PCB design and Manufacturing process. Also cheap capacitors.
The MOSFET also over heats.
Its mainly the Voodoo GPU chip and MOSFET that over heat causing the PCB to over heat which causes the Capacitors to leak
Onto the PCB and destroy the traces on the PCB.
Also over heating causes the solder joints to break on the surface mount components like ram chips and GPU chip.I have handled and repaired literally dozens of Voodoo 3s and I've never seen a leaky capacitor or trace damage. In fact, if the caps haven't been snapped off they generally tend to not be a problem at all. (though it's certainly not a bad idea to replace them if you have the skills... It's fairly easy to do)
Also, these cards aren't rare. There are still thousands of them in circulation and many many still in active use in arcade cabinets. You don't find them all the time because they are desirable. They are desirable because they are great at what they do and there is a lot of hype and prestige around them for retro computing. Also because they are still needed as replacements for arcade cabinets when they do eventually fail.
The main modes of failure I have seen with these are physical damage from poor storage or scrappers and a failed/corrupt BIOS. The PCBs definitely get discolored and can even smell burnt if they have been used for years without good air flow, but surprisingly few of the discolored cards I have found appear to have failed due to heat.
+1 on that. The cards are actually pretty resilient and they're far from scarce, they just get bought pretty quickly whey they appear in the market.
Doornkaat wrote on 2023-02-17, 15:32:Ozzuneoj wrote on 2023-02-17, 15:05:I have handled and repaired literally dozens of Voodoo 3s and I've never seen a leaky capacitor or trace damage from cap leakage […]
Intel486dx33 wrote on 2023-02-17, 10:08:One of the main reasons there are so few of these card around any more is because they over heat. They over heat and the capacit […]
One of the main reasons there are so few of these card around any more is because they over heat.
They over heat and the capacitors start to leak on the PCB and destroy the traces.
Also when they over heat the solder joints break and sometimes the GPU solder ball welds get broken too.
Bad PCB design and Manufacturing process. Also cheap capacitors.
The MOSFET also over heats.
Its mainly the Voodoo GPU chip and MOSFET that over heat causing the PCB to over heat which causes the Capacitors to leak
Onto the PCB and destroy the traces on the PCB.
Also over heating causes the solder joints to break on the surface mount components like ram chips and GPU chip.I have handled and repaired literally dozens of Voodoo 3s and I've never seen a leaky capacitor or trace damage from cap leakage. In fact, if the caps haven't been snapped off they generally tend to not be a problem at all. (though it's certainly not a bad idea to replace them if you have the skills... It's fairly easy to do)
Also, these cards aren't rare. There are still thousands of them in circulation and many many still in active use in arcade cabinets. You don't find them all the time because they are desirable. They are desirable because they are great at what they do and there is a lot of hype and prestige around them for retro computing. Also because they are still needed as replacements for arcade cabinets when they do eventually fail.
The main modes of failure I have seen with these are physical damage from poor storage or scrappers and a failed/corrupt BIOS. The PCBs definitely get discolored and can even smell burnt if they have been used for years without good air flow, but surprisingly few of the discolored cards I have found appear to have failed due to heat.
+1 on that. The cards are actually pretty resilient and they're far from scarce, they just get bought pretty quickly whey they appear in the market.
My absolute favorite things about these cards:
1. No components on the back.
2. A board layout that protects most of the components on the top side, except for the SMD 10uf 16v caps, but those are simple to replace once you figure out a good method.
3. Relatively durable or well protected pins\legs on chips.
For 1 and 2: The single biggest killer of video cards that I find is damage to tiny SMD components. I have a large collection of cards I just can't get rid of, hoping that some day I'll have the skills and tools to easily replace the little "grains of sand" that have been chipped off the back of these boards. Lots of Geforce FX, Geforce 6 and 7 AGP, several Quadro4 980XGL, Radeon 9800s and much more. All dead and with unidentifiable components crushed or missing, mostly on the back. The heavier the card, the more likely it will have a lots of damage on the back. You can imagine, a stack of video cards that weigh a couple pounds each, with their metal brackets scraping across the back of the card next to it... *shudder* So so so sad that people did this to expensive hardware. I never stored my parts loose like that unless they were really worthless or had absolutely no fragile components on them.
3: The second biggest killer of video cards and sound cards is the exposed legs on chips being torn off or bent in such a way that it's impossible to straighten them without breaking them off (or desoldering the entire chip). Voodoo 2s are a huge pain in the butt because they have SO many chips with exposed legs that are very long and fragile. The Voodoo 3 on the other hand has absolutely NONE if it's an SDRAM model, and the SGRAM models aren't too bad either because the heatsink is large enough and tall enough that it makes it a bit tougher for things to get in there and damage the legs of the SGRAM chips.
If you look at the number of Voodoo 3 (or even Banshee) cards being sold for parts or defective compared to later cards or older cards with more fragile designs, it pretty much tells the whole story.
Now for some blitting from the back buffer.
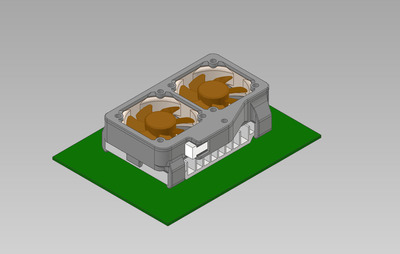
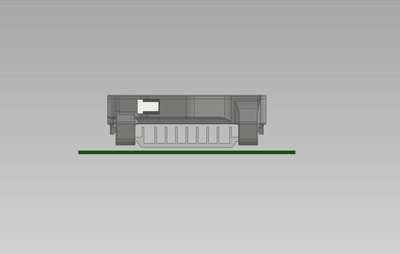
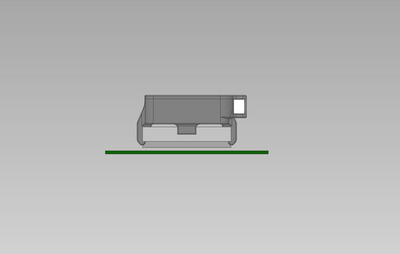
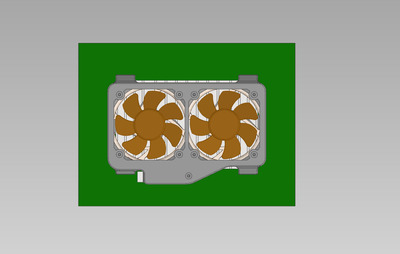
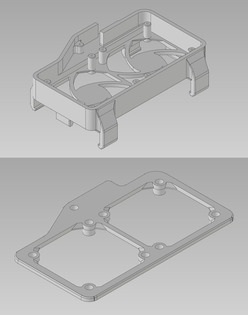
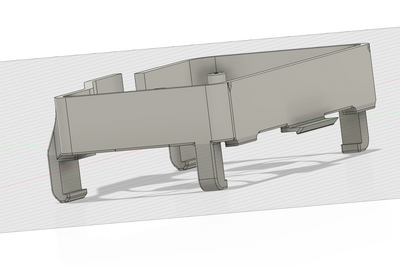
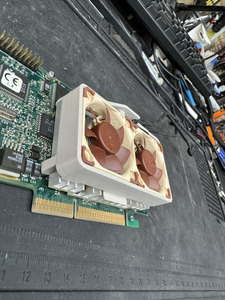
This was my take on for cooling my Voodoo3's about 3 years ago but never ended up 3D printing it as my printer has been broken since. it uses two Noctua NF-A4x10 and two 3D printed parts screwed together and the whole assembly just snapped on the stock heatsink with tabs without any modifications to the card and heatsink:
a_h_adl wrote on 2023-02-20, 08:32:This was my take on for cooling my Voodoo3's about 3 years ago but never ended up 3D printing it as my printer has been broken s […]
This was my take on for cooling my Voodoo3's about 3 years ago but never ended up 3D printing it as my printer has been broken since. it uses two Noctua NF-A4x10 and two 3D printed parts screwed together and the whole assembly just snapped on the stock heatsink with tabs without any modifications to the card and heatsink:
Voodoo 3 3000 001.jpg
Voodoo 3 3000 002.jpg
Voodoo 3 3000 003.jpg
Voodoo 3 3000 004.jpg
Voodoo 3 3000 005.jpg
That is amazing! Any chance of making this available for others to print?
Now for some blitting from the back buffer.
a_h_adl wrote on 2023-02-20, 08:32:This was my take on for cooling my Voodoo3's about 3 years ago but never ended up 3D printing it as my printer has been broken s […]
This was my take on for cooling my Voodoo3's about 3 years ago but never ended up 3D printing it as my printer has been broken since. it uses two Noctua NF-A4x10 and two 3D printed parts screwed together and the whole assembly just snapped on the stock heatsink with tabs without any modifications to the card and heatsink:
Voodoo 3 3000 001.jpg
Voodoo 3 3000 002.jpg
Voodoo 3 3000 003.jpg
Voodoo 3 3000 004.jpg
Voodoo 3 3000 005.jpg
I realize it's been a hot minute, but figured it's worth asking again... any chance you'd share these designs for us to 3d print?
mitchkramez wrote on 2024-02-06, 03:51:I realize it's been a hot minute, but figured it's worth asking again... any chance you'd share these designs for us to 3d print?
Sure, I have attached the model below as Zip file. It contains the STL files for upper and lower pieces. I also attached the STP file if you need to measure anything or to recreate it by yourself.
Just bear in mind, I never had a chance to print and test it by myself so it might need some tweaking and changing some dims to make the gaps tighter or looser or strengthen some areas after the first print, based on the printer type and how flexible/fragile the used material is.
Ozzuneoj wrote on 2023-02-20, 09:27:That is amazing! Any chance of making this available for others to print?
My apology for not being back to you! I have no idea why I haven't noticed your reply at first place. Thanks to mitchkramez I have uploaded the parts below, if you are still interested. Sorry for delay!
a_h_adl wrote on 2024-02-06, 08:50:Sure, I have attached the model below as Zip file. It contains the STL files for upper and lower pieces. I also attached the STP […]
mitchkramez wrote on 2024-02-06, 03:51:I realize it's been a hot minute, but figured it's worth asking again... any chance you'd share these designs for us to 3d print?
Sure, I have attached the model below as Zip file. It contains the STL files for upper and lower pieces. I also attached the STP file if you need to measure anything or to recreate it by yourself.
Just bear in mind, I never had a chance to print and test it by myself so it might need some tweaking and changing some dims to make the gaps tighter or looser or strengthen some areas after the first print, based on the printer type and how flexible/fragile the used material is.Ozzuneoj wrote on 2023-02-20, 09:27:That is amazing! Any chance of making this available for others to print?
My apology for not being back to you! I have no idea why I haven't noticed your reply at first place. Thanks to mitchkramez I have uploaded the parts below, if you are still interested. Sorry for delay!
Wow - this is great - thank you for sharing the original files as well! Do you have any issues if I share any modifications I need to make back here? Again, greatly appreciate the time you put into this, it's a lovely model 😀
mitchkramez wrote on 2024-02-06, 14:36:Wow - this is great - thank you for sharing the original files as well! Do you have any issues if I share any modifications I need to make back here? Again, greatly appreciate the time you put into this, it's a lovely model 😀
No problem at all! Feel free to use, change and share your results, happy to see the outcome.
By the way, if you need the 3D model of heatsink and Noctua NF-A4x10 fans assembly, just let me know.
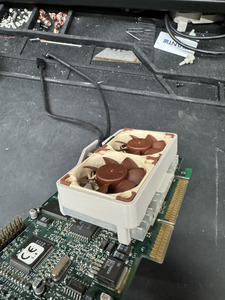
First pint attempt came out nice. The clips on the lower edge bump up against the adjacent PCI slot unfortunately. I’m thinking of moving those clips around to the side, and just place a small lip on the lower edge against the slot there. this will have the added benefit of being able to just slide the whole cooler on and off from top to bottom. My fans should arrive this weekend and I can confirm fitment for those then.
As is, the card did insert far enough into the slot that it did work, but doesn’t seat fully with the clips against that PCI slot. Overall the clips were a bit too tight as well, but I think if we move the bottom ones around to the sides we’ll likely not have to worry about that.
I’ll hopefully have some time this weekend to adjust the originals and do some more test fits 😀

a_h_adl wrote on 2024-02-07, 00:20:mitchkramez wrote on 2024-02-06, 14:36:Wow - this is great - thank you for sharing the original files as well! Do you have any issues if I share any modifications I need to make back here? Again, greatly appreciate the time you put into this, it's a lovely model 😀
No problem at all! Feel free to use, change and share your results, happy to see the outcome.
By the way, if you need the 3D model of heatsink and Noctua NF-A4x10 fans assembly, just let me know.
If you have those models as well, i'd be interested in them for sure. My fans arrived early, and those fit perfectly so it should just be a matter of adjusting these clips 😀 What size screws were you planning to use out of curiosity?
mitchkramez wrote on 2024-02-08, 19:17:If you have those models as well, i'd be interested in them for sure. My fans arrived early, and those fit perfectly so it should just be a matter of adjusting these clips 😀 What size screws were you planning to use out of curiosity?
Good to hear that it went relatively well so far. I was expecting some adjustment to be done on clips as well. For the screw size, I made those holes based on my previous projects which used screws from cheap box sets like below:

Here is a link to one of those sets:
https://www.ebay.com/itm/404462114680
And here is the parts STEP file:
a_h_adl wrote on 2024-02-09, 08:12:Good to hear that it went relatively well so far. I was expecting some adjustment to be done on clips as well. For the screw siz […]
mitchkramez wrote on 2024-02-08, 19:17:If you have those models as well, i'd be interested in them for sure. My fans arrived early, and those fit perfectly so it should just be a matter of adjusting these clips 😀 What size screws were you planning to use out of curiosity?
Good to hear that it went relatively well so far. I was expecting some adjustment to be done on clips as well. For the screw size, I made those holes based on my previous projects which used screws from cheap box sets like below:
Screws.jpg
Here is a link to one of those sets:
https://www.ebay.com/itm/404462114680
And here is the parts STEP file:
Parts.zip
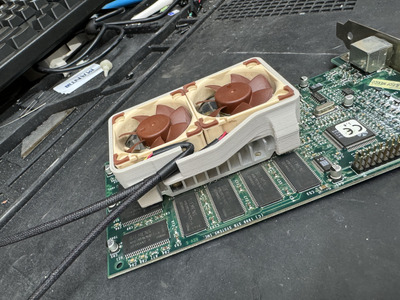
Awesome - Thanks for all the details! I think we've got a fully functional model now!
- Card seats fully now and clears the adjacent PCI slot
- New clip layout allows for you to slide the whole thing on from the top and the flexible clip on the bottom locks it in place nicely.
a_h_adl - i'd love to post this to printables.com to share with people if you don't mind - 1. are you ok with that if i attribute your work (since you clearly did the most of it) and 2. do you have a user account that i can mention in the description?
as always - thanks again, i'll post the STL files for people here if you're ok with that as well 😀
mitchkramez wrote on 2024-02-10, 21:58:Awesome - Thanks for all the details! I think we've got a fully functional model now! - Card seats fully now and clears the adj […]
Awesome - Thanks for all the details! I think we've got a fully functional model now!
- Card seats fully now and clears the adjacent PCI slot
- New clip layout allows for you to slide the whole thing on from the top and the flexible clip on the bottom locks it in place nicely.a_h_adl - i'd love to post this to printables.com to share with people if you don't mind - 1. are you ok with that if i attribute your work (since you clearly did the most of it) and 2. do you have a user account that i can mention in the description?
as always - thanks again, i'll post the STL files for people here if you're ok with that as well 😀
That is a good news! happy to see you finally made it happen. I almost forgot about this and you finished it up so consider it yours. feel free to post, or use it anyhow you like, and don't bother mentioning me, you made it happen!
I'm pretty sure you've already figured it out by yourself but it doesn't hurt mentioning my plan for two fans were to cut one of the end terminals and solder it to the wires of the second one in parallel and place the only actual Noctua terminal where the small white part is located in the model. it should be sitting perfectly as per my old measurements. Can't remember if it needs a drop of superglue or not, but this setup makes the whole fan system nice and tidy without wires hanging down from the card.
Can't wait to see the photos of the actual finished voodoo 😀
a_h_adl wrote on 2024-02-11, 23:14:That is a good news! happy to see you finally made it happen. I almost forgot about this and you finished it up so consider it y […]
mitchkramez wrote on 2024-02-10, 21:58:Awesome - Thanks for all the details! I think we've got a fully functional model now! - Card seats fully now and clears the adj […]
Awesome - Thanks for all the details! I think we've got a fully functional model now!
- Card seats fully now and clears the adjacent PCI slot
- New clip layout allows for you to slide the whole thing on from the top and the flexible clip on the bottom locks it in place nicely.a_h_adl - i'd love to post this to printables.com to share with people if you don't mind - 1. are you ok with that if i attribute your work (since you clearly did the most of it) and 2. do you have a user account that i can mention in the description?
as always - thanks again, i'll post the STL files for people here if you're ok with that as well 😀
That is a good news! happy to see you finally made it happen. I almost forgot about this and you finished it up so consider it yours. feel free to post, or use it anyhow you like, and don't bother mentioning me, you made it happen!
I'm pretty sure you've already figured it out by yourself but it doesn't hurt mentioning my plan for two fans were to cut one of the end terminals and solder it to the wires of the second one in parallel and place the only actual Noctua terminal where the small white part is located in the model. it should be sitting perfectly as per my old measurements. Can't remember if it needs a drop of superglue or not, but this setup makes the whole fan system nice and tidy without wires hanging down from the card.
Can't wait to see the photos of the actual finished voodoo 😀
I’m definitely going to mention this thread and you for everyone, there was clearly a lot care put into your original design and I’m glad that I could help out with it!
I did figure that’s what your plan was with the cable channel there, but for my purposes i’m just using a splitter to combine them into one - the noctua cables are so nice anyway 😀
I’m only awaiting the screws to arrive to assemble the rest of it in my platinum beige filament, but may print another set in black petg 😀
I plant to post these tomorrow for everyone - Thanks again!
Looking good! I'd love to give mine some love, but it never had a heatsink to begin with 😁
All right folks - here's the model ready for use! Enjoy!
https://www.printables.com/model/762463-3dfx- … octua-fan-mount
Awesome work and documentation! Now we need a before and after temperature comparison 😀