VOGONS


First post, by danieljm

User metadata
Rank Member
Rank
Member

So, I got my hands on a Packard Bell Multimedia Supreme 486 (PB410A). Thankfully, I managed to get the battery off the motherboard before the leakage was able to do anything more than a bit of cosmetic damage.

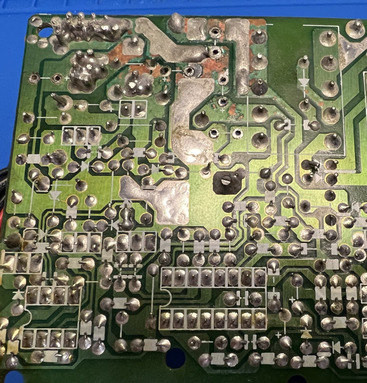
But the PSU is another matter entirely. Looks like some of the caps leaked all over one corner of the board.

IMG_0676.JPEG
Filename
IMG_0676.JPEG
File size
269.85 KiB
Views
811 views
File license
Public domain
IMG_0682.JPEG
Filename
IMG_0682.JPEG
File size
538.58 KiB
Views
811 views
File license
Public domain

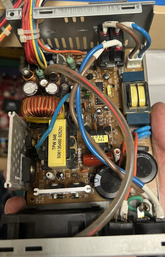
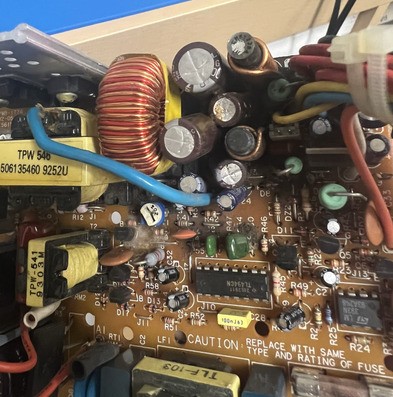
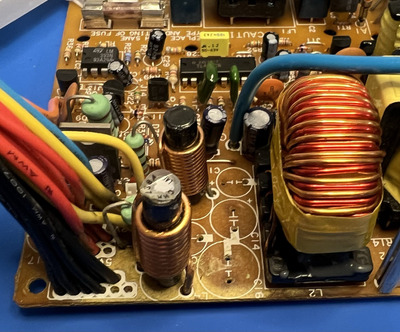
I removed the bigger caps in that corner and cleaned up the whole thing. The top of the board looks discoloured but I don't see much damage. The bottom though certainly looks a little worse with the exposed copper, but I'm hopeful that it isn't bad enough to cause problems.

IMG_0693.JPEG
Filename
IMG_0693.JPEG
File size
545.97 KiB
Views
811 views
File license
Public domain
IMG_0694.JPEG
Filename
IMG_0694.JPEG
File size
695.38 KiB
Views
811 views
File license
Public domain

My plan is to just replace all the caps as well as the fuse, which I can see is blown. But this is something I've never done before, so is there anything else I should do, or things I should poke and prod at? Anything I can test with my multimeter that could point me to other potential issues?

Thanks!

Reply 2 of 12, by analog_programmer

User metadata
Rank Oldbie
Rank
Oldbie

First clean the corrosion on the PCB traces from the leaked caps, then check for shorts. The fuse was not blown for nothing.

from СМ630 to Ryzen gen. 3
engineer's five pennies: this world goes south since everything's run by financiers and economists
this isn't voice chat, yet some people, overusing online communications, "talk" and "hear voices"

Reply 3 of 12, by rasz_pl

User metadata
Rank l33t
Rank
l33t

small electrolytics are also important and should be at least checked with esr meter
if fuse blew there might be dead short somewhere, transistor or diode, get yourself an old incandescent lightbulb and power it with the bulb in series

Open Source AT&T Globalyst/NCR/FIC 486-GAC-2 proprietary Cache Module reproduction

Reply 4 of 12, by danieljm

User metadata
Rank Member
Rank
Member

Thanks everyone. I guess I assumed that the leaked fluid may have caused the short, but now I'll be more wary.

rasz_pl wrote on 2023-09-18, 08:26:

small electrolytics are also important and should be at least checked with esr meter
if fuse blew there might be dead short somewhere, transistor or diode, get yourself an old incandescent lightbulb and power it with the bulb in series

I ordered replacements for every eletcrolytic, even the small ones, so I'll just replace everything.

You mention a dead short, which I take to mean zero resistance. I am still waiting on the new caps to arrive so I don't know if that changes anything, but I measured the resistance between the ground pins and all the pins on the motherboard AT connectors and this is what I got:

+5 = 21.9 Ohms
-5 = 231 Ohms
+12 = 54.2 Ohms
-12 = 146.9 Ohms
PG = 996 Ohms

They're all above zero, but I don't know what's considered good or not.

Also, you mention connecting up to an incandescent bulb, but I can't quite visualize what I should do. Am I replacing all the caps, putting it back together, and connecting only the bulb to use as a sacrifice so I don't ruin any of my valuable parts? Or am I connecting the bulb in some other way that I don't understand?

Thanks for your patience while I muddle my way through this. 😀

Reply 6 of 12, by rasz_pl

User metadata
Rank l33t
Rank
l33t

Switch meter to diode mode, thats the one beeping when shorted, and try buzzing in both directions every diode and transistor starting with big ones on radiators.
lightbulb https://www.youtube.com/watch?v=syQaSfhb604 (good channel with lots of tutorials). should work fine with your AT supply, its too old for active FPC

Open Source AT&T Globalyst/NCR/FIC 486-GAC-2 proprietary Cache Module reproduction

Reply 7 of 12, by danieljm

User metadata
Rank Member
Rank
Member
giantclam wrote on 2023-09-19, 05:38:

Measure the mains input side...

Okay, I checked the two input pins against each other, I checked them against ground, and I checked the output from the blown fuse against ground. All of them showed open loop, so I think that's a good sign. 😀

rasz_pl wrote on 2023-09-19, 06:30:

Switch meter to diode mode, thats the one beeping when shorted, and try buzzing in both directions every diode and transistor starting with big ones on radiators.
lightbulb https://www.youtube.com/watch?v=syQaSfhb604 (good channel with lots of tutorials). should work fine with your AT supply, its too old for active FPC

Nice. This should be really helpful. I should have more time tomorrow to go in-depth with all of that.

Thanks again everyone. The help is much appreciated.

Reply 8 of 12, by rasz_pl

User metadata
Rank l33t
Rank
l33t

Just keep in mind mains voltage is no joke, one bad move and you will get electrocuted while trying to measure something.
Only measure while unplugged from wall, make sure big caps are discharged.

Open Source AT&T Globalyst/NCR/FIC 486-GAC-2 proprietary Cache Module reproduction

Reply 9 of 12, by danieljm

User metadata
Rank Member
Rank
Member

Thank you for that warning. That was the one thing that I already knew about fixing PSUs, but it was still very much appreciated. 😁

So, I checked all the diodes and transistors and everything came back fine. I decided to just swap out all the caps and put in a new fuse and see what happens. I figured I'd see if the fuse blew again, and if it did I'd go back and try other things like building that light bulb box to limit wattage.

Sure enough, it came to life. I attached a couple sacrificial drives to give it a bit of a load and that was fine. So next I connected a socket 7 board that has some issues, so I wouldn't be too sad to see it go. That worked too, so I ran Duke 3D and let the intro demo mode run for a while and everything seems fine.

Not sure if there's a more thorough test I should run, but so far it seems really solid.

Thanks again for all the advice.

Reply 11 of 12, by PcBytes

User metadata
Rank Oldbie
Rank
Oldbie

I would also suggest upgrading the secondary sillicon if possible.

I did this to an older ESCOM (or whatever was it named) PSU that had 2x FR diodes for 12v - basically a full recap (including primary caps!) using parts from a discarded Raidmax (which had failed main switchers).
The end result was a nice PSU that I'd guesstimate to another 30-50W over the 200W original rating it had. Kinda overkill very likely but in any case, it'll have more room in case I have a mobo that needs to convert the 3.3v rail from 5v - I have installed a 30A rectifier for 5v in that regard, and IIRC a 12 or 16A rectifier for the 12v.

"Enter at your own peril, past the bolted door..."
Main PC: i5 3470, GB B75M-D3H, 16GB RAM, 2x1TB
98SE : P3 650, Soyo SY-6BA+IV, 384MB RAM, 80GB

Reply 12 of 12, by danieljm

User metadata
Rank Member
Rank
Member
shamino wrote on 2023-09-24, 08:48:

Check the voltages you're getting from it while it has that load attached.

I should have mentioned that's what I did when I had the sacrificial drives hooked up. I got just a hair over 5v and 12v on their respective lines.

PcBytes wrote on 2023-09-24, 11:14:

I would also suggest upgrading the secondary sillicon if possible.

I did this to an older ESCOM (or whatever was it named) PSU that had 2x FR diodes for 12v - basically a full recap (including primary caps!) using parts from a discarded Raidmax (which had failed main switchers).
The end result was a nice PSU that I'd guesstimate to another 30-50W over the 200W original rating it had. Kinda overkill very likely but in any case, it'll have more room in case I have a mobo that needs to convert the 3.3v rail from 5v - I have installed a 30A rectifier for 5v in that regard, and IIRC a 12 or 16A rectifier for the 12v.

When you say secondary silicon, I'm not sure what that means. I did replace every cap on the board, not just the big ones. As for the other components on there, I'm not sure what would be good to replace. Sorry, I'm definitely not savvy about how electricity works in something I would consider complicated like a PSU. I just know that I can replace caps with new ones that have the same numbers on them. 😁