VOGONS


First post, by dura-zell

User metadata
Rank Newbie
Rank
Newbie

Hi

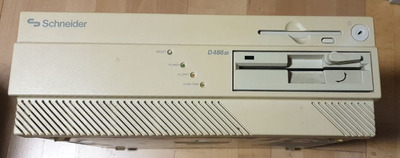
Currently on my bench sits a "Schneider D486 20"
As the name implies, its an 486. Specifically an 486-SX, clocked at 20MHz. The whole thing is a bit weird as there are almost no infos on this machine on the web. (No, its not an CPC type machine and not something in the line of the "Euro AT", both of which were built by Schneider). I'll put some pictures at the end of the post.

Unfortunately - before I can try out the computer, I need to fix the PSU. And this is where I need help. I wasn't able to find any schematics and reverse engineering an SMPS is a bit over my head. The PSU itself is a bit weird as it is neither a regular AT PSU nor an ATX type of PSU but something in between. The power connector itself is also something specific to this machine.

Symptoms:
Whe power is applied and the device is powered on, I get no power whatsoever on the power connector or on the two Molex connectors.

Here is what I know:
- the PSU is built by a company called "dual" and was OEMed by Schneider for this specific line of computers
- The PSU is a switch mode power supply on one side but has a linear power supply also built in
- the linear part has the sole purpose of operating a relay which in turn controls the pass-through connector for a screen and power to the switch-mode part of the PSU
- the machine is powered by turning a key in the front of the device. This is routed to a connector on the mainboard and from there to a pin on the main power connector.
- The SMPS part of the supply seems pretty standard but uses a somewhat unusual / rare controller chip ( SGS-THOMSON TEA2260)

Here is what I did so far
- visual inspection and cleaning: Looks good so far, no cold solderjoints, no leakage. Lots of flux on the underside but this looked like fabrication residue and not someone trying to fix it. Cleaned that up.
- the linear part is working fine. Switch works, relay works and the SMPS part gets power as expected
- fuse is fine
- measured all caps out of circuit. Changed most of them, even when there were within specs just to make sure.
- checked all diodes
- checked all recitifiers
- checked the high voltage side: Power gets to the HV rectifier, to the controller chip and to the power transistor (Sharp S2000A)
- checked said transistor out of circuit with a testing device and additionally with a diode tester
- measured the low voltage side: directly after the transformer for the low power side, there is already now voltage

What I did not so far:
- checking the optocoupler. I have no idea how to check this
- testing the pulses from the controller chip to the transistor: I have a scope but dont want to risk frying it as there is high voltage in play and this part of the PCB is pretty cramped. I measured these with the multimeter, there is some voltage but I can't tell if it is correct.

I know that I can swap in a regular ATX PSU but I want to keep the original one if possible as it is quite an oddball which deserves to be preseverd (at least in my opinion).

So after this "wall of thext" now my question(s):
Has anyone heard of this computer in general and can supply any info about it. Obviously I'm particular interested in the PSU but as there is literally no info at all in the web I would take anything else gladly.
If there were any schematics of the PSU I would be extremely happy.
Has anyone an idea about where to look, what to check - any hint would be appreciated.
As for my background: I know how to work with electronics and also with line-voltage. I can read schematics and operate testing equipment and I'm aware of the risks involved here (charged caps, high voltage DC etc.)

Front of the computer:

front2.jpg
Filename
front2.jpg
File size
67.82 KiB
Views
271 views
File license
CC-BY-4.0

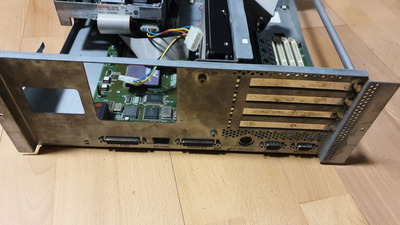
Back of the computer:

back.jpg
Filename
back.jpg
File size
154.09 KiB
Views
271 views
File license
CC-BY-4.0

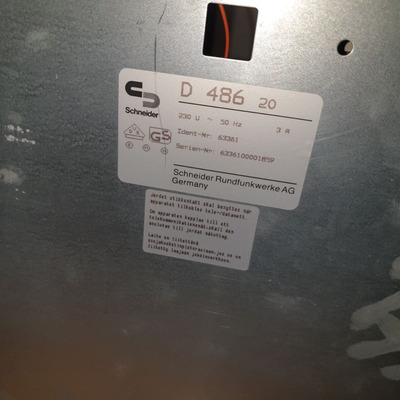
Bottom with model/serial:

sticker.jpg
Filename
sticker.jpg
File size
183.69 KiB
Views
271 views
File license
CC-BY-4.0

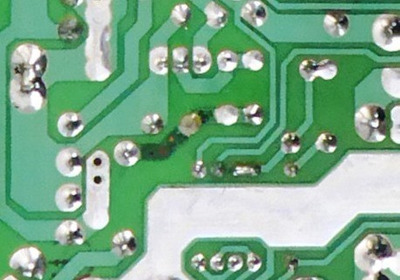
PSU top and bottom view:

nt-top.jpg
Filename
nt-top.jpg
File size
573.19 KiB
Views
271 views
File license
CC-BY-4.0
nt-bottom.jpg
Filename
nt-bottom.jpg
File size
412.48 KiB
Views
271 views
File license
CC-BY-4.0

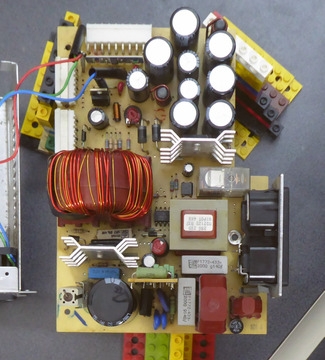
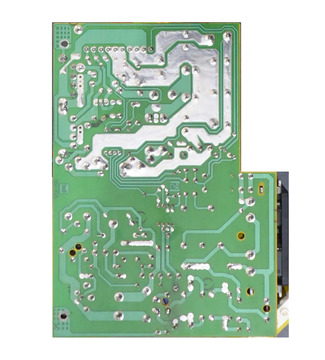
Please note that the bottom is flipped to match the top side. Tried to follow the traces here. Please also note that there are two daugher boards involved. Both are sticking vertically out of the main PCB and are therefore not good to see.
One is located near the large cap on the high voltage side of the PCB and holds the controller chip and some passives. The other one is just below the mainboard connector and has an analog comparator on it. I assume it is part of the regulation circuit and/or generates a power good signal. I'm not allowed to add more than 5 pictures to this post but will supply additional pictures if needed.

Greetings,
dura-zell

Reply 2 of 8, by dura-zell

User metadata
Rank Newbie
Rank
Newbie

Hi

actually I'm not sure.
When inspecting the pcb I did checkfor continuity and everything was fine. To be sure, I added a wire between the solderjoints.
On the other side of the board are I beleive an inductor, -12V regulator and an potentiometer.

greetings
dura-zell

Reply 3 of 8, by Deunan

User metadata
Rank Oldbie
Rank
Oldbie
dura-zell wrote on 2024-02-24, 18:27:

actually I'm not sure.
When inspecting the pcb I did checkfor continuity and everything was fine. To be sure, I added a wire between the solderjoints.
On the other side of the board are I beleive an inductor, -12V regulator and an potentiometer.

Desolder all nearby electrolytic capacitors, this is usually a sign that one of them leaked it's fluid and corroded the trace. This would not be obvious from the top side if the leak was slow, along the lead, as this is single-sided PCB and the holes are not plated so any fluids tend to easily wick into the holes. If in doubt replece the capacitor. The secondary side of SMPS is usually where caps would age quickly and once the ERS goes up it's a runaway situation - temp. rises and the cap will either dry out or leak, or sometimes even vent. If this was 85C then think about 105C replacement. Preferably low-ESR but it's not critical (as on mobo CPU rails), any decent modern electrolytic will work fine.

EDIT: If you already replaced that one, ignore my ramblings. As for the PSU, make sure you attach some load to it, I like using 12V automotive light bulbs - you can use it for 5V as well, or get another 6V bulb. Do note a 12V bulb at 5V will draw more current since it'll be colder than it is supposed to be.
Do not connect your scope to the PSU primary side unless you have a differential probe rated at 400V at least. Yes, there are tricks, like isolating the scope ground lead, but none of that is safe - for you or the scope, or the PSU. It's just better not to do it then regret it. If the PSU doesn't start even with the load, perhaps the PWM chip is dead? If it's cheap to buy then get a replacement before investing a lot of time into circuit analysis.

Reply 4 of 8, by dura-zell

User metadata
Rank Newbie
Rank
Newbie

Hi

I did all tests with 4 sacrificial harddrives connected to the PSU. These are rated with 0.6 amps wich exceedes the minimal load of 2 Amps a noted on the PSU itself. Thought about lightbulbs too but didn't have any around so the harddisks were the way to go.

In the direct vicintiy there is one electrolytic. Did not look bad, neither on the top nor on the bottom after desoldering it. I did not replace it as I do not have this specific one in stock, but I did measure it. According to the device it's fine. (One of these LCR-T4 things you get for a few bucks from amazon, doublechecked with my dmm.). But now when checking a bit closer, the -12V regulator doesn't look that great. Maybe check this one a bit more and order the cap nonetheless. (Any idea how to test a -12V regulator?)

As for the specs of recapping in general:
I tend to use caps which are rated for a higher rated voltage and temperature if possible. I do not change electrolytic for ceramic ones. I did not pay special attention for low-esr and had no issues so far but YMMW - I know about it, just didn't care for PSUs.

For the scope:
I do have a probe rated for 450V but this is only half of my concern. The other half is that while probing I'll short something out or connect something like 385DC to the probe without intending it. As said: its pretty cramped there.
And no - I won't do any tricks here but instead try without the scope.

The PWM chip seems to do "something" but I'm not sure if it's doing the correct thing. I think its not that expensive from what I found with google. The main issue would be to find a shop which has it in stock.

greetings,
dura-zell

Reply 5 of 8, by Deunan

User metadata
Rank Oldbie
Rank
Oldbie
dura-zell wrote on 2024-02-24, 19:36:

Any idea how to test a -12V regulator?

The only true test for any voltage regulator is to load it and measure the output (voltage, ripple). That being said it's rare for these things to go bad. I think it would be safe to remove it from PSU entirely if you suspect it's shorting the rail and tripping it into shutdown. The main rail is either 12V or 5V and that must be loaded, other ones not so much (though without nominal load the voltages might not be in spec).

dura-zell wrote on 2024-02-24, 19:36:

I do have a probe rated for 450V but this is only half of my concern.

Differential probe. Unless you do have one? The problem is shorting, yes, but not with the probe but the ground clip. It's tied to earthing via the scope body and everything on the primary side tends to float at half the mains voltage for 230V regions. Some PSUs can even be at line voltage for the primary "ground", depending how the L/N lines go into it.

dura-zell wrote on 2024-02-24, 19:36:

The PWM chip seems to do "something" but I'm not sure if it's doing the correct thing.

This is already secondary side, you can double-check that but it's typical configuration. So the chip can be probed with the scope safely, and the scope ground clip can be then attached to the ouput GND. If you worry about space inside the PSU then just solder a short wire to the point of interest and attache the probe to that. Just make sure the insulation on the wire is rated at 300V AC / 500V DC and not pinched or pricked by any sharp metal part. You can solder more then one wire but take care not to short them (including to each other).
If you ever have doubts about safety please measure the voltage (both AC and DC!) from the point you want to measure to the earthing pin/contact in the wall socket. Same with grounding point for the scope probe - this must result in 0V measurement. Then it's safe to attach the scope there. With differential probe both the signal and "ground" lead have high impendace to scope body so those can be attached anywhere as long as you don't exceeed its rated voltage.

Reply 6 of 8, by Jo22

User metadata
Rank l33t++
Rank
l33t++

Is that same PSU as used in the Tower AT model?

I'm asking, because I've essentially rebuilt that thing a few years ago. 😁

It took some tome, but it was worth it. Replacing the diodes by bigger ones (4007?) helped.
My MOSFET was broken, too.

Other than that, my memory is a bit foggy.

I vaguely recall that the negative voltage was being created in a very interesting way.
Essentially by using a trick circuit, hah. 🙂

The little daughter card had some "power good" circuit that remote-controlled the PSU, essentially.

Oh well, that's all that comes to mind rught now.

"Time, it seems, doesn't flow. For some it's fast, for some it's slow.
In what to one race is no time at all, another race can rise and fall..." - The Minstrel

//My video channel//

Reply 7 of 8, by dura-zell

User metadata
Rank Newbie
Rank
Newbie

Good Morning

Unfortunately it is not the same. I could only find one picture on a german site (http://retro-net.de/?id=73 / Click on the pictureof the system and then "right" two times). It looks a bit similar with the daughterboard but still quite different.

The negative Voltage is created with a regular ST L7912CV and the rest of the circuit looks more or less "run of the mill" - seems that they did nothing "naughty" here. I think I'll remove the IC later today and also check a bit closr on the PWM chip. Obviously I can replace most parts "just like that" (except for the transformers) but if possible I would like to find the cause of the issue.

greetings,
dura-zell

Update: removed the Cap and -12V regulator and had no change in behavior. Waiting now for the new Cap before reassembling and testing again.

Reply 8 of 8, by dura-zell

User metadata
Rank Newbie
Rank
Newbie

Hi

Short Update:
Replaced the Cap und -12V regulator with no difference.

Currently I'm now concentrating on the SMPS-Controller daughterboard. I'm powering the board with a regular 12V power supply. This gives me the possibility to measure with the scope.
I also dug up an application note: https://archive.org/details/bitsavers_sgsdata … ual2Ed_71700791
I'm linking it as the complete file is about 70MB. The TEA2260 is explained in great detail from page 579 upwards.

At least I can say that the internal oscillator of the TEA2260 ist running (20KHz) and all "outputs" are nominal. For some reason it still refuses to pulse the transformer. Not sure why.
Could be that it expects some kind of input that I'm not "emulating" correctly. I'm still evaluating this.

keep you guys posted...

greetings,
dura-zell