VOGONS


Reply 520 of 858, by MJay99

User metadata
Rank Member
Rank
Member
n0p wrote on 2023-10-24, 07:36:

Just a quick question - does capacitor has to be exactly 100nF? There's some problem getting parts locally, so it would be great to know possible range.

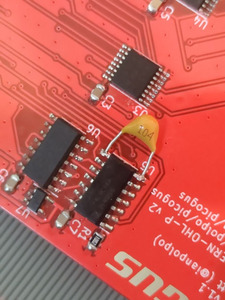
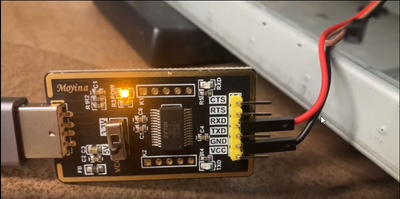
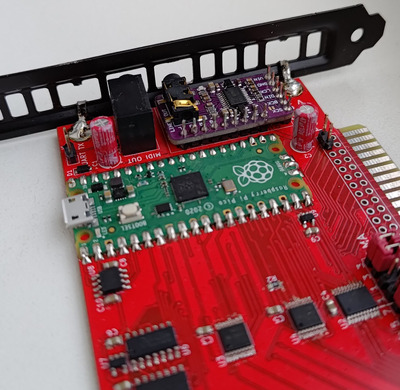
100nF ceramic caps are the most common and generic decoupling caps, which is why I picked one of them and it happened to instantly fix the issue I had. If you want, you can of course also patch in one of the SMD ones this card already uses. Just, since it needs to bridge over another pin, it would have been a lot more work to me than simply using such a through-hole one.

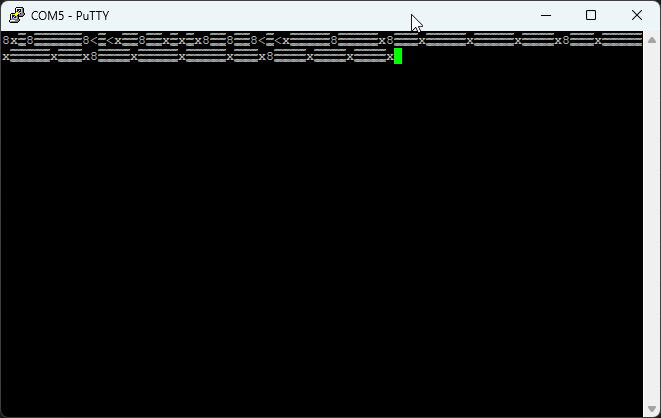
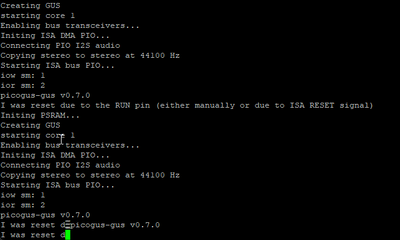
Apart from that: There is no harm at all in trying something else in the Nanofarad range. Actually, since I couldn't even see a good reason for the resets on the oscilloscope at all and even trying two totally different routings to no avail, it's really not been a calculated value and more of a rather desperate 'lets-throw-things-at-it' approach, after seeing it reporting the RUN pin as the reason for the resets. Funny enough, this almost surprisingly instantly helped on both of my variants.

Reply 521 of 858, by Tiido

User metadata
Rank l33t
Rank
l33t

This sort of issue was also the cause of the "reset bug" on my YMF71x card, and I only very recently discovered a fix to it when I found a way to consistently trigger it, and the mix was to put RC on the system reset line from ISA. Every so often there was a tiny few ns long spike on it which was enough to trigger reset on YMF71x... since the values are not critical I just used a 0.1µF capacitor too and a resistor there's several of in the design, in my case 470ohm.

T-04YBSC, a new YMF71x based sound card & Official VOGONS thread about it
Newly made 4MB 60ns 30pin SIMMs ~
mida sa loed ? nagunii aru ei saa 😜

Reply 522 of 858, by n0p

User metadata
Rank Member
Rank
Member
MJay99 wrote on 2023-10-24, 22:55:

100nF ceramic caps are the most common and generic decoupling caps

Thank you!
I found those easy 😀
--
Test results. Those are personal for sure and might contain my error, "does not recognize" means pgusinit cannot see the card:
1. Paper insulator: No blinks on Pico, Hand386 and Book8088 doesn't recognize the card. I definitely might did something wrong here.
2. 100nF capacitor on 28-30 pins on Pico: No luck on both Hand386 and Book8088. One blink on Pico, Hand386 and Book8088 doesn't recognize the card, tried both capacitor orientations.
3. 100nF capacitor on U5 chip: One blink on Pico, worked right away on Hand386, but not on Book8088.

Edit: Forgot to mention behaviour w/o fix:
TC430HX with P166MMX@200Mhz - blinks two times on power on, works perfect with and without fix 3.
Hand386/Book8088 w/o fix 3 - blinks many times in some kind of repeating pattern.

Attachments

Reply 523 of 858, by MJay99

User metadata
Rank Member
Rank
Member
n0p wrote on 2023-10-25, 09:40:

3. 100nF capacitor on U5 chip: One blink on Pico, worked right away on Hand386, but not on Book8088.
[...]
Hand386/Book8088 w/o fix 3 - blinks many times in some kind of repeating pattern.

Frequent blinking can be a sign of repeating resets. To really be sure it's the RUN pin issue, you could use one of those really cheap USB to UART TTL adapters from Ali (e.g. this: 1005001587731393) and check if it's really showing that error message on the two pin debug header. You could also play around a bit with different capacities or maybe even two caps on the pico and U5 (btw.: orientation of these ceramic caps doesn't matter).

Adding a resistor into the RESET or RUN line, as Tiido mentions, could certainly help also (I actually had added a footprint for that into my version also, including a jumper to force it high to 3.3V, if all else fails, but luckily didn't have to use it in my card/mainboard combination). It's just much more difficult to accomplish that in the finished card you have... maybe, if all else fails, you could try and cut the trace and wire it in there, but that's certainly a much more involved patching 😁

Another idea, though, since it's working on your Hand386 now: maybe the power supply of the Book8088 is a really bad and much more noisy one. If that might be the case, swapping it with another suitable (and better) one could maybe help, too...

Reply 524 of 858, by n0p

User metadata
Rank Member
Rank
Member
MJay99 wrote on 2023-10-25, 21:06:

Frequent blinking can be a sign of repeating resets. To really be sure it's the RUN pin issue, you could use one of those really cheap USB to UART TTL adapters from Ali (e.g. this: 1005001587731393) and check if it's really showing that error message on the two pin debug header. You could also play around a bit with different capacities or maybe even two caps on the pico and U5 (btw.: orientation of these ceramic caps doesn't matter).

Adding a resistor into the RESET or RUN line, as Tiido mentions, could certainly help also (I actually had added a footprint for that into my version also, including a jumper to force it high to 3.3V, if all else fails, but luckily didn't have to use it in my card/mainboard combination). It's just much more difficult to accomplish that in the finished card you have... maybe, if all else fails, you could try and cut the trace and wire it in there, but that's certainly a much more involved patching 😁

Another idea, though, since it's working on your Hand386 now: maybe the power supply of the Book8088 is a really bad and much more noisy one. If that might be the case, swapping it with another suitable (and better) one could maybe help, too...

Thank you!
Will this one (photos) do? I used it to work with HDD firmware.
--
I certainly don't want to do potentially disastrous things to board - i can repair a trace, but ruining nice red working board for that one possible use will be a really hard decision for me. Some reversible solution would be great.
Using it with Book8088 might be not practical at all, so we can actually forget about this exact incompatibility 😀

Attachments

Reply 525 of 858, by MJay99

User metadata
Rank Member
Rank
Member
n0p wrote on 2023-10-26, 05:37:

Will this one (photos) do? I used it to work with HDD firmware.
[...]
Using it with Book8088 might be not practical at all, so we can actually forget about this exact incompatibility 😀

I found similar devices on the interwebs and I'd say it should do (uses 3,45V and accepts up to 5V signals).
The header on the picogus are TXD and GND. So you need to change the wiring from the one I see on your picture.

I don't have the card in front of me right now, but if not shown on the silkscreen, identifing the correct pin for TXD should be easy: only one should have a trace going to it, the other is on a GND-fill, as far as I remember.

And you're right, a GUS on an 8088 might not work with a lot of software... maybe Freddy's MODMXT might be able to use it to some extend😄

Reply 526 of 858, by n0p

User metadata
Rank Member
Rank
Member

Well, not much to report, sorry:
On Book8088:

picogus-gus v0.7.0
I was reset due to the RUN pin (either manually or due to ISA RESET signal)
Initing PSRAM...
Creating GUS
starting core 1
Enabling bus transceivers...
Initing ISA DMA PIO...
Connecting PIO I2S audio
Copying stereo to stereo at 44100 Hz
Starting ISA bus PIO...
iow sm: 1
ior sm: 2

On Hand386 exactly the same, but after pgusinit gives one more log string

setting dma interval to 0

So Book8088 simply cannot talk to PicoGUS control port for some reason. I really don't think there's something sitting on 1D0h there. Either way, definitely not a PicoGUS problem.

Reply 527 of 858, by polpo

User metadata
Rank Member
Rank
Member
n0p wrote on 2023-10-26, 17:21:
Well, not much to report, sorry: On Book8088: […]
Show full quote

Well, not much to report, sorry:
On Book8088:

picogus-gus v0.7.0
I was reset due to the RUN pin (either manually or due to ISA RESET signal)
Initing PSRAM...
Creating GUS
starting core 1
Enabling bus transceivers...
Initing ISA DMA PIO...
Connecting PIO I2S audio
Copying stereo to stereo at 44100 Hz
Starting ISA bus PIO...
iow sm: 1
ior sm: 2

On Hand386 exactly the same, but after pgusinit gives one more log string

setting dma interval to 0

So Book8088 simply cannot talk to PicoGUS control port for some reason. I really don't think there's something sitting on 1D0h there. Either way, definitely not a PicoGUS problem.

I checked with someone who has a Book8088 and one of my "Femto" PicoGUS boards that are made to plug directly into the ISA pin header on the Hand386/Book8088. He says it works and he can play mods in Mod Master XT with it. The major difference with that board is that it uses a 74AHC14 at U5 instead of the 74LVC14 chip. If you are comfortable desoldering SMT components, and can source a 74AHC14 in SOIC-14 footprint, you can try replacing it. However, the use of the PicoGUS on a 8088/8086 board is pretty limited, so it may not be worth it.

Reply 528 of 858, by polpo

User metadata
Rank Member
Rank
Member

I thought I'd give an update on PicoGUS 2.0: boards are now in production at JLCPCB. I hope to get them by next week! Also, I have quotes out with some sheet metal bracket fabricators for a metal bracket for PicoGUS 2.0. That will raise the selling cost of PicoGUS 2.0 from $40 to $45, but I think a real metal bracket will be worth the cost. That does delay the release of PicoGUS 2.0 by 2-3 weeks, but again I think it will be worth it. It will also give me some more time to work on firmware improvements like USB joystick support and increasing the reliability of firmware flashing from DOS on some chipsets.

One thing I discovered when designing the new bracket is that the ISA card dimensions I've been using are wrong. I've been using the diagram in this well-researched blog article but it has an error: the distance from the center of ISA pad A1 to the card bracket face is too short by about 1mm. I'm now using the dimensions from the EISA spec, corroborated with caliper measurements from about 15 different ISA cards in my collection. If people have been finding that their PicoGUS cards with 3D printed brackets don't quit fit perfectly in their PCs, this wrong dimension is the reason why. I'll be releasing corrected STL files for the brackets soon.

Also, I am working on a prototype PicoGUS v1.2 design. The goal of it is to solve a few of the issues with the v1.1/v1.1.1 design and do things a bit differently to have a design that is as friendly for DIY assembly as v1, but also makes full PCBA production at places like JLCPCB possible. The changes are:
- Add pull down on RESET and RC on RUN, and specs 74AHC14 for U5 to prevent reset glitches
- For the DAC, you can either use the purple DAC module that previous versions use, or use the footprints for a PCM5100 and supporting circuitry directly on the board
- Uses 5V open collector on MIDI out to allow use of more commonly available resistors
- Uses 1206 SMT resistors instead of the two through-hole electrolytics

In a nutshell, PicoGUS v1.x will continue to be the DIY option, as PicoGUS v2.0 only really makes sense for fully automated assembly.

Screenshot 2023-10-30 at 3.07.01 PM.jpeg
Filename
Screenshot 2023-10-30 at 3.07.01 PM.jpeg
File size
391.55 KiB
Views
2005 views
File license
Public domain

Reply 529 of 858, by 640K!enough

User metadata
Rank Oldbie
Rank
Oldbie
polpo wrote on 2023-10-30, 21:31:

I thought I'd give an update on PicoGUS 2.0: boards are now in production at JLCPCB. I hope to get them by next week! Also, I have quotes out with some sheet metal bracket fabricators for a metal bracket for PicoGUS 2.0. That will raise the selling cost of PicoGUS 2.0 from $40 to $45, but I think a real metal bracket will be worth the cost.

It's interesting to read this. Back when the ARGUS project was still active, I did a good bit of the legwork on that, but ultimately, there was no interest from other stakeholders due to cost. The cost per bracket, in quantity, was reasonable; it was the four-figure tooling cost that was a little difficult to swallow. Even then, divided by the number of cards that we were originally expecting to produce, it still wasn't too bad, but the effort never went anywhere, because of the continued lack of buy-in. It was a shame, really, as that would have made the whole thing look so much more professional.

Are you seeing numbers that look anything like that? Are your quotes from the major U.S.-based manufacturers?

Reply 530 of 858, by polpo

User metadata
Rank Member
Rank
Member
640K!enough wrote on 2023-10-31, 01:36:

It's interesting to read this. Back when the ARGUS project was still active, I did a good bit of the legwork on that, but ultimately, there was no interest from other stakeholders due to cost. The cost per bracket, in quantity, was reasonable; it was the four-figure tooling cost that was a little difficult to swallow. Even then, divided by the number of cards that we were originally expecting to produce, it still wasn't too bad, but the effort never went anywhere, because of the continued lack of buy-in. It was a shame, really, as that would have made the whole thing look so much more professional.

Are you seeing numbers that look anything like that? Are your quotes from the major U.S.-based manufacturers?

I'm not seeing numbers anything near that. In order to get the price down to anything I'd consider acceptable for a hobbyist-level project, I had to go to China. I'm getting used to dealing with sellers on Alibaba by now – I've purchased 3.5mm TRS to 5-pin MIDI adapters and the PSRAM chips that PicoGUS needs from there. So now that I'm brave enough to try having brackets made, I found a few vendors who do custom card brackets that I sent quote requests to. The ones that advertised a minimum order quantity of 100 pieces (which is what I'm doing) advertise less than $1 per bracket, but the quotes I've gotten so far fall between $2-$3 per bracket, and then add $80 or more for shipping to the US. It's not cheap by most metrics, but I'd consider that well within reach. There is no tooling cost because the brackets are CNC laser cut and I assume they already have brakes set up to bend PCI brackets. I asked if the fact that the screws on these ISA cards are on the opposite side from PCI cards would be an issue and they say it isn't a problem. For my drawings, I'm using the Keystone 9202's datasheet as a basis.

Reply 531 of 858, by Shreddoc

User metadata
Rank Oldbie
Rank
Oldbie

By comparison: Considering the retail cost of a 9202 blank bracket - a few bucks apiece plus shipping, for a hobbyist making a card or two - not to mention the effort of accurately drilling the holes at home oneself, the abovequoted $3-4 (after shipping) per fabricated bracket seems very reasonable.

Reply 532 of 858, by n0p

User metadata
Rank Member
Rank
Member
polpo wrote on 2023-10-30, 21:06:

I checked with someone who has a Book8088 and one of my "Femto" PicoGUS boards that are made to plug directly into the ISA pin header on the Hand386/Book8088. He says it works and he can play mods in Mod Master XT with it. The major difference with that board is that it uses a 74AHC14 at U5 instead of the 74LVC14 chip. If you are comfortable desoldering SMT components, and can source a 74AHC14 in SOIC-14 footprint, you can try replacing it. However, the use of the PicoGUS on a 8088/8086 board is pretty limited, so it may not be worth it.

Thank you! Looks like i can source Philips 74AHC14D. There's two versions of Book8088 so far, some ISA bus functionality might be fixed in V2.

Reply 533 of 858, by Delphius

User metadata
Rank Newbie
Rank
Newbie

Hello, I built my PicoGUS the other day, but I have been having a few issues I am trying to troubleshoot. I also have a issue ticket on the github that you can follow here. https://github.com/polpo/picogus/issues/20

As an overview I have been having issues with initializing the card. When using anything that requires the DAC module there is a maybe 1 / 6 chance that the card will initialize correctly. It will work however, but I have to reset the computer until I see at least one blink on the PicoGUS. I also discovered that when using the pg-mpu.uf2 it works 100% of the time, so this at least tells me that it is mostly working.

Currently I am in the process of trying to debug through UART, but I am also having troubles with that. I am familiar with how it should work, and I have two different RS232 TTL adapters that should work. However everything I have received so far in my putty terminal is coming in scrambled. I have tried changing baud rates and a few other settings with no success. I am hoping I might find some insight on this.

Here is my current setup and a screen shot of how the data is received when turning the computer on.

Signal_vya9kv72JN.png
Filename
Signal_vya9kv72JN.png
File size
477.94 KiB
Views
1749 views
File license
Public domain
putty_PTTTKaQWQV.png
Filename
putty_PTTTKaQWQV.png
File size
5.6 KiB
Views
1748 views
File license
Public domain

Reply 534 of 858, by Delphius

User metadata
Rank Newbie
Rank
Newbie

Ok so the UART I was seeing putty was actually coming from the pg-mpu firmware. Maybe the console was showing MIDI. When I use the pg-gus firmware I am getting proper console feedback. Looks like I might also be dealing with a sensitive reset line? This is strange because I already put a 100nf capacitor on RUN pin, and have tried masking the reset pin on the ISA. I guess I will keep trying.

putty_Bw7Cjw1jxu.png
Filename
putty_Bw7Cjw1jxu.png
File size
17.91 KiB
Views
1721 views
File license
Public domain

Reply 535 of 858, by MJay99

User metadata
Rank Member
Rank
Member

It does indeed look like such an issue there, too.

If all else fails (i.e. also the cap nop put on U5: Re: PicoGUS: ISA sound card emulator with Raspberry Pi Pico (Gravis Ultrasound, AdLib, MPU-401, Tandy, CMS)), maybe it would be an idea to also try and isolate the corresponding pin from U5 (bend away, or kapton tape underneath pin 8, iirc) and either feed 3,3V into the RUN pin (via a pullup-resistor, e.g. from pin 36 of the pico), or: fully isolate the pico's RUN pin (as it should have an internal pull-up already):
https://forums.raspberrypi.com/viewtopic.php?t=319671

And maybe (since I haven't tried that option, yet, since my issue was solved by that simple cap alone), polpo's fix of a 74AHC14 replacing U5 could help you, too?

Reply 536 of 858, by Delphius

User metadata
Rank Newbie
Rank
Newbie
MJay99 wrote on 2023-11-04, 22:23:
It does indeed look like such an issue there, too. […]
Show full quote

It does indeed look like such an issue there, too.

If all else fails (i.e. also the cap nop put on U5: Re: PicoGUS: ISA sound card emulator with Raspberry Pi Pico (Gravis Ultrasound, AdLib, MPU-401, Tandy, CMS)), maybe it would be an idea to also try and isolate the corresponding pin from U5 (bend away, or kapton tape underneath pin 8, iirc) and either feed 3,3V into the RUN pin (via a pullup-resistor, e.g. from pin 36 of the pico), or: fully isolate the pico's RUN pin (as it should have an internal pull-up already):
https://forums.raspberrypi.com/viewtopic.php?t=319671

And maybe (since I haven't tried that option, yet, since my issue was solved by that simple cap alone), polpo's fix of a 74AHC14 replacing U5 could help you, too?

I would be open to trying some things out, especially if it helps with development of the next revision. I have already tried adding caps to U5. I started with a 100nf which I think did help a little, and also doubled it with another 100nf which seems about the same. But overall it is not behaving in a way that I would expect. Sometimes I will have a lucky streak and it will fully initialize after 4 or 5 computer resets. But usually I just get a reset error right as I turn the computer on, or a dozen power cycles where I don't even get UART data to show up. So far this has been the same behavior with two of my AG430HX chipset motherboards, so it could be a specific compatibility thing as well. I had no luck with 440BX either, but I didn't spend a lot of time checking IRQ's and DMA's so it could have been a different configuration error. I have a 430VX (I think) motherboard I would also like to try, but it is not setup as a full system at the moment.

I would be curious in replacing with the 74AHC14 as well, seems like less work then lifting the pin and fully isolating with a pull up resistor.

Reply 537 of 858, by vutt

User metadata
Rank Member
Rank
Member

I thought I share my ultra cheap good enough bracket solution aka what can be used from spare parts bin. Bracket is from my CM NR200 itx case.
It's not exactly sturdy so should be handled with care, but from plus side you can fix 1mm mounting holes bracket alignment issue with ease 😀

Attachments

  • IGusbr.jpg
    Filename
    IGusbr.jpg
    File size
    340.46 KiB
    Views
    1601 views
    File license
    Fair use/fair dealing exception

Reply 538 of 858, by Delphius

User metadata
Rank Newbie
Rank
Newbie
vutt wrote on 2023-11-05, 11:32:

I thought I share my ultra cheap good enough bracket solution aka what can be used from spare parts bin. Bracket is from my CM NR200 itx case.
It's not exactly sturdy so should be handled with care, but from plus side you can fix 1mm mounting holes bracket alignment issue with ease 😀

Nice idea! Thanks for sharing!

Reply 539 of 858, by Delphius

User metadata
Rank Newbie
Rank
Newbie

I feel like I might have something else going on besides the common reset bug, but I am not sure exactly what it is. I have taped the ISA reset pin up and did a little probing. The cap on U5 does seem to clean things up on pin 9 (seems to be the reset input?), but when I probe directly from the ISA bus reset pin there is still a lot of activity happening even though it is taped off from the motherboard. Almost like there is a data line that is bridged with it. I have been testing short circuit from that pin but all that I can find it connecting to is U5 pin 9. There must be something I am missing or not understanding.

Debug never shows a bunch of repeating reset's or anything like that either. Most of the time it doesn't make it past the first reset or even try to initialize. I have checked all my work over a few times under the microscope and everything looks good as far as I can tell.