VOGONS


First post, by Justin1091

User metadata
Rank Member
Rank
Member

Hey guys,

For some time I notice my Iiyama Vision Master Pro 514 has a dim output. I've used it extensively for years so I didn't notice it that much until I got a look at another monitor.

At 100 brightness and contrast it's still a lot darker than it used to be. At factory 50% brightness you can't see anything in games.

So probably it's dying I guess, but maybe someone here has an other idea. It has two outputs and I tried both. I have a Vision Master Pro 513 or similar age and it's way brighter.

Tried on Windows 98 - v5 5500 and Windows 7 - gtx 970 both are dark.

Reply 2 of 9, by duga3

User metadata
Rank Member
Rank
Member

This can actually be fixed in most cases 😀 The following works for me on another Diamondtron monitor (Mitsubishi 2070SB) so you can try it and maybe it will work on yours too:

1) Turn the monitor ON while holding down EXIT button

2) after you see picture, stop holding EXIT and press (not hold) EXIT once again

3) press MINUS once and you will see 255

4) press PLUS several times until you see 5

5) press SELECT

You should then be in Factory Mode (= a service menu with extra options available). To cancel Factory Mode you need to change 5 to 10 and then press SELECT. Changes made in Factory Mode will propagate to regular usage like you would expect.

If this works for you then write here and I can tell you more about which settings to change, dont try them on your own just yet because some of them can possibly "brick" your monitor (mainly the high voltage settings).

If this will not work then you could (as a last resort) take off the housing and adjust some knob(s) while its turned on.

BTW, is there a difference in picture when it has just been powered on and when being turned on for an hour?

98/XP multi-boot system with P55 chipset (build log)
Screenshots
10Hz FM

Reply 3 of 9, by Justin1091

User metadata
Rank Member
Rank
Member

Thanks for the replies.

Duga, you're right I completely forgot about that menu. I searched a bit online and found a service manual and how to activate the menu.
I have attached a screenshot of the manual showing which options the menu shows.

iiyama service.PNG
Filename
iiyama service.PNG
File size
130.89 KiB
Views
1782 views
File license
Fair use/fair dealing exception

If an option is changed there, there is no way to revert it right? Which ones should I change? I'm also still unsure what's too dark: brightness, contrast or gamma correction. Contrast is at 100% (0.7V), Brightness at 100% and Gamma Correction at 62%.

BTW, is there a difference in picture when it has just been powered on and when being turned on for an hour?

Well, it needs some time to warm up so the picture aligns with the monitor, but that's normal right? Brightness is the same after 3 seconds of powering on vs 2 hours.

Attachments

Reply 4 of 9, by duga3

User metadata
Rank Member
Rank
Member

This is progress, nice!

The menu is quite different to what I am used to so give me some time to have a look at that manual and I will get back to you later today. But at first look I dont think you can adjust it from menu alone 😒

Start by writing down all settings values on paper somewhere (+backup) so you have something to revert to in case you mess up.

Then try changing the Brightness value from factory mode in case it will let you push it past what you could push it via regular user menu. But I dont think that will be possible.

98/XP multi-boot system with P55 chipset (build log)
Screenshots
10Hz FM

Reply 5 of 9, by duga3

User metadata
Rank Member
Rank
Member

Where do you see this "Gamma Correction" setting exactly? I cant find it mentioned anywhere.

Also, the settings from your screenshot are pretty limited. Are there no other pages in the factory menu with more settings? On my Diamondtron model (2070SB) there is a ton more settings like this for example:

FACTORY 1

CPDIS 001 PRDIS 001 HVZER 000
V-PUR 07F HPR-G 080 DBF2T 037
DBF2B 037 DBF4T 000 DBF4B 000
HFOCS 0C8 VFOCS 001 HFOCD 035
SOG-E 001 DIREC 001 WPDDC 000
HPURC 000 VPURC 000 6G-DC 0C0

FACTORY 2

YH-TT 0F3 YH-TB 0A0 YH-JT 05A YH-JB 0A4
XH-L 08B XH-R 060
PQHTL 018 PQHTR 053 PQHBL 05A PQHBR 05A
S3HTL 07F S3HTR 051 S3HBL 099 S3HBR 0B1
YV-TT 03D YV-TB 037 YV-JT 0A9 YV-JB 06B
XV-L 06E XV-R 01E
PQVTL 09E PQVTR 05F PQVBL 04E PQVBR 0DE
S3VTL 04F S3VTR 0E4 S3VBL 0C3 S3VBR 04C

FACTORY 3

R-BS1 0C0 G-BS1 0DB B-BS1 0CC
R-BS2 0C2 G-BS2 0DB B-BS2 0C8
R-BS3 0C5 G-BS3 0DB B-BS3 0C5
R-GN1 08B G-GN1 07F B-GN1 07F
R-GN2 087 G-GN2 075 B-GN2 066
R-GN3 080 G-GN3 069 B-GN3 04F
BTCEN 5A3 BTMAX 770 ABLAJ 07D
SBCN1 03C SBCN2 03C SBBR1 000 SBBR2 032

FACTORY-HV

HVADJ 063 XPCAL 063 XPROT 063 X-PRO 0B4

"BTCEN 5A3" from above is what I would need to change on my monitor in your situation. As you can see its surrounded by RGB bias/gain settings and ABL adjustment which you dont seem to have there either.

98/XP multi-boot system with P55 chipset (build log)
Screenshots
10Hz FM

Reply 6 of 9, by Justin1091

User metadata
Rank Member
Rank
Member
duga3 wrote:

This is progress, nice!

Then try changing the Brightness value from factory mode in case it will let you push it past what you could push it via regular user menu. But I dont think that will be possible.

Damn, I can't 🙁 It won't go past the 'user mode's' 100%.

duga3 wrote:

Where do you see this "Gamma Correction" setting exactly? I cant find it mentioned anywhere.

Strangely I only see it in 'user mode'. It's at the 'Picture Quality' menu along with Moiré, Degauss and Convergence. Increasing it helps a little, but it makes the picture look 'washed out' (grey get's white).

duga3 wrote:
Also, the settings from your screenshot are pretty limited. Are there no other pages in the factory menu with more settings? On […]
Show full quote

Also, the settings from your screenshot are pretty limited. Are there no other pages in the factory menu with more settings? On my Diamondtron model (2070SB) there is a ton more settings like this for example:

FACTORY 1

CPDIS 001 PRDIS 001 HVZER 000
V-PUR 07F HPR-G 080 DBF2T 037
DBF2B 037 DBF4T 000 DBF4B 000
HFOCS 0C8 VFOCS 001 HFOCD 035
SOG-E 001 DIREC 001 WPDDC 000
HPURC 000 VPURC 000 6G-DC 0C0

FACTORY 2

YH-TT 0F3 YH-TB 0A0 YH-JT 05A YH-JB 0A4
XH-L 08B XH-R 060
PQHTL 018 PQHTR 053 PQHBL 05A PQHBR 05A
S3HTL 07F S3HTR 051 S3HBL 099 S3HBR 0B1
YV-TT 03D YV-TB 037 YV-JT 0A9 YV-JB 06B
XV-L 06E XV-R 01E
PQVTL 09E PQVTR 05F PQVBL 04E PQVBR 0DE
S3VTL 04F S3VTR 0E4 S3VBL 0C3 S3VBR 04C

FACTORY 3

R-BS1 0C0 G-BS1 0DB B-BS1 0CC
R-BS2 0C2 G-BS2 0DB B-BS2 0C8
R-BS3 0C5 G-BS3 0DB B-BS3 0C5
R-GN1 08B G-GN1 07F B-GN1 07F
R-GN2 087 G-GN2 075 B-GN2 066
R-GN3 080 G-GN3 069 B-GN3 04F
BTCEN 5A3 BTMAX 770 ABLAJ 07D
SBCN1 03C SBCN2 03C SBBR1 000 SBBR2 032

FACTORY-HV

HVADJ 063 XPCAL 063 XPROT 063 X-PRO 0B4

"BTCEN 5A3" from above is what I would need to change on my monitor in your situation. As you can see its surrounded by RGB bias/gain settings and ABL adjustment which you dont seem to have there either.

No, I'm afraid the settings you see on the screenshot are the same I get here when I open the menu 🙁 The settings from your monitor I don't understand 😀 What are those codes?

Also, mine has Red, Green and Blue 'Gain' settings. Would increasing those help perhaps?

Reply 7 of 9, by duga3

User metadata
Rank Member
Rank
Member

My codes range between 00 and FF which is HEX for 0 and 255. More info is in the 2070SB service manual here: https://hardforum.com/data/attachment-files/2 … nc_FP2141SB.pdf

But you are out of luck there so put all settings the way they were originally and adjust the SCREEN knob on the flyback transformer. The SCREEN knob is basically a huge BRIGHTNESS setting, this is where it will allow you to go beyond your menus 0-100%. Here is a video that will help you:

https://www.youtube.com/watch?v=_Qi1D1delPk

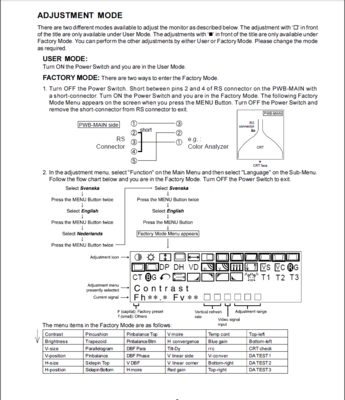
They are adjusting FOCUS which is a knob that should be located near the SCREEN knob you need to adjust (the position of the knobs is showcased on Page 15, should be 3 knobs there). Get a very long (30cm?) insulated screwdriver, ideally all-plastic without any metal for adjusting (screwing) the knob. Instructions can be found on Page 13 of your manual, the problem is you cant follow them because you do not have their own service RS-232C adapter but it should do the trick even without that. You will need to take off the plastic casing and then have the monitor turned on which is not very safe so be careful not to touch anything inside. You will need a good battery light so you can located the knobs through the metal cage holes. Here is how the knobs usually look (on a different monitor): http://i.imgur.com/txGgyx6.jpg

You can replace Page 13 steps with something like this:

1. Set your brightness to 50 and contrast to 100. I am only assuming these are the default/center values for Diamondtrons (on Trinitrons these would be for example 31/90).
2. Set your resolution to 2048 x 1536 at 88 Hz (or whatever you use the most) and adjust the screen size with monitor buttons to be almost fullsize, and maintain correct aspect ratio.
3. Make sure your room is not too light, night time with a couple lights on is okay.
4. Use irfanview to display 100% black image, fullscreen
5. Adjust the knob (very carefully since its probably sensitive to even the slightest change) so that the black signal can be barely seen. Since your monitor is dark you should not see anything at first but when you start moving the knob in one direction (probably clockwise) the black should become dark grey. The sweetspot is where you can barely see the dark grey, where it is almost black (like 99% black).

Thats it. That should take care of your dark image problem. After this you will want to play with the color settings in both user and factory menus (gain, bias, etc). I suggest getting the old DTP94 calibration tool off eBay to help you with this process a little bit. It can help you with telling the current cd2 (=light output) and if you are spot on with the 9300K white coordinates for example which is impossible to tell with your eyes only.

NOTE 1: Sometimes the knobs are glued to prevent them from moving on their own. You will either see glue with your own eyes or feel it when you wont be able to turn the knob at first. If this will be the case you need to very carefully apply more turning pressure to break/crack the glue first. There should not be any damage if you accidentally turn the knobs too much in either direction since the ABL feature will prevent that but rather be careful, also not to slip the screwdriver.

NOTE 2: Personally I would cut a small hole (or 3, for focus knobs as well) in the plastic casing instead of taking the cover of, making it easier to adjust in the future. But you would need to know where exactly to make that hole and it might be impossible to see inside without taking off the plastic casing off at least once.

NOTE 3: And as you probably already know, the insides of the monitor are dangerous due to high voltage (up to 31,000 V I think) and some other things so do this only at your own risk and educate yourself on some basic safety rules first.

98/XP multi-boot system with P55 chipset (build log)
Screenshots
10Hz FM

Reply 8 of 9, by Justin1091

User metadata
Rank Member
Rank
Member

Duga, thanks a lot! It looks almost the same as in the video you linked to in your post, funny they're also Dutch, like me.

How 'old' is the screen you think? I bought it in 2011 when it was brand new and used it up to early 2018 daily (not at 100 brightness though). When I got it, an asshole from the postal service put it down very hard when delivering it. I wasn't home, but later I powered it on and used it for a week. After that the CRT would switch off a lot of times, with the monitor still on (power on but no screen). I had it repaired, the guy who serviced it told me it's pcb was broken because it had been dropped. No idea what he did, but it still works. It sometimes does power off when you bump against the desk where it's on. I remember hearing some crackling noises and smelling a whiff of something burned a couple of years ago when turning it on, don't think it instantly dimmed the screen though, I would have remembered that.

Not sure if any of this is relevant, it probably isn't but who knows. I'm typing this here because I've also seen a video on youtube where someone fixed it by replacing some components on the circuit board. https://www.youtube.com/watch?v=-BC_YTihwJo I don't understand anything he's saying though.

Could it perhaps happen because of for example bad capacitors or bad solder connections?

If you think this is unlikely then I'll just go ahead and turn the knob when I have time. By the way, is turning the knob like overclocking it because it has worn out? Or is it something that can be useful for crt's of any age? Just curious.

Reply 9 of 9, by duga3

User metadata
Rank Member
Rank
Member

You are welcome, it would be a shame to throw it out if there is a chance it could be restored 😀 I hope more people will attempt to repair their CRTs so they dont go extinct too soon. Its not like they are going to make new ones these days and they are a perfect pair with old games.

I am not sure what I am advising will help in your case (it probably will though) but it is very normal to do it on CRTs after they age. I am no expert (I just use CRTs so I have some experience) but my guess would be that the cathode gets worn out over time, meaning it emitts less electrons, so you need to apply more voltage to it so it starts to emit more electrons again. The electron beams hit the screen phosphor layer (vertical RGB stripes) and transform into photons so you get the nice colored picture. And you need enough electrons for that otherwise the picture will be dim (like in your case apparently).

I think a reason why CRTs are generally dim (on white signal upto 200cd2, usually only around 100cd2 when "properly" calibrated) because you need around 20-30,000 V to accelerate all those electrons away from the tube to the anode after they are used, otherwise they would stay and build-up and your picture would be super blurry and bright. And any more electrons than the 30,000V could handle would probably emit x-rays beyond some safe standards. So if they would gave a regular user the means to play with the SCREEN knob then it could create an issue - ABL will shut off the monitor if too much electrons/high voltage is detected. But if the picture is already dim from age, then its actually what you need to do to adjust it to correct operating voltage values again, compensating the lower number of emitted electrons from the worn out cathode. Again, this is just my guess.

98/XP multi-boot system with P55 chipset (build log)
Screenshots
10Hz FM