VOGONS


Reply 1040 of 1228, by ChrisXF

User metadata
Rank Newbie
Rank
Newbie
Beerfloat wrote on 2023-08-16, 19:14:
The list was very helpful, thanks. […]
Show full quote

The list was very helpful, thanks.

As this is just a one-off project for me (or well, five-off really) I figure I would just go with ready-made PGA168 females like these:
https://www.ebay.com/itm/393079893830
2 for $6.81 is not great, not terrible but ymmv.

Yeah, for me it's got $15 shipping on top. Ugh, hey!? Those are a decent price for the precision they'll offer though, good find!

Beerfloat wrote on 2023-08-16, 19:14:

I ordered the pin strips you linked but was also looking at whether it's worth getting PGA132 adapter ready-made as a terminal type like this:
https://www.mpe-connector.de/en/products/pga- … 1-107-M1NFX-XS0
Not sure about the ideal contact type pin thickness-wise.

Yeah, that looks like it would be good, but I'm not a fan of how proud that's going to sit from the board... I know it's just a fairly low frequency part but less conductor is more better usually! My plan for dealing with that bit is to probably not bother with the socket as a jig and I'll put the pins on the PCB, then interface them with socket strips running the opposite direction, on the bottom. That should hold everything in more or less alignment, I think! Once it's done, I'll pull the socket strips off and viola! Anyone sees a problem with that idea do speak up! 🤣

Other option is to solder it on the actual motherboards socket... but I think that could be a wee bit risky.

Beerfloat wrote on 2023-08-16, 19:25:

Been there, received 5x supposed Motorola MC68882 FPUs from Ali that were I don't even know what.
They didn't even fit properly in the PLCC68 socket, legs came off when trying to get them back out.

🤣
Reply 1041 of 1228, by feipoa

User metadata
Rank l33t++
Rank
l33t++
ChrisXF wrote on 2023-08-15, 16:04:

Right, I sort of gave up a bit on Mouser... Those regulators are like 6$ alone lol

Here's my SUPER HIGH QUALITY CHINA list instead...

Normally, I will wait until I get an order with value over $100 CAD to receive get free shipping from digikey or mouser. I always have a living parts list on my desk that I continually add items to, but don't order until it is over $100. If I think I have over $200 worth of parts to order, then I may get some parts from Digikey and some from Mouser to save a little more. Mouser is normally cheaper, but on some items, Digikey is cheaper. From my experience, Digikey orders to Canada arrive significantly faster than Mouser orders. On my last order, the Digikey order arrived in 2 days, while the Mouser order took a week.

Plan your life wisely, you'll be dead before you know it.

Reply 1042 of 1228, by ChrisXF

User metadata
Rank Newbie
Rank
Newbie

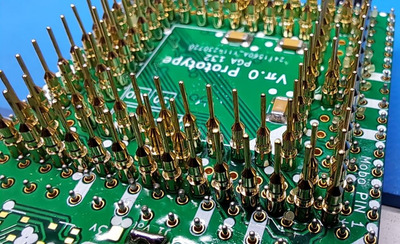
Awww, I ran out of pins for just now. Getting there on the first experimental one though!

Inter Start.jpg
Filename
Inter Start.jpg
File size
197.12 KiB
Views
1256 views
File license
CC-BY-4.0

Some things I've done / noticed:

* I used another spare PCB to hold the pins in alignment for soldering: this actually worked pretty well and saved me having to buy the smaller PGA socket as a jig. Just put the pins in place, then put one of your spare PCB's on top to line it all up: hold tight and solder.

* I think this would be easier to work on with a HASL finish instead of ENIG. The gold is great, but you need to put a LOT of heat into those larger ground planes and I think having a little solder on the through holes from the factory would make for a stronger pin to board connection on the bottom end. It'll work out cheaper too probably.

* 'Painting' on some thick flux so it gobs in the through holes worked well for me: as the pins are inserted it coats them AND it is tacky so it actually holds the pins in place, even upside down!

* Once I've got the pins in, I'll use a VERY thin solder tip to do the socket from below: there is just enough clearance. I'm not sure how it can be done with the plastic on, so I just chipped the individual pins from the strip. This could all be done in a 'one-er' by putting the pins in a jig coated on solder flux, installing the socket with solder flux and then baking in a reflow oven.

* Method aside, I LOVE the look of these individual pins done like this, and they all make great contact with the socket. Also, of course, allows for MUCH easier repair later if I should damage a pin. Yes, this is MUCH more work, but I'm also using this as an exercise before I return to work after an illness, so it's helping my muscles and coordination.

Anyways, it's coming along slowly but surely! Oh, also! The cheap Chinese regulators came in and test out perfectly, and look legit, so that's good too.

Chris...

Reply 1043 of 1228, by Sphere478

User metadata
Rank l33t++
Rank
l33t++

Yeah, it does kinda look a bit exotic without the plastic. Reminds me of a quantum computer

Sphere's PCB projects.
-
Sphere’s socket 5/7 cpu collection.
-
SUCCESSFUL K6-2+ to K6-3+ Full Cache Enable Mod
-
Tyan S1564S to S1564D single to dual processor conversion (also s1563 and s1562)

Reply 1044 of 1228, by ChrisXF

User metadata
Rank Newbie
Rank
Newbie

Right, finished this today and I'll give it a test tomorrow.

I can say with certainty that this was a complete bellend to build: not for the beginner! In the event I ever build another, hot air or reflow oven with solder paste only for me.

It could be made easier by taking the sockets and throwing them away, instead using strips of pins and strips of pin-sockets and alternating the sides you solder on, working out from the middle row by row. If someone held a gun to my head and told me to build one with a soldering iron only, this is the approach I'd take I think.

Anyways, we'll see if I let any magic smoke out tomorrow!! 🤣

Reply 1045 of 1228, by ChrisXF

User metadata
Rank Newbie
Rank
Newbie

Well mixed results. At first I had the jumper set for 5v, all was OK with just the interposer in the motherboard...

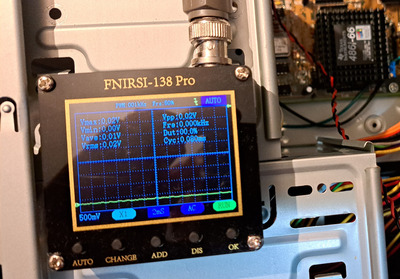
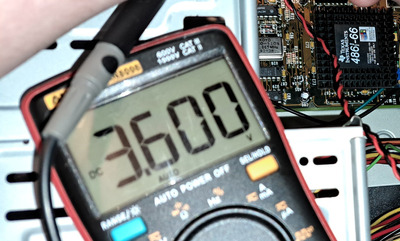
Realised my cpu was 3.6v, so flipped the jumper over for 3v operation. Installed interposer, switched on machine to read voltages and set trim, and the PC speaker cable burst into flames.

Not.. quite... the result we were looking for. See attached for details.

Here's the odd thing, motherboard seems to still work with the old cpu back in it. 🤷 that's good at least, not sure if the speaker circuit is still good.

I wonder, what went wrong 🤔

Attachments

Reply 1047 of 1228, by Sphere478

User metadata
Rank l33t++
Rank
l33t++

That jumper is for a different cpu you want it in 5v for the sxl2 66

It’s for the vcc5 pin not the rest of the cpu

Edit: looking at your pic what cpu do you have there? Is that a sxl?

Sphere's PCB projects.
-
Sphere’s socket 5/7 cpu collection.
-
SUCCESSFUL K6-2+ to K6-3+ Full Cache Enable Mod
-
Tyan S1564S to S1564D single to dual processor conversion (also s1563 and s1562)

Reply 1048 of 1228, by Sphere478

User metadata
Rank l33t++
Rank
l33t++

https://habr.com/en/articles/439192/#

Perhaps some clues

Sounds like the cpu commanded the speaker to be driven at 100% duty cycle. As a glitch I’m gonna guess.

Sphere's PCB projects.
-
Sphere’s socket 5/7 cpu collection.
-
SUCCESSFUL K6-2+ to K6-3+ Full Cache Enable Mod
-
Tyan S1564S to S1564D single to dual processor conversion (also s1563 and s1562)

Reply 1049 of 1228, by Sphere478

User metadata
Rank l33t++
Rank
l33t++

I just read your reply again. Did you not have the CPU installed when this happened? Because that 5/3.3 V jumper only goes to the J1 pin if I can recall correctly so it’s kind of impossible for that two of affected anything with the CPU not installed so I am kind of thinking that maybe you have an error in your assembly

Sphere's PCB projects.
-
Sphere’s socket 5/7 cpu collection.
-
SUCCESSFUL K6-2+ to K6-3+ Full Cache Enable Mod
-
Tyan S1564S to S1564D single to dual processor conversion (also s1563 and s1562)

Reply 1050 of 1228, by ChrisXF

User metadata
Rank Newbie
Rank
Newbie

Heres the cpu in question, attached. 3.6v. I -think- this is the 3v jumper option? I've read this thread until my eyes spin and there's no collected documentation, so hopefully that's the case? There is some confusion for me, because this IS a sxl2, which I read should have the 5v jumper set... and yet it says right on it, 3.6v.

But yes, you're right: the cpu was not attached. I thought it best to see about trimming off the voltage pot and observing any explosions before committing the cpu to the power 🤣

I have a working theory perhaps speaker was connected to KEYLOCK... which I think has a power LED connection. 5v right up the speakers jacksey? Yep, that might do it.

Unfortunately, when I saw the wires melt I snagged em out asap and didn't notice... my son swears blind he hasn't fiddled with this, but, hey, he might have: he's only six. 🤣

Ok, I'm going to remove the speaker totally and try this again... if any bad things happen it's OK this is a test mule I'm using.

Oh, yes, no assembly errors that I can see. Can't see under the socket that's soldered down, of course, but multimeter doesn't show any shorts so I'm thinking prolly ok 🤔

Attachments

Reply 1051 of 1228, by Sphere478

User metadata
Rank l33t++
Rank
l33t++

Set it to 5v

That jumper is for the vcc5 pin. J1 if I recall the alpha numeric coordinates. It is not the core voltage. It is a single cpu pin

We talked about that jumper early in the thread.
It is for a different related cpu.

Hopefully there is still a build guide and BOM coming from feopia? Fingers crossed.

Okay, if the cpu wasn’t attached then it is basically impossible that the jumper was the reason. If it was attached then maybe.

I think your keylock theory is probably correct.

I inspected all of my solder points with a microscope as I did them and once again when done. All it takes is one very small solder bridge.

Sphere's PCB projects.
-
Sphere’s socket 5/7 cpu collection.
-
SUCCESSFUL K6-2+ to K6-3+ Full Cache Enable Mod
-
Tyan S1564S to S1564D single to dual processor conversion (also s1563 and s1562)

Reply 1052 of 1228, by ChrisXF

User metadata
Rank Newbie
Rank
Newbie

Yeah I inspected with a microscope also, but, like I say - under that socket is a hidden world of forbidden mystery!

I put the interposer back in and powered up, no explosions with and without a speaker connected. I figure maybe it was KEYLOCK... only thing I can come up with... if it was anything else in sure the board wouldn't survive whereas KEYLOCK just takes 5v right from the PSU I guess. 🤔

Anyways, the variable voltage works fine, the ripple looks to be all in spec (although cpu still not in so no load to be sure) so tomorrow I'll change the jumper back to 5v tomorrow and try with the cpu. 😁

Reply 1053 of 1228, by Sphere478

User metadata
Rank l33t++
Rank
l33t++

Fingers crossed!

Sphere's PCB projects.
-
Sphere’s socket 5/7 cpu collection.
-
SUCCESSFUL K6-2+ to K6-3+ Full Cache Enable Mod
-
Tyan S1564S to S1564D single to dual processor conversion (also s1563 and s1562)

Reply 1054 of 1228, by ChrisXF

User metadata
Rank Newbie
Rank
Newbie

Looking pretty good there!! Now just have to play around setting registers to get the cache and the clock doubling working.

Wonder if there's a way to hard code that into the bios ROM 🤔

Attachments

Reply 1055 of 1228, by ChrisXF

User metadata
Rank Newbie
Rank
Newbie

Welp, it's been running fine since yesterday, hardly even warm to the touch.

It did NOT like being overclocked to 40Mhz base frequency: ran fine in single speed mode but activating clock doubling with that overclock made it fall over. That's OK, I just was curious to try. 😀

I'd also forgotten, just how tricky and kinda janky these chips are with odd hidden secret codes to get all the registers set and the system stable. I'm picking away at that, feipoa's guide on register settings is super helpful. So odd the CPU enables L1 cache then maps it completely out so it's effectively disabled, that made me laugh.

Reply 1056 of 1228, by Sphere478

User metadata
Rank l33t++
Rank
l33t++

Yeah, I got mine all working physically then am kinda stuck at figuring out the registers 🤣. My clock doubling experience was the same.

But to be fair I have it in my closet at the moment because I have been playing with my blue and white g3 mac.

Do be detailed in what you find out with the registers so I can follow along. Reading with interest! 😀

Sphere's PCB projects.
-
Sphere’s socket 5/7 cpu collection.
-
SUCCESSFUL K6-2+ to K6-3+ Full Cache Enable Mod
-
Tyan S1564S to S1564D single to dual processor conversion (also s1563 and s1562)

Reply 1057 of 1228, by pshipkov

User metadata
Rank Oldbie
Rank
Oldbie

i tested this contraption along with standard sxl2-50 chips on MANY motherboards and this one here is for sure a lot more finniky.
so you are not alone, if that makes you feel better.

retro bits and bytes

Reply 1058 of 1228, by ChrisXF

User metadata
Rank Newbie
Rank
Newbie

Yep, I'll post up details of the things I try with the benchmarks.

Also, I don't know if anyone can shed any light: the FLUSH hardware mod for some motherboards... Do you think I'd require it? I enabled the FLUSH register... didn't seem to do much but then it might not with the benchmark pack... There's a pin out on the PCB for MEMW# (I think) - this is required to get FLUSH working properly? If so, I'll wire that up this weekend as a test.

I also got a modified version of the PS/2 interposer for mouse / kybd support in, and that's another thing I'll be testing out.

Reply 1059 of 1228, by Sphere478

User metadata
Rank l33t++
Rank
l33t++
pshipkov wrote on 2023-09-15, 15:26:

i tested this contraption along with standard sxl2-50 chips on MANY motherboards and this one here is for sure a lot more finniky.
so you are not alone, if that makes you feel better.

Maybe memw not being hooked up? Or, the lack of the logic chips that some of the other’s have. Would be cool to investigate more into the functions that those are performing and see if that can be implemented. Have you reached the same conclusion? Or do you feel it is a different cause. Or are you speaking of the sxl2 in general being a picky chip?

Someone should whip up a isa tab that can be pushed into the slot for tapping memw#

Attachments

  • IMG_0905.jpeg
    Filename
    IMG_0905.jpeg
    File size
    10.04 KiB
    Views
    890 views
    File license
    Public domain

Sphere's PCB projects.
-
Sphere’s socket 5/7 cpu collection.
-
SUCCESSFUL K6-2+ to K6-3+ Full Cache Enable Mod
-
Tyan S1564S to S1564D single to dual processor conversion (also s1563 and s1562)