First post, by Tesla
Hello all,
-P A R T 1-
Some history
I'm from the seventies and when I was 12, I asked a beautiful girl to be my girlfriend. She said "NO" and that was reason enough for me to focus the rest of my life on computers ! It's possible that I never asked her, but in my head I did... 😉. My first computer was a 286 with VGA-graphics card (I think a Paradise-card). No soundcard though. A friend of mine was always kind enough to share his new games and one of them was "Wing Commander". I was hooked by the extremely beautiful graphics, the story and the gameplay. Later I got a Sound Blaster v1.0 and a whole new world opened up ! This was one of the first things that blasted through my speakers : https://www.youtube.com/watch?v=CFTxidMaTOE&l … T79Fvc&index=18. The blind can see and the deaf can hear !!! I listened to it for daaaaaaays.
One day, the 286 burned out and got replaced with a fairly average 486DX2/66. There was no money for expanding anything, but I got to play a lot of great games, so I never had the feeling that I missed something. Only in a later phase when Pentiums started to be mainstream, I felt that I missed that extra power to run everything smoothly. Nevertheless, the 486 is the system I associate most with the Westwood-, Sierra-, Origin-, MicroProse-, LucasArts-titles.
2 years ago, I got an opportunity to buy a fully functioning 486. I tested it and lay dormant for almost 2 years because of reallife happens 😀.
But now.... it's alive again ! If I may, I must thank PhilsComputerLab with the many usefull video's/files he provided to get me back up-2-speed for the ultimate MS-DOS 6.22/Win98SE setup ! Thank you.
System Specs
CPU : 80486DX2/66
Motherboard : BioTeq VLB with AmiBios (exactly like Phil once showed : https://www.youtube.com/watch?v=HNlcZetLzY8)
Slots : 4x ISA, 3x VLB
Memory : 8Mb 60ns, upgraded to 32Mb 60ns
Video : Cirrus Logic GD5428 1Mb, replaced with Hercules Stealth 64, S3-Vision964 2Mb
Sound : ESS-chipset
Joystick : Thrustmaster FLCS on ATM-card
Extra : PS/2-to-ISA card (still to arrive) --> Another PS/2 Mouse ISA (ISA8) card adapter
Music : Roland MT-32 rev. 1 + Roland Sound Canvas SC-88
Speakers : KRK-RP8 G4 !
.... if only I had this as a kid.... 😀... but the kid in me is very happy !
Why the project started
The computer came with a small sized case. It was filled with cables and even though the previous owner did his best to make it a bit neat, it still was total chaos in my eyes. I want the inside of the case clean and orderly. Welcome in the AT-case : showcasing was never the primary goal for the designers! I never took a picture of it and I ditched it a couple of weeks ago. I did my best to search for a photo on google, but everybody must share my opinion that this case was ugly as hell and never bothered to keep a digital memory of it. I only have pictures from the inside.
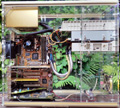
01. How it was...

I already replaced the flat cables with round ones. I also added a CF-card interface.
The picture immediately shows what the problem is : you can't see a thing of anything. It's like a human body exploded all over your screen and it's a big guess what everything is... Hence why I say : "The outside/looks aren't all that matters, it's about the inner things !"
02. So... away with the case ! Long live the no-case. I just had to make some pictures for mental notes on how it was. Lots of images coming up...

The HDD- and CDROM-connectors... In the original setup, I wanted to boot from the HDD (250Mb) and use the CF-card as data-drive. But the fabrication date of the hdd was 1996 and I saw no reason to forsee a replacement harddisk. I decided to ditch the harddisk and cdrom all together. There are ways of using IMG-copies of cdroms, thus making the cdrom obsolete. It's just a bulky peace of hardware that doesn't do anything for me.
03. Reminder of the powercable-pinning, quite important :

Black next to black. Notice that the previous owner already removed the dreaded battery and replaced it with homemade CR-battery-connection. In this picture, there's the original 8Mb-setup with different kinds of modules.
04. Noisemaker : be gone !

Removing the fan shouldn't cause too much trouble for DX2/66. Now, I'm aware that the case will be polycarbonat, quite a good insulator. To make it future-proof, I forsaw a very silent 14cm fan blowing inside. I'll use one of my wives panties to cover the inlet.... mmmmmyesss, I got married...😀
05. Backplate :

One thing tells me I'll probably see the backplate again after the project is finished...
06. Re-organising cables...
Here's where the real fun starts. The idea is to hide as much of the cabling as possible. I took pictures in different phases. I used a white tape to outline the size of the final case.
The key solution for hiding cables : lift the motherboard higher using mounting screws of (in my case) 2cm. Put the cables underneath the motherboard and isolate them from making contact with the motherboard.

In this picture : 2 CF-card interfaces (bottom and top). HDD and CDROM are gone. Powerbutton on the bottom right. The case will be standing. The top is where the powersupply is.

In this picture : moved the botton CF-card interface next to the top CF-card interface. But... cables still over the motherboard.

Here we see (a little upside down I know) the CF-cables underneath the motherboard. On the side there's the 14cm fan in about the correct position.

The mounting screws. Key for the solution. These are 1.5cm and are already replaced with 2cm ones. Installing them is as easy as drilling a 3mm hole in the case and screwing them in. They're extremely firm.

I wanted the biggest card (Hercules) on the bottom of the case, but the result was a HDD-cable still halfway hanging over the cpu. It can be better...

More space !

Still not happy with the cables around the power supply...But I bet it's better already than the average AT-case now....
Adding the Gotek-floppy emulator !

I can't repeat this enough : you have to get this ! It's not a solution for all your floppies : it is THE solution and the last one you'll ever need. It's relatively cheap (mine was custom made via Ebay UK with modified OLED-screen and the Rotator is absolutely easy to use ! It has FlashFloppy firmware configured for IBM-PC. The USB-stick holds 64Gb, but that's about 63Gb too much. What it DOES do is change colors and makes me think : "Hey! Doesn't that look awefully lot like a CARRACK-cockpit ??!" 😀.
How it works (I used Phils guideline, but that's for another firmware so it doesn't apply) : format the USB to FAT32. You HAVE to make an image of your floppy disk. The source file can be a real floppy or an image you make yourself. It needs to be IMG or IMA. I use WinImage (free download : https://www.winimage.com/download.htm). It let's you already use 1.44Mb sized images. The rotary-knob scrolls through your current directory (Root: the disk-images. Inside image/disk: files). Pressing the knob selects. Returning 1 map back is done with selecting ".."
The Polycarbonat !
I wasn't lucky... at all. I placed my order for polycarbonat just 1 DAY before the Government gave businesses the chance to start again. One of the conditions was safety for the employees = use glass/plexiglass in between the client and them. The result : my order was postponed for 1 month, because the whole country was looking for that material. I could live with that though. But after that month, it took another month to get it home. All excuses and what not, one day I received an email with the promiss that the delivery was about to happen... But I wasn't happy still... There's a reason why this is Part-1...
There's difference between Plexiglass and Polycarbonat. The first easily splinters or breaks when manipulated, the latter doesn't. Plexiglass has a lower melting temperature and has the tendency to stay lit once on fire. Polycarbonat doesn't. The idea is to "melt" the plates to eachother using "Acrifix" (https://www.modulor.de/en/acrifix-192-acrylic … tube-100-g.html). It doesn't glue by itself, but dissolves the polycarbonat, thus "melting" the 2 surfaces to 1 combined piece. Fish tanks are done this way, so it's very solid and strong. To make this happen the way it's recommended, you'll need 20 minutes of direct sunlight. The last 3 weeks, the weather was fabulous in Belgium !! The day the polycarbonat arrived : rain and clouds !!!
07. Yet, here it is :

Notice the ultra professional way of stabilising the pieces...
08. Next step : placing things once again

I decided to place the CF-interfaces vertically, which means they'll also face towards me when the case is put up standing. With all the white plastic, it does look easy on the eyes...
09. And with cards installed :

There are holes drilled for power/reset/turbo/leds. Polycarbonat is VERY easy to manipulate. I compare it with very thick/hard silicone. So if you ever want to do it too, consider polycarbonat.

I attached the CF-card to polycarbonat. The idea is to meld it to the case, which should be fairly enough to withstand the handling of the card itself (push/pull). The 3 leds are actually good to give sign of life to the motherboard.
Final Setup before glue !

It was late in the evening, had to use a flash. I'm still not sure for the position of the IO-card and the VGA-card.
1 ISA-slot isn't occupied, but it's reserved for the PS/2-ISA-card.
Updated 05/07/2020:

The lights don't reflect in the case yet, but they obviously will once the plastic cover is removed.
I believe this setup looks clean. The 14cm fan gives blue light. The leds on the CF-cards shine through the powersupply, delivering cool shades of life on the wall. On the Gotek, the USB-stick always changes color. I know, it's not the VOGON-way, but yet, this hardware looks beautiful and will always be there to look at ! It's a great looking motherboard, true VLB, max'd out memory, no moving parts and with those Compact Flash cards, I have about 150Gb of storage that's easily replaceable with more if needed !!
Oh Sun, Where Art Thou ???!