VOGONS


First post, by feipoa

User metadata
Rank l33t++
Rank
l33t++

I've had several requests over the years requesting guidance on adding PS/2 mouse support to the MSI MS-4144 motherboard, similar to what had been presented for the Chaintech 486SPM here: Adding PS/2 mouse components to a Chaintech 486SPM

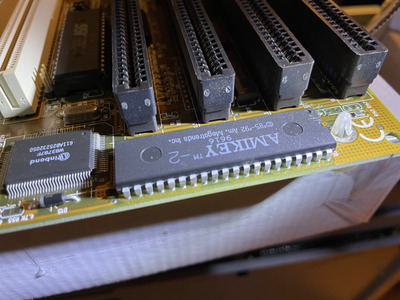
I've attaches some photos and a PDF scan to guide you. There is a typo in the PDF scan. Where you see "R140", it should read "R14". My motherboard revision is 2.1. There may be some differences with other revisions. Please check the photos carfeully.

Filename
MS-4144_PS2_Mouse_sketches.pdf
File size
50.41 KiB
Downloads
79 downloads
File license
CC-BY-4.0

In brief:

1) Add two 47 pF surface mount capacitors. The motherboard's silkscreen states 470 pF, however I'm pretty sure I used 47 pF because that is what is normally used on other motherboards and is what I had on hand.

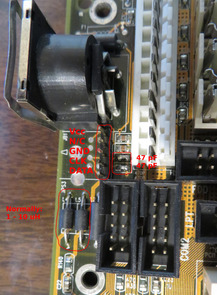
2) Add a 5-pin connector at J5. The pinouts are Vcc, N/C, GND, CLK, DATA.

3) Add two through-hole inductors at L4 and L5. Most 486 era motherboards I've encountered have these in the 1-10 uH range. I normally use 2.2 uH, but I think in this particular board, I am using 1 uH.

4) Under the keyboard socket, ensure that R14 and R106 are populated. Your motherboard revision might have these components missing. My board had them already installed and were such that R106 = 4.7 K-ohm and R14 = 10 K-ohm.

5) Short R147. This connects KBC pin 36 to IRQ 12. The PS/2 mouse won't work without it. For my board, I used a jumper header and jumper, but it is a bit tricky to implement because the pads are SMD. Thus, you can just solder these pads closed, use a 0-ohm resistor, or solder on a wire.

6) Flash your BIOS to one which includes PS/2 support. See my next post for this file.

MSI_MS-4144_Ver2.1_PS2-a.JPG
Filename
MSI_MS-4144_Ver2.1_PS2-a.JPG
File size
1.54 MiB
Views
1237 views
File license
CC-BY-4.0
MSI_MS-4144_Ver2.1_PS2-b.JPG
Filename
MSI_MS-4144_Ver2.1_PS2-b.JPG
File size
1 MiB
Views
1237 views
File license
CC-BY-4.0
MSI_MS-4144_Ver2.1_PS2-c.JPG
Filename
MSI_MS-4144_Ver2.1_PS2-c.JPG
File size
253.69 KiB
Views
1237 views
File license
CC-BY-4.0
MSI_MS-4144_Ver2.1_PS2-d.JPG
Filename
MSI_MS-4144_Ver2.1_PS2-d.JPG
File size
226.37 KiB
Views
1237 views
File license
CC-BY-4.0
Last edited by feipoa on 2022-04-18, 09:46. Edited 2 times in total.

Plan your life wisely, you'll be dead before you know it.

Reply 1 of 16, by feipoa

User metadata
Rank l33t++
Rank
l33t++

6) Looking at my BIOS folder, it looks like I had modified the MSI MS-4144 AWARD BIOS to support the PS/2 mod. It most likely came from the latest AWARD revision for this board. It is attached below. Included is what I think is a DOS BIOS flashing program which came with other MSI BIOSes. I haven't verified that the flashing app works since I always flash my EEPROM BIOS chips on an external programmer.

Filename
MSI_MS-4144_AWARD_BIOS_with_PS2_support.zip
File size
96.95 KiB
Downloads
55 downloads
File license
CC-BY-4.0

Plan your life wisely, you'll be dead before you know it.

Reply 2 of 16, by Chadti99

User metadata
Rank Oldbie
Rank
Oldbie

Thanks Feipoa, this looks straightforward, I definitely needed it spelled out in this format though. I’m building a digikey part list, hope it’s okay to share here.

47 pF SMD Capacitor:
https://www.digikey.com/en/products/detail/ky … 70FAT2A/1597483

1uH Inductor:
https://www.digikey.com/en/products/detail/bo … K-TR-RC/3779464

Reply 3 of 16, by feipoa

User metadata
Rank l33t++
Rank
l33t++

For 30 cents, just as well get two 470 pF caps as well, in case my memory is wrong.

I normally use 2.2 uH inductors for PS/2 mouse mods, digikey part M10140-ND. I suspect I went for those 1 uH inductors for the optics of having all black inductors; I used desolders.

I take it your board already had R14 and R106 populated?

Of all the boards, the MS-4144 is the easiest PS/2 mod.

Plan your life wisely, you'll be dead before you know it.

Reply 4 of 16, by Chadti99

User metadata
Rank Oldbie
Rank
Oldbie
feipoa wrote on 2022-04-18, 23:34:

I take it your board already had R14 and R106 populated?

Unfortunately my KBC isn’t socketed so unsure atm.

I’ll add those parts just in case and a socket.

Attachments

Reply 5 of 16, by feipoa

User metadata
Rank l33t++
Rank
l33t++

Just measure from L4 to 5 V and from L5 to 5 V. Assuming negligible impact from the KBC and inverter IC, if L4 to 5 V measures 4.7-10K and L5 to 5 V measures 4.7-10K, then those resistors should be in place. if you get some weird measurement, let me know and I'll pull my board and measure these values.

It is always a good idea to have DIP-40 sockets on hand anyway.

Plan your life wisely, you'll be dead before you know it.

Reply 6 of 16, by Chadti99

User metadata
Rank Oldbie
Rank
Oldbie
feipoa wrote on 2022-04-19, 00:41:

Just measure from L4 to 5 V and from L5 to 5 V. Assuming negligible impact from the KBC and inverter IC, if L4 to 5 V measures 4.7-10K and L5 to 5 V measures 4.7-10K, then those resistors should be in place. if you get some weird measurement, let me know and I'll pull my board and measure these values.

It is always a good idea to have DIP-40 sockets on hand anyway.

If I’m doing this correctly L4 is measuring 9.35 and L5 is measuring 4.68.

Reply 9 of 16, by Chadti99

User metadata
Rank Oldbie
Rank
Oldbie

Or not, the capacitors I picked are dust sized 🤣. How do I go about picking the right size?

Attachments

Reply 10 of 16, by feipoa

User metadata
Rank l33t++
Rank
l33t++

Measure the pads and follow the size chart:
https://www.kadvacorp.com/technology/smd-capacitor-sizes/

I bet you could still get those to solder on. If you look at the caps on my board, they are also some of the smaller varieties. They were left-over from another job.

Plan your life wisely, you'll be dead before you know it.

Reply 12 of 16, by feipoa

User metadata
Rank l33t++
Rank
l33t++

Click the above photos. What you see shown is a down-scaled size. I uploaded high res photos of all, but you need to click on them.

Plan your life wisely, you'll be dead before you know it.

Reply 13 of 16, by Chadti99

User metadata
Rank Oldbie
Rank
Oldbie

Success!

I had clock and data reversed. It’s basically the same pin-out as the 4DPS so already had a ps2 adapter ready to go but for some reason I thought I needed to swap those two for this board. Toned it out and found out I was wrong 🤣.

Those caps are so small they kept trying to align with the sky when one end heated up, had to hold them down.

Thank you feipoa!