VOGONS


First post, by kinetix

User metadata
Rank Member
Rank
Member

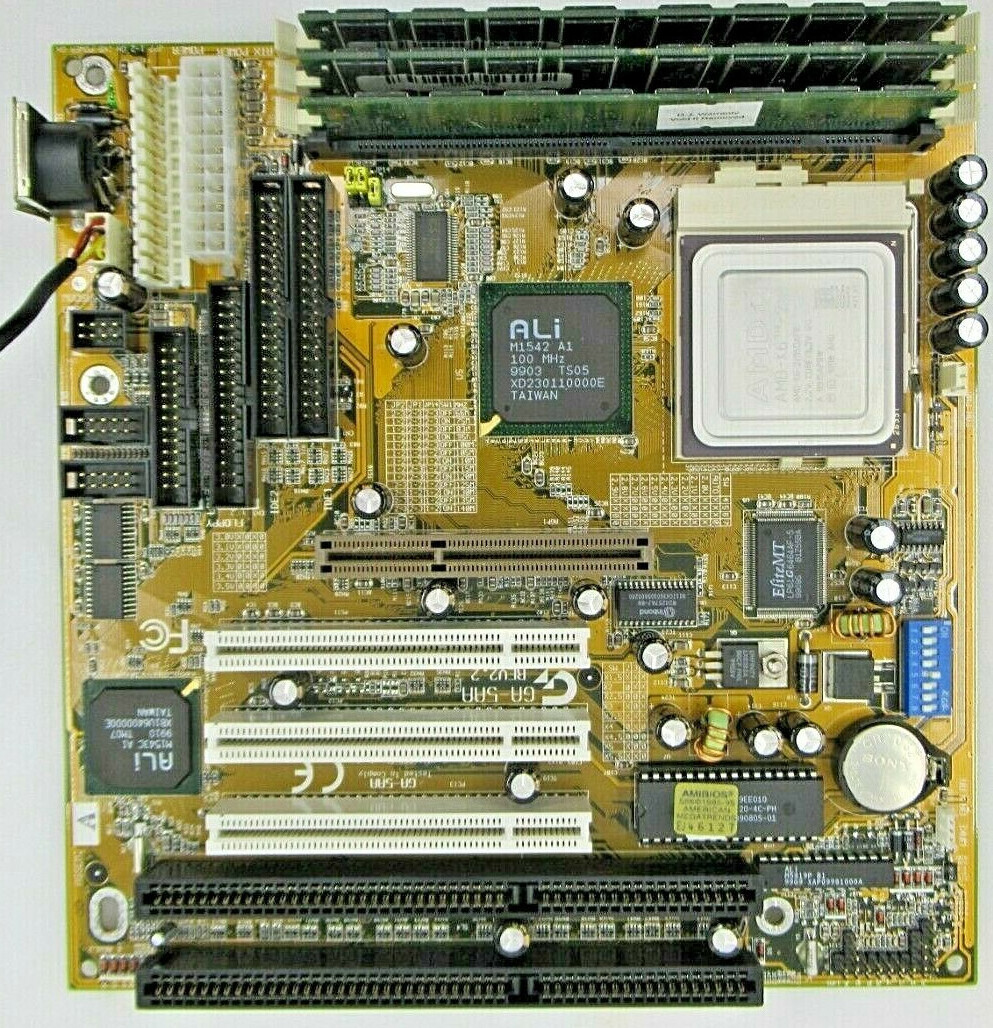
A friend gave me a nice Gigabyte GA-5AA rev 2.2 motherboard with a K6-2/450, which he had stored somewhere for many years. but it does not work. He tells me that it was functional when put away, but it kept restarting, probably due to the problem that I describe below. Hopefully with this board I can build a PC for Win98SE2 and move my PIII to Win2000 (it is the one that currently has w98se2), since I have not been able to get my other socket 7, somewhat older, to work again (nor my 486, I´m having bad luck).

Now, I need help on two topics:

1-
I have downloaded the motherboard manual. More specifically, two manuals, revision 2.2 and 3.2. Being the rev2.2 , this is the one I take as a guide. To test the board, instead of using the K6-2, as a "safety" measure I´m using a Pentium-166. BUT, the jumper/switch configuration in the manual and what is stamped on the board differ slightly!!

2-
The capacitors around the CPU, about 7, were in bad condition. This is surely the reason for the errors my friend had before on his PC.
At least the clock signals on the buses were in good shape.
I decided to change the capacitors but forgot to do one thing: to measure and photograph each welding point.
When checking the solders, now I have a position of a capacitor that gives me a "short" and that war a hard/bad soldering so I don't know what each point was like before, whether or not it had contact with which veins, and on which side.
These are later images, after desoldering the replacement capacitor to verify.
It seems to me that at the top the circular point does not make contact with the vein, but it does at the bottom (on three sides). Now, I am not sure at all about the square point in either case, it seems to me that it makes contact at the top, but at the bottom I have not been able to clean it well to see how it is (my tools leave a lot to be desired).
I found on picture of the bottom side of this board , but whoever made it had changed all those same capacitors, but left all the burned flux residue and it is impossible to see the points well.

I would appreciate if someone has one and can tell me if this "short" in that capacitor is like that. although I doubt, taking a look at the circuit. It is the TC40 capacitor.
And how are those soldering points, at least in the bottom side, were those are visible.

edit1: I found another image of the bottom side, but with worse resolution. Although I improve it with Topaz Gigapixel AI, it is not enough to be sure what the solder points are like. The round one seems like I said before, but the squared one, na-ah..

Attachments

  • upperside.jpg
    Filename
    upperside.jpg
    File size
    115.88 KiB
    Views
    1100 views
    File comment
    upper side
    File license
    Public domain
  • bottomside.jpg
    Filename
    bottomside.jpg
    File size
    88.31 KiB
    Views
    1100 views
    File comment
    bottom side
    File license
    Public domain
Last edited by kinetix on 2023-09-24, 02:29. Edited 7 times in total.

Reply 2 of 49, by kinetix

User metadata
Rank Member
Rank
Member
Nexxen wrote on 2023-09-24, 01:48:

Your short, what is the measure in ohms?
If it's diode mode (beeper) it might not be a short.

yes, I was measuring in diode mode
let me see how many ohms....

update: 60 ohms +-10. fluctuates quite a bit, somewhat upwards.
update 2: After cleaning and placing the test leads better, there are 55 ohms almost fixed, with slight variation

Last edited by kinetix on 2023-09-24, 02:24. Edited 1 time in total.

Reply 3 of 49, by Nexxen

User metadata
Rank Oldbie
Rank
Oldbie
kinetix wrote on 2023-09-24, 01:56:
yes, I was measuring in diode mode let me see how many ohms.... […]
Show full quote
Nexxen wrote on 2023-09-24, 01:48:

Your short, what is the measure in ohms?
If it's diode mode (beeper) it might not be a short.

yes, I was measuring in diode mode
let me see how many ohms....

update: 60 ohms +-10. fluctuates quite a bit, somewhat upwards.

That's not a dead short. 0.06 would have been a problem.
Wait for the ones that know this board well.

PC#1 Pentium 233 MMX - 98SE
PC#2 PIII-1Ghz - 98SE/W2K

Reply 4 of 49, by kinetix

User metadata
Rank Member
Rank
Member
Nexxen wrote on 2023-09-24, 02:21:

That's not a dead short. 0.06 would have been a problem.
Wait for the ones that know this board well.

update 2: After cleaning and placing the test leads better, there are 55 ohms almost fixed, with slight variation

thanks, I´ll wait

Reply 5 of 49, by Nexxen

User metadata
Rank Oldbie
Rank
Oldbie

Since nobody hopped in I'll keep asking for stuff 😀
- a full high res pic of your board, back too
- after soldering new caps, what happened?
- did you insert a new 3V cr2032?
- beeps?
- smoke?
- is the cpu gettng warm, any other component?

Those are electrolytic capcitors, through hole (they go through both sides). It's normal to be separated as one side is usually connected to ground and the other to whatever voltage it serves.
They have a polarity, normally you find a stripe on a side and that indicates the cathode (-). Maybe you know all this, in case disregard.
Holes look good to me, I do worse than that while desoldering.

PC#1 Pentium 233 MMX - 98SE
PC#2 PIII-1Ghz - 98SE/W2K

Reply 6 of 49, by kinetix

User metadata
Rank Member
Rank
Member

you can find some pics around.
https://theretroweb.com/motherboard/image/ga- … 13600354894.jpg
http://hw-museum.cz/data/mb/pic/Gigabyte_GA-5AA_B.jpg
https://a.allegroimg.com/original/1e4eab/9a4c … 9ba053105571e54

I initially put a Pentium-133 in it (I didn't want to damage the K6-2/450 if something bad happened) and configured it for it, according to the manual, but it differs in the position of a switch with respect to the configuration tables printed on the MB.
It didn't work. I measured the clocks signal on the ISA bus and the PCI (I forgot to do it on the AGP) and they were perfect. I didn't get a clock signal on the CPU, maybe I did it wrong (get the wrong pin), or the damaged capacitors were "swallowing" the signal, or the clock circuitry did not send the signal if there was no CPU in the socket (this testing was in another place, where I can use an oscilloscope, and I did it without CPU in the socket).

I haven't connected it yet after changing the capacitors. I realized the problem when checking... that's why I removed that replacement capacitor that I had just soldered in that place, to verify if it was a real problem (short) or the circuit was like that. The square point is my big doubt. I will try to clean it as best as possible , mainly in the back side. I really regret not having taken images of each detail in its original form, it is something I usually do before any work.
I won't connect the MB until I solve it and I'm sure its ok.
I hope some charitable soul will take pity and give me information, 😀
Yes, I put a new battery in it.

latter , with calm, I´ll do a circuit tracing and make a diagram to check how it is

The original capacitors are 1000uf/10v. I replaced them with others with the same parameters, but somewhat larger and less "aesthetic". I have some "nicer" 1000uf/6v ones, which I would like to use in the positions close to the CPU. Even if they are 6v instead of 10v, in that circuit the maximum voltage would be 3.5v (the maximum configurable for a cpu in this MB). BUT I must verify it is not a 5V line.

Last edited by kinetix on 2023-09-25, 00:12. Edited 2 times in total.

Reply 7 of 49, by kinetix

User metadata
Rank Member
Rank
Member

Look at these other images, enlarged with super resolution from some I found on the web.
What opinion do you have? What do you think each welding point is like, specially the one to the right, the square one?
Do they contact the veins?

My opinion is that the circular contact joins the veins at the back but not at the top. The square is the opposite, it is attached to the upper side vein, but not to the back one.

Attachments

Reply 8 of 49, by Horun

User metadata
Rank l33t++
Rank
l33t++

Question: did you take good top side pictures BEFORE removing the caps so you are sure which lead goes where ? The pics of the top side I found are very poor....
Your square theory does not work. See cut picture attached below from http://hw-museum.cz some are veined, some not... IMHO the design is poor, should have been a bit more room on any via not connected to a plane on the bottom..
This is the cap near the 8 dip switch that feeds off a coil correct?. If the coil is connected then the cap has to be connected to it also if you understand how these VRMs work, one side to coil and one side to ground (there are exceptions but rare)

added: Vogons I understand why you compress images to make files size smaller but you also reduced the size of mine by over 2/3. was a whole 741x527 and 260k. You made it 527x325 ??? Why ??? 🤣
repost of picture turned sideways, sorry if going to mess with a 260k picture I will find a way around it 😁

Attachments

  • Image1.jpg
    Filename
    Image1.jpg
    File size
    68.07 KiB
    Views
    923 views
    File license
    Public domain
  • Image1r.jpg
    Filename
    Image1r.jpg
    File size
    120.12 KiB
    Views
    923 views
    File license
    Public domain

Hate posting a reply and then have to edit it because it made no sense 😁 First computer was an IBM 3270 workstation with CGA monitor. Stuff: https://archive.org/details/@horun

Reply 9 of 49, by shevalier

User metadata
Rank Member
Rank
Member
kinetix wrote on 2023-09-24, 20:29:

Do they contact the veins?

Horun wrote on 2023-09-25, 02:12:

some are veined, some not... IMHO the design is poor

This is thermal relief, please.... And the design is competent.

A square pad (from normal manufacturers, such as Gigabyte) is a plus, a round pad is ground.
Accordingly, you need to scratch the plain near the round pad and make sure that it is ground, for example, between the scratch and the USB shield or PS/2 shield.
Square should be measured with a coil.

Attachments

  • Untitled.jpg
    Filename
    Untitled.jpg
    File size
    78.12 KiB
    Views
    893 views
    File license
    Public domain

Aopen MX3S, PIII-S Tualatin 1133, Radeon 9800Pro@XT BIOS, Diamond monster sound MX300
JetWay K8T8AS, Athlon DH-E6 3000+, Radeon HD2600Pro AGP, Audigy 2 Value

Reply 10 of 49, by asdf53

User metadata
Rank Member
Rank
Member

If you measure the resistance of capacitors in circuit and you get a short or low resistance, it can mean that one or more capacitors have developed a high amount of leakage current. This can happen if the capacitors have not been powered on for a long time. You need to desolder all capacitors from that circuit one by one until the problem disappears. Do not turn on the board until it is fixed, it can be very dangerous, I had one such board that started smoking.

Reply 11 of 49, by kinetix

User metadata
Rank Member
Rank
Member

My theory is not that all the "squares" touch the veins, it is that THAT square point does so at the top, but not at the bottom.
My hope is that someone who has this board (I already wrote asking questions in two other older posts about this board) can take a look and clarify my doubt.

Last edited by kinetix on 2023-09-25, 04:55. Edited 1 time in total.

Reply 12 of 49, by kinetix

User metadata
Rank Member
Rank
Member
asdf53 wrote on 2023-09-25, 04:34:

If you measure the resistance of capacitors in circuit and you get a short or low resistance, it can mean that one or more capacitors have developed a high amount of leakage current. This can happen if the capacitors have not been powered on for a long time. You need to desolder all capacitors from that circuit one by one until the problem disappears. Do not turn on the board until it is fixed, it can be very dangerous, I had one such board that started smoking.

I measure the resistance in that place without the capacitor

Reply 13 of 49, by kinetix

User metadata
Rank Member
Rank
Member
shevalier wrote on 2023-09-25, 03:58:

I think you are correct, it took me a lot to extract the tin and open the hole the first time, it barely melted, I realized the circuit "swallowed" the heat. That's also why it was even more difficult for me the second time.

Reply 14 of 49, by asdf53

User metadata
Rank Member
Rank
Member
kinetix wrote on 2023-09-25, 04:49:

I measure the resistance in that place without the capacitor

Did you measure with all of the capacitors currently removed? If there are other capacitors in the same circuit, you need to remove them as well.

Reply 15 of 49, by asdf53

User metadata
Rank Member
Rank
Member

From the picture in your first post, it can be seen that the component lead that is next to the capacitor (the inductor coil) is connected to the top and the bottom plane. This means that the square pad of the capacitor must have also had connection to both sides before, so the soldering can not have caused this short circuit.

Reply 16 of 49, by kinetix

User metadata
Rank Member
Rank
Member
asdf53 wrote on 2023-09-25, 05:24:

From the picture in your first post, it can be seen that the component lead that is next to the capacitor (the inductor coil) is connected to the top and the bottom plane. This means that the square pad of the capacitor must have also had connection to both sides before, so the soldering can not have caused this short circuit.

Yes, it seems more and more to me that the square point is connected to the veins on both sides of the board. At the top it is obvious, at the back it should be like this and the reason why the tin has stuck so much and evenly, if there were spaces it would not be like that. But until I try to clean it better, I won't be sure.
It's homework for tomorrow.
just look this better "macro" pictures.

Attachments

  • photoafback.jpg
    Filename
    photoafback.jpg
    File size
    78.88 KiB
    Views
    823 views
    File license
    Public domain
  • photoaftop.jpg
    Filename
    photoaftop.jpg
    File size
    87.1 KiB
    Views
    823 views
    File license
    Public domain

Reply 17 of 49, by kinetix

User metadata
Rank Member
Rank
Member
kinetix wrote on 2023-09-24, 19:48:
you can find some pics around. https://theretroweb.com/motherboard/image/ga- … 13600354894.jpg http://hw-museum.cz/data/mb/pic/G […]
Show full quote

you can find some pics around.
https://theretroweb.com/motherboard/image/ga- … 13600354894.jpg
http://hw-museum.cz/data/mb/pic/Gigabyte_GA-5AA_B.jpg
https://a.allegroimg.com/original/1e4eab/9a4c … 9ba053105571e54

I initially put a Pentium-133 in it (I didn't want to damage the K6-2/450 if something bad happened) and configured it for it, according to the manual, but it differs in the position of a switch with respect to the configuration tables printed on the MB.
It didn't work. I measured the clocks signal on the ISA bus and the PCI (I forgot to do it on the AGP) and they were perfect. I didn't get a clock signal on the CPU, maybe I did it wrong (get the wrong pin), or the damaged capacitors were "swallowing" the signal, or the clock circuitry did not send the signal if there was no CPU in the socket (this testing was in another place, where I can use an oscilloscope, and I did it without CPU in the socket).

I haven't connected it yet after changing the capacitors. I realized the supposed problem when checking... that's why I removed that replacement capacitor that I had just soldered in that place, to verify if it was a real problem (short) or the circuit was like that. The square point is my big doubt. I will try to clean it as best as possible , mainly in the back side. I really regret not having taken images of each detail in its original form, it is something I usually do before any work.
I won't connect the MB until I solve it and I'm sure its ok.
I hope some charitable soul will take pity and give me information, 😀
Yes, I put a new battery in it.

latter , with calm, I´ll do a circuit tracing and make a diagram to check how it is

The original capacitors are 1000uf/10v. I replaced them with others with the same parameters, but somewhat larger and less "aesthetic". I have some "nicer" 1000uf/6v ones, which I would like to use in the positions close to the CPU. Even if they are 6v instead of 10v, in that circuit the maximum voltage would be 3.5v (the maximum configurable for a cpu in this MB). BUT I must verify it is not a 5V line.

Reply 18 of 49, by asdf53

User metadata
Rank Member
Rank
Member

Do you still have the capacitor that you desoldered? Measure its resistance. If it is low or short, it is leaking. And I can see at least one other capacitor connected to the same circuit. If this one is bad as well, it could be the cause for the short circuit. Desolder it and test the board again.

Reply 19 of 49, by snufkin

User metadata
Rank Oldbie
Rank
Oldbie

Just wondering, but is 55 ohms actually a problem? That's only going to be a few 10s of mA, which might just be leakage currents. It doesn't sound like a metal-metal short. Anyone know what would be an expected value would be on this board? I've got a vague memory of measuring resistances on a working Athlon motherboard and getting low resistance (10s of ohms) on at least one supply rail.