VOGONS


First post, by Omarkoman

User metadata
Rank Member
Rank
Member

I got myself this motherboard :

https://theretroweb.com/motherboards/s/fic-486-gio-vt2

it only supports 5V CPUs but I'd like to use a DX4-100 or 5x86 CPUs on it but need advice on getting a 3.3V RM module regulator.

the motherboad has a connector for it (called PS1).

Any suggestions where I can source one? Cant seem to find anything on ebay.

Alternatively what are my options ?

Reply 1 of 23, by rasz_pl

User metadata
Rank l33t
Rank
l33t

Get 3.3V ~3A LDO actually buck converters are cheaper ($1) and easier to get than a 3A LDO, and wire it to this connector with short jumper wires.

https://github.com/raszpl/FIC-486-GAC-2-Cache-Module for AT&T Globalyst
https://github.com/raszpl/386RC-16 memory board
https://github.com/raszpl/440BX Reference Design adapted to Kicad
https://github.com/raszpl/Zenith_ZBIOS MFM-300 Monitor

Reply 2 of 23, by Omarkoman

User metadata
Rank Member
Rank
Member

Im not that electronically adept, i can do basic soldering though.

Thanks for the suggestion but I dont really understand what I need to do exactly, what parts to get etc.

Reply 3 of 23, by rasz_pl

User metadata
Rank l33t
Rank
l33t

You will need
- soldering iron
- multimeter
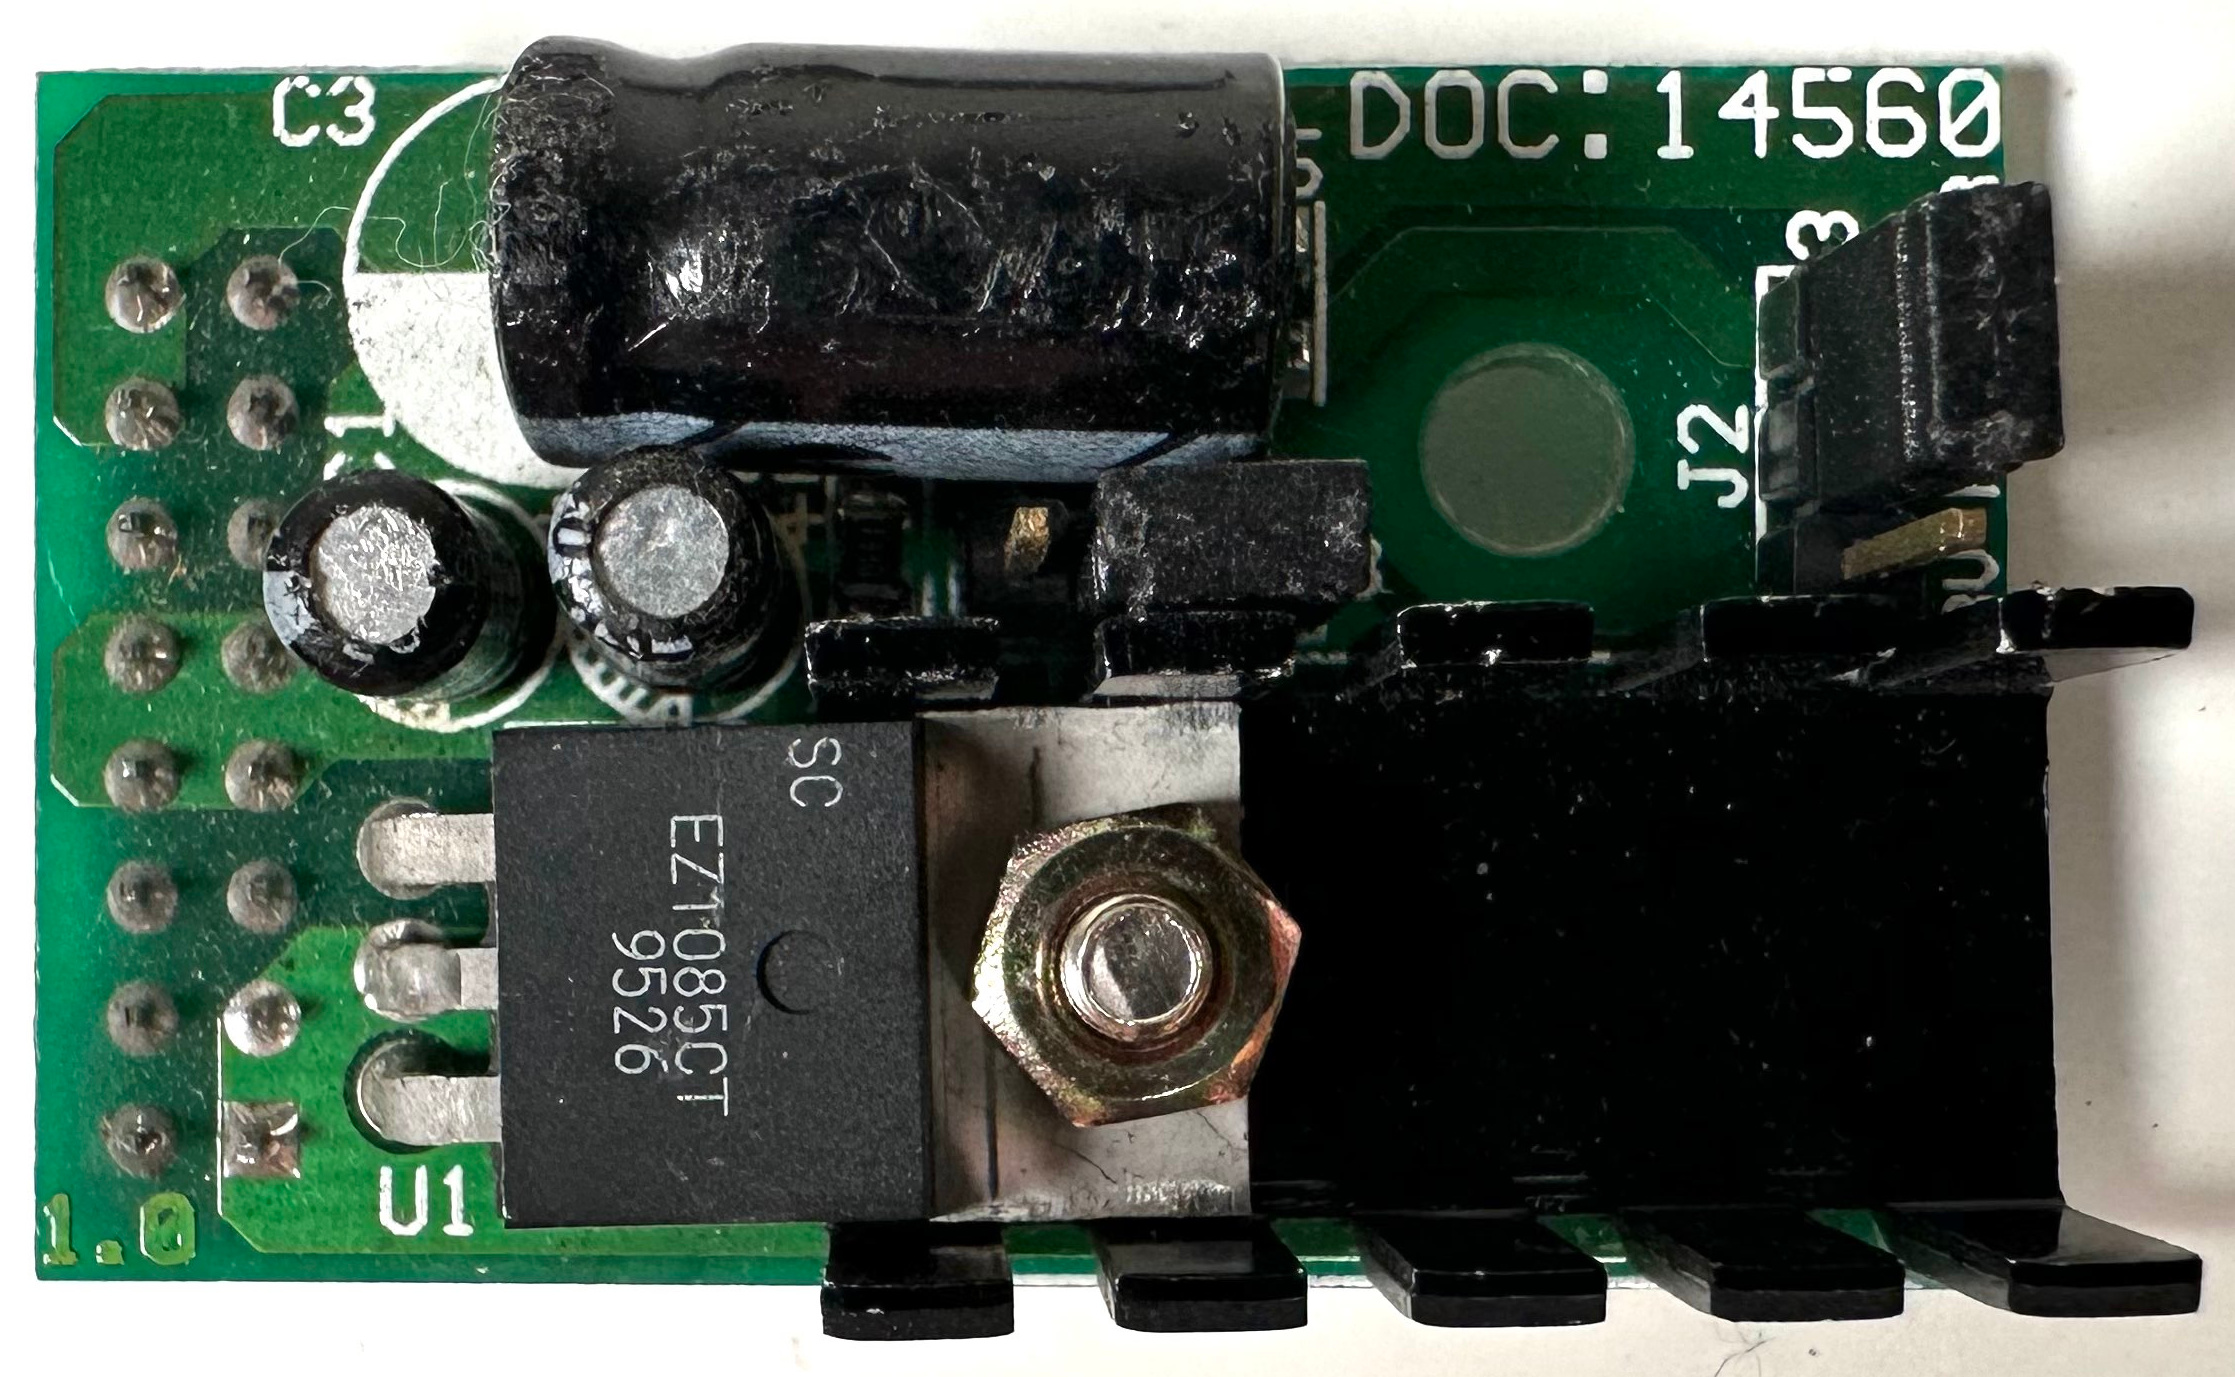
- 3A Buck module, for example $1 https://www.ebay.com/itm/374000814358 or $3 https://www.ebay.com/itm/404810958911
- Dupont Wire Jumper Cables Female To Female $1 https://www.ebay.com/itm/314583815735
- small screwdriver
- wire cutters

This https://theretroweb.com/motherboard/image/vrm … c2871067516.jpg shows the pinout
1, 3 connected to CPU
7, 8, 9, 10 ground
13, 15 +5V

Rip two 2 wire strands of dupont cables, cut them in half (5cm) from connectors. Dont worry about the length too much, if it turns out more would be better for mounting you still got 70 plugs to get it right 😀
Solder ends of each two wire jumper strand together so you have 4 dual wire jumpers. Solder each to one of the holes in Buck module.
Plug the two jumpers soldered to "IN-" "OUT-" to pins 7, 8, 9, 10
Plug jumper soldered to "IN+" to pins 13, 15
Set your multimeter to DC voltage range up to at least 5V.
Remove CPU.
Stick your multimeter black probe into PC powersupply molex (HDD power) connector middle hole (one going to black wire)
Touch/Stick your multimeter red probe to last remaining jumpers you soldered to Buck module "OUT-" hole.
Power on PSU.
Use small screwdriver to turn the turny thing on the Buck module until you get ~3.3V.
Power off
Plug last remaining jumper to pins 1, 3.
Plug a wire/needle into one of CPU socket VCC holes using this for reference https://theretroweb.com/sockets/5
Power on PSU.
Touch your multimeter red probe to that wire/needle and check if you are getting same ~3.3V, it might be less due to wires/connector in the way, you can fine tune the voltage at this stage.

If yes you are almost done, last step is securing Buck module so it wont dangle/short to anything. One way is thick double sided tape covering whole of the back of Buck module and sticking it to nearby VIA chip, then cable tie thru nearby hole in the motherboard to make it super secure for good measure 😀 You might find that jumper wires you cut are too short at this step, cut longer ones and resolder accordingly.

Last last step is plugging CPU and trying it on, you might need to tune Voltage one more time with loaded CPU if computer is unstable/you are overclocking.

Last edited by rasz_pl on 2024-10-24, 04:27. Edited 1 time in total.

https://github.com/raszpl/FIC-486-GAC-2-Cache-Module for AT&T Globalyst
https://github.com/raszpl/386RC-16 memory board
https://github.com/raszpl/440BX Reference Design adapted to Kicad
https://github.com/raszpl/Zenith_ZBIOS MFM-300 Monitor

Reply 4 of 23, by Omarkoman

User metadata
Rank Member
Rank
Member

Wow thank you! Extremely detailed! I might give it a go at some stage.

In the meantime, I found this:

https://www.pcbway.com/project/shareproject/4 … d_a791e096.html

And requested few to be made, it seems extremely cheap including shipping so lets see what i’ll receive!

Reply 5 of 23, by rasz_pl

User metadata
Rank l33t
Rank
l33t

Thats also an option, but ~$50-100 and not ~$2-4 😀 uses exact same Buck converter I linked.

https://github.com/raszpl/FIC-486-GAC-2-Cache-Module for AT&T Globalyst
https://github.com/raszpl/386RC-16 memory board
https://github.com/raszpl/440BX Reference Design adapted to Kicad
https://github.com/raszpl/Zenith_ZBIOS MFM-300 Monitor

Reply 6 of 23, by Omarkoman

User metadata
Rank Member
Rank
Member

I ordered 5 of them and it cost $15 including shipping so not sure if that was error or if they will make it.

Reply 7 of 23, by rasz_pl

User metadata
Rank l33t
Rank
l33t

hmm maybe pcbway hand soldering is this crazy cheap? jlcpcb is https://jlcpcb.com/help/article/pcb-assembly-faqs
setup $8
hand soldering $3.5
~300 pins ~$5
10 rounded pin headers ~$6
x2 minimum order
+$5 pcbs
~$50 minimum

https://github.com/raszpl/FIC-486-GAC-2-Cache-Module for AT&T Globalyst
https://github.com/raszpl/386RC-16 memory board
https://github.com/raszpl/440BX Reference Design adapted to Kicad
https://github.com/raszpl/Zenith_ZBIOS MFM-300 Monitor

Reply 8 of 23, by Omarkoman

User metadata
Rank Member
Rank
Member

yeah , strange , I was happy to pay that for one piece but it said minimum is 5 pieces and it quoted that price. it says its in production, 53% through so far.

I wonder if its just the stocket without any voltage regulator components. I am not experienced in deciphering what the item description and assembly details says on that product page exacyl says but just assumed I get fully assembled 486 socket blaster with all the parts its supposed to come. We'll see ...

Reply 10 of 23, by CharlieFoxtrot

User metadata
Rank Oldbie
Rank
Oldbie
Omarkoman wrote on 2024-10-23, 10:42:

I ordered 5 of them and it cost $15 including shipping so not sure if that was error or if they will make it.

Are you sure you ordered assembled units or just the PCBs? Because that $15 including shipping is exactly what it costs to get five small PCBs made and shipped.

Reply 11 of 23, by rasz_pl

User metadata
Rank l33t
Rank
l33t
Dorunkāku wrote on 2024-10-24, 03:57:

:-] love it! You effortlessly beat my $2-4 😀 I bow to you sir.
This confirms 1,3 as the output, but your input is from 13, 15, means I read picture of original wrong, correcting.

https://github.com/raszpl/FIC-486-GAC-2-Cache-Module for AT&T Globalyst
https://github.com/raszpl/386RC-16 memory board
https://github.com/raszpl/440BX Reference Design adapted to Kicad
https://github.com/raszpl/Zenith_ZBIOS MFM-300 Monitor

Reply 12 of 23, by Omarkoman

User metadata
Rank Member
Rank
Member
CharlieFoxtrot wrote on 2024-10-24, 04:18:

Are you sure you ordered assembled units or just the PCBs? Because that $15 including shipping is exactly what it costs to get five small PCBs made and shipped.

I dont see an option there for assembled units. So like I said, I dont know what I ordered, I simply clicked add to cart and checked out, I did not see anywhere along the process option to add any more components or assembly. If you can see that anywhere there, please let me know, I can re-order.

there is not much description there , it says :

486 Socket Blaster // 3V CPU to 5V Mainboard

486SocketBlaster is a simple voltage adapter for 486 processors. It allows you to use a 3-volt 486 CPU on an older 5-volt-only motherboard.

based on that, I assumed I get the whole unit manufactured and assembled. I am happy to pay whatever its costing but again, I saw nowhere along the lines any options to take out / add that would say are needed for whole unit or part.

EDIT: apologies, looks Iike I was wrong. there is assembly option during checkout. I can get one for $29 or 20 for $29 !!! so what will this do ? will they actuall make 20 units for me that have everything? and it will be a fully finished product? so confusing.

Reply 13 of 23, by CharlieFoxtrot

User metadata
Rank Oldbie
Rank
Oldbie
Omarkoman wrote on 2024-10-24, 04:40:
I dont see an option there for assembled units. So like I said, I dont know what I ordered, I simply clicked add to cart and che […]
Show full quote
CharlieFoxtrot wrote on 2024-10-24, 04:18:

Are you sure you ordered assembled units or just the PCBs? Because that $15 including shipping is exactly what it costs to get five small PCBs made and shipped.

I dont see an option there for assembled units. So like I said, I dont know what I ordered, I simply clicked add to cart and checked out, I did not see anywhere along the process option to add any more components or assembly. If you can see that anywhere there, please let me know, I can re-order.

there is not much description there , it says :

486 Socket Blaster // 3V CPU to 5V Mainboard

486SocketBlaster is a simple voltage adapter for 486 processors. It allows you to use a 3-volt 486 CPU on an older 5-volt-only motherboard.

based on that, I assumed I get the whole unit manufactured and assembled. I am happy to pay whatever its costing but again, I saw nowhere along the lines any options to take out / add that would say are needed for whole unit or part.

EDIT: apologies, looks Iike I was wrong. there is assembly option during checkout. I can get one for $29 or 20 for $29 !!! so what will this do ? will they actuall make 20 units for me that have everything? and it will be a fully finished product? so confusing.

I think you should read how the assembly prices are calculated before you continue to ordering these things. First, you of course need to match the number of PCBs to the assembly number. Second, you will get final quote about the cost of assembly after you’ve submitted it. As you can see the quote, only assembly fee is calculated with the PCBs and no component costs are included.

So all in all, I suggest you don’t just randomly order stuff from there before you know what you are actually ordering. You are soon just wasting your money or they can’t provide you the final quote because some information you provided isn’t correct. It isn’t confusing system if you know what you are doing.

Reply 14 of 23, by rasz_pl

User metadata
Rank l33t
Rank
l33t

It will be much easier and cheaper to replicate Dorunkāku solution, a 10A bridge rectifier (like https://www.newark.com/04AC8154) + two jumpers

https://github.com/raszpl/FIC-486-GAC-2-Cache-Module for AT&T Globalyst
https://github.com/raszpl/386RC-16 memory board
https://github.com/raszpl/440BX Reference Design adapted to Kicad
https://github.com/raszpl/Zenith_ZBIOS MFM-300 Monitor

Reply 15 of 23, by CharlieFoxtrot

User metadata
Rank Oldbie
Rank
Oldbie
rasz_pl wrote on 2024-10-24, 06:27:

It will be much easier and cheaper to replicate Dorunkāku solution, a 10A bridge rectifier (like https://www.newark.com/04AC8154) + two jumpers

Absolutely. If motherboard like the one in question has pins for external 3V regulator, this is pretty much the easiest option. By far.

Reply 16 of 23, by Omarkoman

User metadata
Rank Member
Rank
Member

fair enough. The part you listed has 4 legs though, the one in the thread above has only two conected. Do I cut off the two legs in the middle ? and then just solder onto the two open jumpers as per pic? is that it ? that particular part listed will automatically drop the voltage? Sorry, it sounds super simple but thought I'll ask to double check. As clearly, I click before I read or ask.

you can see the connector next to CPU:

https://theretroweb.com/motherboard/image/486 … 22724999186.jpg

in this photos, it has some jumpers on it on the outer edge 4 pins on each side.

so I remove those and connect two jumpers soldered to the part above? and connect same as this guy ?

Re: What retro activity did you get up to today?

what is that other connector connected to those pins?

thanks.

sorry but you guys make it sound so simple to do this but I dont understand what I am doing unless I am replicating what I visually see in the photo you showed me.

Reply 17 of 23, by CharlieFoxtrot

User metadata
Rank Oldbie
Rank
Oldbie
Omarkoman wrote on 2024-10-24, 07:03:
fair enough. The part you listed has 4 legs though, the one in the thread above has only two conected. Do I cut off the two legs […]
Show full quote

fair enough. The part you listed has 4 legs though, the one in the thread above has only two conected. Do I cut off the two legs in the middle ? and then just solder onto the two open jumpers as per pic? is that it ? that particular part listed will automatically drop the voltage? Sorry, it sounds super simple but thought I'll ask to double check. As clearly, I click before I read or ask.

you can see the connector next to CPU:

https://theretroweb.com/motherboard/image/486 … 22724999186.jpg

in this photos, it has some jumpers on it on the outer edge 4 pins on each side.

so I remove those and connect two jumpers soldered to the part above? and connect same as this guy ?

Re: What retro activity did you get up to today?

what is that other connector connected to those pins?

thanks.

sorry but you guys make it sound so simple to do this but I dont understand what I am doing unless I am replicating what I visually see in the photo you showed me.

You don’t need the ac terminals at all. A diode in bridge rectifier causes a voltage drop roughly 0,5-1V. And as there are two of them (you don’t use the other two from ac side as said), so you should expect something around double of that. And as the post indicates, he got something around 1,45V drop with that rectifier.

This is really that simple and as such, pretty damn smart solution.

Reply 18 of 23, by rasz_pl

User metadata
Rank l33t
Rank
l33t
Omarkoman wrote on 2024-10-24, 07:03:

The part you listed has 4 legs though, the one in the thread above has only two conected. Do I cut off the two legs in the middle ?

yes

Omarkoman wrote on 2024-10-24, 07:03:

and then just solder onto the two open jumpers as per pic? is that it ?

yes, yes

Omarkoman wrote on 2024-10-24, 07:03:

that particular part listed will automatically drop the voltage?

yes

Omarkoman wrote on 2024-10-24, 07:03:

so I remove those and connect two jumpers soldered to the part above? and connect same as this guy ?

yes

Omarkoman wrote on 2024-10-24, 07:03:

what is that other connector connected to those pins?

I think Dorunkāku additionally plugged a 5V fan in there because this connector is a convenient source of 5V

https://github.com/raszpl/FIC-486-GAC-2-Cache-Module for AT&T Globalyst
https://github.com/raszpl/386RC-16 memory board
https://github.com/raszpl/440BX Reference Design adapted to Kicad
https://github.com/raszpl/Zenith_ZBIOS MFM-300 Monitor

Reply 19 of 23, by Dorunkāku

User metadata
Rank Member
Rank
Member
rasz_pl wrote on 2024-10-24, 14:04:

I think Dorunkāku additionally plugged a 5V fan in there because this connector is a convenient source of 5V

No the fan is 12Volt. If I recall correctly the pin header has 16 pins like this:
5Volt - Vcore
5Volt - Vcore
12Volt- 12Volt
Ground- Ground
Ground- Ground
12Volt- 12Volt
Vcore - 5Volt
Vcore - 5Volt

So you can plug in the VRM both ways.