First post, by makechu
In 2022, I bought one of these "FX 5500" PCI cards via ebay, and it has worked pretty good for what it is. So, I bought another one this year, and what a letdown it was. It seems there are some extremely cost-cut versions of these cards floating around with significant quality compromises.
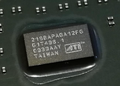
Hopefully, we all already know that most likely all of these recently built FX 5500 PCI boards from china actually have 5200 chips on them, probably recycled from AGP cards. It seems that some of them are being painted over with some fake garbage, for whatever pathological dishonesty reasons.
Below is the picture which shows the quality of the fakery on my card's GPU, which can be spotted in seconds. The one I bought in 2022 at least had an honest 5200 on it, without some extra layer of crap worsening thermal conductivity. On the newer card, also the soldering underneath the GPU looked absolutely awful, one side being almost squished flat against the PCB. The board also was a bit discolored around the GPU area, so too much heat has been applied as well. At least nothing is shorted, and hopefully that won't change over time...
Second issue was that the fan made a grinding noise right out of the box. After taking it apart and greasing it to make the grinding noise go away, it was still taking double the current than the fan on the older good version of the card, while spinning significantly slower. The fan motor also runs very hot, when looked through a thermal camera, over 60 degrees C being visible at the center of the fan. Within the motor, parts must be running way hotter to have that much heat visible on a well ventilated plastic surface. It can also be seen through the translucent plastic that the inductors are a lot smaller on the later version of the fan. Estimating by look, the fan coils in the stator only have roughly half of the wire compared to the older fan version.
The other major notable things were that a lot of the ceramic capacitors were missing. Even the, presumably polymer, capacitors appear as if they may have been recycled and reused... Isn't t that nice!
Then there were three different types of RAM chips on the card. One chip was from NANYA, and rest were two different types from Winbond. They were probably picked from some random pile of reused close-enough RAM chips.
edited note; I used Everest Home edition to see what the RAM clock speed was, and it reported that the RAM was running at 133 base / 266 MHz DDR speed. After a quick search, it seems it should be around 333 - 400 MHz DDR range for a proper FX 5500 PCI card. The reported GPU speed was 250 MHz, which is the same as the FX 5200 reference clock speed.
And the final quality compromise that I noticed, was that a bunch of ferrite beads from video signal lines have been replaced with 0 ohm resistors, and some fuses. The 0 ohm resistors can be located based on the difference on the cards pointed below by the squares. (Blue card is the newer one with the issues, and ignore the holes drilled to the heat sinks :p)
In my case, the removal of ferrite beads from the video signal lines seem to have caused a lot of observable horizontal line glitches, clearly visible at lower resolutions when using the VGA connector. They were very noticeable and annoying, of which I have a example picture below. As they happened between each screen refresh at different places randomly, a picture won't even begin to describe how annoying they were.
To fix this issue, first thing was to find out what the ferrite beads should have been.
The properties of the ferrite beads from the good version of the card can be seen below. It seems they are some digital line 50 Ohm @ 100 MHz ferrite beads. This guess is based on one I tested from one line related to the DVI-port from the good card.
In the graph, the range between the horizontal lines (bottom to top) for X, and R values is 100 Ohms. For |Z| it is 50 Ohms.
Vertical lines (left to right) for frequency, the range between lines is 200 MHz. All start from almost zero at the bottom left corner.
Maybe this can be used as a reference, if someone wants to find and use closely matching ferrite beads similar to what I had on the better card.
In my case, the fix to the VGA signal related issue was replacing the signal lines related 0 ohm resistors to ferrite beads, near the output ports, like they were on the older and better card. Unfortunately, I did not have these, so I used some 30 Ohm @ 100 MHz general purpose beads, the Murata BLM21PG300SN1D, which I happened to have a lot left over from some other project. These seem to have been close enough as the glitching completely disappeared, and I was not able to spot any difference with my eyeballs in the image quality. At least it is so minimal, that I had to look at the sub-pixels very carefully from centimeters away to spot any difference... I also changed to these ferrites on the S-Video and DVI related lines. I was only able to test that the DVI worked up to 1600x1200 @ 60 Hz. First I thought it was a fault with the added ferrite beads, but apparently these cards just can't do any higher for digital video via DVI... Unbelievable! VGA connector works fine at 1920x1200 @ 60 Hz, which I use in W98 SE desktop.
The below modification may not have been necessary regarding the missing capacitors but here goes anyways.
The list of missing 0805 sized SMD ceramic capacitors I was able to spot, compared to the old better version of the card, were the following:
- EDIT: The seem to be 5V voltage related, which is coming from PCI slot. Originally I incorrectly assumed they were RAM related.
C91
C92
C93
C94
C256
C257
C258
C259
- Probably all somehow GPU related:
C110
C115
C116
C121
C122
C123
C184
C185
C186
C187
C188
C189
To find out the value of what these all probably are, I tested 3 from the good card, C93, C115, and C122. They all measured about 4.7 - 5 uF.
As all the missing caps look the same, I assume that they are all the same value... Adding these might be unnecessary, if there are zero stability issues. However, I added 4.7 uF 10 V X5R capacitors to all of these as I don't like leaving stability to chance.
So, if someone else is having stability issues with these cards, look if these capacitors are missing. If they are, I would go about adding the missing capacitors in phases, and testing between changes. I would start by adding only the 5V related ceramic capacitors first (the first set of listed capacitors). If the card still crashes, also add the GPU related capacitors, starting from the ones right where the GPU sits, on the other side of the board, and expanding further out from there. Some of the capacitors will require removal of the heat sink, as they reside under it on the top side of the card. However, adding only the missing capacitors on the bottom side of the board should be enough.
Only 4 GPU related capacitors (C116, C123, C186, C189) and 1 RAM (C259) related capacitor are unaccessible without removing the heat sink. Soldering them must also be done very well, so that they won't short on the heat sink. The space under it is small.