VOGONS


Reply 40 of 45, by geordiepingu

User metadata
Rank Newbie
Rank
Newbie
shevalier wrote on 2026-07-05, 17:10:
You have to experience this firsthand. :-) First, you buy an AGP DX10 graphics card (I have a 2600PRO), and only then do you rea […]
Show full quote
geordiepingu wrote on 2026-07-05, 15:35:

In other news, I have purchased a Sapphire HD 3850 AGP for this machine. I found one at a reasonable price, so I snapped it up. It should arrive next week.

You have to experience this firsthand. 😀
First, you buy an AGP DX10 graphics card (I have a 2600PRO), and only then do you realize it's useless.
It's underperforming for "relatively new" games and poorly compatible with older ones.
For such builds, an X800-type graphics card (or at most an X19xx) is optimal.

I know this, as I had not dissimilar cards 20 years ago. All for the benchmarks!

geordiepingu wrote on 2026-07-05, 17:19:

All for the benchmarks!

Petrol head and serial PC tweaker

Reply 41 of 45, by H3nrik V!

User metadata
Rank l33t
Rank
l33t
geordiepingu wrote on 2026-07-05, 17:19:

All for the benchmarks!

That is an appropriate quote for a signature here on vogons 😎

If it's dual it's kind of cool ... 😎

--- GA586DX --- P2B-DS --- BP6 ---

Please use the "quote" option if asking questions to what I write - it will really up the chances of me noticing 😀

Reply 42 of 45, by geordiepingu

User metadata
Rank Newbie
Rank
Newbie

Progress has been slow as I've been away for a short while. Either way, I've managed to put another shift in. I've made my PSU cables and reassembled the case "internals" after painting them with cold zinc spray. The outer panels have not been fitted as I am going to sand and paint them (BMW Techno Violet Metallic...). I've also mocked up my water cooling hoses and have decided I need to go a slightly different route, but that's ok as this is all in the spirit of R&D... Finally I added some rubber "u-channel" trim to the cuts I've made to make them look a bit prettier and to stop the abrasion of cables.

Making the PSU cables was quite easy, but tedious. Over 100 pins crimped later... The irony was not lost in my making of coloured cables. Years ago, I bought a set of depinning tools (before the Hiper Modulars!!) so I could sleeve my cables in paracord to hide the colours.... Still quite nice to see the old coloured cables again, quite funny seeing them come out of a modern black PSU. They are definitely an upgrade over the previous cables; the old PSU had 18AWG for everything. This time, I have 18AWG for most cables; however, 16AWG for CPU power and PCI-E power. While on the face of the power requirements are fine for 18AWG, 16 will help keep things a bit more stable under heat as I push harder. I'm still in the process of cable tying them; however, I'm conscious that I'm not completely cable tying them down as I want some room to manoeuvre for the final assembly!

The large hole cutout in the mid-panel has allowed me to route the ATX and CPU 12v cables quite eloquently, for the sort of case we are dealing with.

You will note the addition of the HD3850 in there now. I am keeping it air-cooled as it will allow me to swap between video cards easily.

With regards to the water cooling hoses, I thought I would try the 45-degree angles to keep the hoses out of the way of the mounting hardware and to make sure I'm not applying pressure onto the other socket. It's more cumbersome than I thought, so I think I will swap them for 90-degree fittings.

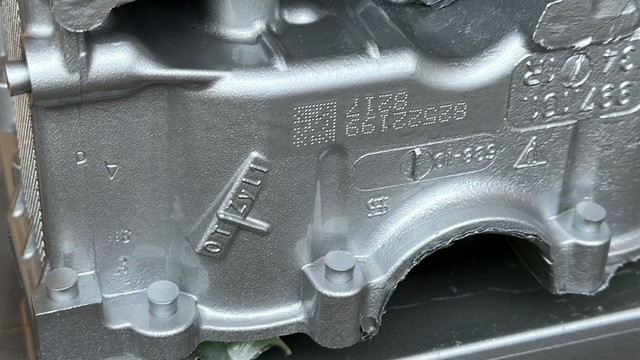
For the other case panels, the plan is to sand them all down smooth and make the side window cut out in the side panel. Although I'm going for a fun colour, I'm not going super crazy on the finish. I will be using my automotive kit to do it, all in 2k, so it should be a durable finish. Just need to find some 2k plastic primer for the ABS where I've gone a bit far with the scotch brite pads, then it'll be 2k epoxy primer, 2k base, then 2k clear. Not going to go as far as making it look like glass, but it should be a pretty good finish when done. Attached a picture of my 911 engine when I painted that; that will be the sort of finish I'll be looking for.
file.php?mode=view&id=245541
file.php?mode=view&id=245542
file.php?mode=view&id=245543
file.php?mode=view&id=245545
4079768a-8d48-4645-bbee-ac539d7bcc0b.jpg

geordiepingu wrote on 2026-07-05, 17:19:

All for the benchmarks!

Petrol head and serial PC tweaker

Reply 43 of 45, by TELVM

User metadata
Rank Oldbie
Rank
Oldbie

Legendary thread 👍 . That retro re-cabling of the PSU is epic, first time I've seen something like that 😀 .

Let the air flow!

Reply 44 of 45, by geordiepingu

User metadata
Rank Newbie
Rank
Newbie
TELVM wrote on Yesterday, 18:22:

Legendary thread 👍 . That retro re-cabling of the PSU is epic, first time I've seen something like that 😀 .

Thank you 😀 Just trying to do the board justice!

I decided to be brave this morning and do some drilling and cutting.... Here's my mock-up. The rad fits. I've cut some tube to length for the pump, but not getting too far ahead of myself as I need my new 3d printed drive rails to arrive. I need to do some finishing to the holes, then the top cover is ready to paint later. Ditto the bottom cover; I have drilled and test-fitted the new feet this morning, and they work OK. I may fit some U-channel rubber trim around the fan holes in the top, just to get the grilles to butt up a little bit tighter. I used the 120mm holesaw, which gave me great accuracy but not much control over the size of the hole. The alternative would be to get a grille 3D printed, which I suppose would give me a better fit and finish, given I've got full control over the CAD drawings. Overall, I'm very happy with how that is turning out.

The 6mm 6-32 UNC screws are a bit too short to bolt the radiator on now. I have ordered some black cap head screws (9.5~mm long), with some 0.5mm washers to pack them out. The Silverstone mesh is 3mm thick.

A stroke of madness or genius - I have printed new fan mounts in TPU, which is obviously quite soft and malleable. The theory here is that the fan mounts will have some vibration-dampening properties and behave a bit like a gasket against the chassis, reducing turbulence from the fans compared to the OEM mounts.

Next up is the side panel cut out. I will be spending some time cutting and sticking CAD templates before I do actual cutting, unfortunately.

In the purchasing department, I've ordered a bunch of 90-degree fittings to tidy the waterblocks up

In summary, it's amazing what some contact adhesive and a printout can help you achieve.

file.php?mode=view&id=245620
file.php?mode=view&id=245621
file.php?mode=view&id=245619
file.php?mode=view&id=245618
file.php?mode=view&id=245617

geordiepingu wrote on 2026-07-05, 17:19:

All for the benchmarks!

Petrol head and serial PC tweaker

Reply 45 of 45, by geordiepingu

User metadata
Rank Newbie
Rank
Newbie

Cut the side panel and prepped for paint. Doing the template was very fiddly and time-consuming; alas, it's turned out rather well. I hand-cut it with a jigsaw, finished some of the edges with a file, and then used a sanding flap thing on my die grinder. I've notched the acrylic for the handle too.

For the plastics, I sanded out the scratches to avoid filler. I then used my shot blaster to get a uniform finish across the whole thing. I should note that I am not looking for a show-car mirror finish on the plastics; I do want to preserve some of the faithful "mottle" effect. The metal panels have seen the shot blaster and then been surface finished with the DA and some 180 grit discs.

Unfortunately, I couldn't get a coat of primer on. The fluid knob for my paint gun has gone walkabouts, so I've ordered another to arrive tomorrow. With a bit of luck, I'll have the thing painted tomorrow.

The paint is all 2k solvent, apart from the plastic primer. So once the plastic primer has flashed off, everything will get coated in 2k epoxy primer. This should mean that when the 2k base coat goes on, everything should be the same shade - aka the plastics won't be a different colour. Then I have some 2k clear to go on after.
file.php?mode=view&id=245654
file.php?mode=view&id=245655
file.php?mode=view&id=245653

geordiepingu wrote on 2026-07-05, 17:19:

All for the benchmarks!

Petrol head and serial PC tweaker