VOGONS


First post, by Warlord

User metadata
Rank l33t
Rank
l33t

I researched this some I understand that the jumpers represent what digits show up and that just have to be experimented.

I used a multi meter to check continuity of the switch I want to use.
I checked continuity of the pins on the LED and found 2 pins that have continuity.
Help me understand this I am a noob.

Attachments

  • front.jpg
    Filename
    front.jpg
    File size
    362.36 KiB
    Views
    903 views
    File license
    Public domain
  • back.jpg
    Filename
    back.jpg
    File size
    501.88 KiB
    Views
    903 views
    File license
    Public domain
  • switch.jpg
    Filename
    switch.jpg
    File size
    310.1 KiB
    Views
    903 views
    File license
    Public domain
  • sback.jpg
    Filename
    sback.jpg
    File size
    197.85 KiB
    Views
    903 views
    File license
    Public domain
  • Mobo Header.png
    Filename
    Mobo Header.png
    File size
    125.41 KiB
    Views
    903 views
    File license
    Public domain

Reply 1 of 10, by Warlord

User metadata
Rank l33t
Rank
l33t

Anyone? I found this site and It has a PCB similar but it didn't work or I don't understand it.

http://www.minuszerodegrees.net/led_speed_dis … eed_display.htm

I can get it to display with a 5v header I made, I can switch turbo modes with the switch I made, I can even get just a status LED plugged into the motherboard header to turn on and off when I hit the switch,

What I cant figure out is how to get the MHZ display to switch frequency modes. It is just staying same mode.

Reply 2 of 10, by TheMobRules

User metadata
Rank Oldbie
Rank
Oldbie

Usually for each of the 7 segments of each digit in the display you have 4 possibilities:

  1. Always ON
  2. Always OFF
  3. ON in Turbo mode only
  4. ON in non-Turbo mode only

You can see that clearly in this example, where each color corresponds to a specific segment, and the different positions of the jumper cap allow you to set one of the 4 states I mentioned above.

So, you first need to determine in which of those 4 states each segment will be on your display and then set the jumpers accordingly. If there is no documentation for your display, you can just connect it to 5V and do some trial and error to find out which set of jumpers controls each segment.

Reply 3 of 10, by Warlord

User metadata
Rank l33t
Rank
l33t

Does this make any since to anyone>? What could unknown be? Also I can only use low or high I can't use both.

How would you wire this. The Motherboard has a 2 pin header for turbo switch I have it wired like if the switch is off the 2 pins are not connected. If I switch it on the 2 pins make a circuit.

The switch isn't connected to anything other than to the Turbo header.

The Turbo LED has 2 pins a negative and a positive.

Turbo +/- LED wire touched means wire coming from motherboard header.

there's continuity between the 2 grounds..

Attachments

  • block.jpg
    Filename
    block.jpg
    File size
    12.75 KiB
    Views
    833 views
    File license
    Public domain

Reply 4 of 10, by kalohimal

User metadata
Rank Member
Rank
Member

There're 2 types of 7-segment LED modules, common anode and common cathode. You'll need to find out which type it is. Here is a pinout diagram that might or might not match your module.

HTB11bIoLFXXXXapXXXX760XFXXXT.png
Filename
HTB11bIoLFXXXXapXXXX760XFXXXT.png
File size
110.42 KiB
Views
824 views
File license
Fair use/fair dealing exception

The turbo LED circuit is just a common emitter circuit like this:

LED-driver-circuit.png
Filename
LED-driver-circuit.png
File size
17.48 KiB
Views
824 views
File license
Fair use/fair dealing exception

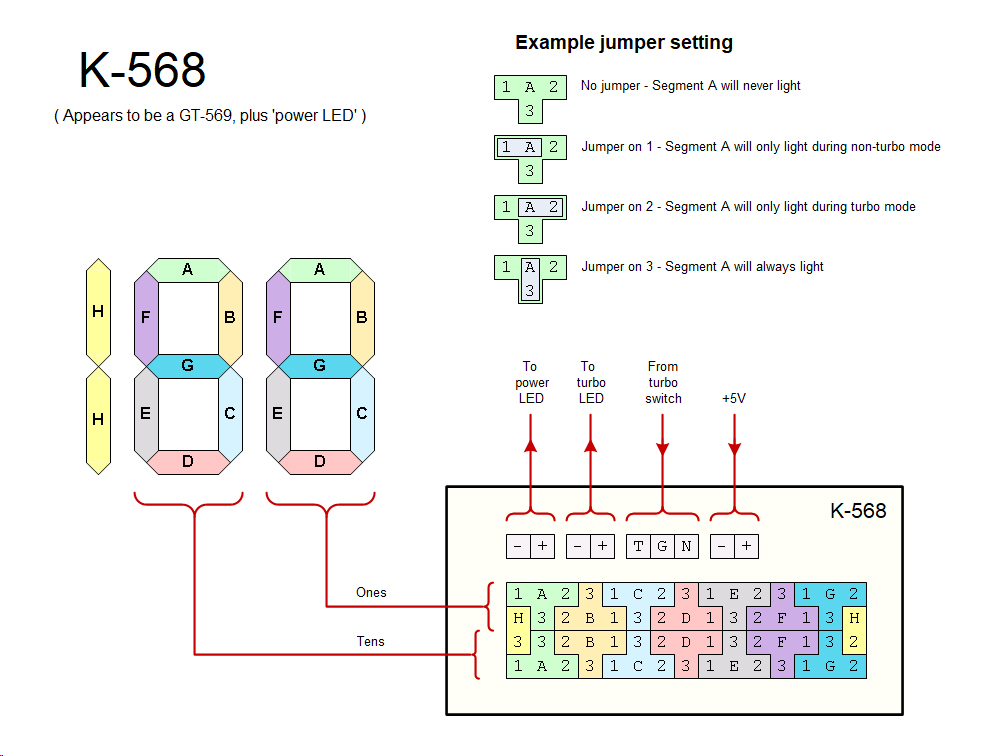
The jumpers will determine the segment is either always on, always off, or control by the turbo LED circuit. What you need to do is first draw out the turbo and non turbo digits that you like. Then look at the segments: if it is present in both turbo and non turbo, it is always on (connect to +5V). If on the other hand it is absent in both, then it is always off (no connection). If on in one and off in the other or vice versa, then it needs to be controlled by the turbo LED circuit. You'll need to find out on your 7-segment PCB which header pin position is for always on, always off, or controlled.

From simple tracing of the connections on your 7-segment PCB, it looks like this:

front.jpg
Filename
front.jpg
File size
405.39 KiB
Views
817 views
File license
Fair use/fair dealing exception

I've drawn out just a few, the rest are just repetition. So it has a centre post and 3 possible jumper position: left, right, or vertical. The left & right look like controlled by turbo LED circuit (either on or off when turbo is active). The vertical position looks like +5V. But I couldn't see the traces at the other side (obscured by the header block) so I could be wrong, and you'll need to trace them with a multimeter.

Slow down your CPU with CPUSPD for DOS retro gaming.

Reply 5 of 10, by kalohimal

User metadata
Rank Member
Rank
Member

I think yours look like this one, except that you have an extra hundredth digit (left most "1"). The bottom left most headers are for this digit, turning both segments either on/off together.

LED display - DP-524.jpg
Filename
LED display - DP-524.jpg
File size
585.1 KiB
Views
808 views
File license
Fair use/fair dealing exception

Btw, that site has some great info on the turbo display.

Slow down your CPU with CPUSPD for DOS retro gaming.

Reply 6 of 10, by Warlord

User metadata
Rank l33t
Rank
l33t

Ya thats the one I found, the difference is the 6 pin header seems wired differently. Thats the main point I am stuck on. That diagram would lead you to beleive that plugging in the negative wire from the turbo led header to the S pin would allow it to detect weather turbo was on or off from sensing the negative lead from the power LED pin on the motherboard..

Nope that S pin does nothing on my board. Or at the very least is unresponsive to signals from the turbo LED from the motherboard.

Other difference is that diagram would lead you to believe that If you plug in a LED into L and P or P and h that it would light up when u switch turbo on for low or high again by sensing S. Nope. P is a ground on mine that it shares with the ground from the - pin from the +5 and - connector from the powersupply.

And L and H on mine only seem to be there to detect if turbo is on or off by sensing the negative or positive from the turbo led header on the mother board when I touch a wire to them when turbo is on.

That will make Low and High segments appear and dont have anything to do with connecting a turbo LED to. I have tried pluging in just a LED light like the normal LEDs for power or HDD that are on all cases into multiple differnt ways into that thing and it nothting will make one of those light up.

So either I am not understanding that diagram right or my board is damaged.

I think I might have it figured out enough right now that I can hack it to make it work, I am just worried about somhow damaging my motherboard for hooking it up wrong.

Reverse side

Attachments

  • Clipboard01.jpg
    Filename
    Clipboard01.jpg
    File size
    373.7 KiB
    Views
    784 views
    File license
    Public domain

Reply 7 of 10, by kalohimal

User metadata
Rank Member
Rank
Member

It is very difficult to tell from the pictures unless you trace out the circuit of at least one segment. And we won't be able to tell you what the "unknown" pin is either, since we do not have the physical part, we could only help by looking at the traces on the photo that are visible and not obscured. It's time to put your multimeter to full use and find out.

Slow down your CPU with CPUSPD for DOS retro gaming.

Reply 8 of 10, by kalohimal

User metadata
Rank Member
Rank
Member

Ok I've opened up my P-mmx and taken a look at the turbo display panel and the turbo switch. The turbo display panel is not connected to the motherboard's turbo LED header, but rather to the turbo switch. The turbo switch is a DPDT (double-pole-double-throw) switch, with one pole /throws connected to the motherboard, and the other pole/throws to the display panel. The turbo LED header on the motherboard is connected to an individual turbo LED at the front of the case.

IMG_20200828_164545.jpg
Filename
IMG_20200828_164545.jpg
File size
1.02 MiB
Views
763 views
File license
Public domain
IMG_20200828_164856.jpg
Filename
IMG_20200828_164856.jpg
File size
1.53 MiB
Views
763 views
File license
Public domain

I think yours is similar, and judging from the PCB traces, your 7-segment is common anode. So for your 6-pin header, the GND goes to the centre pole of the turbo switch, the pin above it goes to one throw of this pole, and the pin below goes to the other throw. Your "unknown" pin is probably unused.

Slow down your CPU with CPUSPD for DOS retro gaming.

Reply 9 of 10, by kalohimal

User metadata
Rank Member
Rank
Member

So in other words, your connection should look something like this:

tbsw.jpg
Filename
tbsw.jpg
File size
76.69 KiB
Views
762 views
File license
Public domain

So when the turbo switch is off (down), the centre pole connects to the bottom throw, all segments on your turbo panel connected to the bottom pin will be pulled to ground, and this is the "turbo switch off, segment on" portion. Similarly when the switch is on, the top throw is connected to the centre pole, and all segments connected to the top pin will be pulled to ground. This would be the "turbo switch on, segment on" portion.

Slow down your CPU with CPUSPD for DOS retro gaming.

Reply 10 of 10, by Warlord

User metadata
Rank l33t
Rank
l33t

I have it figured out thank you for all of your help. I hope this thread will help somone. Here is the diagram.

2D48M MHZ Display / Tubro LED / Pearl Case MHZ Display / 2D48M

The way I set it up is grounding H or L with the switch Segments H or L on or off representing Turbo on or off.

Then the turbo Switch is just wired to itself and just either switches turbo on by connecting to itself in a circuit or turbo off by disconnecting the circuit.

The Turbo LED is just wired to a LED by itself.

Attachments

  • Clipboard02.jpg
    Filename
    Clipboard02.jpg
    File size
    89.06 KiB
    Views
    733 views
    File license
    Public domain